![Loewe Auro 2216 — установка и настройка активной 5.1 аудиосистемы. Подключение, AUX вход, пульт [10/44]](/img/pdf.png)
Loewe Auro 2216 — установка и настройка активной 5.1 аудиосистемы. Подключение, AUX вход, пульт [10/44]
![Loewe Auro 2216 [10/44] Wiringauro audiosystem](/views2/1013691/page10/bga.png)
- 10
PREOUT
L C R L L
SL LFE SR R R
TO TV
AUX1 IN
DIGITAL
IN
DIGITAL
OUT
TV
L-LINK
12V / 15mA
EXT
AUX OUT AUX 2
ON
OFF
Satellite Speaker OUT
Surr.
Front
R
R
L
C
L
Loewe
Auro
COMPONENT
VIDEO OUT
Y
Pb
Pr
PRE IN
L
SL
SR
R
C
LFE
L
SL
SR
R
C
FLE
First installation
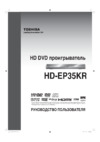
Wiring Auro – audio system
Connect the cables as shown in the graphic:
Use a six-wire cinch cable to connect the PRE OUT outputs of the Auro to the
corresponding inputs of the active 5.1 loudspeaker system.
You can connect an additional external analogue source to the analogue audio
input AUX 1 IN.
Set the loudspeaker system to Auro as described on page 13.
Set the limit frequency for the bass speaker on your active 5.1 loudspeaker
system to at least 100 Hz.
•
•
•
•
Remote control
Inserting the batteries
To insert or change the batteries, press on the point indicated by an imprinted
arrow. Push the battery compartment cover down and remove it. Insert batteries
of the alkaline-manganese LR 03 (AAA) type and make sure the + and – poles
are the right way round.
Then push the cover back on from below.
Note on disposing batteries
The batteries provided contain no harmful materials such as
cadmium, lead or mercury.
Regulations concerning used batteries stipulate that batteries
may no longer be thrown out with the household rubbish.
Deposit any used batteries free of charge into the designated
collection containers set up at commercial businesses. You can
dispose used batteries also at your dealer.
e.g. MP3 Player
Satellite loudspeakers
Aktive 5.1 loudspeaker system
e.g. Loewe Individual Sound/Tremo
Содержание
- Auro2216ps p.1
- 32486 25 p.1
- Operating manual p.1
- Equipment p.1
- Audio cd 28 p.2
- Remotecontrolassist tv operation 41 p.2
- Remotecontrolassist dvd operation 3 p.2
- Mp3andjpeg 32 p.2
- Firstinstallation 8 p.2
- Dvd 19 p.2
- Contents p.2
- Childlock 34 p.2
- Auro2216psrearpanel display 5 p.2
- Auro2216psfrontpanel 4 p.2
- Audiofunctions 38 p.2
- Whattodo if 42 p.2
- Aboutoperation 15 p.2
- Welcome 6 p.2
- Tuner 36 p.2
- Technicaldata 43 p.2
- Service 44 p.2
- Remotecontrolassist dvd operation p.3
- Operating indicator p.4
- Next chapter p.4
- Headphones jack p.4
- Front flap open p.4
- Front flap closed p.4
- Display p.4
- Disc tray open close p.4
- Disc tray p.4
- Control volume p.4
- Auro 2216 ps front panel p.4
- Stop play pause previous chapter p.4
- Select sound source p.4
- Save search radio p.4
- Power button switch off in standby p.4
- Auro 2216 ps rear panel display p.5
- Welcome p.6
- Theunit p.6
- Thankyou p.6
- Scopeofdelivery p.6
- Disposal p.6
- Cardboardboxandpackaging p.6
- Welcome p.7
- Foryoursafety p.7
- Cleaning p.7
- Advantagesofconnectiontoaloewetvset p.7
- Connectingantennae p.8
- First installation p.8
- Connection p.8
- Wiringloeweflattv auro individualsound tremo p.9
- First installation p.9
- Wiringauro audiosystem p.10
- Remotecontrol p.10
- Noteondisposingbatteries p.10
- Insertingthebatteries p.10
- First installation p.10
- Switching on for the first time p.11
- Settingthelanguage p.11
- Powermains p.11
- First installation p.11
- First installation p.12
- Doingareset p.12
- Activatedigitallink p.12
- Switchoverpal ntsc p.12
- Switchingovertoprogressivescan p.12
- Switchingondigitallink p.12
- Switchingoffdigitallink p.12
- Settingtheloudspeakersystem p.13
- Selectingthespeakersystem p.13
- First installation p.13
- Connectspeakers p.13
- First installation p.14
- Enteringthedistancebetweenspeakers p.14
- Adjustloudspeakerlevel p.14
- Menubar p.15
- Insertingadisc p.15
- Basicfunctions p.15
- Activatethemodeoftheremotecontrol p.15
- About operation p.15
- Userinterface p.15
- Menuandwindow p.16
- Contexthelp p.16
- About operation p.16
- Titletable p.17
- Statusdisplay p.17
- Chapter p.17
- About operation p.17
- Sleeptimer p.18
- Screensaver p.18
- Resume p.18
- Numericinput p.18
- Fivesecondstosave p.18
- Changetostandbymode p.18
- Automaticfunctions p.18
- About operation p.18
- Userinterfaceoftheinserteddvd p.18
- Startplayback p.19
- Selecttitle p.19
- Menubar p.19
- Menuandwindow p.19
- Insertingadisc p.19
- Basicfunctions p.19
- Selectchapter p.20
- Search p.21
- Pause singleframe p.21
- Interruptingplayback p.21
- Endingplayback p.21
- Subtitles p.22
- Selectingsoundformat p.22
- Extendedfunctions p.22
- Cameraposition p.22
- Zoom magnifyimage p.23
- Repeat p.23
- Usingmarkers p.24
- Playfrom p.24
- Slowmotion p.25
- Settings p.25
- Pictureformat p.25
- Basicsettings p.25
- Specialfeaturesofdvdaudio p.26
- Settingdigitalsoundoutput p.26
- Languagespresettings p.26
- Audio cd p.28
- Statusdisplay p.28
- Menubar p.28
- Audio cdswithcd text p.29
- Audio cd p.29
- Titleprogramming p.30
- Audio cd p.30
- Saveprogram customfile p.31
- Audio cd p.31
- Statusdisplay p.32
- Mp3andjpegmixed p.32
- Mp3 and jpeg p.32
- Menubarmp3 p.32
- Menubarjpeg p.32
- Cdtext p.32
- Titleprogramming customfile p.33
- Rotatejpegpictures p.33
- Mp3 and jpeg p.33
- Kodakpicturecd p.33
- Folder titletable p.33
- Activating the child lock for the first time p.34
- Child lock p.34
- Usingthechildlock p.35
- Child lock p.35
- Stationtable p.36
- Selectingstation programplace p.36
- Initialinstallationfm p.36
- Firstinstallationam p.36
- Automaticstationsearch p.36
- Switchingtunerdisplay p.37
- Mono stereoswitching p.37
- Manualstationsearch p.37
- Individualresorting p.37
- Finetuning p.37
- Trebleandbass p.38
- Programmingthestationmanually p.38
- Audio functions p.38
- Volume p.38
- Nightmode p.39
- Audio functions p.39
- Soundmode p.40
- Settingtheremotecontrol p.40
- Audio functions p.40
- Remote control assist tv operation p.41
- What to do if p.42
- Problem remedy p.42
- Technical data p.43
- Playback p.43
- General p.43
- Connections p.43
- Service p.44
Похожие устройства
-
 BBK DVP176SI черныйРуководство по эксплуатации
 -
 Toshiba SDP73SWRРуководство по эксплуатации
 -
 Toshiba SDP63SWRРуководство по эксплуатации
 -
 Toshiba SD-P1707SRРуководство по эксплуатации
 -
 Toshiba SD-P101SKRРуководство по эксплуатации
 -
 Toshiba SD-K690KRРуководство по эксплуатации
 -
 Toshiba SD-K590SR_SD-K590KRРуководство по эксплуатации
 -
 Toshiba SD-9500Руководство по эксплуатации
 -
 Toshiba SD-890KRРуководство по эксплуатации
 -
 Toshiba SD-680SR_SD-682KRРуководство по эксплуатации
 -
 Toshiba SD-580SR_SD-581SRРуководство по эксплуатации
 -
 Toshiba HD-EP35KRРуководство по эксплуатации
Полная инструкция по подключению и настройке активной 5.1 аудиосистемы. Включает подключение к источнику, AUX вход, настройку низк. динамика, работа с пультом и замену батареек.