
Aten KH2516A Краткое руководство по установке онлайн
ATEN Altusen
™
Package Contents
1
Requirements
2
3
Hardware Review (Front View)
4
Hardware Review (Rear View)
5-1
Hardware Installation
Hardware Installation
5-2
1 KH2508A or KH2516A Cat 5 High-Density KVM Switch
1 Firmware Upgrade Cable
1 Power Cord
1 Mounting Kit
1 Foot Pad Set (4 pcs.)
1 User Instructions
Important Notice
Considering environmental protection, ATEN does not provide a fully printed user manual for this product. If the
information contained in the Quick Start Guide is not enough for you to configure and operate your product, please
visit our website www.aten.com, and download the full user manual.
Suggestion:
Shielded twisted pair (STP) Cat5 cables must be used with the unit to ensure compliance with FCC & CE standards.
1. Port Selection Buttons
2. Port LEDs
3. Reset Switch
4. Console Selection Buttons
5. Firmware Upgrade Recovery Switch
6. Firmware Upgrade Port
7. Power LED
8. Station ID LED
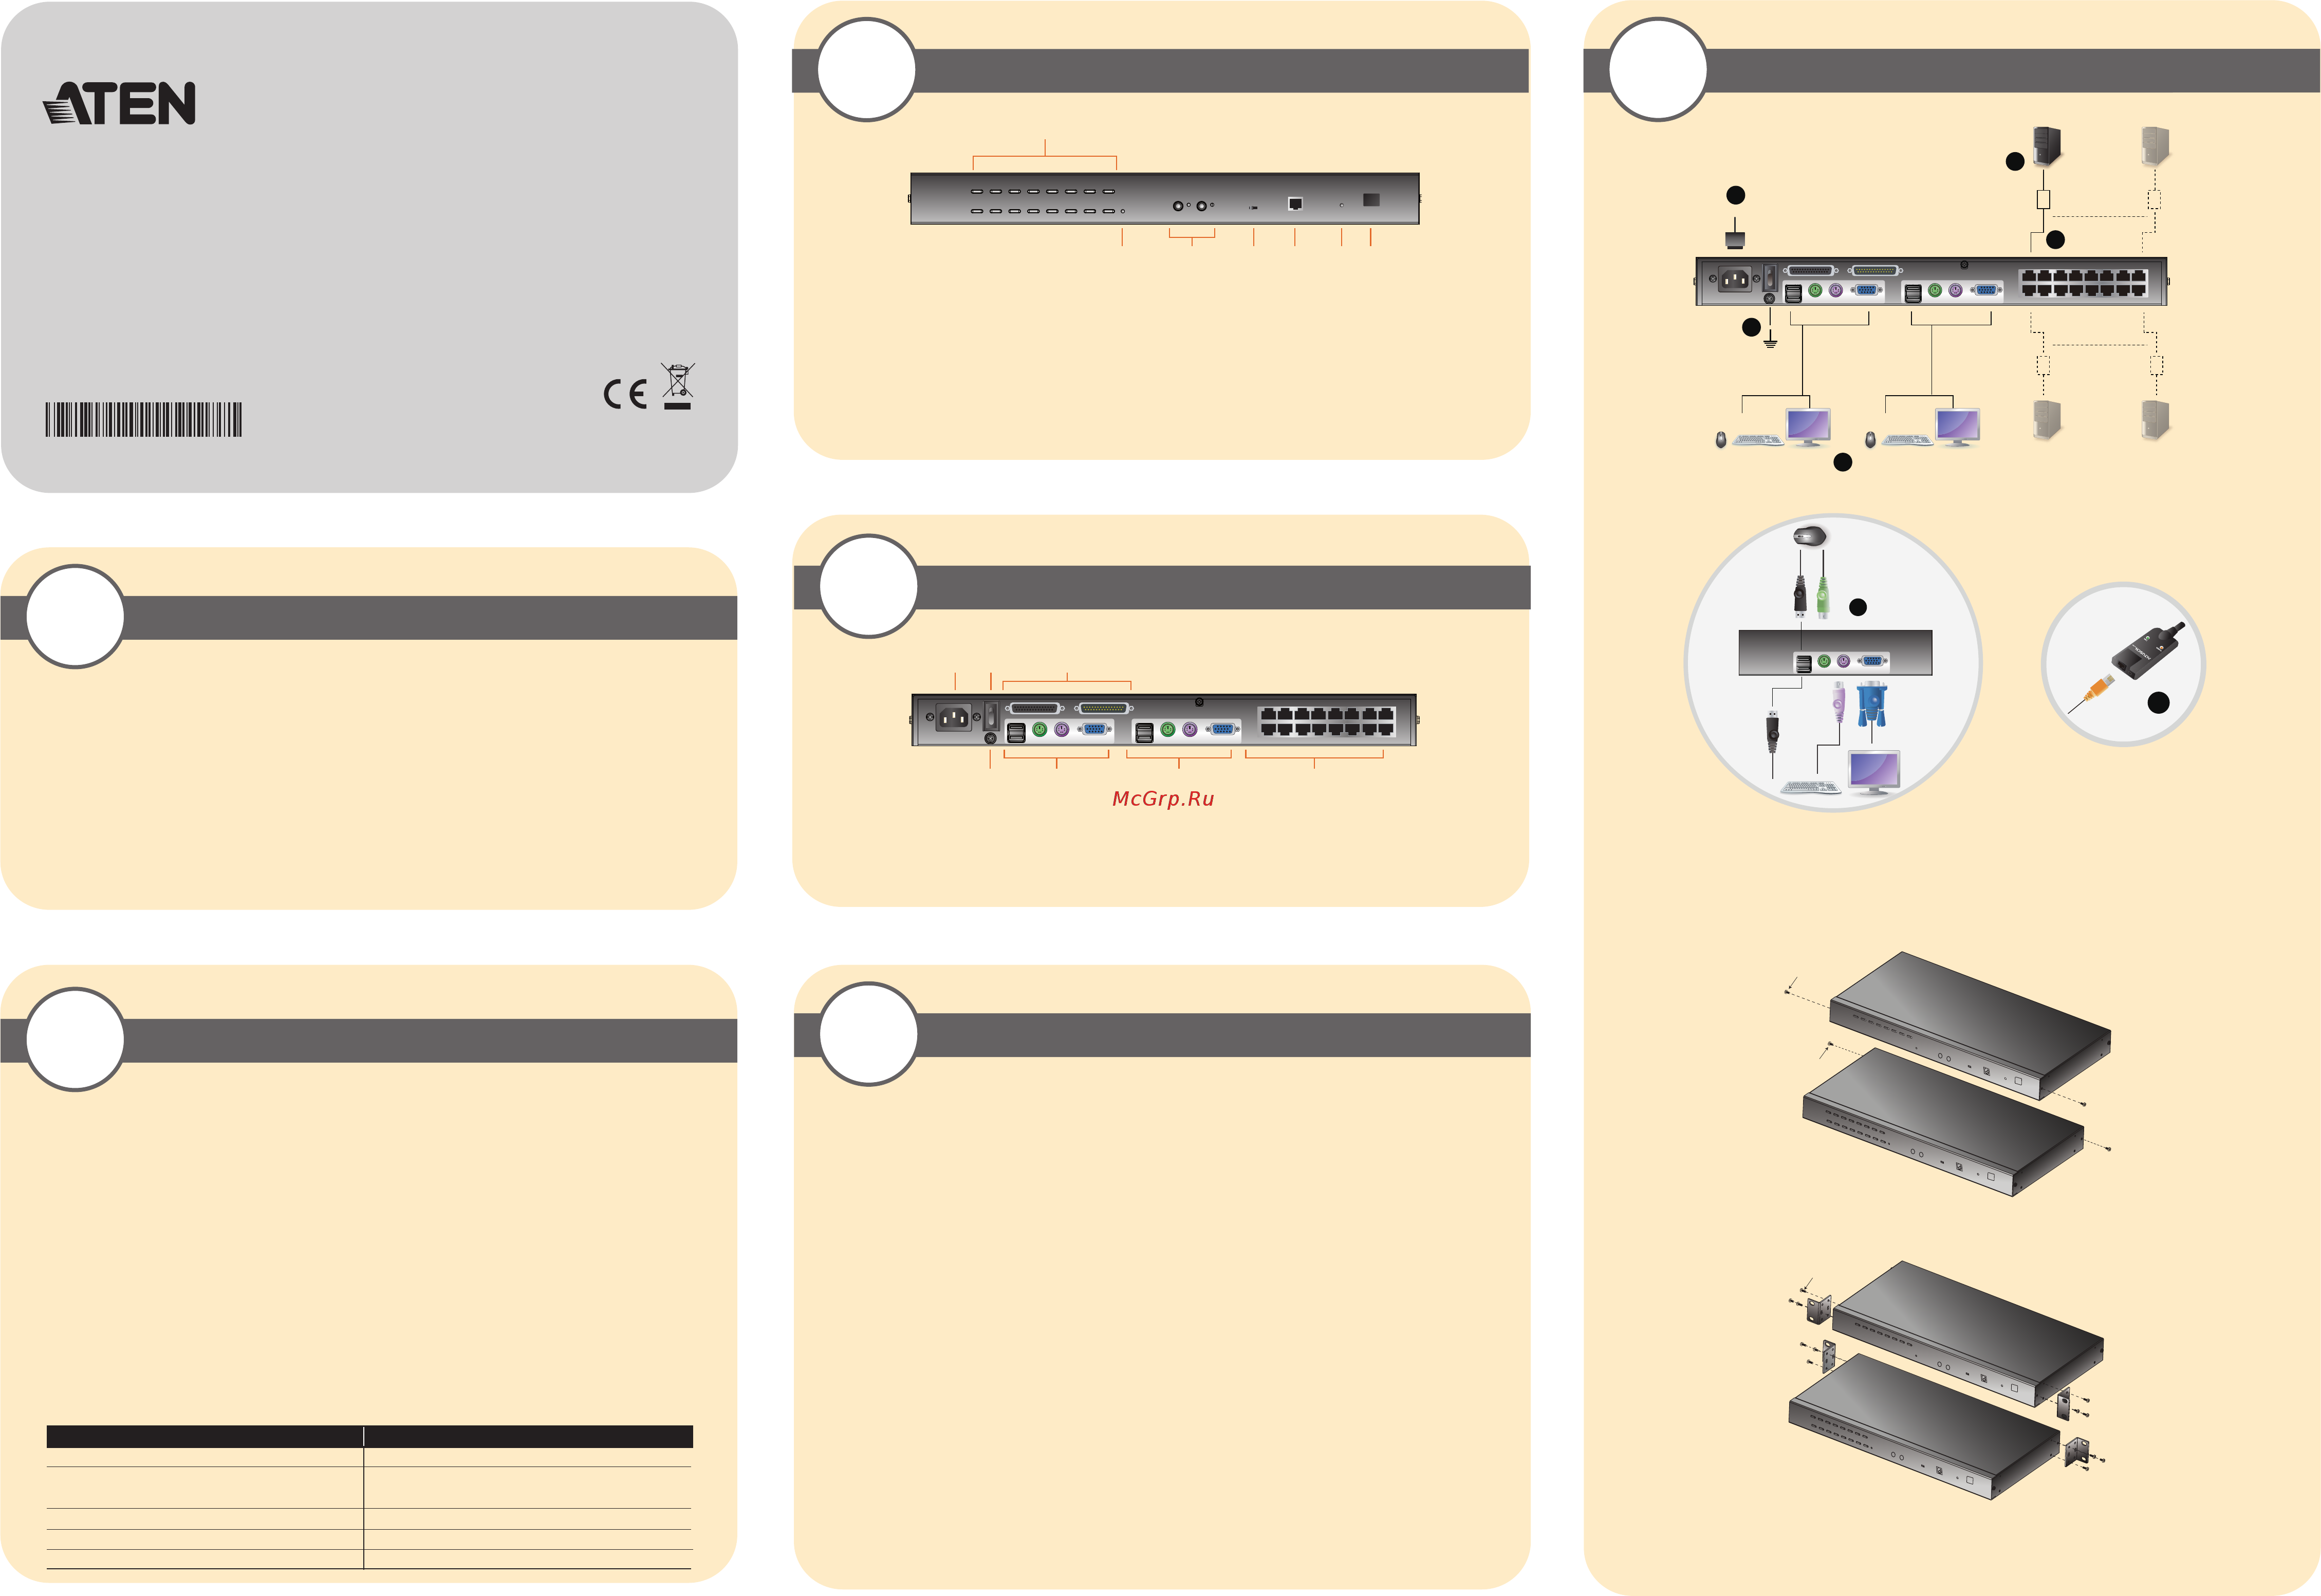
1. Power Socket
2. Power Switch
3. Daisy Chain Ports
4. Grounding Terminal
5. Console 1 Ports
6. Console 2 Ports
7. KVM Port Section
Console
• A VGA, SVGA, or multisync monitor capable of the highest resolution that you will be using on any computer in
the installation
• A PS/2 or USB mouse
• A PS/2 or USB keyboard
Computers
The following equipment must be installed on the computers that connect to the KH2508A or KH2516A KVM
ports:
• A VGA, SVGA or multisync port
• A Type A USB port and USB host controller (for USB KVM adapter cable connection)
- or -
6-pin Mini-DIN keyboard and mouse ports (for PS/2 KVM adapter cable connection)
KVM Adapter Cables
• Cat 5e/6 cable is required to connect the KH2508A / KH2516A to one of the KVM adapter cables.
• The following KVM adapter cables are required for use with the KH2508
A/ KH2516A:
Single Station Installation
In a single stage installation, there are no additional KVM switches daisy chained down from the KH2508A /
KH2516
A. To set up a single stage installation, refer to the installation diagrams starting (the numbers in the
diagram correspond with the numbers of the instruction steps), and do the following:
1. Ground the KH2508
A / KH2516A by connecting one end of the grounding wire provided with your switch to the
grounding terminal, and the other end of the wire to a suitable grounded object.
Note: Do not omit this step. Proper grounding helps to prevent damage to the unit from surges or static
electricity.
2. Plug the console keyboards, monitors, and mice into the unit’s Console 1 and Console 2 console ports. The ports
are color coded and marked with icons for easy identification.
Note: You can use any combination of keyboard and mouse connections. For example, you can use a PS/2
keyboard with a USB mouse.
3. Use Cat 5e/6 cable to connect any available KVM port to a KVM adapter cable that is appropriate for the
computer you are installing.
Note: The KH2508
A / KH2516A does not support distances greater than 50 m between itself and the KVM
adapter cable.
4. Connect the KVM adapter cable to the computer.
Plug the connectors on the KVM adapter cable into the appropriate ports of the computer you are installing.
5. Plug the female end of the power cord into the KH2508
A / KH2516A's power socket; plug the male end into an
AC power source.
After the KH2508
A / KH2516A is cabled up, you can turn on the power. After it is powered up, you can turn on the
servers.
Rack Mounting
The KH2508A / KH2516A can be mounted in a 19" (1U) rack. The mounting brackets can screw into either the front
or the back of the unit so that it can attach to the front or the back of the rack. To rack mount the unit:
1. Remove the screws at the front or the rear, as shown in the diagram below.
2. Screw the mounting brackets into the sides of the unit at the front or the rear, as shown in the diagram below.
3. Slide the unit into the front or rear of the rack and secure it to the rack.
Function Module
Connect to devices with PS/2 ports KA7920 / KA7520 / KA7120
Connect to devices with USB ports KA7970 / KA7570 / KA7170
KA7166 / KA7168 / KA7169
Connect to Sun Legacy systems (with 13W3 port) KA7130
Connect to Sun USB systems KA7170
Connect to serial based devices KA9140
543 6
1&2
7 8
1 2
74 5 6
3
Note: The front and rear panel views are similar for the KH2508A, the difference being that the
KH2508
A has only one row of LED lights (front) and one row of CPU ports (rear)
5
4
3
1
2
3
2
KH2508A/KH2516A Cat 5 High-Density KVM Switch
Quick Start Guide
© Copyright 2015 ATEN
®
International Co., Ltd. www.aten.com
Altusen and the Altusen logo are trademarks of ATEN International Co., Ltd.
All rights reserved. All other trademarks are the property of their respective owners.
This product is RoHS compliant PAPE-1214-L30G Printing Date: 04/2015
Online Registration
• http://eservice.aten.com
Technical Phone Support
International:
• 886-2-8692-6959
China:
• 86-10-5255-0110
Japan:
• 81-3-5615-5811
Korea:
• 82-2-467-6789
North America:
• 1-888-999-ATEN Ext: 4988
United Kingdom:
• 44-8-4481-58923
All information, documentation, and specifications contained in this package are subject to change without prior notification by the
manufacturer.
Phillips head hex
M3 x 6
Phillips head hex
M3 x 6
Phillips head hex
M3 x 8
Содержание
- Aten altuse 1
- Computers 1
- Console 1
- Hardware installation 1
- Hardware review front view 1
- Hardware review rear view 1
- Kvm adapter cables 1
- Package contents 1
- Rack mounting 1
- Requirements 1
- Single station installation 1
- Control and f12 keys 2
- Hotkey command operation 2
- Hotkey summary table 2
- Manual 2
- Number lock and minus keys 2
- Operation 2
- Osd operation 2
- Port selection 2
- Select the active port 2
- Specification 2
Похожие устройства
- Aten KH2516A Описание и спецификации продукта
- Aten KH2516A Руководство пользователя
- Aten CS261 Краткое руководство по установке
- Aten CS261 Описание и спецификации продукта
- Aten CS261 Руководство пользователя по системе команд
- Aten CS261 Руководство пользователя
- Aten CS231 Краткое руководство по установке
- Aten CS231 Описание и спецификации продукта
- Aten CS231 Руководство пользователя
- Aten CS1922 Описание и спецификации продукта
- Aten CS1922 Руководство пользователя
- Aten CS1924 Краткое руководство по установке
- Aten CS1924 Описание и спецификации продукта
- Aten CS1924 Руководство пользователя
- Aten CS782DP Краткое руководство по установке
- Aten CS782DP Описание и спецификации продукта
- Aten CS782DP Руководство пользователя
- Aten CS72D Краткое руководство по установке
- Aten CS72D Описание и спецификации продукта
- Aten CS72D Руководство пользователя