
Sirui R-1004 (без головы) Инструкция по эксплуатации онлайн
Содержание
Похожие устройства
- Sirui N-1004KX (без головы) Инструкция по эксплуатации
- Sirui ET-2204+E-20 углепластик (с головой) Инструкция по эксплуатации
- Sirui ET-2004+E-20 (с головой) Инструкция по эксплуатации
- Sirui ET-1004+E-10 (с головой) Инструкция по эксплуатации
- Sirui EN-2004+K-20X (с головой) Инструкция по эксплуатации
- Sky-Watcher BK MAK90SP OTA Инструкция по эксплуатации
- Samsung Galaxy Ace 3 LTE GT-S7275 Инструкция по эксплуатации
- Sky-Watcher BK MAK80SP OTA Инструкция по эксплуатации
- Sky-Watcher BK MAK127SP OTA Инструкция по эксплуатации
- Samsung Galaxy Ace 3 LTE GT-S7275 Брошюра
- Samsung Xcover GT-B2710 Инструкция по эксплуатации
- Samsung Galaxy Young Duos GT-S6312 Инструкция по эксплуатации
- Samsung Galaxy S4 Zoom 4G C105 Инструкция по эксплуатации
- Samsung B7722 User Manual
- Samsung Galaxy Express GT-I8730 Инструкция по эксплуатации
- Sky-Watcher BK MAK102SP OTA Инструкция по эксплуатации
- Sky-Watcher BK P2008 Steel OTA Инструкция по эксплуатации
- Sky-Watcher AZ-EQ5 SynScan GOTO со стальной треногой NEQ5 Инструкция по эксплуатации
- Sky-Watcher EQ3 с алюминиевой треногой Инструкция по эксплуатации
- Sky-Watcher EQ5 со стальной треногой Инструкция по эксплуатации
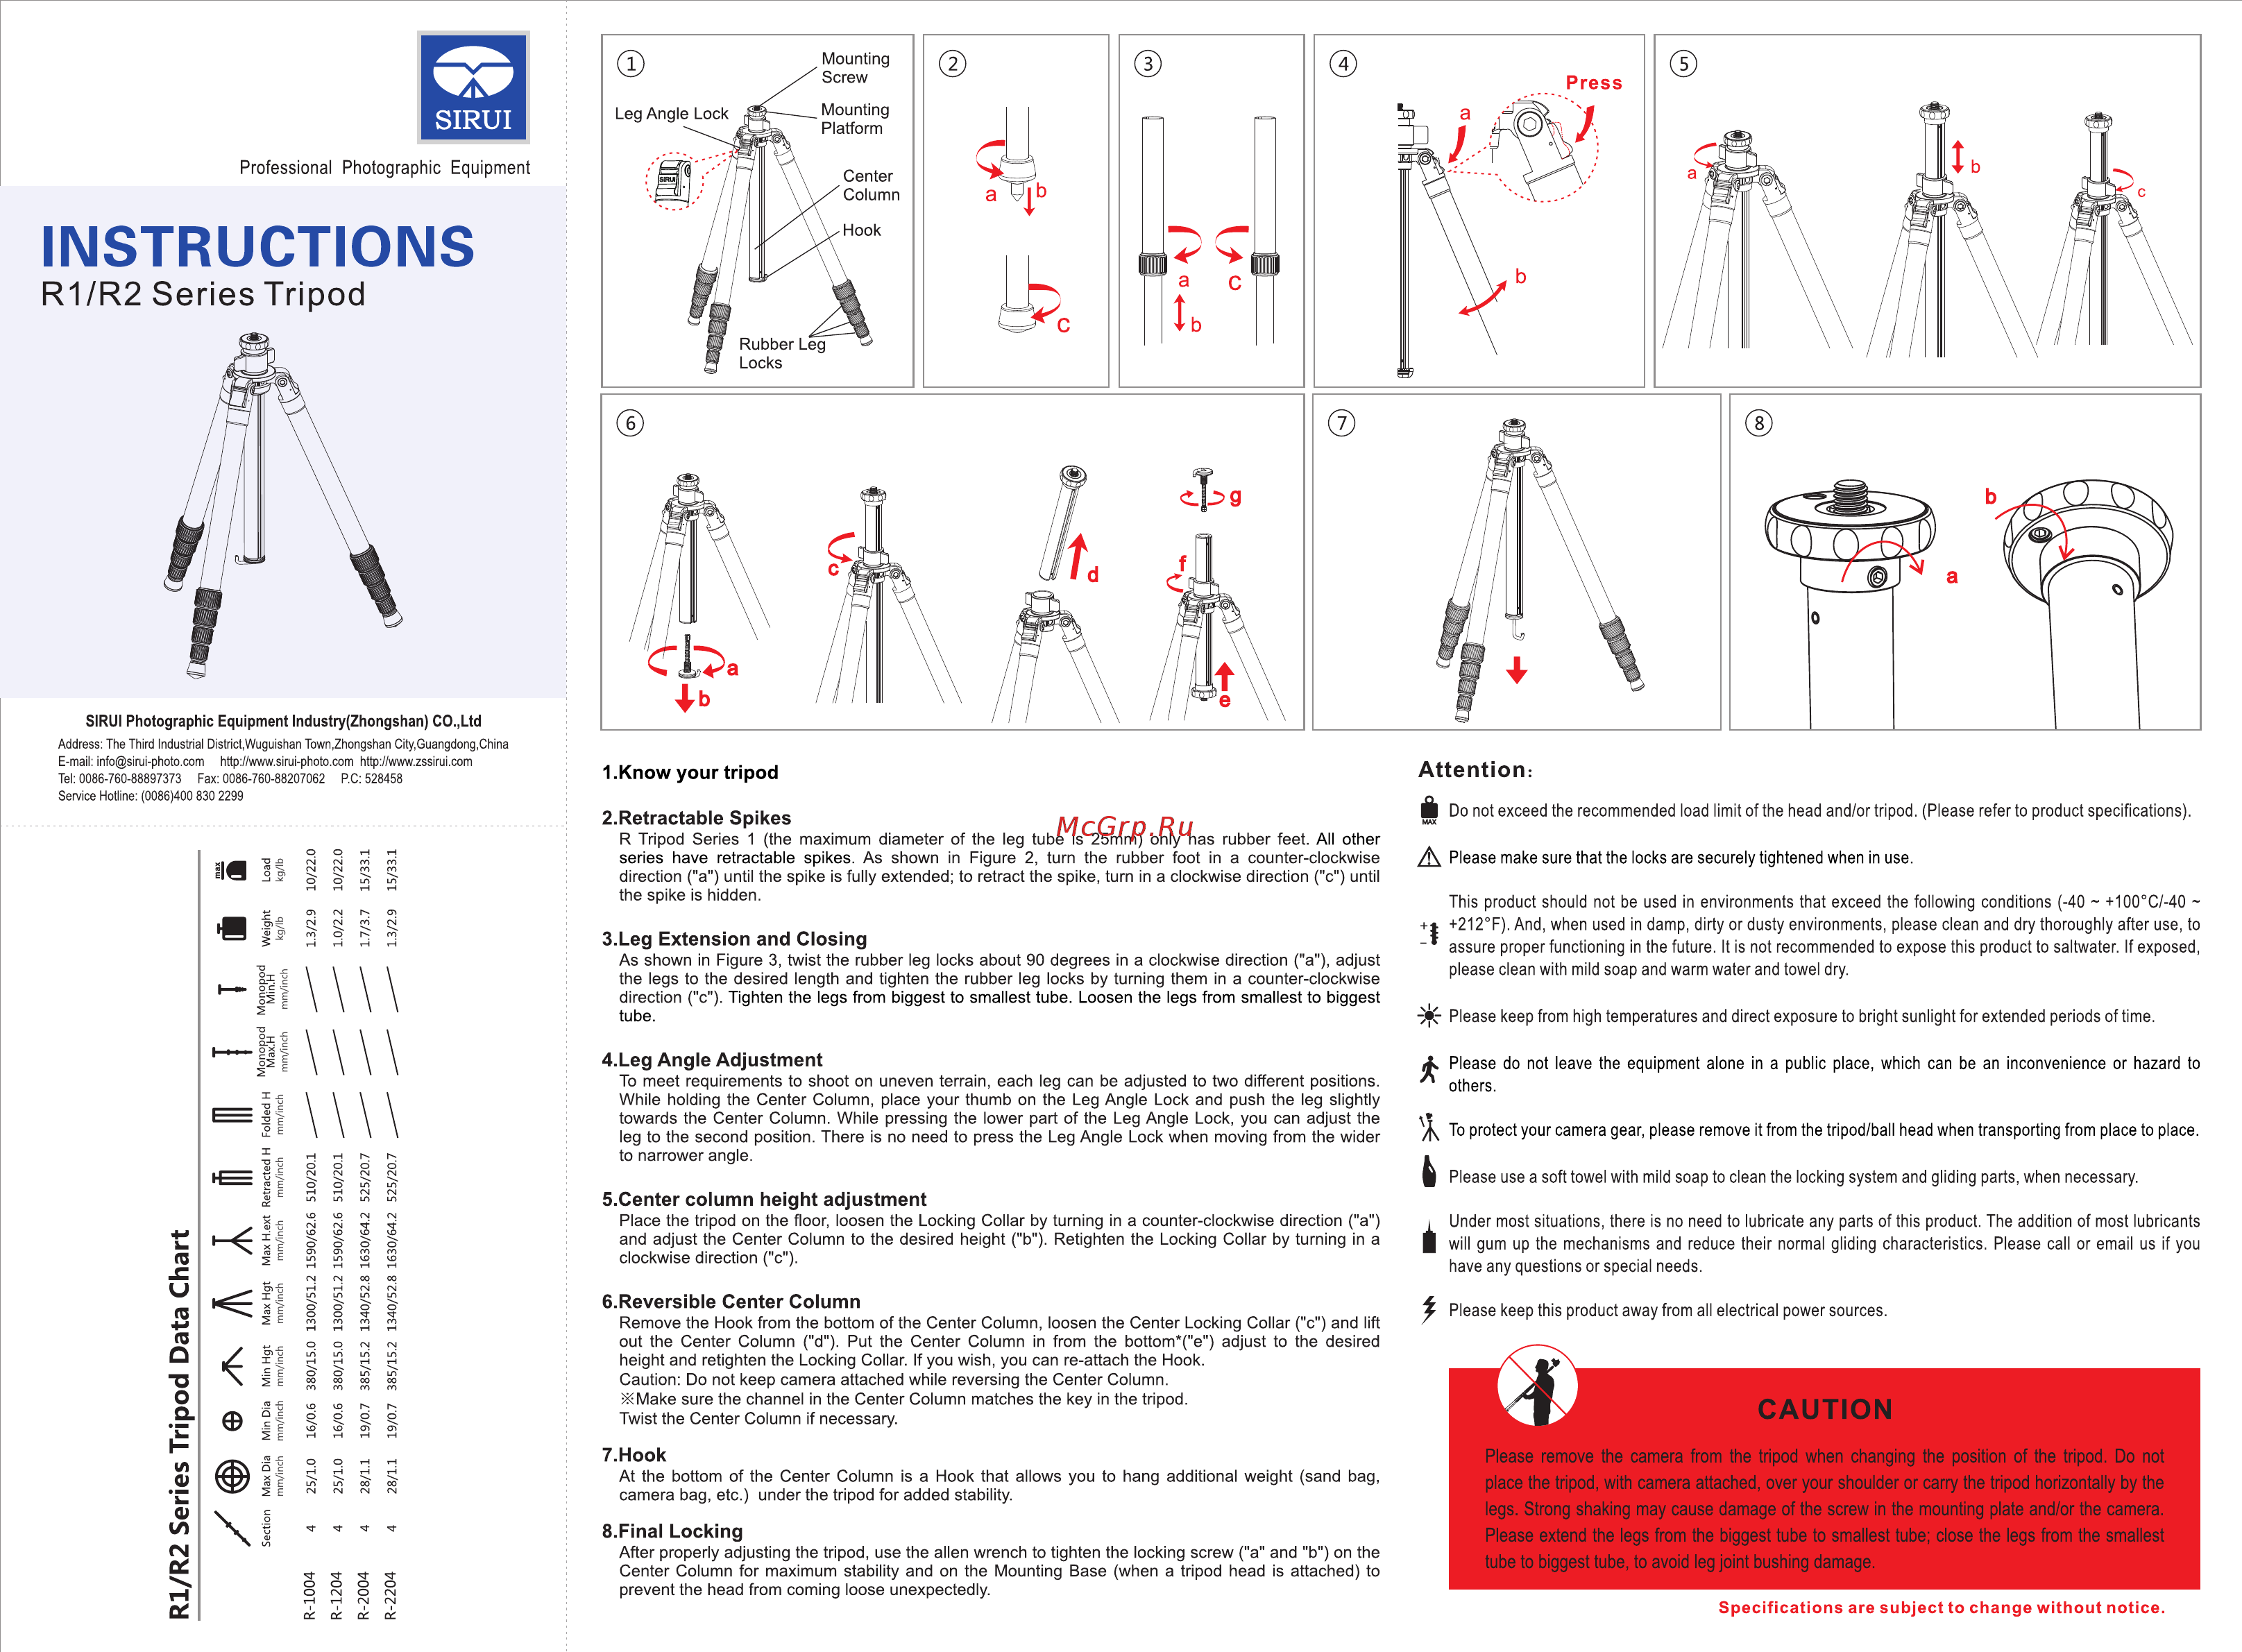
Professional Photographic Equipment INSTRUCTIONS R1 R2 Series Tripod SIRUI Photographic Equipment Industry Zhongshan CO Ltd Address The Third Industrial District Wuguishan Town Zhongshan City Guangdong China E mail info sirui photo com http www sirui photo comhttp www zssirui com Tel 0086 760 88897373 Fax 0086 760 88207062 P C 528458 I Know your tripod Attention 2 Retractable Spikes H Service Hotline 0086 400 830 2299 R Tripod Series 1 the maximum diameter of the leg tube is 25mm only has rubber feet All other series have retractable spikes As shown in Figure 2 turn the rubber foot in a counter clockwise direction a until the spike is fully extended to retract the spike turn in a clockwise direction c until the spike is hidden 3 Leg Extension and Closing As shown in Figure 3 twist the rubber leg locks about 90 degrees in a clockwise direction a adjust the legs to the desired length and tighten the rubber leg locks by turning them in a counter clockwise direction c Tighten the legs from biggest to smallest tube Loosen the legs from smallest to biggest tube 4 Leg Angle Adjustment To meet requirements to shoot on uneven terrain each leg can be adjusted to two different positions While holding the Center Column place your thumb on the Leg Angle Lock and push the leg slightly towards the Center Column While pressing the lower part of the Leg Angle Lock you can adjust the leg to the second position There is no need to press the Leg Angle Lock when moving from the wider to narrower angle Do not exceed the recommended load limit of the head and or tripod Please refer to product specifications A Please make sure that the locks are securely tightened when in use This product should not be used in environments that exceed the following conditions 40 100 C 40 t 212 F And when used in damp dirty or dusty environments please clean and dry thoroughly after use to assure proper functioning in the future It Is not recommended to expose this product to saltwater If exposed please clean with mild soap and warm water and towel dry Please keep from high temperaturesand direct exposure to bright sunlight for extended periods of time X Please do not leave the equipment alone in a public place which can be an inconvenience or hazard to others To protect your camera gear please remove it from the tripod ball head when transporting from place to place Please use a soft towel with mild soap to clean the locking system and gliding parts when necessary 5 Center column height adjustment Place the tripod on the floor loosen the Locking Collar by turning in a counter clockwise direction a and adjust the Center Column to the desired height b Retighten the Locking Collar by turning in a clockwise direction c 6 Reversible Center Column Remove the Hook from the bottom of the Center Column loosen the Center Locking Collar c and lift out the Center Column d Put the Center Column in from the bottom e adjust to the desired height and retighten the Locking Collar If you wish you can re attach the Hook Caution Do not keep camera attached while reversing the Center Column Make sure the channel in the Center Column matches the key in the tripod Twist the Center Column if necessary 7 Hook At the bottom of the Center Column is a Hook that allows you to hang additional weight sand bag camera bag etc under the tripod for added stability most situations there is no need to lubricate any parts of this product The addition of most lubricants Under will gum up the mechanisms and reduce their normal gliding characteristics Please call or email us if you have any questions or special needs Please keep this product away from all electrical power sources CAUTION Please remove the camera from the tripod when changing the position of the tripod Do not place the tripod with camera attached over your shoulder or carry the tripod horizontally by the legs Strong shaking may cause damage of the screw in the mounting plate and or the camera 8 Final Locking After properly adjusting the tripod use the alien wrench to tighten the locking screw a and b on the Center Column for maximum stability and on the Mounting Base when a tripod head is attached to prevent the head from coming loose unexpectedly Please extend the legs from the biggest tube to smallest tube close the legs from the smallest tube to biggest tube to avoid leg joint bushing damage Specifications are subject to change without notice