Hotpoint-Ariston LST 53977 X — установка и подключение бытового прибора: инструкция по эксплуатации [16/28]
![Hotpoint-Ariston LST 53977 X [16/28] Warning hazardous voltage](/views2/1038672/page16/bg10.png)
Содержание
173- Неисправности и методы их устранения 12
- Включение и эксплуатация 6 7
- Программы 8
- Lst 53977
- Загрузка корзин 5
- Монтаж 2 3
- Ополаскиватель и регенерирующая соль 9
- Руководство по эксплуатации
- Предупреждения и рекомендации 11
- Техническое обслуживание и уход 10
- Посудомоечная машина
- Русский 1
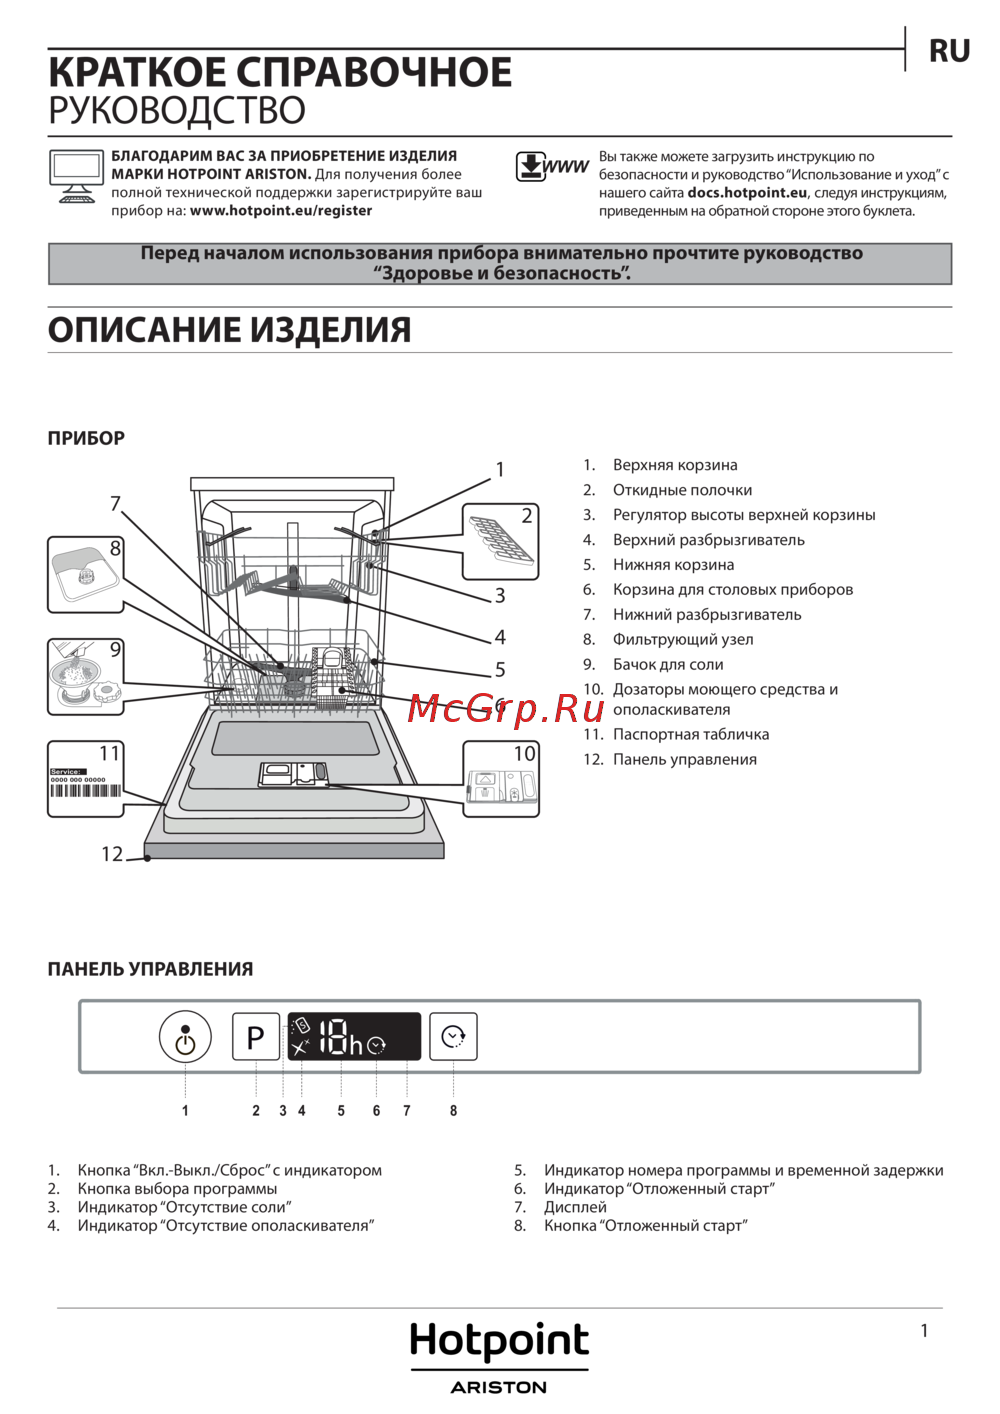
- Описание изделия 4
- Сервис технического обслуживания 13
- Содержание
- С13 en
- Монтаж
- Защита против затопления
- Расположение и нивелировка
- Подсоединение шланга подачи воды
- Внимание опасное напряжение
- Технические данные
- Подсоединение сливного шланга
- Электрическое подсоединение
- Предупреждения по первому использованию машины
- Пленка защиты от конденсата
- Панель управления
- Бачок соли
- Дозаторы моечного средства и дозатор
- Паспортная табличка 12 панель управления
- Описание изделия
- Нижняя корзина
- Верхняя корзина
- Откидные полки
- Ополаскивателя
- Корзинка для столовых приборов
- Верхний ороситель
- Регулятор высоты корзины
- Нижний ороситель
- Фильтр мойки
- Нижняя корзина
- Откидные полки с варьируемым наклоном
- Наклон а наклон в наклон с
- Корзинка для столовых приборов
- Загрузка корзин
- Верхняя корзина
- Запуск посудомоечной машины
- Случайное прерывание мойки
- Включение и эксплуатация
- Изменение текущей программы
- И в целях энергосбережения в некоторых случаях простоя машина отключается автоматически
- Порядок догрузки посуды
- Загрузка моющего вещества
- Половина загрузки в верхней или нижней корзине
- Запуск с задержкой
- Дополнительные функции мойки
- Многофункциональные таблетки
- Программы
- Заливка ополаскивателя
- Ополаскиватель и регенерирующая соль
- Загрузка регенерирующей соли
- Вкл выкл
- Отрегулируйте дозу ополаскивателя
- Очистка водного фильтра
- Чистка посудомоечной машины
- Чистка фильтров
- Чистка оросителей
- Средства против неприятных запахов
- Техническое обслуживание и уход
- Отключение воды и электрического тока
- Длительный простой машины
- Экономия электроэнергии и охрана окружающей среды
- Экономия воды и электроэнергии
- Утилизация
- Предупреждения и рекомендации
- Общие требования к безопасности
- Моющие средства не содержащие фосфатов хлора и содержащие ферменты
- Неисправности и методы их устранения
- Сервис технического обслужи ван ия
- Lst 53977
- Loading the racks 19
- Installation 16 17
- English 15
- Dishwasher
- Description of the appliance 18
- Contents mb
- Care and maintenance 24
- Assistance 27
- Wash cycles 22
- Troubleshooting 26
- Start up and use 20 21
- Rinse aid and refined salt 23
- Precautions advice and assistance 25
- Operating instructions
- Warning hazardous voltage
- Positioning and levelling
- Installation
- Connecting the water inlet hose
- Connecting the water and electricity supplies
- Anti flooding protection
- Capacity
- Anti condensation strip
- Advice regarding the first wash cycle
- Water supply pressure
- Total absorbed power
- Technical data
- Power supply voltage
- Electrical connection
- Dimensions
- Connecting the water outlet hose
- Description of the appliance
- Control panel
- Lower rack
- Loading the racks
- Loading examples for the upper rack
- Items which should not be washed in the dishwasher
- Cutlery basket positioning examples loading examples for the upper rack
- Cutlery basket
- Adjusting the height of the upper rack
- Upper rack
- Tip up compartments with adjustable tilt
- Tilt a tilt b tilt c
- To achieve the best results from each washing and drying cycle powder detergent rinse aid liquid and salt should be used
- The use of tablets is only recommended for models which offer the multi functional tablets option
- The machine will switch off automatically during certain periods of inactivity in order to minimise electricity consumption
- Starting the dishwasher
- Start up and use
- Only use detergent which has been specifically designed for dishwashers
- Modifying a wash cycle in progress
- Measuring out the detergent
- Kj using excessive detergent may result in foam residue remaining in the machine after the cycle has ended
- Kj do not use washing up liquid
- Adding extra crockery
- Accidental interruptions
- Delayed start
- Wash options
- Multi functional tablets
- Half load using the upper or lower rack
- Wash cycles
- Water hardness table
- W if you do not add salt or rinse aid the low salt and low rinse aid indicator lights remain lit
- Specifically designed for dishwashers do not use table salt or industrial salt or washing up liquid follow the instructions given on the packaging
- Setting the water hardness
- Rinse aid and refined salt
- Only use products which have been
- Measuring out the rinse aid
- Measuring out the refined salt
- Adjusting the amount of rinse aid
- Cleaning the filters
- Cleaning the dishwasher
- Care and maintenance
- Shutting off the water and electricity supplies
- Preventing unpleasant odours
- Leaving the machine unused for extended periods
- Cleaning the water inlet filter
- Cleaning the sprayer arms
- Saving water and energy
- Saving energy and respecting the environment
- Precautions and advice
- Phosphate free and chlorine free detergents containing enzymes
- General safety
- Disposal
- Troubleshooting
- Malfunction possible causes solutions
- Att always ask for original spare parts for your repair
- Assistance
- Accessories
- Www hotpoint ariston ru
- We care about our consumers and we always try to provide the highest level of service we keep improving our products to make your contact with the appliance simple and pleasant
- Please have the following information to hand
- If you need to call to the service center
- Before contacting assistance
- Authorized service centers
Похожие устройства
-
 Hotpoint-Ariston HSIC 3T127Инструкция по эксплуатации
 -
 Hotpoint-Ariston HI 5030 WИнструкция по эксплуатации
 -
 Hotpoint-Ariston HIC 3O33 WFИнструкция по эксплуатации
 -
 Hotpoint-Ariston ELTF 8B019 EUИнструкция по эксплуатации
 -
 Hotpoint-Ariston MVFTA+5H X RFHИнструкция по использованию
 -
 Hotpoint-Ariston LSTF 7B019 EUИнструкция по эксплуатации
 -
 Hotpoint-Ariston LSTA+ 329 AXРуководство пользователя
 -
 Hotpoint-Ariston ltf 11s111 o euИнструкция по эксплуатации
 -
 Hotpoint-Ariston LST 11477Инструкция по эксплуатации
 -
 Hotpoint-Ariston LST 53977 XИнструкция по эксплуатации
 -
 Hotpoint-Ariston LST 11477Инструкция по эксплуатации
 -
 Maunfeld MLP-122DИнструкция к устройству
Installation EN M Keep this instruction manual in a safe place for future reference If the appliance is sold given away or moved please ensure the manual is kept with the machine so that the new owner may benefit from the advice contained within it Please read this instruction manual carefully it contains important information regarding the safe installation use and maintenance of the appliance M If the appliance must be moved at any time keep it in an upright position if absolutely necessary it may be Connecting the water inlet hose tilted onto its back To a suitable cold water connection point before Positioning and levelling attaching the hose run the water until it is perfectly clear so that any impurities that may be present in the 1 Remove the appliance from all packaging and check water do not clog the appliance after performing this that it has not been damaged during transportation operation screw the inlet hose tightly onto a tap with If it has been damaged contact the retailer and do not a gas threaded connection proceed any further with the installation process 2 Check the dishwasher by placing it so that its sides or To a suitable hot water connection point your back panel are in contact with the adjacent cabinets or dishwasher may be supplied with hot water from the even with the wall This appliance can also be recessed mains supply if you have a central heating system under a single worktop see the Assembly instruction with radiators provided that it does not exceed a sheet temperature of 60 C Screw the hose to the tap as described for connection 3 Position the dishwasher on a level and sturdy floor If to a cold water supply the floor is uneven the front feet of the appliance may be adjusted until it reaches a horizontal position If the IM If the inlet hose is not long enough contact a appliance is levelled correctly it will be more stable and specialist store or an authorised technician see much less likely to move or cause vibrations and noise Assistance while it is operating 4 Adjust the height of the rear foot from the front of the appliance on the central lower part of the dishwasher turning a hexagonal spanner red color with an opening of 8 mm in a clockwise direction to increase the height or in an anticlockwise direction to decrease the height Connecting the water and electricity supplies IM Connection to the water and electricity supplies IM The water pressure must be within the values indicated in the Technical data table see adjacent information M The hose should not be bent or compressed Anti flooding protection To ensure floods do not occur the dishwasher is provided with a special system which blocks the should only be performed by a qualified technician water supply in the event of anomalies or leaks from M The dishwasher should not stand on top of the water inside the appliance hoses or the electricity supply cable M The appliance must be connected to the water Some models are also equipped with the supplementary safety device New Acqua Stop which guarantees anti supply network using new hoses flooding protection even in the event of a supply hose Do not use old hoses rupture The water inlet A and outlet B hoses and the electricity supply cable may be positioned towards the WARNING HAZARDOUS VOLTAGE right or the left in order to achieve the best possible installation see figure Under no circumstance should the water inlet hose be cut as it contains live electrical parts Only available in selected models 16
Следуйте этой инструкции для безопасной установки и подключения вашего бытового прибора. Важные советы по эксплуатации и обслуживанию помогут избежать проблем.
