Pioneer DEH-4200SD — установка автомобильного CD-приемника: пошаговое руководство [1/8]
Превью страниц
Страница 1 /
8
Installation English Installation English
<KMINX> <09H00000>
Printed in Thailand
Imprimé en Thaïlande
<CRD4436-A/N> EW
Installation Manual
Manuel d’installation
Manuale d’installazione
Manual de instalación
Installationsanleitung
Installatiehandleiding
Руководство по установке
CD RDS RECEIVER
AUTORADIO CD RDS
SINTOLETTORE CD RDS
REPRODUCTOR DE CD CON RECEPTOR RDS
CD RDS-EMPFÄNGER
CD RDS-ONTVANGER
CD RDS ПРИЕМНИК
DEH-4200SD
DEH-3200UB
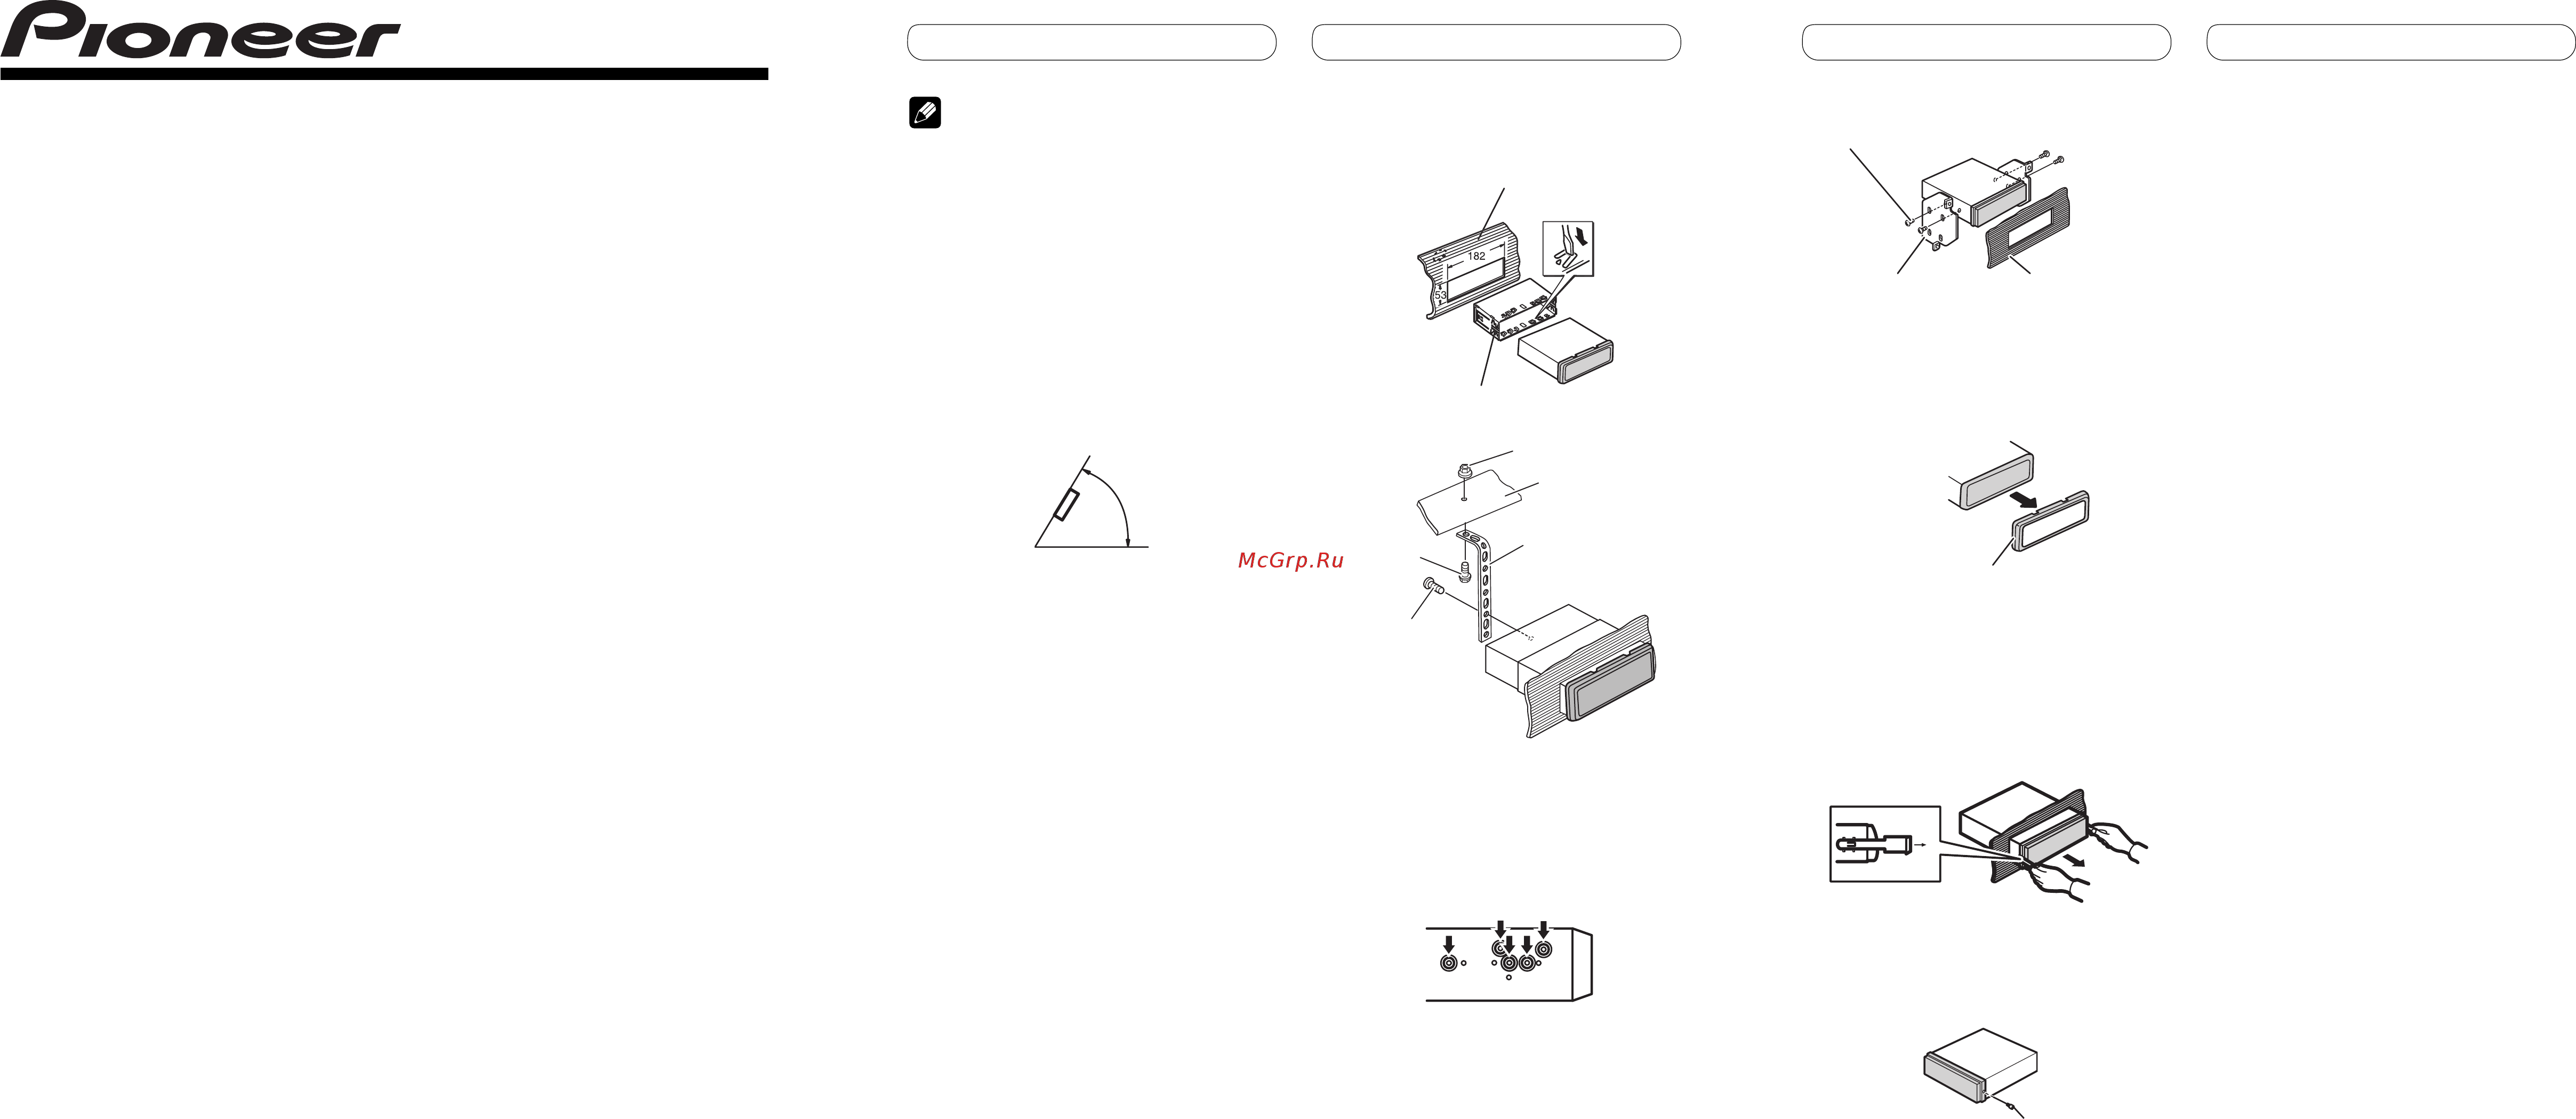
2. Tighten two screws on each side.
Dashboard or ConsoleMounting bracket
Tapping screw (5 mm × 8 mm)
Removing the unit
1. Extend top and bottom of the trim
ring outwards to remove the trim
ring. (When reattaching the trim ring,
point the side with the groove down.)
Trim ring
• Releasing the front panel allows easier access
to the trim ring.
2. Insert the supplied extraction keys
into both sides of the unit until they
click into place.
3. Pull the unit out of the dashboard.
Fastening the front panel
If you do not plan to detach the front panel,
the front panel can be fastened with supplied
screw.
Screw
Note
• Check all connections and systems before final
installation.
• Do not use unauthorized parts. The use of
unauthorized parts may cause malfunctions.
• Consult with your dealer if installation requires
drilling of holes or other modifications of the
vehicle.
• Do not install this unit where:
— it may interfere with operation of the vehicle.
— it may cause injury to a passenger as a result
of a sudden stop.
• The semiconductor laser will be damaged if it
overheats. Install this unit away from hot places
such as near the heater outlet.
• Optimum performance is obtained when the unit is
installed at an angle of less than 60°.
60°
DIN front/rear-mount
This unit can be properly installed either from
“Front” (conventional DIN Front-mount) or
“Rear” (DIN Rear-mount installation, utilizing
threaded screw holes at the sides of unit
chassis). For details, refer to the following
installation methods.
• Use commercially available parts when
installing.
DIN Front-mount
1. Insert the mounting sleeve into the
dashboard.
For installation in shallow spaces, use the
supplied mounting sleeve. If there is enough
space, use the mounting sleeve that came with
the vehicle.
2. Secure the mounting sleeve by using
a screwdriver to bend the metal tabs
(90°) into place.
Dashboard
Mounting sleeve
3. Install the unit as illustrated.
Screw (M48)
Screw
Metal strap
Nut
Firewall or
metal support
• Make sure that the unit is installed securely
in place. An unstable installation may cause
skipping or other malfunctions.
DIN Rear-mount
1. Determine the appropriate position
where the holes on the bracket and
the side of the unit match.
Содержание
65- Deh 4200sd deh 3200ub
- Din front rear mount
- For installation in shallow spaces use the supplied mounting sleeve if there is enough space use the mounting sleeve that came with the vehicle
- Installation manual manuel d installation manuale d installazione manual de instalación installationsanleitung installatiehandleiding руководство по установке
- Fastening the front panel
- Installation english installation english
- If you do not plan to detach the front panel the front panel can be fastened with supplied screw
- This unit can be properly installed either from front conventional din front mount or rear din rear mount installation utilizing threaded screw holes at the sides of unit chassis for details refer to the following installation methods
- Montage arrière din
- Installation français
- Montaggio din posteriore
- Fixation du panneau avant
- Fissaggio del pannello anteriore
- Enlèvement de l appareil
- Rimozione dell unità
- Remarque
- Montaggio din frontale
- Montage frontal din
- Montage avant arrière din
- Installazione din frontale posteriore
- Installation français installazione italiano installazione italiano
- Entfernen des geräts
- Fijación del panel delantero
- Einbau deutsch einbau deutsch instalación español
- Din rückmontage
- Din frontmontage
- Din front rückmontage
- Befestigung der frontplatte
- Retirada de la unidad
- Montaje trasero din
- Montaje delantero trasero din
- Montaje delantero din
- Instalación español
- Hinweise
- Демонтаж устройства
- Заднее крепление стандарта din
- Vastzetten van het voorpaneel
- Installatie nederlands установка pycckий установка pycckий
- Закрепление передней панели
- Installatie nederlands
- Het toestel verwijderen
- Din voormontage
- Din voor achter montage
- Din achtermontage
- Переднее крепление стандарта din
- Переднее заднее крепление по стандарту din
- Connection diagram
- Connecting the units english connecting the units english
- Schema di collegamento
- Italiano
- Français
- Diagramme de connexion
- Connexions des appareils
- Collegamento delle unità
- Español
- Diagrama de conexión
- Deutsch
- Conexión de las unidades
- Anschlussdiagramm
- Anschließen der geräte
- Pycckий
- Подключение устройств
- Nederlands
- Aansluitingsschema
- Aansluiten van de toestellen
Похожие устройства
-
 Pioneer DEH-X5500BTИнструкция по применению
 -
 Pioneer avh-x8800btЭксплуатационная инструкция
 -
 Pioneer deh-x5900btИнструкция по работе
 -
 Pioneer fh-x730btИнструкция пользователя
 -
 Pioneer FH-X720BTЭксплуатационная инструкция
 -
 Pioneer AVH-P3200BTИнструкция по работе
 -
 Pioneer MVH-S520BTfw_update_instructions
 -
 Pioneer CDX-P1270Руководство пользователя
 -
 Pioneer CDX-P2050VSРуководство пользователя
 -
 Pioneer CDX-P650Руководство пользователя
 -
 Pioneer CDX-P670Руководство пользователя
 -
 Pioneer DEH-1310Инструкция по установке
Подробное руководство по установке CD-приемника в автомобиле. Узнайте, как правильно установить устройство, чтобы избежать неисправностей и обеспечить оптимальную работу.
