
Pioneer DEH-P5700MP Руководство по установке онлайн
Превью страниц
Страница 1 /
8
60°
5
Fig. 1
Abb. 1
Afb. 1
Fig. 2
Abb. 2
Afb. 2
53
182
1
2
3
4
<KNNZX> <04K00000>
DEH-P5700MP
DEH-P5730MP
Printed in Thailand
Imprimé en Thailand
<CRD3944-A/N> EW
This product conforms to new cord colors.
Los colores de los cables de este producto se confor-
man con un nuevo código de colores.
Dieses Produkt entspricht den neuen Kabelfarben.
Le code de couleur des câbles utilisé pour ce produit est
nouveau.
Questo prodotto è conforme ai nuovi codici colori.
De kleuren van de snoeren van dit toestel zijn gewijzigd.
Fig. 3
Abb. 3
Afb. 3
INSTALLATION MANUAL
MANUEL D’INSTALLATION
6
Fig. 4
Abb. 4
Afb. 4
7
9
11
10
Fig. 5
Abb. 5
Afb. 5
Fig. 6
Abb. 6
Afb. 6
8
Fig. 7
Abb. 7
Afb. 7
12
Fig. 8
Abb. 8
Afb. 8
13
Fig. 9
Abb. 9
Afb. 9
Fig. 10
Abb. 10
Afb. 10
Fig. 11
Abb. 11
Afb. 11
CRD3944AN 04.11.29 2:16 PM Page 1
Содержание
100- Installation manual
- Deh p5700mp deh p5730mp
- Manuel d installation
- Colocación del panel delantero
- Montaje delantero trasero din
- Montaje delantero din
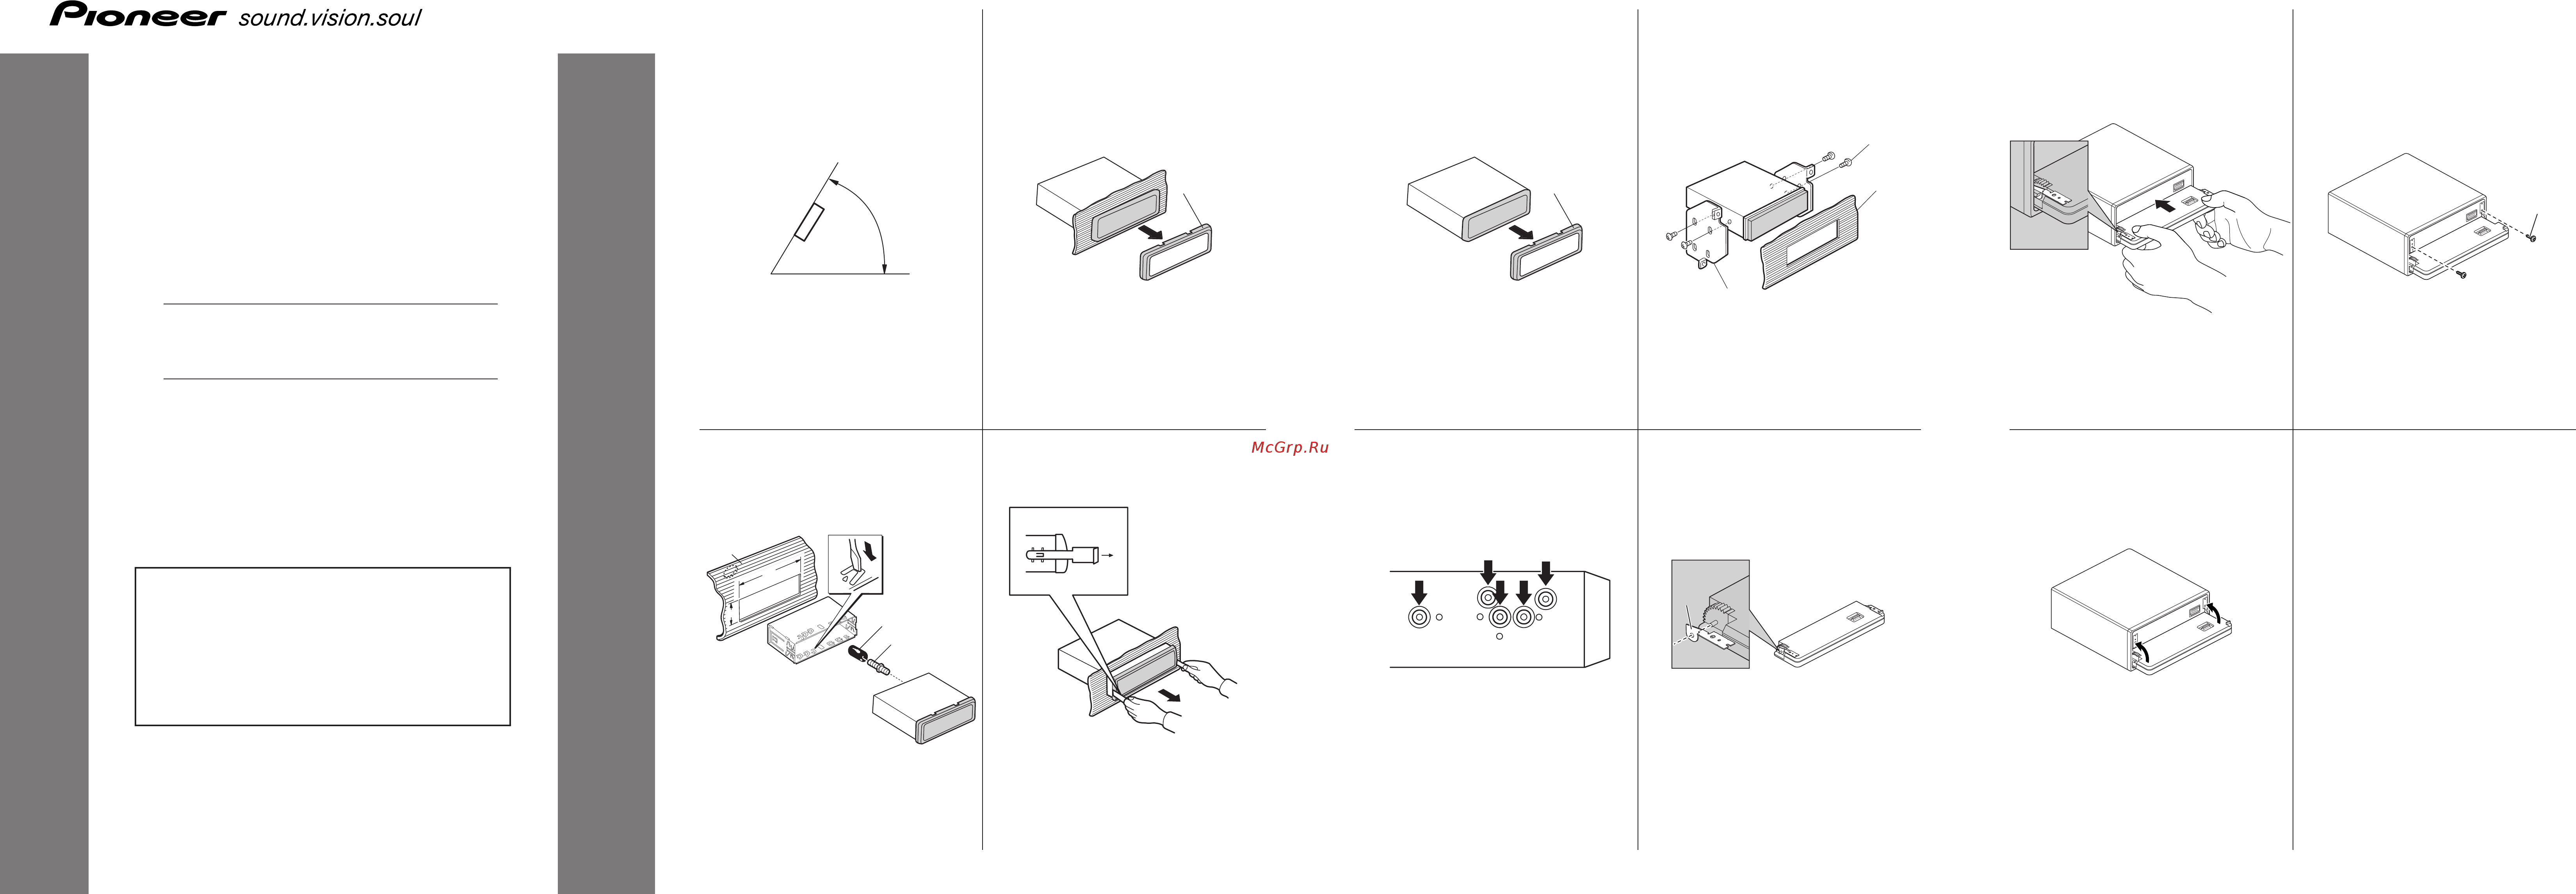
- Attach the holders to both sides of the front panel fig 8
- Installation with the rubber bush fig 2
- Installation using the screw holes on the side of the unit fig 5 fig 6 fig 7
- Instalación usando los agujeros para tornillos ubicados en ambos costados de la unidad fig 5 fig 6 fig 7
- Instalación con tope de goma fig 2
- Flip the holders into upright posi tions fig 10
- Fixing the front panel
- Fix the front panel to the unit using fixing screws fig 11
- Replace the front panel to the unit fig 9
- Removing the unit fig 3 fig 4
- Fije el panel delantero a la unidad utilizando los tornillos de fijación fig 11
- Remove the frame
- Fijación de la unidad a la ménsula de montaje existente
- Reinstale el panel delantero en la unidad fig 9
- Fastening the unit to the factory radio mounting bracket
- Quite el marco
- Din rear mount
- Quitado de la unidad fig 3 fig 4
- Din front rear mount
- Mueva los sujetadores en las posi ciones verticales fig 10
- Din front mount
- Montaje trasero din
- Coloque los sujetadores en ambos lados del panel delantero fig 8
- Din vordermontage
- Nehmen sie den rahmen ab
- Din rückmontage
- Montage din avant arrière
- Din befestigung von vorne hinten
- Montage din avant
- Montage din arrière
- Bringen sie die halter an beiden seiten der frontplatte an abb 8
- Klappen sie die halter hoch abb 10
- Bringen sie die frontplatte wieder am gerät an abb 9
- Installation unter gebrauch der gewindebohrungen an der seite der einheit abb 5 abb 6 abb 7
- Befestigen der frontplatte
- Installation en utilisant les trous de vis sur les côtés de l appareil fig 5 fig 6 fig 7
- Attachez les crochets des deux côtés de la face avant fig 8
- Installation avec une bague en caoutchouc fig 2
- Anbringen dieser einheit an die werks radiomontagehalterung
- Fixez la face avant sur l appareil avec les vis de fixation fig 11
- Fixation de la face avant
- Fixation de l appareil au support pour le montage de la radio installée par le constructeur
- Faites pivoter les crochets en position droite fig 10
- Entnahme des gerätes abb 3 abb 4
- Enlever le cadre
- Einbau mit der gummibuchse abb 2
- Sichern sie die frontplatte mit den befestigungsschrauben am gerät abb 11
- Dépose de l unite fig 3 fig 4
- Remettez la face avant en place sur l appareil fig 9
- Installatie met de rubber mof afb 2
- Fissaggio del pannello anteriore
- Verwijderen van het apparaat afb 3 afb 4
- Fig 10
- Verwijder het frame
- Estrazione dell unità fig 3 fig 4
- Ruotare i supporti nelle posizioni vertiali
- Din voorbevestiging
- Rimuovere il telaio
- Din voor achterbevestiging
- Rimontare il pannello anteriore sull unità fig 9
- Din achterbevestiging
- Plaats het voorpaneel weer op het toestel afb 9
- Bloccare il pannello anteriore all unità per mezzo delle apposite viti di fissaggio fig 11
- Bevestigen van het voorpaneel
- Montaggio din posteriore
- Bevestigen van het apparaat aan de radio bevestigingsbeugel van de fabrikant
- Montaggio din frontale
- Bevestig het voorpaneel met de bevestigingsschroeven aan het toestel afb 11
- Montaggio din forntale posteriore
- Bevestig de houders aan beide zijden van het voorpaneel afb 8
- Klap de houders overeind afb 10
- Assicurare l unità alla staffa di mon taggio radio
- Installeren
- Assicurare i supporti di fissaggio ad entrambi i lati del pannello anteriore fig 8
- Installazione per mezzo dei fori per vite situati sui lati dell unità fig 5 fig 6 fig 7
- Installazione con la boccola di gomma fig 2
- Installatie via de schroefgaten in de zijkant van het apparaat afb 5 afb 6 afb 7
- Connection diagram fig 12
- Connecting the units
- Fig 12 abb 12 afb 12
- Verbindungs diagramm abb 12
- Hinweis
- Diagrama de conexión fig 12
- Conexión de las unidades
- Anschließen der geräte
- Schéma de connexion
- Schema di collegamento fig 12
- Remarque
- Fig 12
- Connexion des appareils
- Collegamento degli apparecchio
- Opmerking
- Aansluitschema afb 12
- Aansluiten van de apparatuur
Похожие устройства
-
 Pioneer DEH-X5500BTИнструкция по применению
 -
 Pioneer avh-x8800btЭксплуатационная инструкция
 -
 Pioneer deh-x5900btИнструкция по работе
 -
 Pioneer fh-x730btИнструкция пользователя
 -
 Pioneer FH-X720BTЭксплуатационная инструкция
 -
 Pioneer AVH-P3200BTИнструкция по работе
 -
 Pioneer MVH-S520BTfw_update_instructions
 -
 Pioneer CDX-P1270Руководство пользователя
 -
 Pioneer CDX-P2050VSРуководство пользователя
 -
 Pioneer CDX-P650Руководство пользователя
 -
 Pioneer CDX-P670Руководство пользователя
 -
 Pioneer DEH-1310Инструкция по установке

Случайные обсуждения