![Icom PS-125 — инструкция по подключению и установке источника питания PS-125 [2/2]](/img/pdf.png)
Icom PS-125 — инструкция по подключению и установке источника питания PS-125 [2/2]
![Icom PS-125 [2/2] Panel description](/views2/1074375/page2/bg2.png)
Содержание
Похожие устройства
-
 D-Link DPS-500AКраткая инструкция
 -
 ABB SU/S 30.640.1Инструкция по работе
 -
ABB SV/S 30.640.5.1Руководство пользователя
-
ABB SV/S 30.320.2.1Инструкция пользователя
-
ABB SV/S 30.640.3.1Руководство по работе с устройством
-
ABB SV/S 30.320.1.1Руководство пользователя
-
ABB SV/S 30.160.1.1Инструкция по работе
-
 Yamaha PW1DИнструкция по эксплуатации
 -
 Delta Electronics DVPPS05Руководство по эксплуатации
 -
Delta Electronics DVPPS02Руководство по эксплуатации
-
Delta Electronics DVPPS01Руководство по эксплуатации
-
 Delta Electronics DRR-40AИнструкция по эксплуатации(ENG)
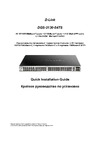
OPERATION Make sure the POWER switches on the PS125 and transceiver are OFF Connect the DC output cable of the PS 125 to the transceiver DC power input socket Connect the AC power cable to an AC outlet and the PS 125 Turn the PS 125 ON I ON red indicator lights O OFF red indicator goes off Turn the transceiver ON To turn OFF the system turn the transceiver power OFF then the PS 125 in sequence POWER PROTECTOR The PS 125 has an output protection circuit When the and pins are shorted the PS125 stops functioning In such a case remove the source of the problem turn OFF the PS 125 wait several seconds then turn it ON again INSTALLATION The PS 125 s height can be changed from 111mm 4 4in to 94mm 3 7in by moving the 4 rubber feet see diagram at right to match your own Icom transceiver such as IC 91 OH IC 718 etc Rubber feet attached for 111mm 4 4in height at the factory Stick Icom logo plate on the front panel after installation Example of installation with IC 756PRO 111mm 4 4in height Example of installation with IC 91 OH 94mm 3 7in height PANEL DESCRIPTION 1 1 32 Kamiminami Hirano ku Osaka 547 0003 Japan A 6003S 1G Printed in Japan 2001 Icom Inc
Подробная инструкция по подключению и установке источника питания PS-125 для трансиверов. Узнайте, как правильно включить и настроить устройство.