![Xiaomi Robot Vaccum-Mop 2 BHR5055EU [15/401] Using the mopping function](/img/pdf.png)
Xiaomi Robot Vaccum-Mop 2 BHR5055EU [15/401] Using the mopping function
![Xiaomi Robot Vaccum-Mop 2 BHR5055EU [15/401] Using the mopping function](/views2/1860950/page15/bgf.png)
Содержание
- Яиф p.1
- Made in china p.2
- Safety information p.4
- Product overview p.8
- Accessories p.8
- Vacuum mop p.9
- Dust compartment p.10
- Vacuum mop and sensors p.11
- Charging dock p.11
- Install the side brush p.12
- Before use p.12
- Remove protective coverings p.12
- Position and connect the charging dock p.12
- Reset wi fi p.13
- Charge the vacuum mop connect with mi home xiaomi home app p.13
- Start cleaning p.14
- Pausing p.14
- Howto use p.14
- Sleep mode p.14
- More app features p.14
- Using the mopping function p.15
- Omnidirectional wheel p.16
- Care maintenance p.16
- Side brush p.17
- Sensors and charging contacts p.17
- Filter p.18
- Dust compartment p.18
- Mop pad p.19
- Updating the firmware p.20
- Restoring factory settings p.20
- Restarting the vacuum mop p.20
- Resetting consumables p.20
- Charging dock p.20
- Battery p.20
- Weee information p.23
- Vacuum mop charging dock p.23
- Specifications p.23
- Información de seguridad p.24
- Descripción general del producto p.28
- Accesorios p.28
- Aspirador con тора p.29
- Conjunto de la mopa p.30
- Compartimento de polvo p.30
- Cargador p.31
- Aspirador con mopay sensores p.31
- Quitar las cubiertas protectoras colocar y conectar la base de carga p.32
- Instalar el cepillo lateral p.32
- Antes de usar p.32
- Restablecer wi fi p.33
- Cargar el aspirador con mopa conectando con la aplicación mi home xiaomi home p.33
- Más funciones de la aplicación p.34
- Modo suspensión p.34
- Modo de uso p.34
- Comenzar limpieza pausar p.34
- Usar la función de fregado p.35
- Rueda omnidireccional p.36
- Mantenimiento rutinario p.36
- Cepillo p.36
- Cepillo lateral p.37
- Sensores y contactos de carga p.37
- Filtro p.38
- Compartimento de polvo p.38
- Almohadilla de la mopa p.39
- Restaurar los ajustes de fábrica p.40
- Restaurar consumibles p.40
- Reiniciar el aspirador con mopa p.40
- Cargador p.40
- Batería p.40
- Actualizar el firmware p.40
- Información sobre raee p.43
- Especificaciones p.43
- Aspirador con mopa cargador p.43
- Informations sur la sécurité p.44
- Présentation du produit p.48
- Accessoires p.48
- Robot aspirateur laveur p.49
- Ensemble de lavage p.50
- Compartiment à poussière p.50
- Socle de charge p.51
- Robot aspirateur laveur et capteurs p.51
- Retrait des revêtements protecteurs positionnement et branchement du socle de charge p.52
- Instalar el cepillo lateral p.52
- Avant utilisation p.52
- Réinitialiser le wi fi p.53
- Connexion avec l application mi home xiaomi home p.53
- Chargement du robot aspirateur laveur p.53
- Plus de fonctionnalités p.54
- Mode veille p.54
- Mode d utilisation p.54
- Commencer le nettoyage p.54
- Utilisation de la fonction lavage p.55
- Roue omnidirectionnelle p.56
- Entretien et maintenance p.56
- Capteurs et contacts de chargement p.57
- Brosse latérale p.57
- Fi itfo p.58
- Compartiment à poussière p.58
- Serpillière p.59
- Socle de charge p.60
- Réinitialisation des consommables p.60
- Restauration des paramètres d usine p.60
- Redémarrage du robot aspirateur laveur p.60
- Mise à jour du firmware p.60
- Batterie p.60
- Spécifications p.63
- Robot aspirateur laveur charging dock p.63
- Informations deee p.63
- Informazioni di sicurezza p.64
- Panoramica prodotto p.68
- Accessori p.68
- Vacuum mop p.69
- Scomparto raccogli polvere p.70
- Gruppo di lavaggio p.70
- Stazione di ricarica p.71
- Aspirapolvere lavapavimenti e sensori p.71
- Rimuovere i rivestimenti protettivi p.72
- Prima dell uso p.72
- Posizionare e collegare la stazione di ricarica p.72
- Installare la spazzola laterale p.72
- Ripristino della connessione wi fi p.73
- Ricaricare l aspirapolvere lavapavimenti p.73
- Connessione con l app mi home xiaomi home p.73
- Altre caratteristiche dell app p.74
- Modalità risparmio energia p.74
- Modalità d utilizzo p.74
- In pausa p.74
- Avvio della pulizia p.74
- Utilizzo della funzione lavapavimenti p.75
- Spazzola p.76
- Rotella omnidirezionale p.76
- Cura e manutenzione p.76
- Spazzola laterale p.77
- Sensori e linguette di ricarica p.77
- Scomparto raccogli polvere p.78
- Filtro si p.78
- Panno per lavare p.79
- Riavviare l aspirapolvere lavapavimenti p.80
- Batterìa p.80
- Aggiornamento del firmware p.80
- Stazione di ricarica p.80
- Ripristino impostazioni di fabbrica p.80
- Ripristina materiali di consumo p.80
- Vacuum mop stazione di ricarica p.83
- Specifiche tecniche p.83
- Informazioni raee p.83
- Информация по технике безопасности p.84
- Сдайте батареи в организацию по утилизации p.87
- Перед извлечением батарей рекомендуем разрядить их и убедиться что устройство отключено от источника питания выкрутите винт внизу затем снимите крышку p.87
- Отсоедините разъем затем извлеките батареи будьте аккуратны чтобы не повредить корпус батарей и не получить травму p.87
- Литий ионный аккумулятор содержит вещества представляющие опасность для окружающей среды перед утилизацией робота пылесоса с функцией влажной уборки сначала извлеките аккумулятор и утилизируйте или сдайте его на переработку в соответствии с местными законами и правилами страны или региона эксплуатации p.87
- Обзор устройства p.88
- Аксессуары p.88
- Робот пылесос с функцией влажной уборки p.89
- Контейнер для пыли p.90
- Блок для влажной уборки p.90
- Робот пылесос с функцией влажной уборки и датчики p.91
- Зарядная док станция p.91
- Установка боковой щетки p.92
- Снятие защитных крышек p.92
- Расположение и подключение зарядной док станции p.92
- Перед использованием p.92
- Сброс wi fi p.93
- Зарядка робота пылесоса подключение к приложению mi home xiaomi home p.93
- Спящий режим p.94
- Состояние паузы p.94
- Начало уборки p.94
- Инструкция p.94
- Дополнительные функции приложения p.94
- Использование функции влажной уборки p.95
- Уход и техническое обслуживание p.96
- Всенаправленное колесо p.96
- Датчики и контакты зарядки p.97
- Боковая p.97
- Фильтр p.98
- Контейнер для пыли p.98
- Губка для влажной уборки p.99
- Сброс данных о расходных материалах p.100
- Перезапуск робота пылесоса p.100
- Обновление встроенного по p.100
- Зарядная док станция p.100
- Восстановление заводских настроек p.100
- Аккумулятор p.100
- Рао p.101
- Технические характеристики p.103
- Робот пылесос с функцией влажной уборки зарядная док станция p.103
- Информация об утилизации и переработке отходов электрического и электронного оборудования p.103
- Informacje dotycz ce bezpieczeñstwa p.104
- Podczas wyjmowania baterii produkt powinien bye odtqczony od zasilania odkrçcic srubç u dofu i zdjqc pokrywç p.107
- Odtqczyc ztqcze baterii i wyjqc baterie aby uniknqc obrazen nalezy uwazac aby nie uszkodzic komory baterii p.107
- Na czas transporta nalezy upewnic siç ze odkurzacz z mopem jest wytqczony oraz w miarç mozliwosci znajduje siç w oryginalnym opakowaniu p.107
- Jezeli odkurzacz z mopem nie bçdzie uzywany przez dtuzszy czas nalezy natadowac go do petna a nastçpnie wytqczyc i przechowywac w chtodnym i suchym miejscu tadowac odkurzaczz mopem co najmniej raz na 3 miesiqce aby uniknqc nadmiernego roztadowania akumulatora p.107
- Baterie nalezy oddawac do utylizaeji firmie zajmujqcej siç recyklingiem odpadôw p.107
- Akumulator litowo jonowy zawiera substancje niebezpieczne dla srodowiska przed utylizacjq odkurzacza z mopem nalezy najpierw wyjqc akumulator a nastçpnie zutylizowac go lub poddac recyklingowi zgodnie z lokalnymi przepisami i regulacjami prawnymi kraju lub regionu w ktôrym jest uzywany p.107
- Przeglqd produktu p.108
- Akcesoria p.108
- Odkurzacz z mopem p.109
- Zespot myjqcy p.110
- Pojemnik na kurz p.110
- Stacjafadujaca p.111
- Odkurzacz z mopem mi robot czujniki p.111
- Ustawianie i podt czanie stacji ladujqcej p.112
- Przed uzyciem p.112
- Montazszczotki bocznej p.112
- Zdejmowanie oslon ochronnych p.112
- Tqczenie z aplikacjq mi home xiaomi home p.113
- Tadowanie odkurzacza z mopem p.113
- Resetowanie potaczenia wi fi p.113
- Wstrzymywanie p.114
- Wi cej funkcji aplikacji p.114
- Uzytkowanie p.114
- Tryb uspienia p.114
- Rozpoczynanie czyszczenia p.114
- Korzystanie zfunkcji mycia p.115
- Szczotka p.116
- Kofо wie lokie ru n kowe p.116
- Dbanie о urzqdzenie i konserwacja p.116
- Szczotka boczna p.117
- Czujniki styki fadowania p.117
- Pojemnik na kurz p.118
- Wktad myj cy p.119
- Stacjatadujqca p.120
- Resetuj materiaty eksploatacyjne p.120
- Przywracanie ustawieñ fabrycznych p.120
- Ponowne uruchamianie odkurzacza z mopem p.120
- Akumulator p.120
- Aktualizacja oprogramowania ukfadowego p.120
- Pytania i odpowiedzi p.121
- Odkurzacz z mopem stacjafadujqca p.123
- Informacje dotyczqce europejskiej dyrektywy weee p.123
- Danetechniczne p.123
- Sicherheitsinformationen p.124
- Zubehör p.128
- Produktübersicht p.128
- Staubsauger wischer p.129
- Staubbehälter p.130
- Wischtuch aufsatz p.130
- Staubsauger wischer und sensoren p.131
- Ladestation p.131
- Vor der verwendung p.132
- Schutzabdeckung abnehmen die ladestation positionieren und anschließen p.132
- Die seitenbürste montieren p.132
- Wlan zurücksetzen p.133
- Den staubsauger wischer aufladen verbinden mit der mi home xiaomi home app p.133
- Verwendung p.134
- Reinigung beginnen p.134
- Pausiert p.134
- Mehr app funktionen p.134
- Energiesparmodus p.134
- Benutzung der wischfunktion p.135
- Regelmäßige wartung p.136
- B ü rste p.136
- Steuerrad p.136
- Sensoren und aufladekontakte p.137
- Seiten bürste p.137
- Staubbehälter p.138
- Filter p.138
- Wischer p.139
- Werkseinstellungen wiederherstellen p.140
- Staubsauger wischer neu starten p.140
- Ladestation p.140
- Fehlerbehebung p.140
- Aktualisieren auf die neueste firmware p.140
- Weee informationen p.143
- Staubsauger wischer ladestation p.143
- Spezifikationen p.143
- Clhaz yalnizca clhazla birlikte verllen güç kaynagi ünitesi ile birlikte kullanilmalidir bu ürün yalnizca nltelikli teknlsyenlerve sati sonrasi servis ekibi tarafmdan degiçtirilebilen piller içerir p.144
- Bu ürün yalnizca ev ortaminda zemin temizligi için kullanihr ürünü diç mekanlarda zemin olmayan yüzeylerde veya ticari ya da endüstriyel ortamlarda kullanmayin p.144
- Ürünün güvenli kullaniidigindan emin olmak ve tehlikelerden kaçmmak amaciyla 8 ya ve üzerindeki çocuklar fiziksel duyusal veya zih in sel yetmezlikleri ya da deneyim veya bilgi eksi klik le ri bulunan kiçller bu ürünü bir ebeveyn veya vaslnin gozetimi altmda kullanabilir çocuklartarafmdan gozetimsiz blr e kl ide temlzllk ve bakim yapilmamahdir p.144
- Ürünü kullanmadan once bu kilavuzu dikkatlice okuyun ve ileride baçvurmak üzere saklaym p.144
- Çocuklar ürünle oynamamalidir temizlik robotu çahçirken çocuklann ve éveil hayvanlann güvenli bir mesafede bulundugundan emin olun p.144
- Kullanim kisitlamalan p.144
- Güç kablosu hasar gôrürse üreticiden veya servis acentesinden temin edi le bi len ozel bir kablo veya tertibatla degiçtirilme lidir p.144
- Güvenlik bilgileri p.144
- Ürüne genel baki p.148
- Aksesuarlar p.148
- Temizlik robotu p.149
- Toz haznesi p.150
- Paspas grubu p.150
- Temizlik robotu ve sensorler p.151
- Arj standi p.151
- Yan fir ayitakma p.152
- Kullanmadan once p.152
- Koruyucu kil if ian qikarma arj standim konumlandirma ve baglama p.152
- Wi fi i sifirlama p.153
- Temizlik robotunu arj etme mi home xiaomi home uygulamasma baglamhyor p.153
- Uyku modu p.154
- Temizligi ba latma p.154
- Kullanim p.154
- Duraklatma p.154
- Daha fazla uygulama özel ligi p.154
- Paspaslama lev n kullanma p.155
- Çokyônlütekerlek p.156
- Fl tçâ p.156
- Yan fir a p.157
- Senso rler ve arj temas yiizeyleri p.157
- Toz haznesi p.158
- Filtre p.158
- Paspas pedi p.159
- Arj standi p.160
- Yazihmi gíincelleçtirme p.160
- Temizlik robotunu yeniden baçlatma p.160
- Sarf malzemelerini sifirlama p.160
- Pil fabrika ayarlanni geri yükleme p.160
- Weee bilgileri p.163
- Temizlik robotu p.163
- Belirtimler p.163
- Arj standi p.163
- Дз il p.164
- Pljôlxül p.164
- I40l9 1 iòdi ãjl gíji lulslcjlg p.164
- Bluji j p.164
- Pl aöixüil i jgx9 p.164
- I lllrigl ori о p.164
- Bb gíji p.164
- Деи ji õbjlku p.164
- Pib ill с oj jblóxji p.164
- Hõ9 ãjj lo 4ixj õlxõjill i ó jãij p.164
- Aìb gjlloji 11ф jlòbill uxstb ili e oj p.164
- Ддд 9i p.164
- Paóluj il p.164
- Hä9 pljõlujil p.164
- Aulüojlg p.164
- Ûgjbzj jjji lpló billg g9 p.164
- L lsbo 4 blo j lûb_ ji p.164
- Gãlgxji кзллзд j llji jól il hõ9 p.164
- Aqlhilll slúi p.164
- Û9 i jlòbill p.164
- Kuúlgj p.164
- Gxloji lidi p.164
- Afilli p.164
- Õlgluj o p.164
- Joäjloxi p.164
- Gxi3u âxjb giji luaíxjlg jico p.164
- 4ãxoil jlgxs 9i jjlg j l ulc p.164
- Õillí gl asul p.164
- Gl улъсо piu il p.164
- 0 ôj ouzji 9i aji p.164
- Ójáj dl ale öaiöliuoji blgj ibú p.164
- Jlòbill jgllão qc p.164
- Gl с uo5g p.164
- Í9 gl p.164
- Jlòbill elûj p.164
- Gl öjgajto p.164
- Äjlxojig p.164
- Jlòbill p.164
- Gl iüß цзд p.164
- Ãlo j gl xxõjill p.164
- Jlá dl p.164
- Gl gjbji j to3 tuñ il p.164
- _uaaxjb d_ lxji laòjji p.164
- Jlxi_lujl ou i49lbll j lj p.164
- Xul ojlg p.164
- Jljb p9 lgzubojg igj p p.164
- Gl 4jjbsü p.164
- Яедллл p.164
- Téyxx p.164
- Jj a1c ljbj l p.164
- Gkuül gl i ójáj d lubj íji uul ojlg djx j o oji paájluj il p.164
- Уъсуи p.164
- T lil il p.164
- Iàj 111 õwgojig p.164
- Gkuüill p.164
- Зцрл p.164
- Puui õaclâ jxo99 jb gíji lui ojlg p.164
- Isgioj o il voi lo 0aò gl j i iri go j iq 49jjtoj p.164
- Eb öiji p.164
- I l 4ià i p.165
- I lujxzjlg p.166
- Sllaji p.169
- Ptall òacl9 p.169
- Ojl 0 11 d ò pi zi p.169
- Lui ojl9 p.169
- Õjxlâ ijsljji jailli äjljl p.170
- Ìujlsji öliyji p.170
- Wi fi 2 jlix ii mfüj p.171
- J s jxslsjb ä uiojig p.171
- 9 o lcl p.171
- Qj9 juxlib p.171
- J ola jaji j mi home xiaomi home p.171
- 9 15 9 4iko a a oalcl p.171
- Oll ji p.171
- J lgzji p.171
- 311 öljlkoji p.171
- Ol _ l isli j p.171
- J joixlu mi home xiaomi home jaj pjai j p.171
- 3 t aj 19 5 1 j kgzi qziu og j p.171
- Oj ßjb p.171
- J jogzi p.171
- 11 ifft 9 lft i c p.171
- Oag gxji p.171
- Islojig ix xuxoji pci p.171
- O loli 9i p.171
- Ijolaji t jjg l ogj p.171
- Gxioji ila p.171
- Mi home xiaomi home ko jlajill p.171
- Gjl cu ill ujbji j o hi lg mi home xiaomi home jaj gxsl p.171
- Ljläjj 4 jbj iji cualizjig p.171
- Gjb chuj p.171
- Jxloiug p.171
- Gj giftig p.171
- Jlö9jji p.171
- G a xj 9 lr j p.171
- Jjlkujj j_ol ji p.171
- Ji auäizjig p.171
- Djjilxji p.171
- Jbj ij i lujizjig 4 zxoji p.171
- Bgjgi xiaomi home jaj o ob p.171
- Öclao p.171
- J9i jjuaji p.171
- A äji jaji o j go p.171
- _ji öjlblll xü p.171
- J1 9 clijl p.171
- 9 qzx09luj p.171
- Улльллл с jj p.172
- Jgí jl g 9 p.172
- V ri i p.173
- Sölxuoji p.175
- Sujill ö p.175
- Obdl _pl ji p.175
- Jq il d ii л p.175
- Ijxlu lji ij оод ддл p.175
- I ãôbji õli 1 tõ liuj сх э p.175
- G gzji p.175
- Doc li p.175
- Djvxlooj i i 1 p.175
- Dajjíu glolöji j ölöbc p.175
- Смзьл ôl p.175
- D_oki9 p ks ôjl p.175
- Ôji jlzúl blñjg ö p.175
- Çj öjg goji cljxixll p.175
- Äxjbjßiji lö ojlg p.175
- Vã hhíb p.175
- T x i_p õdlcl p.175
- Х 1 du g gj j p.177
- Д ьд uuxuji j 3 p.177
- Üljll p.177
- Ui jjl p.177
- Q kixj p.177
- Pj ô o gâ p.177
- Lugillg p.177
- Jjlàji jjl p.177
- Bójl pjx p.177
- 9 jj laâ lg p.177
- Âxualojlg яллхио oji jxãáó xcl p.178
- Jlo51l igxxküji ij p.178
- Ádbj ji p.178
- Jlm jiolji сын p.178
- Àxxu oxkll û9x9 yo p.178
- Jjlkbji p.178
- _ iil9 p.178
- Jax _pxüill c_jlxji дс1 ij p.178
- V ft i kl i 71 pq p.178
- J ill _д 15 z p.178
- Uíji g ztoji p.178
- I ojlci jj lz p.178
- I ig a p.178
- Uji 1 11 99 p.178
- Huíais p.178
- Pltài j p j joj iil lalâxllo p.178
- G m home xiaomi home xkü з1 p.178
- Зшклпд p.178
- Pcuji õaclã p.178
- D_ol l ft 1 0 a i ii ã г iq p.178
- Дхмло ú9 9 ij cûji öaxls cobj sji xu iizjig p.178
- Ojgxgxji jlodibji gj 9 p.178
- Colili liojjxj p.178
- Ûljàcl i_yji l ulcojlg xxuxxxji ku ó õjlcl 1 db лдххо g ózxoji p.178
- O lc lôlûxu jl plaxäxüji cidi алх 4jgx_ lo j p.178
- Clicùj p.178
- Õljlxcl õjlalujl p.178
- Lgj 10 p.178
- Õaxj _ jjji p.178
- Lasuól dj p.178
- Cbíll cjlc ó9 í j p.178
- Õ idl p.178
- L9 ccll coill jlgoji p.178
- 4xsjx _дс âçlj_ íji luaslojlg 4xx xkoji sglxj p.178
- Òbj ill luaslojlg 4xxu oxji c à99j bl p.178
- L uaíxjlg p.178
- 3113 jí p.178
- Í озк ijj p.178
- L ljdó õ ilei p.178
- 0 2 õgjgj p.178
- Llxoul p.179
- Gllaìùjji p.181
- Тп ш p.182
- Ûdelu uulkl p.185
- Лике aial p.186
- Ufflldl p.186
- Rial euue каш еакке p.186
- Q aeiuxu emint emiau rial uadu p.186
- Каш artice p.188
- Hill filili p.188
- Bine fflial luufflccq fflinc fflial luufflciq p.188
- Тксии иак си aaidaucnjicainl икге кф шиеи ни ашиш 1еш p.189
- Или еяшс илиоь коси ucifoar kl л çci p.189
- Виехл kmdc a cal auxur miraba фак p.189
- Utdia лаш нанеси iimud p.189
- Ulcc nu uclfflu uxl p.189
- Wi fi dll n p.190
- Qoiwn аюуп лгуо p.190
- Mi home грхр ьзкп nwxnni лтплп p.190
- Niel uíaiuua p.191
- Licitili ciûgiu cng dxiu p.191
- I a gu q 1хаз а p.191
- Cullnllí cng dk do ií p.191
- At u ainc u aiau cng dk u эшон 1л1 p.191
- Каш p.191
- Кати t u aiíaií p.191
- Ишиц алоси uaaar p.191
- Икс raiti p.191
- Uuuw arti стоите up шиш nal дели нс emial ardi цса curuau adu p.191
- Uraucu p.191
- Ungqdkar u aiau çcl líciciu p.191
- U a ai a p.191
- Ьэпп niiï лк лпуь tnby 131л d nn ьэпь d nn d n п о1л ьк p.192
- О уэга юплшпь p.192
- Na dwn л u0440з1па win w p.192
- D nil ьэпь по п 1к npn nnin утл ьк лш лоп узп пь пэ p.192
- M pna ihm m pannnw p.193
- Laanonw лгите плп папуа mhihan nwnann hw чрпп ha лптуа p.193
- Impon aw w ay amn min ynhi impnh hahan лк атлп з p.193
- Aîi mw p.193
- Ту i hv ynhiптап лк wann ipnn nmpnh nwnann лк птлп p.193
- Липапп зоп лк прл qonwn aniwn hw л wnann лк опп p.193
- Qoiwn акпип лк pan p.193
- Nwonn pn лк konnh па mpannn m у p.193
- Nwnana p.193
- N ïnm hihinn лата nhroai phah aire non p.193
- N dlvj приял p.193
- Mva ann haha n nn pwm qwiwn akiwn лк pan p.193
- Atea icdiliu иск cuben p.194
- Px n nitdn dld n p.197
- Nwi pn 1375 p.197
- N u2019n nmanbpio n p.197
- Donn d min p.197
- Гйуцш cglklu p.198
- Qoiw aww p.200
- Informações de segurança p.201
- Visão geral do produto p.205
- Acessórios p.205
- Aspirador com тора p.206
- Unidade de lavagem p.207
- Compartimento do pó p.207
- Estação de carregamento p.208
- Aspirador com mopa e sensores p.208
- Remover as capas protetoras p.209
- Posicionar e ligar a estação de carregamento p.209
- Instalar a escova lateral p.209
- Antes de utilizar p.209
- Reiniciar wi fi p.210
- Carregar o aspirador com тора ligar à aplicação mi home xiaomi home p.210
- Inicie a limpeza p.211
- Como utilizar p.211
- Colocação em pausa p.211
- Modo de suspensão p.211
- Mais funcionalidades da aplicação p.211
- Utilizar a função de lavagem p.212
- Rodaomnidirecional p.213
- Manutenção de rotina p.213
- Sensores e contactos de carregamento p.214
- Escova lateral p.214
- Limpar o filtro lavável p.215
- Compartimento do pó e filtro p.215
- Pano mopa p.216
- Reiniciar o aspirador com mopa p.217
- Reiniciar consumíveis p.217
- Estação de carregamento p.217
- Bateria restaurar definições de fábrica p.217
- Atualizar o firmware p.217
- Perguntas frequentes p.218
- Informações relativas aos reee p.220
- Especificações p.220
- Aspirador com тора estação de carregamento p.220
- Нформацт про безпеку p.221
- Опис продукту p.225
- Аксесуари p.225
- Миючий робот пилосос p.226
- Миючий модуль p.227
- Вщс к для пилу p.227
- Миючий робот пилосос 1 датчики p.228
- Док станц1я для заряджання p.228
- Установления боковой щп ки p.229
- Перед використанням p.229
- Знмть захисне покриття p.229
- Виберпъ мюце для заряднот док станцп та пщключпь н p.229
- Заряд1ть миючий робот пилосос p.230
- Скидання налаштувань wi fi p.230
- Пщключення за допомогою додатка mi home або xiaomi home p.230
- Ыльше функцм додатка p.231
- Режим сну p.231
- Прибирания p.231
- Пауза p.231
- Нструкц1я p.231
- Використання функцнбологого прибирания p.232
- Щ1ткэ p.233
- Усеспрямоване колвс p.233
- Регуля рне технике обслуговування p.233
- Датчики та заряди контакти p.234
- Оновлення вбудованого пз p.237
- Док станц1я для заряджання p.237
- Вщновлення заводських налаштувань p.237
- Батарея p.237
- Скидання даних про витратж матерели p.237
- Перезавантаження миючого робота пилососа p.237
- Поширеж запитання p.238
- Характеристики p.240
- Нформац1я щодо weee p.240
- Миючий робот пилосос док станц я для заряджання p.240
- Bezpecnostní nformace p.241
- Рп51и5епзм p.245
- Ргеыес о уугоьки p.245
- Vysavacs mopem p.246
- Sestava pro mopovani p.247
- Pfihradka na prach p.247
- Vysavac s mopem a senzory p.248
- Nabíjecí dokovací stanice p.248
- Odstranéni ochrannych krytù p.249
- Instalace bocniho kartàce p.249
- Umisténi a pfipojeni nabijeci dokovaci stanice p.249
- Pred prvnim pouzitim p.249
- Resetování wi fi p.250
- Pfipojení k aplikaci mi home xiaomi home p.250
- Nabiti vysavace s mopem p.250
- Zpùsob pouziti p.251
- Zahajte ùklid p.251
- Rezim spànku p.251
- Pozastaveni p.251
- Dalsi funkce aplikace p.251
- Pouzití funkce mopování p.252
- Vsesmérové kolecko p.253
- Rutinní údrzba p.253
- Kartác p.253
- Senzory a nabíjecí kontakty p.254
- Cisténí pratelného p.255
- Prihrádka na prach a filtr p.255
- Poduska тори p.256
- Restartovàni vysavace s mopem p.257
- Resetovàni spotfebniho material u p.257
- Nabijeci dokovaci stanice p.257
- Baterie obnoveni tovàrniho nastaveni p.257
- Aktualizace firmwaru p.257
- Casté dotazy p.258
- Vysavac s mopem nabijeci dokovaci stanice p.260
- Parametry p.260
- Informace o oeez p.260
- Пärpoфopí8ç аофалесар p.261
- Ettlokóttnoq npolóvtoç p.265
- Açeoouáp p.265
- Popnotikií okoúna офоиууаротра p.266
- Aicrra r otjjouyyapiopatoc p.267
- Xcopot ouxxoyr p.267
- Zxaôpóç óprior ç p.268
- Popnotikií окоипа офоиууаротра kaiaiaôqxiípeç p.268
- Пplv апо тг хрп п p.269
- Афар аг проотатеит1ксьу калирратсоу p.269
- Tono0exqoq naaivqq роиртоас p.269
- Tono0exqoq kai ouvscoq тои ага0рои фортю p.269
- Фортюг xqç рорпопкрр акоипар офоиууар отрар p.270
- Епауафора wi fi p.270
- Riverai oüvöeoq ретпуефарроуг mi ноте xiaomi ноте p.270
- Riepiaoótepa xapakrqpioriká rqç e appoyqç p.271
- Riaúoq p.271
- Katáaraaq aôpáveiaç p.271
- Evapçq kasapiopoú p.271
- Àeitoupyiac atpouyvapiopatoc p.272
- Xpiioq p.272
- Фрсл тсба p.273
- Tpoxóq exeúqepqp перютрофрр p.273
- Auvxríprar p.273
- Popnorikq окоипа офоиууартотра кат aioôqxiípeç p.274
- Пелца офоиууарорато am náraika0apiapóçpietáanó ká0e xpúoq p.276
- Opovtíôa kai auvtripqar p.276
- Eqpeílúoq euvimárai va avxikaôiaráte xonéapa афоиууар арато ká0e 3 éœç 6 púveç p.276
- Zxaqpóç póprioqç p.277
- Mncccapía p.277
- Evqpépiooq rou uàikoàoyiapikoú p.277
- Enavekkívqoq xqç popnotikqç okoúnaç ocjjouvvapíotpaç p.277
- Enava j opá epyootaoiakcóv puspíoscov p.277
- Enava j opá avaàióoipiov p.277
- Uvqôsl p.278
- Epwxríaelç p.278
- Плг рофоре анне p.280
- Тех ька характпрюткка p.280
- Рорпоикг окоипа офоиууаротра та0ро фортюпс p.280
- Informati privine siguranta p.281
- Prezentare generalä a produsului p.285
- Accesorii p.285
- Aspirators mop p.286
- Compartiment pentru praf p.287
- Accesoriu pentru spalare cu mopul p.287
- Ìndepàrtarea ambalajelor de protectie p.289
- Instalarea periei laterale p.289
- Inainte de utilizare p.289
- Amplasarea si conectarea suportului de ìncàrcare p.289
- Încàrcarea aspiratorului eu mop p.290
- Se conecteazä cu aplicatia mi home xiaomi home p.290
- Resetarea conexiunii wi fi p.290
- Altefunctii ale aplicatiei p.291
- Punereaîn pauzà p.291
- Pornirea curätärii p.291
- Modul repaus p.291
- Mod de utilizare p.291
- Utilizarea functiei de spalare cu mopul p.292
- Ro ata o m n i d recti o n al p.293
- Perie se recomandá curátarea ssplámánalá p.293
- Intretinerea de rutina p.293
- Senzori si contacte de ìncàrcare p.294
- Perie lateralà p.294
- Intretinerea de rutinà p.295
- Curàtarea filtrului lavabil p.295
- Compartimentul pentru praf sì filtro i p.295
- Lavetà mop p.296
- Baterie p.297
- Actualizarea firmware ului p.297
- Suportdeìncarcare p.297
- Restaurarea setarilor din fabrica p.297
- Resetarea consumabilelor p.297
- Repornirea aspiratorului cu mop p.297
- Intrebäri frecvente p.298
- Specificati p.300
- Informati deee p.300
- Aspirators mop suportdeíncãrcare p.300
- Sikkerhedsinformation p.301
- T lbeh0r p.305
- Produktoversigt p.305
- Ro botst0vs u ge r m o p pe p.306
- St0vbeholder p.307
- Moppekomponent p.307
- Robotst0vsuger moppe og sensorer p.308
- Ladestation p.308
- Placer og tilslut ladestationen p.309
- Installer sidebgrsten p.309
- For brug p.309
- Fjern beskyttelsesafdækninger p.309
- Tilslutning med mi home xiaomi home appen p.310
- Oplad robotst0vsuger moppen p.310
- N ulstil wi fi p.310
- Start reng0ring p.311
- Flere app funktioner p.311
- Dvaletilstand p.311
- Brugsanvisning p.311
- Brug af moppefunktionen p.312
- Pleje og vedligeholdelse p.313
- Drejehjul p.313
- Sensorer ogladekontakter p.314
- S deb0rste p.314
- St0vbeholde г p.315
- Filter p.315
- Moppepude p.316
- Opdatering af firmware p.317
- Nulstilling af forbrugsvarer p.317
- Ladestation p.317
- Genstart robotst0vsuger moppen p.317
- Batteri gendannelse af fabriksindstillinger p.317
- Ofte stillede sporgsmäl p.318
- Weee oplysninger p.320
- Specifikationer p.320
- Robotst0vsuger moppe ladestation p.320
- Säkerhetsinformation p.321
- Til ibehor p.325
- Produktôversikt p.325
- Vakuummopp p.326
- Moppenhet p.327
- Dammbehällare p.327
- Vakuummopp och sensorer p.328
- Laddningsdocka p.328
- Positionera och anslut laddningsdockan p.329
- Montera sidoborsten p.329
- Innan användning p.329
- Avlägsna skyddandeförpackningsmaterial p.329
- Äterställ wi fi p.330
- Ladda vakuummoppen p.330
- Ansluta med mi home xiaomi home appen p.330
- Sä använder du p.331
- Sovläge p.331
- Fier app funktioner p.331
- Börja rengör pausar p.331
- Använda moppningsfunktionen p.332
- Skötsel och underhâll p.333
- Omnihjul p.333
- Borste p.333
- Sidoborste p.334
- Sensoreroch laddningskontakter p.334
- Filter p.335
- Dammbehallare p.335
- Äterställa fabriksinställningar p.337
- Äterställ förbrukningsvaror p.337
- U p p d ate ra fi rm wa re p.337
- Starta om vakuummoppen p.337
- Laddningsdocka p.337
- Batteri p.337
- Vanliga fragor och svar p.338
- Vakuummopp laddningsdocka p.340
- Specifikationer p.340
- Weee information p.340
- Turvallisuustiedot p.341
- Tuotteen yleiskuva p.345
- Lisävarusteet p.345
- Imurimoppi p.346
- Polykotelo p.347
- Latausasema p.348
- Imurimoppi ja antu rit p.348
- Poista suojukset p.349
- Ennen kàyttòà p.349
- Asenna sivuharja p.349
- Asemoijayhdistà latausasema p.349
- Nollaa wi fi p.350
- Lataa imurimoppi yhdistäminen mi home xiaomi home sovellukseen p.350
- Kàyttò p.351
- Aloita puhdistaminen p.351
- Lisaasovelluksen ominaisuuksia p.351
- Lepotila p.351
- Moppitoiminnon kâyttâminen p.352
- Monisuuntainen pyörä p.353
- Hoito ja huolto p.353
- Tunnistimetja latauskontaktit p.354
- Sivuharja p.354
- Latausasema p.357
- Laiteohjelman päivittäminen p.357
- Käynnistä imurimoppi uudelleen p.357
- Kulutustavaroiden nollaaminen p.357
- Akku tehdasasetusten palauttaminen p.357
- Weee tiedot p.360
- Tiedot p.360
- Imurimoppi latausasema p.360
- Sikkerhetsinformasjon p.361
- Til beh0r p.365
- Produktoversikt p.365
- St0vsugermopp p.366
- St0vkammer p.367
- St0vsugermopp og sensorer p.368
- Ladedokk p.368
- Posisjoner og koble til ladedokken p.369
- Installer sidebgrsten p.369
- For bruk p.369
- Fjern beskyttelsesdeksler p.369
- Verbinding maken met de mi home xiaomi home app p.370
- Tilbakestill wi fi p.370
- Lad st0vsugermoppen p.370
- Hvordan i bruk p.371
- Hvilemodus p.371
- Fiere appfunksjoner p.371
- Start rengjaring p.371
- Sette pä pause p.371
- Bruke moppefunksjonen p.372
- Rundsträlende hjul p.373
- Pleie og vedlikehold p.373
- B0 tste p.373
- Sideb0rste p.374
- Sensorer ogladekontakter p.374
- St0vkammer p.375
- Filter p.375
- Tilbakestille forbruksartikler p.377
- Start stavsugermoppen pä nytt p.377
- Oppdatere fastvaren p.377
- Ladedokk p.377
- Batteri gjenopprette fabrikkinnstil linger p.377
- Vanlige sporsmäl p.378
- Weee informasjon p.380
- St0vsugermopp ladedokk p.380
- Spesifikasjoner p.380
- Veiligheidsinformatie p.381
- Productoverzicht p.385
- Accessories p.385
- Robotstofzuiger dweil robot p.386
- Stofcompartiment p.387
- Dweilsysteem p.387
- Robotstofzuiger dweilrobot en sensoren p.388
- Robotstofzuiger dweil robot en sensoren p.388
- Oplaadstation p.388
- Het oplaadstation plaatsen en verbinden p.389
- Doe vóór gebruik het volgende p.389
- De zijborstel bevestigen p.389
- Beschermkappen verwijderen p.389
- Wifi resetten p.390
- Verbinding maken met de mi home xiaomi home app p.390
- De robotstofzuiger dweilrobot opladen p.390
- Slaapstand p.391
- Pauzeren p.391
- Meer app functies p.391
- Het reinigen starten p.391
- Gebruik p.391
- De dweilfunctie gebruiken p.392
- Zwenkwiel p.393
- Verzorging en onderhoud p.393
- Bo tstel p.393
- Zijbo tstel p.394
- Sensoren en oplaadcontacten p.394
- Stofcompartiment p.395
- Filter p.395
- Dweil doek p.396
- Verbruiksgoederen resetten p.397
- Oplaadstation p.397
- Fabrieksinstellingen herstellen p.397
- De robotstofzuiger dweilrobot opnieuw starten p.397
- Bijwerken van de firmware p.397
- Batterij p.397
- Veelgestelde vragen p.398
- Specificaties p.400
- Robotstofzuiger dweil robot oplaadstation p.400
- Aeea informatie p.400
- Епюк p.401
Похожие устройства
-
 Xiaomi Mi Roborock Sweep OneРуководство по эксплуатации
 -
 Xiaomi Mi Robot Vacuum SKV4022GLРуководство по эксплуатации
 -
 Xiaomi Robot Vacuum-MopРуководство по эксплуатации
 -
 Xiaomi Mi Robot Vacuum-Mop 2 RUИнструкция по эксплуатации
 -
 Xiaomi Mi Robot Vacuum-Mop 2 Lite RUИнструкция по эксплуатации
 -
 Xiaomi Mi Robot Vacuum-Mop 2 Ultra (BHR5195EU)Инструкция по эксплуатации
 -
 Xiaomi Mi Robot Vacuum-Mop 2 PRO (BHR5204EU)Инструкция по эксплуатации
 -
 Xiaomi Mi Robot Vacuum-Mop 2 Pro (BHR5044EU)Инструкция по эксплуатации
 -
 Xiaomi Robot Vacuum-Mop 2 Lite BHR5217EUИнструкция по эксплуатации
 -
 Xiaomi Robot Vacuum-Mop Essential SKV4136GLИнструкция по эксплуатации
 -
 Polaris PVCR G2 0826 Wi-Fi IQ Home BlackИнструкция по эксплуатации
 -
Polaris PVCR G2 0826 Wi-Fi IQ Home WhiteИнструкция по эксплуатации
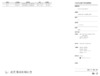
Using the Mopping Function 3 Install the mopping assembly To install the mopping assembly slide it into the back of the vacuum mop 1 Install the mop pad until it clicks into place Dampen the mop pad and wring out excess water Slide the pad all the way into the slot of the water tank until it is securely in place 4 Start mopping Press the button O or use the Mi Home Xiaomi Home app to start the cleanup The vacuum mop will automatically recognize the mopping assembly and begin mopping and dispensing water as needed 2 Fill the water tank Open the water tank lid fill the tank with water then securely close the lid Notes Only use the mopping mode when someone is al home To prevent the vacuu m f rom entering carpeted areas objects may be used The mop pad should be cleaned after every 30 minutes of uselo ensure adequate waler flow and cleaning effectiveness 5 Remove the mopping assembly After the vacuum mop finishes cleaning and returns to the charging dock press the side clips of the mopping assembly inward and pull to remove the assembly Notes Do not add hoi waler to the waler tank as this may cause the lank lo become deformed To avoid clogging do nol add any clean ing agenls or disinfeclan Is to the waler lank Note When the vacuum mop is charging or not in use remove the mopping assembly Pour out all remaining waler in the tank and clean the mop pad lo prevent mildew or lingering odors 12