![Brother FAX 1170 ч.1 [24/50] Installing fax machine external two line tad and two line telephone](/img/pdf.png)
Brother FAX 1170 ч.1 [24/50] Installing fax machine external two line tad and two line telephone
![Brother FAX 1170 ч.1 [24/50] Installing fax machine external two line tad and two line telephone](/views2/1965648/page24/bg18.png)
14
CHAPTER TWO
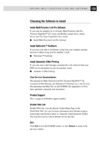
Converting Telephone Wall Outlets
There are three ways to convert to an RJ11 receptacle. The first two ways may
require assistance from the telephone company. You can change the wall outlets
from one RJ14 jack to two RJ11 jacks. Or, you can have an RJ11 wall outlet
installed and slave or jump one of the phone numbers to it.
The third way is the easiest: Buy a triplex adapter. You can plug a triplex adapter
into an RJ14 outlet. It separates the wires into two separate RJ11 jacks (Line 1,
Line 2) and a third RJ14 jack (Lines 1 and 2). If your fax machine is on Line 1,
plug the fax machine into L1 of the triplex adapter. If your machine is on Line 2,
plug it into L2 of the triplex adapter.
RJ14
RJ11
Triplex Adapter
RJ14
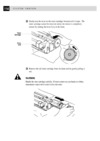
Installing Fax Machine, External Two-Line TAD,
and Two-Line Telephone
When you are installing an external two-line telephone answering device (TAD)
and a two-line telephone, your fax machine must be isolated on one line at both
the wall jack and at the TAD. The most common connection is to put the fax
machine on Line 2, which is our assumption in the following steps. The back
of the two-line TAD must have two telephone jacks: one labeled L1 or L1/L2, and
the other labeled L2. You will need at least three telephone line cords, the one that
came with your fax machine and two for your external two-line TAD. You will
need a fourth line cord if you add a two-line telephone.
1
Place the two-line TAD and the two-line telephone next to your fax machine.
2
Plug one end of the telephone line cord for your fax machine into the L2
jack of the triplex adapter. Plug the other end into the LINE jack on the left
side of the fax machine.
3
Plug one end of the first telephone line cord for your TAD into the L1 jack of
the triplex adapter. Plug the other end into the L1 or L1/L2 jack of the
two-line TAD.
Содержание
- Owner s manual p.1
- Fax 1170 fax 1270 mfc 1770 mfc 1780 p.1
- Year 2000 compliant p.2
- If you need to call customer service p.2
- For customer service p.3
- Fax back system p.3
- Brother on the world wide web p.3
- Brother numbers p.3
- Brother bulletin board p.3
- Notice disclaimer of warranties for usa and canada p.4
- Ordering accessories and supplies p.5
- Table of contents p.6
- Sending faxe p.8
- Receiving faxe p.8
- Dialing option p.8
- Specification p.10
- Packing and shipping the fax machin p.10
- Option for fax 1170 and fax 1270 p.10
- Multi function lin p.10
- Using this manual p.11
- Introduction p.11
- Fax tones and handshake p.12
- About fax machines p.12
- Ecm error correction mode p.13
- Fax 1170 control panel overview p.14
- C h a p t e r o n e p.14
- 18 19 20 21 16 15 p.14
- I n t r o d u c t i o n p.15
- Fax 1270 control panel overview p.15
- 6 7 7 10 11 12 8 9 p.15
- 18 19 20 21 16 15 22 p.15
- Mfc 1770 1780 control panel overview p.16
- C h a p t e r o n e p.16
- 18 19 20 16 15 p.16
- Caution p.17
- Assembly and connections p.17
- Packing list p.18
- Make sure you have the following items p.18
- C h a p t e r t w o p.18
- Choosing a location p.19
- Attach the document support p.19
- Assembly p.19
- Install the printing cartridge p.20
- Attach recording paper support p.20
- Install recording paper p.21
- Connect the power cord p.22
- Connect the handset p.22
- Two line phone system p.23
- Special line considerations p.23
- Roll over phone lines p.23
- Connect the telephone line p.23
- Installing fax machine external two line tad and two line telephone p.24
- Converting telephone wall outlets p.24
- Multi line connections pbx p.25
- Sequence p.26
- Custom features on your phone line p.26
- Connecting an external telephone answering device tad p.26
- Connections p.27
- Outgoing message ogm p.28
- Connecting an external telephone p.28
- Fax settings p.29
- Enter month xx p.29
- Entering text p.30
- Setting station id p.30
- Special characters and symbols p.31
- Repeating letters p.31
- Making corrections p.31
- Inserting spaces p.31
- Storing one touch dial numbers p.32
- One touch dialing p.33
- Storing speed dial numbers p.34
- Speed dialing p.34
- 05 enter set p.34
- Setup group go enter set p.35
- Setting groups for broadcasting p.35
- Changing one touch and speed dial numbers p.35
- Setting beeper level p.36
- Name enter set p.36
- Memory storage p.36
- User friendly programming p.37
- On screen programming p.37
- When you see alternating displays the lcd sometimes alternates between the currently selected option and a help message giving brief instructions about how to proceed the display you ll probably see most often is shown below showing you when you place a document in the feeder that you can dial a number and send a fax or you can make a copy p.38
- Temp settings function description factory set more info p.38
- If you have a basic understanding of how to program a fax machine you can perform most of the programming settings without the owner s manual to help you understand the function selections options and settings that are found in your fax programs use the function selection table below p.38
- Function selection table p.38
- Fax no start copy press copy p.38
- Alternating displays p.38
- User options function description factory set more info p.39
- Set auto dial function description factory set more info p.39
- Print reports function description factory set more info p.39
- Cancel job function description factory set more info p.39
- Tel options function description factory set more info p.40
- Setup system function description factory set more info p.40
- Remote fax opt only for fax 1270 mfc 1770 and mfc1780 function description factory set more info p.41
- Interrupt function description factory set more info p.41
- Sending faxes p.43
- Basic fax operation p.43
- Manual transmission p.44
- Contrast setting p.44
- Select answer mode p.45
- Receiving faxes p.45
- Manual and automatic fax redial p.45
- Automatic transmission p.45
- Easy receive p.46
- Setting ring delay p.47
- Setting f t ring time p.47
- Ring time xx sec p.47
- Speaker volume p.48
- Setting the handset volume p.48
- Ring volume p.49
- Rcd paper p.49
- Smoothing p.49
- Setting recording paper size p.49
- Reduction p.50
- Printing a reduced incoming document p.50
Похожие устройства
-
 Brother 1350 MРуководство по эксплуатации
 -
 Brother MFX-1200 ч.4Руководство по эксплуатации
 -
 Brother MFX-1200 ч.3Руководство по эксплуатации
 -
 Brother MFX-1200 ч.2Руководство по эксплуатации
 -
 Brother MFX-1200 ч.1Руководство по эксплуатации
 -
 Brother FAX-1575mc ч.4Руководство по эксплуатации
 -
 Brother FAX-1575mc ч.3Руководство по эксплуатации
 -
 Brother FAX-1575mc ч.2Руководство по эксплуатации
 -
 Brother FAX-1575mc ч.1Руководство по эксплуатации
 -
 Brother FAX 2750 ч.5Руководство по эксплуатации
 -
 Brother FAX 2750 ч.4Руководство по эксплуатации
 -
 Brother FAX 2750 ч.3Руководство по эксплуатации