![Brother FAX-1575mc ч.2 [20/30] Setup send](/img/pdf.png)
Brother FAX-1575mc ч.2 [20/30] Setup send
![Brother FAX-1575mc ч.2 [20/30] Setup send](/views2/1965664/page20/bg14.png)
6 - 1
SETUP SEND
6
Setup Send
Before You Begin
Before you begin sending faxes, make sure you read all the instructions and cautions
for placing originals in the automatic document feeder.
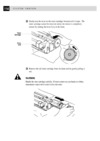
Automatic Document Feeder (ADF)
■ Originals must be between 5.8 and 8.5 inches wide and between 5.9 and 23.7 inches
long. Your fax machine can scan an image only 8.2 inches wide, regardless of the
paper width.
■ Make sure you place the original face down, top edge first in the ADF.
■ Adjust the paper guides to fit the width of your original.
■ The ADF can hold up to 20 pages (17lb -20 lb), feeding each one individually through
the fax machine. Use standard (17 lb –24 lb) paper when using the ADF; if you’re
using heavier paper, feed each sheet individually to prevent paper jams.
■ Make sure originals written with ink are completely dry.
DO NOT use curled, wrinkled, folded or ripped paper, or paper with staples, paper
clips, paste or tape attached. DO NOT use cardboard, newspaper or fabric.
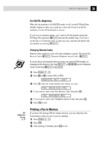
If you want to change from Standard resolution, press Resolution to select the type
of original before you send the fax. (See Resolution, page 6-6.)
Paper guides
Содержание
- Tel service p.1
- Setup receive 3 setup send p.1
- Select set p.1
- Navigation keys p.1
- Initial setup p.1
- To access the menu press menu set p.2
- The factory setting option is shown in bold p.2
- O n s c r e e n p r o g r a m m i n g p.2
- Main menu menu selections options descriptions page p.2
- To access the menu press menu set p.3
- The factory setting option is shown in bold p.3
- O n s c r e e n p r o g r a m m i n g p.3
- Main menu menu selections options descriptions page p.3
- The factory setting option is shown in bold p.4
- O n s c r e e n p r o g r a m m i n g p.4
- Main menu menu selections options descriptions page p.4
- To access the menu press menu set p.4
- To access the menu press menu set p.5
- The factory setting option is shown in bold p.5
- O n s c r e e n p r o g r a m m i n g p.5
- Main menu menu selections options descriptions page p.5
- To access the menu press menu set p.6
- The factory setting option is shown in bold p.6
- O n s c r e e n p r o g r a m m i n g p.6
- Main menu menu selections options descriptions page p.6
- Setting station id p.7
- Setting date and time p.7
- Initial setup p.7
- Getting started p.7
- Notice p.8
- Inserting spaces p.8
- Details for entering text p.8
- Special characters and symbols p.9
- Setting the speaker volume p.9
- Repeating letters p.9
- Making corrections p.9
- Warning p.10
- Choosing the handset volume for volume amplify p.10
- Volume amplify p.11
- Vol amplify off p.11
- Setting volume amplify p.11
- Setting the ring volume p.11
- Setting beeper volume p.11
- Permanent p.11
- Beeper p.11
- Caller id p.12
- Area code 908 p.12
- Area code 000 p.12
- Tone pulse p.12
- Setting up your area code usa only p.12
- Setting tone pulse dialing mode p.12
- Memory storage p.12
- Dialing tone p.12
- Dialing pulse p.12
- Setup receive p.13
- Select receive mode p.13
- Basic receiving operations p.13
- To select or change your receive mode p.14
- Mc msg ctr p.14
- Manual p.14
- Fax tel p.14
- Fax only p.14
- Ring delay p.15
- F t ring time p.15
- Setting ring delay p.15
- Setting f t ring time p.15
- Ring time 20 sec p.15
- Record fax tel outgoing message f t ogm p.16
- Easy receive p.16
- Yes 2 no change reduction p.17
- Setting paper size p.17
- Reduction p.17
- Recommended reductions p.17
- Printing a reduced incoming fax p.17
- Operation from external or extension telephone p.18
- Advanced receiving operations p.18
- Polled tx p.19
- Enter fax no p.19
- Dialing p.19
- Accepted p.19
- Setting up sequential polling receive p.19
- Setting up for polled transmit p.19
- Polling rx on p.19
- Polling rx p.19
- Polling p.19
- Polled tx on p.19
- Setup send p.20
- Before you begin p.20
- Automatic document feeder adf p.20
- Manual transmission p.21
- Manual and automatic fax redial p.21
- Automatic transmission p.21
- Confidential p.22
- Composing electronic cover page p.22
- Comment off p.22
- Basic sending operations p.22
- Urgent p.22
- Quick scan fax transmission p.22
- Please call p.22
- User defined p.23
- Urgent p.23
- Please call p.23
- Other settings p.23
- Coverpage on p.23
- Coverpage off p.23
- Cover page for next fax only p.23
- Confidential p.23
- Comment off p.23
- Always send a cover page p.23
- Accepted p.23
- Comment off p.24
- Accepted p.24
- Using a printed cover page p.24
- User defined p.24
- Urgent p.24
- Please call p.24
- Other settings p.24
- Coverpg setup p.24
- Confidential p.24
- Composing your own comments p.24
- Resolution p.25
- Overseas mode p.25
- Contrast p.25
- Advanced sending operations p.25
- Call reservation call back message p.26
- Call back on p.26
- Call back off p.26
- Accepted p.26
- Print sample call back message p.26
- Other settings p.26
- Call reserve on p.26
- Call reserve off p.26
- Call reserve p.26
- Setting up for polled transmit p.27
- Polled tx on p.27
- Polled tx p.27
- Other settings 1 yes 2 no p.27
- Memory 100 enter fax no p.27
- Delayed fax p.27
- Accepted p.27
- Interrupting delayed fax and polled transmit jobs p.28
- Insert original p.28
- Canceling a scheduled job p.28
- Cancel job p.28
- Remove original p.28
- Storing one touch dial numbers p.29
- Storing numbers for easy dialing p.29
- Auto dial numbers and dialing options p.29
- Storing speed dial numbers p.30
- Speed dial p.30
Похожие устройства
-
 Brother 1350 MРуководство по эксплуатации
 -
 Brother MFX-1200 ч.4Руководство по эксплуатации
 -
 Brother MFX-1200 ч.3Руководство по эксплуатации
 -
 Brother MFX-1200 ч.2Руководство по эксплуатации
 -
 Brother MFX-1200 ч.1Руководство по эксплуатации
 -
 Brother FAX-1575mc ч.4Руководство по эксплуатации
 -
 Brother FAX-1575mc ч.3Руководство по эксплуатации
 -
 Brother FAX-1575mc ч.1Руководство по эксплуатации
 -
 Brother FAX 2750 ч.5Руководство по эксплуатации
 -
 Brother FAX 2750 ч.4Руководство по эксплуатации
 -
 Brother FAX 2750 ч.3Руководство по эксплуатации
 -
 Brother FAX 2750 ч.2Руководство по эксплуатации