![Brother FAX-1575mc ч.2 [22/30] Urgent](/img/pdf.png)
Brother FAX-1575mc ч.2 [22/30] Urgent
![Brother FAX-1575mc ч.2 [22/30] Urgent](/views2/1965664/page22/bg16.png)
6 - 3
SETUP SEND
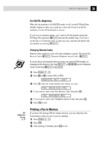
Quick-Scan Fax Transmission
You can scan a fax into the fax machine’s memory to be sent as soon as the scan is
complete. This way, you don’t have to wait for the entire fax to be transmitted before
you retrieve your original.
If you get an OUT OF MEMORY message while scanning the first page of a fax,
press Stop/Exit to cancel the scan. If you get an OUT OF MEMORY message
while scanning in a subsequent page, you’ll have the option to press Fax Start to
transmit the pages scanned so far, or to press Stop/Exit to cancel the Quick Scan
operation.
1
Place the original face down in the ADF.
2
Press Quick-Scan/Reports. The LCD indicates how much memory is available.
3
Enter the fax number.
4
Press Fax Start to begin scanning the document into memory. Once the scan is
complete, the fax machine dials the call.
Basic Sending Operations
Composing Electronic Cover Page
The cover page is generated at the receiving party’s machine. Your cover page
includes the name stored in the One Touch or Speed Dial memory. If you’re dialing
manually, the name is left blank.
(See One Touch Dialing, page 7-4 and Speed Dialing, page 7-5)
The cover page indicates the fax is from your Station ID, and the number of pages
you’re sending. If you have Coverpage Setup set to ON (Menu/Set 3 1), the number
of pages remains blank. (See Setting Station ID, page 4-1)
Most of the SETUP SEND settings are temporary to allow you to make adjustments
for each original you send. However, so that you can set up your cover page and cover
page comments in advance, the Cover Page Setup and Cover Page Message settings
will change their default settings.
You can select a comment to include on your cover page.
Instead of using one of the comments above, you can enter up to two customized
messages, each 27 characters long. Use the chart on page 25 to help enter characters.
1.COMMENT OFF
4.CONFIDENTIAL
2.PLEASE CALL
3.URGENT
Содержание
- Tel service p.1
- Setup receive 3 setup send p.1
- Select set p.1
- Navigation keys p.1
- Initial setup p.1
- To access the menu press menu set p.2
- The factory setting option is shown in bold p.2
- O n s c r e e n p r o g r a m m i n g p.2
- Main menu menu selections options descriptions page p.2
- To access the menu press menu set p.3
- The factory setting option is shown in bold p.3
- O n s c r e e n p r o g r a m m i n g p.3
- Main menu menu selections options descriptions page p.3
- To access the menu press menu set p.4
- The factory setting option is shown in bold p.4
- O n s c r e e n p r o g r a m m i n g p.4
- Main menu menu selections options descriptions page p.4
- To access the menu press menu set p.5
- The factory setting option is shown in bold p.5
- O n s c r e e n p r o g r a m m i n g p.5
- Main menu menu selections options descriptions page p.5
- To access the menu press menu set p.6
- The factory setting option is shown in bold p.6
- O n s c r e e n p r o g r a m m i n g p.6
- Main menu menu selections options descriptions page p.6
- Setting station id p.7
- Setting date and time p.7
- Initial setup p.7
- Getting started p.7
- Notice p.8
- Inserting spaces p.8
- Details for entering text p.8
- Special characters and symbols p.9
- Setting the speaker volume p.9
- Repeating letters p.9
- Making corrections p.9
- Warning p.10
- Choosing the handset volume for volume amplify p.10
- Setting beeper volume p.11
- Permanent p.11
- Beeper p.11
- Volume amplify p.11
- Vol amplify off p.11
- Setting volume amplify p.11
- Setting the ring volume p.11
- Tone pulse p.12
- Setting up your area code usa only p.12
- Setting tone pulse dialing mode p.12
- Memory storage p.12
- Dialing tone p.12
- Dialing pulse p.12
- Caller id p.12
- Area code 908 p.12
- Area code 000 p.12
- Setup receive p.13
- Select receive mode p.13
- Basic receiving operations p.13
- To select or change your receive mode p.14
- Mc msg ctr p.14
- Manual p.14
- Fax tel p.14
- Fax only p.14
- Setting ring delay p.15
- Setting f t ring time p.15
- Ring time 20 sec p.15
- Ring delay p.15
- F t ring time p.15
- Record fax tel outgoing message f t ogm p.16
- Easy receive p.16
- Setting paper size p.17
- Reduction p.17
- Recommended reductions p.17
- Printing a reduced incoming fax p.17
- Yes 2 no change reduction p.17
- Operation from external or extension telephone p.18
- Advanced receiving operations p.18
- Setting up sequential polling receive p.19
- Setting up for polled transmit p.19
- Polling rx on p.19
- Polling rx p.19
- Polling p.19
- Polled tx on p.19
- Polled tx p.19
- Enter fax no p.19
- Dialing p.19
- Accepted p.19
- Setup send p.20
- Before you begin p.20
- Automatic document feeder adf p.20
- Manual transmission p.21
- Manual and automatic fax redial p.21
- Automatic transmission p.21
- Urgent p.22
- Quick scan fax transmission p.22
- Please call p.22
- Confidential p.22
- Composing electronic cover page p.22
- Comment off p.22
- Basic sending operations p.22
- Coverpage off p.23
- Cover page for next fax only p.23
- Confidential p.23
- Comment off p.23
- Always send a cover page p.23
- Accepted p.23
- User defined p.23
- Urgent p.23
- Please call p.23
- Other settings p.23
- Coverpage on p.23
- Using a printed cover page p.24
- User defined p.24
- Urgent p.24
- Please call p.24
- Other settings p.24
- Coverpg setup p.24
- Confidential p.24
- Composing your own comments p.24
- Comment off p.24
- Accepted p.24
- Advanced sending operations p.25
- Resolution p.25
- Overseas mode p.25
- Contrast p.25
- Print sample call back message p.26
- Other settings p.26
- Call reserve on p.26
- Call reserve off p.26
- Call reserve p.26
- Call reservation call back message p.26
- Call back on p.26
- Call back off p.26
- Accepted p.26
- Other settings 1 yes 2 no p.27
- Memory 100 enter fax no p.27
- Delayed fax p.27
- Accepted p.27
- Setting up for polled transmit p.27
- Polled tx on p.27
- Polled tx p.27
- Remove original p.28
- Interrupting delayed fax and polled transmit jobs p.28
- Insert original p.28
- Canceling a scheduled job p.28
- Cancel job p.28
- Storing one touch dial numbers p.29
- Storing numbers for easy dialing p.29
- Auto dial numbers and dialing options p.29
- Storing speed dial numbers p.30
- Speed dial p.30
Похожие устройства
-
 Brother 1350 MРуководство по эксплуатации
 -
 Brother MFX-1200 ч.4Руководство по эксплуатации
 -
 Brother MFX-1200 ч.3Руководство по эксплуатации
 -
 Brother MFX-1200 ч.2Руководство по эксплуатации
 -
 Brother MFX-1200 ч.1Руководство по эксплуатации
 -
 Brother FAX-1575mc ч.4Руководство по эксплуатации
 -
 Brother FAX-1575mc ч.3Руководство по эксплуатации
 -
 Brother FAX-1575mc ч.1Руководство по эксплуатации
 -
 Brother FAX 2750 ч.5Руководство по эксплуатации
 -
 Brother FAX 2750 ч.4Руководство по эксплуатации
 -
 Brother FAX 2750 ч.3Руководство по эксплуатации
 -
 Brother FAX 2750 ч.2Руководство по эксплуатации