
Aten VM5404HA Краткое руководство по установке онлайн
A
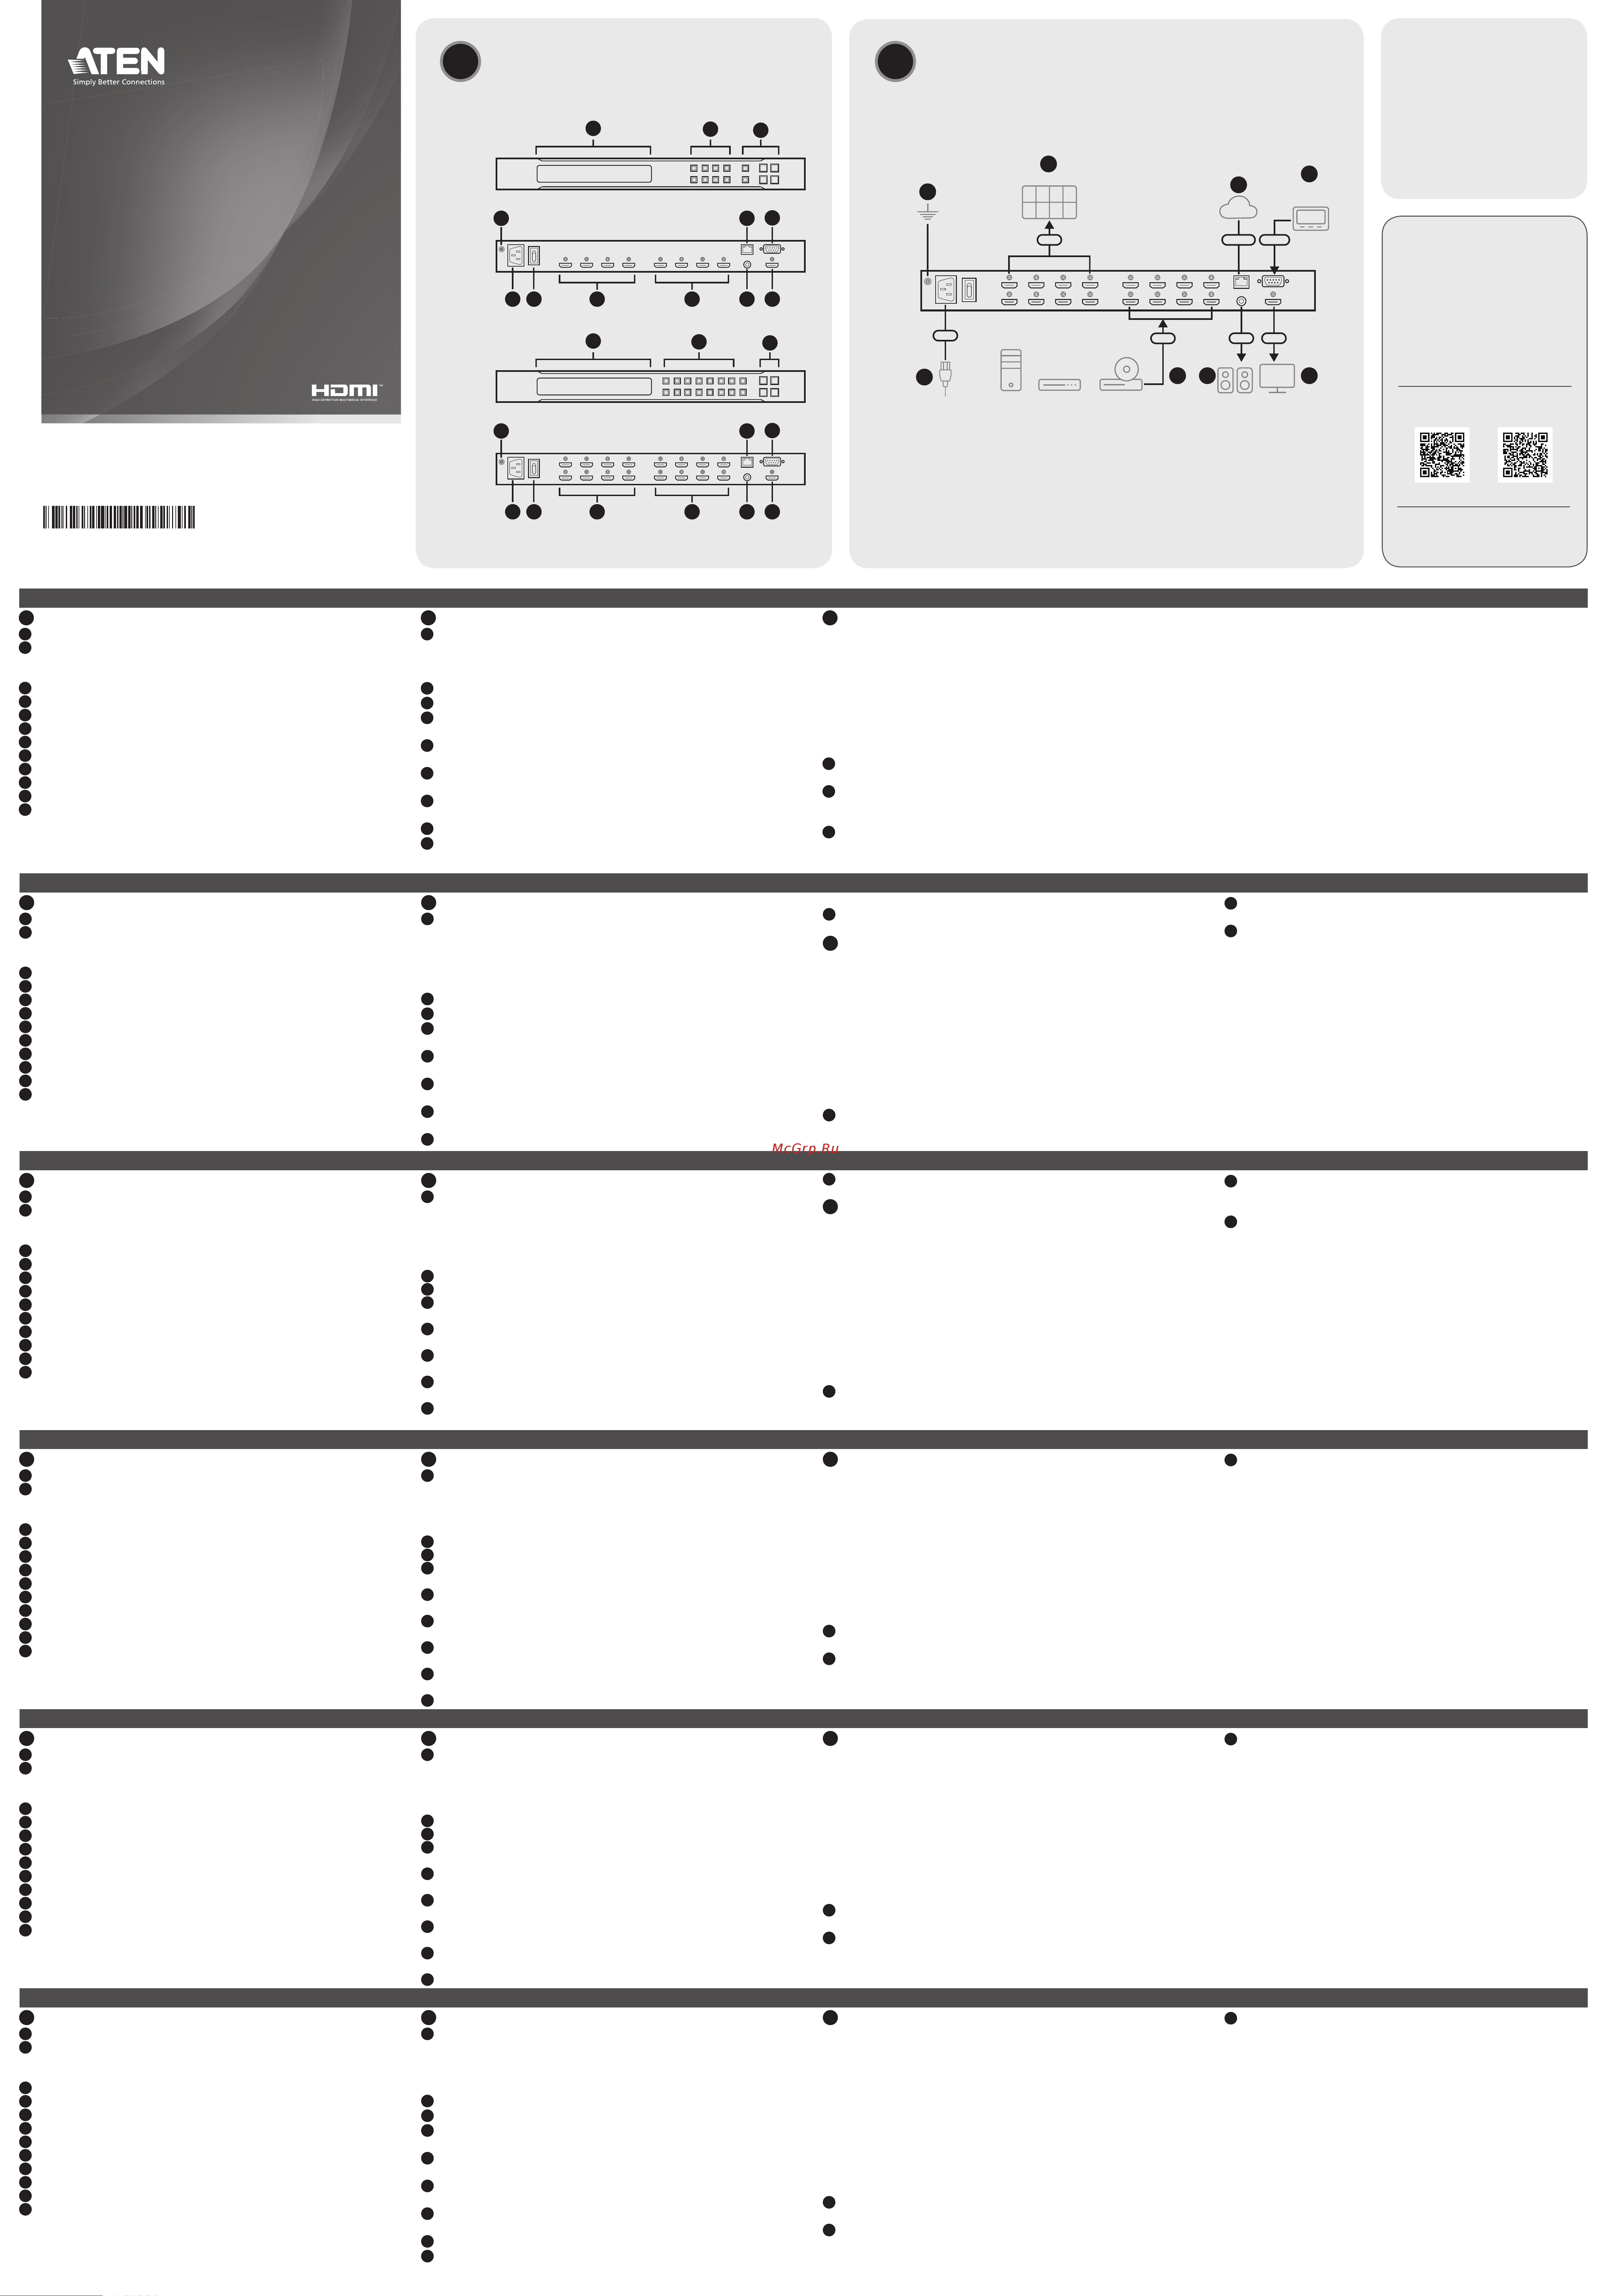
Обзор Оборудования
1
ЖК-дисплей
2
Кнопки выбора портов
Примечание: Номера кнопок соответствуют номерам портов на
задней панели.
3
Функциональные кнопки
4
Контакт заземления
5
Разъем питания
6
Выключатель питания
7
Выходные порты HDMI
8
Входные порты HDMI
9
Порт Ethernet
10
Последовательный порт RS-232
11
Выходной аудиопорт
12
Локальный выходной порт HDMI
Матричный коммутатор VM5404HA / VM5808HA 4 x 4 / 8 x 8 HDMI с масштабатором
www.aten.com
B
Установка
1
Заземлите блок, подсоединив один конец заземляющего провода к
контакту заземления, а другой конец к заземленному объекту.
Примечание: Не пропускайте это действие. Надлежащее
заземление помогает предотвратить повреждение блока из-за
перепадов напряжения или разрядов статического электричества.
2
Подключите к блоку до 8 источников сигнала HDMI.
3
Подключите к блоку до 8 дисплеев HDMI.
4
Для извлечения звука из видеосигнала одного из подключенных
источников подключите динамик к выходному аудиопорту.
5
Для просмотра видеовходов на дисплее в режиме мультивью,
подключите дисплей к локальному выходному порту HDMI.
6
Для доступа к настройкам блока через веб-интерфейс подключите
блок к сетевому коммутатору.
7
Для управления блоком с помощью команд RS-232 подключите к
блоку устройство аппаратного/программного управления.
8
Подключите шнур питания к блоку и включите выключатель питания.
9
Включите все подсоединенные устройства.
c
Эксплуатация
Кнопки на передней панели
Доступ к передней панели защищен паролем. Чтобы разблокировать
переднюю панель, нажмите 1234, используя кнопки выбора входов.
• Кнопка «Меню»: Нажмите эту кнопку для настройки основных
параметров системы.
• Кнопка «Профиль»: Эта кнопка используется для циклического
выбора и применения профилей предварительно настроенных
назначений входов.
• Кнопки «назад/далее»: Используйте эти кнопки для навигации в меню
ЖКД.
• Кнопка «Enter»: Используйте эту кнопку, чтобы перейти на следующий
уровень настроек или подтвердить операцию.
• Чтобы назначить вход:
1
Нажмите кнопку выбора входа. Кнопки выходов, для которых
назначен этот вход, начнут светиться.
2
Для назначения входа нужному выходу нажмите кнопку выбора
выхода. Кнопка загорится, показывая, что назначение выполнено
успешно.
3
Чтобы отменить назначение данному выходу, нажмите кнопку
выбора выхода. Кнопка выхода погаснет, показывая, что она не
назначена данному входу.
Веб-интерфейс
Веб-интерфейс позволяет получить доступ к расширенным
настройкам системы, таким как расписания профилей и учетные
записи пользователей. Матричный коммутатор поддерживает до
16 одновременных сеансов доступа. Для первого доступа к веб-
интерфейсу используйте следующую информацию.
• IP-адрес по умолчанию: 192.168.0.60
• Имя пользователя / пароль по умолчанию: administrator/password
Примечание: Матричный коммутатор поддерживает имена
пользователей только в нижнем регистре.
Последовательный интерфейс RS-232
Встроенный последовательный интерфейс RS-232 позволяет
настраивать матричный коммутатор с помощью компьютера и других
высокотехнологичных средств управления.
A
Panoramica dell'Hardware
1
Display LCD
2
pulsanti di selezione porta
Nota: I numeri dei pulsanti corrispondono ai numeri di porta sul pannello
posteriore.
3
pulsanti funzione
4
terminale di messa a terra
5
presa di alimentazione
6
interruttore dell'alimentazione
7
Porte HDMI di uscita
8
Porte HDMI di entrata
9
Porta Ethernet
10
Porta seriale RS-232
11
porta audio di uscita
12
porte HDMI locali di uscita
VM5404HA / VM5808HA Switch Matrix 4 x 4 / 8 x 8 HDMI con Scaler
www.aten.com
B
Installazione
1
Utilizzare un fi lo di messa a terra per mettere a terra l'unità collegando
un'estremità al terminale di messa a terra e l'altra estremità a un oggetto
con messa a terra adatto.
Nota: Non saltare questo passaggio. La messa a terra adeguata aiuta a
prevenire danni all'unità dovuti a sovraccarico o elettricità statica.
2
Collega all'unità fi no a 8 sorgenti HDMI.
3
Collega all'unità fi no a 8 schermi abilitati per HDMI.
4
Per estrarre audio da una delle sorgenti collegate, collega un altoparlante
alla porta audio di uscita.
5
Per vedere un'anteprima degli ingressi video in uno schermo a vista
multipla, collega uno schermo alla porta HDMI locale di uscita.
6
Per accedere alle impostazioni dell'unità dall'interfaccia web, collega l'unità
a un interruttore di rete.
7
Per operare l'unità tramite i comandi RS-232, collega all'unità un comando
hardware/software.
8
Collega il cavo di alimentazione alla presa di corrente e metti l'interruttore
di accensione su ON.
9
Accendi tutti i dispositivi collegati.
c
Funzionamento
Pulsante pannello anteriore
L'accesso al pannello anteriore è protetto da password. Per sbloccare il
pannello anteriore, premi 1234 dai pulsanti di selezione dell'input.
• Pulsante menù: Premi questo pulsante per confi gurare le impostazioni di
base del sistema.
• Pulsante profi lo: Usa questo pulsante per vedere via via i vari profi li di
impostazioni predefi nite di input e applicarli.
• Pulsanti avanti/indietro: Usa questi pulsanti per muoverti all'interno del menù
LCM.
• Pulsante di avvio: Usa questo pulsante per entrare nel livello successivo delle
impostazioni o per confermare l'operazione.
• Per assegnare un ingresso:
1
Premi il pulsante di selezione per l'ingresso. I pulsanti di uscita delle uscite
assegnate con questo ingresso si accendono.
2
Per assegnare l'ingresso a un uscita, premi il pulsante di selezione per
l'uscita. Il pulsante si accende per indicare che l'assegnazione è avvenuta.
3
Per rimuovere l'assegnazione da un'uscita, premi il pulsante di selezione per
l'uscita. Il pulsante di uscita si affi evolisce per indicare che non è assegnata
all'ingresso.
Interfaccia web
L'interfaccia web ti permette di accedere alle impostazioni avanzate del
sistema, come le programmazioni del profi lo e gli account degli utenti. Lo
switch matrix supporta fi no a 16 accessi contemporanei. Usa le seguenti
impostazioni per accedere all'interfaccia web per la prima volta.
• Indirizzo IP preimpostato: 192.168.0.60
• Nome utente/password preimpostati: administrator/password
Nota: Lo switch matrix supporta solo nomi utente con lettere minuscole.
Interfaccia seriale RS-232
L'interfaccia seriale integrata RS-232 permette di confi gurare lo switch matrix
tramite un comando avanzato, come un computer.
A
Vista general del hardware
1
Pantalla LCD
2
botones de selección de puerto
Nota: La numeración de los botones corresponde a los números de puerto
del panel posterior.
3
botones de función
4
terminal de conexión a tierra
5
toma de corriente
6
conmutador de alimentación
7
puertos de salida HDMI
8
puertos de entrada HDMI
9
Puerto Ethernet
10
Puerto serie RS-232
11
puerto de salida de audio
12
puerto de salida HDMI local
Conmutador de matriz HDMI VM5404HA / VM5808HA 4 x 4 / 8 x 8 con escalador
www.aten.com
B
Instalación
1
Utilice un cable a tierra para conectar la unidad a tierra conectando un
extremo al terminal de tierra y el otro extremo a un objeto conectado a
tierra correctamente.
Nota: No omita este paso. La conexión a tierra adecuada ayuda a evitar
daños en la unidad por sobrecargas de energía o electricidad estática.
2
Conecte hasta 8 fuentes de HDMI a la unidad.
3
Conecte hasta 8 pantallas con HDMI habilitado a la unidad.
4
Para extraer audio de una de las fuentes de entrada conectadas, conecte
un altavoz al puerto de salida de audio.
5
Para obtener una vista previa de las entradas de vídeo en una pantalla de
vista múltiple, conecte una pantalla al puerto de salida HDMI local.
6
Para acceder a la confi guración de la unidad a través de la interfaz web,
conecte la unidad a un conmutador de red.
7
Para operar la unidad mediante comandos RS-232, conecte un controlador
de hardware/software a la unidad.
8
Conecte el cable de alimentación al enchufe de alimentación y coloque el
conmutador de alimentación en ENCENDIDO (ON).
9
Encienda todos los dispositivos conectados.
c
Funcionamiento
Botones del panel frontal
El acceso al panel frontal está protegido por contraseña. Para desbloquear el
panel frontal, presione 1234 usando los botones de selección de entrada.
• Botón menú: Presione este botón para confi gurar los ajustes básicos del
sistema.
• Botón de perfi l: Use este botón para recorrer y aplicar un perfi l de
asignaciones de entrada preconfi guradas.
• Botones Anterior/Siguiente: Utilice estos botones para navegar por el menú
LCM.
• Botón Enter: Utilice este pulsador para pasar al siguiente nivel de
confi guración o confi rmar operaciones.
• Para asignar una entrada:
1
Presione el botón de selección para la entrada. Se encienden los pulsadores
de salida de las salidas que tienen asignada esta entrada.
2
Para asignar la entrada a una salida, presione el botón de selección de la
salida. El pulsador se ilumina para indicar que la asignación se ha realizado
correctamente.
3
Para eliminar la asignación a una salida, presione el botón de selección de
la salida. El pulsador de salida se atenúa para indicar que no está asignado
a la entrada.
Interfaz web
La interfaz web le permite acceder a confi guraciones avanzadas del sistema,
como horarios de perfi les y cuentas de usuario. El conmutador de matriz
admite hasta 16 inicios de sesión simultáneos. Utilice la siguiente información
para acceder a la interfaz web por primera vez.
• Dirección IP predeterminada: 192.168.0.60
• Nombre de usuario/contraseña predeterminados: administrador/contraseña
Nota: El conmutador de matriz solo admite nombres de usuario en
minúsculas.
Interfaz serie RS-232
La interfaz serie RS-232 incorporada le permite confi gurar el conmutador de
matriz a través de un controlador de gama alta, como una computadora.
A
Hardware Übersicht
1
LCD Anzeige
2
Anschlussauswahl Drucktasten
Hinweis: Die Nummerierung der Drucktasten entspricht den
Anschlussnummern auf der Rückseite.
3
Funktion Drucktasten
4
Erdungsanschluss
5
Netzanschluss
6
Netzschalter
7
HDMI Ausgangsanschlüsse
8
HDMI Eingangsanschlüsse
9
Ethernet-Anschluss
10
Serieller RS-232 Port
11
Audioausgang
12
Lokaler HDMI Ausgangsanschluss
VM5404HA / VM5808HA 4 x 4 / 8 x 8 HDMI Matrix Switch mit Scaler
www.aten.com
B
Installation
1
Verwenden Sie ein Erdungskabel, um das Gerät zu erden, indem Sie ein
Ende mit der Erdungsklemme und das andere Ende mit einem geeigneten
geerdeten Objekt verbinden.
Hinweis: Lassen Sie diesen Schritt nicht aus. Eine angemessene Erdung
hilft bei der Verhinderung von Geräteschäden durch Spannungsspitzen
oder statische Elektrizität.
2
Schließen Sie bis zu 8 HDMI Quellen an das Gerät an.
3
Schließen Sie bis zu 8 HDMI-fähige Bildschirme an das Gerät an.
4
Schließen Sie einen Lautsprecher an den Audioausgangsanschluss an, um
Audio von einer der angeschlossenen Eingangsquellen zu extrahieren.
5
Schließen Sie ein Display an den lokalen HDMI Ausgangsanschluss an, um
die Videoeingänge auf einem Multiview-Bildschirm anzuzeigen.
6
Schließen Sie das Gerät an einen Netzwerk Switch an, um über die
Webschnittstelle auf die Einstellungen des Geräts zuzugreifen.
7
Schließen Sie zur Bedienung des Geräts über RS-232 Befehle einen
Hardware/Software Controller an das Gerät an.
8
Schließen Sie das Netzkabel an das Gerät an und stellen Sie den
Netzschalter auf ON.
9
Schalten Sie alle angeschlossenen Geräte ein.
c
Bedienung
Drucktasten an der Vorderseite
Der Zugriff auf die Vorderseite ist durch ein Passwort geschützt. Drücken
Sie zum Entsperren der Vorderseite die Taste 1234 über die Drucktasten zur
Auswahl der Eingänge.
• Menü Drucktaste: Drücken Sie diese Drucktaste, um grundlegende
Systemeinstellungen vorzunehmen.
• Profi l Drucktaste: Mit dieser Drucktaste können Sie ein Profi l mit
vorkonfi gurierten Eingangszuweisungen durchlaufen und anwenden.
• Zurück/Weiter Drucktasten: Mit diesen Drucktasten navigieren Sie durch das
LCM Menü.
• Eingabe Drucktaste: Verwenden Sie diese Drucktaste, um zur nächsten
Einstellungsebene zu gelangen oder um Vorgänge zu bestätigen.
• Um einen Eingang zuzuweisen:
1
Drücken Sie die Auswahl Drucktaste für den Eingang. Die Ausgang
Drucktasten der Ausgänge, denen dieser Eingang zugewiesen wurde,
leuchten auf.
2
Drücken Sie die Auswahl Drucktaste für den Ausgang, um den Eingang
einem Ausgang zuzuordnen. Die Drucktaste leuchtet auf, um anzuzeigen,
dass die Zuordnung erfolgreich war.
3
Drücken Sie die Auswahl Drucktaste für den Ausgang, um die Zuordnung
zu einem Ausgang aufzuheben. Die Drucktaste für den Ausgang wird
abgeblendet, um anzuzeigen, dass er nicht mit dem Eingang verknüpft ist.
Webschnittstelle
Über die Webschnittstelle können Sie auf erweiterte Systemeinstellungen
zugreifen, z.B. Profi lpläne und Benutzerkonten. Der Matrix Switch unterstützt
bis zu 16 gleichzeitige Anmeldungen. Verwenden Sie die folgenden
Informationen, um zum ersten Mal auf die Weboberfl äche zuzugreifen.
• Standard-IP-Adresse: 192.168.0.60
• Standard Benutzername/Passwort: Administrator/Passwort
Hinweis: Der Matrix Switch unterstützt nur Benutzernamen in Kleinbuchstaben.
Serielle RS-232 Schnittstelle
Über die integrierte serielle RS-232 Schnittstelle können Sie den Matrix Switch
über einen High-End Controller, z.B. einen Computer, konfi gurieren.
A
Survol du matériel
1
Écran LCD
2
Boutons de sélection de port
Remarque : La numérotation des boutons correspond aux numéros des
ports sur le panneau arrière.
3
boutons de fonction
4
terminal de terre
5
prise de courant
6
commutateur d'alimentation
7
Ports de sortie HDMI
8
Ports d'entrée HDMI
9
Port Ethernet
10
Port sériel RS-232
11
port de sortie audio
12
port de sortie HDMI local
Commutateur matriciel HDMI 4 x 4 / 8 x 8 avec scaler VM5404HA / VM5808HA
www.aten.com
B
Installation
1
Utilisez un câble de mise à la terre pour relier l'unité à la terre en
connectant une extrémité à la borne de terre et l'autre extrémité à un objet
approprié relié à la terre.
Remarque : N'ignorez pas cette étape. Une mise à terre appropriée
permet d'éviter que l'unité ne soit endommagée par des surtensions ou de
l'électricité statique.
2
Connectez jusqu'à 8 sources HDMI à l'unité.
3
Connectez jusqu'à 8 écrans compatibles HDMI à l'unité.
4
Pour extraire l'audio de l'une des sources d'entrée connectées, connectez
un haut-parleur au port de sortie audio.
5
Pour prévisualiser les entrées vidéo sur un écran multi-vues, connectez un
écran au port de sortie HDMI local.
6
Pour accéder aux paramètres de l'unité via l'interface Web, connectez
l'unité à un commutateur réseau.
7
Pour faire fonctionner l'unité via des commandes RS-232, connectez un
contrôleur matériel/logiciel à l'unité.
8
Branchez le cordon d'alimentation à l'unité et mettez le commutateur
d'alimentation sur MARCHE.
9
Mettez en marche tous les appareils connectés.
c
Fonctionnement
Boutons du panneau avant
L'accès au panneau avant est protégé par mot de passe. Pour déverrouiller le
panneau avant, tapez 1234 à l'aide des boutons de sélection d'entrée.
• Bouton de menu : Appuyez sur ce bouton pour confi gurer les paramètres de
base du système.
• Bouton Profi l : Utilisez ce bouton pour parcourir et appliquer un profi l
d'affectations d'entrée préconfi gurées.
• Boutons Précédent/Suivant : Utilisez ces boutons pour naviguer dans le menu
LCM.
• Bouton Entrée : Utilisez ce bouton pour passer au niveau suivant des
paramètres ou pour confi rmer les opérations.
• Pour affecter une entrée :
1
Appuyez sur le bouton de sélection de l'entrée. Les boutons des sorties qui
ont été affectés à cette entrée s'allument.
2
Pour affecter l'entrée à une sortie, appuyez sur le bouton de sélection de la
sortie. Le bouton s'allume pour indiquer que l'affectation est réussie.
3
Pour supprimer l'affectation à une sortie, appuyez sur le bouton de
sélection de la sortie. La luminosité du bouton de la sortie diminue pour
indiquer qu'elle n'est pas affectée à l'entrée.
Interface Web
L'interface Web vous permet d'accéder aux paramètres avancés du système,
tels que les programmations de profi l et les comptes d'utilisateur. Le
commutateur matriciel prend en charge jusqu'à 16 connexions simultanées.
Utilisez les informations suivantes lors du premier accès à l'interface Web.
• Adresse IP par défaut : 192.168.0.60
• Nom d'utilisateur/mot de passe par défaut : administrateur/mot de passe
Remarque : Le commutateur matriciel prend en charge les noms d'utilisateur
en minuscules uniquement.
Interface série RS-232
L'interface série RS-232 intégrée vous permet de confi gurer le commutateur
matriciel via un contrôleur haut de gamme, tel qu'un ordinateur.
A
Hardware Overview
1
LCD display
2
port selection pushbuttons
Note: The numbering on the pushbuttons corresponds to the port numbers
on the rear panel.
3
function pushbuttons
4
grounding terminal
5
power socket
6
power switch
7
HDMI out ports
8
HDMI in ports
9
Ethernet port
10
RS-232 serial port
11
audio out port
12
local HDMI out port
B
Installation
© Copyright 2022 ATEN
®
International Co. Ltd.
ATEN and the ATEN logo are registered trademarks of ATEN International Co., Ltd.
All rights reserved. All other trademarks are the property of their respective owners.
Part No. PAPE-1223-X60G Released: 05/2022
4 x 4 / 8 x 8 HDMI Matrix Switch with Scaler
Quick Start Guide
VM5404HA / VM5808HA
VM5404HA / VM5808HA 4 x 4 / 8 x 8 HDMI Matrix Switch with Scaler
www.aten.com
A
Hardware
Overview
Package Contents
1 HDMI Matrix Switch with Scaler
1 power cord
1 mounting kit
1 user instructions
Support and Documentation Notice
All information, documentation, fi rmware,
software utilities, and specifi cations
contained in this package are subject to
change without prior notifi cation by the
manufacturer.
To reduce the environmental impact of
our products, ATEN documentation and
software can be found online at
http://www.aten.com/download/
Technical Support
www.aten.com/support
Scan for more information
ATEN Website User Manual
The terms HDMI, HDMI High-Defi nition
Multimedia Interface, and the HDMI Logo are
trademarks or registered trademarks of HDMI
Licensing Administrator, Inc.
B
Installation
1
Use a grounding wire to ground the unit by connecting one end to the
grounding terminal, and the other end to a suitable grounded object.
Note: Do not omit this step. Proper grounding helps prevent damage to
the unit from power surges or static electricity.
2
Connect up to 8 HDMI sources to the unit.
3
Connect up to 8 HDMI-enabled displays to the unit.
4
To extract audio from one of the connected input sources, connect a
speaker to the audio out port.
5
To preview video inputs in a multiview screen, connect a display to the local
HDMI out port.
6
To access the unit’s settings via the web interface, connect the unit to a
network switch.
7
To operate the unit via RS-232 commands, connect a hardware/software
controller to the unit.
8
Plug the power cord to the unit and put the power switch to ON.
9
Power on all the connected devices.
c
Operation
Front-panel Pushbuttons
The access to the front panel is protected by password. To unlock the front
panel, press 1234 using the input selection pushbuttons.
• Menu Pushbutton: Press this pushbutton to confi gure basic system settings.
• Profi le Pushbutton: Use this pushbutton to cycle through and apply a profi le
of preconfi gured input assignments.
• Prev/Next Pushbuttons: Use these pushbuttons to navigate the LCM menu.
• Enter Pushbutton: Use this pushbutton to go into the next level of settings or
confi rm operations.
• To assign an input:
1
Press the selection pushbutton for the input. The output pushbuttons of
the outputs that have been assigned with this input light up.
2
To assign the input to an output, press the selection pushbutton for
the output. The pushbutton lights up to indicate that the assignment is
successful.
3
To remove assignment to an output, press the selection pushbutton for the
output. The output pushbutton dims to indicate that it is not assigned with
the input.
Web Interface
The web interface allows you to access advanced system settings, such as
profi le schedules and user accounts. The matrix switch supports up to 16
concurrent logins. Use the following information to access the web interface
for the fi rst time.
• Default IP address: 192.168.0.60
• Default Username/Password: administrator/password
Note: The matrix switch supports usernames in lower-case only.
RS-232 Serial Interface
The built-in RS-232 serial interface allows you to confi gure the matrix switch
through a high-end controller, such as a computer.
VM5404HA
Front View
1
2
3
VM5404HA
Front View
VM5808HA
Rear View
VM5808HA
Rear View
9
10
4
75 6
12
11
8
1
2
3
9
10
4
7
5 6
12
11
8
Power Cord
Power
HDMI
HDMI
Ethernet
Network
HDMI
Hardware /
Software Controller
RS-232
MonitorsSpeakers
52 4
1
6
7
3
8
VM5808HA
Rear View
PC
DVD /
Media Player
Blu-ray
Player
or or
Audio
Video Wall
Содержание
- Hardware 1
- Installation 1
- Overview 1
- Vm5404ha vm5808ha 1
- Vm5808ha rear view 1
- Donanıma genel bakış 2
- Funcionamento 2
- Instalacja 2
- Instalare 2
- Instalação 2
- Kurulum 2
- Obsługa 2
- Operare 2
- Prezentare hardware 2
- Przegląd sprzętu 2
- Vista geral do hardware 2
- Çalıştırma 2
- Встановлення 2
- Огляд обладнання 2
- Робота 2
- セットアップ 2
- 安装 2
- 安裝 2
- 操作 2
- 操作方法 2
- 硬件概览 2
- 硬體概覽 2
- 製品各部名称 2
- 설치 2
- 작동 2
- 하드웨어 개요 2
Похожие устройства
- Aten VM5404HA Руководство пользователя
- Aten VM6404HB Краткое руководство по установке
- Aten VM6404HB Руководство видеоматрицы
- Aten VM6404HB Руководство пользователя
- Aten VM6809H Краткое руководство по установке
- Aten VM6809H Руководство пользователя
- Aten VM51616H Руководство к видеоматрице
- Aten VM51616H Руководство к приложению контроля видеоматрицы
- Aten VM51616H Руководство пользователя
- Aten VM3250 Руководство пользователя
- Aten VM3250 Руководство к видеоматрице
- Aten VM3250 Краткое руководство по установке
- Aten VM3250 Руководство к приложению для контроля видеоматрицы
- Aten VM7824 Краткое руководство по установке
- Aten VM8824 Краткое руководство по установке
- Aten VM7584 Краткое руководство по установке
- Aten VM8584 Краткое руководство по установке
- Aten VM7904 Краткое руководство по установке
- Aten VM7814 Краткое руководство по установке
- Aten VM8814 Краткое руководство по установке