![Aten VS481C [16/38] Rear view](/img/pdf.png)
Aten VS481C [16/38] Rear view
![Aten VS481C [16/38] Rear view](/views2/1977946/page16/bg10.png)
Chapter 2. Hardware Setup
6
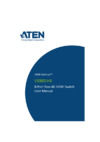
Rear View
No. Component Description
1 power jack Connects to the power adapter.
2 HDMI output port Connects to the HDMI input port on the display device.
3 HDMI input port Connects to the HDMI output port on the source device.
4 RS-232 serial port Connects to an RS-232 serial controller, such as a PC or
a control system.
5 auto switch ON /
OFF
Enables or disables the next mode. For details, see
Setting the Switch Mode, page 13
Note: When the auto switch is put to ON, the VS481C will
remain in next mode regardless of any RS-232
commands to set the unit into other switch modes.
6 IR extension port Connects to an IR receiver to extend the reception range
for IR signals.
3
1
2
4
5 6
Содержание
- Vs481c p.1
- Compliance statements p.2
- About this manual p.4
- This manual uses the following conventions p.5
- Conventions p.5
- Package contents p.6
- User information p.7
- Telephone support p.7
- Product information p.7
- Online registration p.7
- For telephone support call this number p.7
- For information about all aten products and how they can help you connect without limits visit aten on the web or contact an aten authorized reseller visit aten on the web for a list of locations and telephone numbers p.7
- Be sure to register your product at our online support center p.7
- User notice p.8
- The firmware upgrade utility p.9
- Table of contents p.9
- Operation p.9
- Introduction p.9
- Hardware setup p.9
- Appendix p.10
- Chapter 1 p.11
- Overview p.11
- Introduction p.11
- Chapter 1 introduction p.11
- Features p.12
- The vs481c is compatible with the following aten products p.13
- Required equipment p.13
- Product web page at http www aten com global en p.13
- Planning the installation p.13
- Or the equivalent for best results p.13
- Optional equipment p.13
- Note for an up to date list of compatible aten products go to the vs481c p.13
- Note aten recommends using the high speed hdmi cable 2l 7d02h 1 p.13
- Compatible aten products p.13
- 1 display device equipped with an hdmi type a connector p.13
- 1 5 hdmi cables p.13
- 1 4 source devices equipped with an hdmi type a connector p.13
- This page intentionally left blank p.14
- Hardware setup p.15
- Front view p.15
- Components p.15
- Chapter 2 hardware setup p.15
- Chapter 2 p.15
- Rear view p.16
- 2 4 5 6 p.16
- Ir remote control unit p.17
- Connecting the vs481c p.18
- This page intentionally left blank p.20
- Overview p.21
- Operation p.21
- Chapter 3 operation p.21
- Chapter 3 p.21
- Switching the display source p.22
- Setting the switch mode p.23
- Enabling disabling the priority and the pod mode p.23
- Enabling disabling the next mode p.23
- Restarting the vs481c p.24
- Executing an rs 232 command p.24
- Vs481c user manual p.25
- Task rs 232 command description p.25
- Switch the source p.25
- Rs 232 commands p.25
- Note separate each command string with a space p.25
- Change the switch mode p.25
- This page intentionally left blank p.26
- Introduction p.27
- Downloading the firmware upgrade package p.27
- Chapter 4 the firmware upgrade utility p.27
- Chapter 4 p.27
- The firmware upgrade utility p.27
- Preparation p.28
- Starting the upgrade p.29
- Upgrade succeeded p.31
- Upgrade failed p.31
- Firmware upgrade recovery p.32
- Safety instructions p.33
- General p.33
- Appendix p.33
- Technical support p.35
- North america p.35
- International p.35
- Specifications p.36
- Limited warranty p.38
Похожие устройства
-
 Aten VS481CКраткое руководство по установке
 -
 Aten VS0801HBРуководство пользователя
 -
 Aten VS0801HBКраткое руководство по установке
 -
 Aten VS482BРуководство пользователя
 -
 Aten VS482BКраткое руководство по установке
 -
 Aten VS381BРуководство пользователя
 -
 Aten VS381BКраткое руководство по установке
 -
 AVTech HDM02 (AVX917)Схема 2
 -
 AVTech HDM02 (AVX917)Схема 1
 -
 Kramer VS-161HСхема подключения
 -
 Kramer VS-81HСхема подключения
 -
 Kramer VS-41HСхема подключения