
Aten EC1000 Краткое руководство по установке онлайн
C
Installation
© Copyright 2023 ATEN
®
International Co. Ltd.
ATEN and the ATEN logo are registered trademarks of ATEN International Co., Ltd.
All rights reserved. All other trademarks are the property of their respective owners.
Part No. PAPE-1224-101G Released: 03/2023
Energy Box with Real-time
Power Monitoring
Quick Start Guide
EC1000
A
Hardware Overview
Package Contents
1 EC1000 Energy Box
1 Power Adapter
1 Mounting Kit
4 RJ-45 Cables
Support and Documentation Notice
All information, documentation, fi rmware,
software utilities, and specifi cations
contained in this package are subject to
change without prior notifi cation by the
manufacturer.
To reduce the environmental impact of
our products, ATEN documentation and
software can be found online at
http://www.aten.com/download/
Technical Support
www.aten.com/support
Scan for more information
ATEN Website (EC1000) User Manual
ATEN Website (eco DC)
Front View
Rear View
Power
Adapter
Network
Humidity
Sensor
4
Temperature
Sensor
or
RJ-11
3
RJ-45 RJ-45
1
2
PDU x 4
5
EC1000
(Rear)
Power
Ethernet
B
Mounting
7
8
10
1 2
3 4 5 6
11
9
Rack Mounting – Front Rack Mounting – Side
A
Hardwareübersicht
1
Auslesebereich
2
Energie- und Umweltsensor-LEDs
3
Auswahl-LEDs
4
Auswahltaste
5
Reset-Schalter
B
Montage
Die EC1000 kann in einem 19-Zoll-Rack (1U) oder in einer 0U-Konfi guration an der Seite
des Racks montiert werden.
Rackmontage – Vorderseite
1
Mit den drei M3 x 8 Kreuzschlitzschrauben, die dem Rack-Montagesatz beiliegen,
werden die Rack-Montagehalterungen an den Seiten nahe der Gerätevorderseite
befestigt.
2
Positionieren Sie das Gerät an der Rackvorderseite und richten Sie die Löcher in den
Montagewinkeln an den Löchern im Rack aus.
3
Schrauben Sie die Montagehalterungen an das Rack.
EC1000 Energiebox mit Echtzeit-Stromüberwachung
www.aten.com
Rackmontage - Seite
1
Schrauben Sie die Rack-Montagewinkel mit zwei M3 x 8 Kreuzschlitzschrauben, die
dem Rack-Montagesatz beiliegen, in die Rack-Montagewinkel an den Seiten in der
Mitte des Geräts.
2
Setzen Sie das Gerät auf die äußere Vorderseite des Racks und richten Sie die Löcher
in den Montagewinkeln mit den Löchern im Rack aus.
3
Schrauben Sie die Montagehalterungen an das Rack.
C
Installation
1
Erden Sie die EC1000 mit Hilfe einer Erdungsleitung, indem Sie das eine Ende der
Erdungsleitung an der Erdungsklemme anschließen und das andere Ende mit einem
geeigneten geerdeten Gegenstand verbinden.
Hinweis: Überspringen Sie diesen Schritt nicht. Eine ordnungsgemäße Erdung hilft dabei,
Schäden am Gerät durch Überspannung oder elektrostatische Aufl adung vorzubeugen.
2
Für jede PDU, die Sie anschließen möchten, verwenden Sie ein im Lieferumfang
enthaltenes RJ-45-Kabel, um die EC1000 Energiebox mit den PDUs zu verbinden.
3
Für den Anschluss der Energiebox an das LAN verwenden Sie ein Ethernet-Kabel.
4
Um Sensoren in der Anlage der EC1000-Energiebox zu verwenden, schließen Sie diese
an die hinteren Anschlüsse für Umgebungssensoren an.
5
Schließen Sie den Netzadapter der EC1000 an eine Wechselstromquelle an.
Hinweis: Wir raten dringend davon ab, die EC1000 an ein Mehrfachsteckdosen-
Verlängerungskabel anzuschließen, da in diesem Fall die Stromstärke für einen
ordnungsgemäßen Betrieb nicht ausreichen könnte.
Bedienung
Die EC1000 Energiebox bietet mehrere Zugriffs- und Verwaltungsmöglichkeiten für Ihre
Anlage: Frontpanel, Browser, eco DC (Energy & DCIM Management Web GUI), und SNMP.
Frontpanel
Der Anzeigebereich auf dem Frontpanel zeigt den Energieanschluss, den Umweltanschluss
und die IP-Adresseinstellung an. Drücken Sie die Auswahltaste, um zwischen diesen
Einstellungen zu wechseln.
Browser
1
Geben Sie in einem Webbrowser die IP-Adresse der EC1000 Energiebox ein. Siehe den
Abschnitt Bestimmung der IP-Adresse des Benutzerhandbuchs.
Hinweis: Die Standard-IP-Adresse ist 192.168.0.60.
2
Wenn eine Sicherheitswarnung erscheint, akzeptieren Sie das Zertifi kat - es ist
vertrauenswürdig. Die Anmeldeseite wird angezeigt.
3
Geben Sie einen gültigen Benutzernamen und ein Kennwort ein und wählen Sie
danach eine Sprache aus.
Hinweis: Die Standard-Anmeldedaten lauten administrator und password.
4
Klicken Sie auf Anmelden, um die Hauptseite aufzurufen.
eco DC
Die EC1000 Energiebox unterstützt eco DC (Energy & DCIM Management Web GUI).
eco DC bietet Ihnen eine einfache Methode zur Verwaltung mehrerer Geräte sowie eine
intuitive und benutzerfreundliche GUI, mit der Sie die eco PDUs konfi gurieren und den
Energiestatus aller angeschlossenen Geräte überwachen können. Um die Software zu
installieren, scannen Sie den eco DC QR-Code, um die Produktwebseite zu besuchen, und
laden Sie dann das Installationsprogramm von der Registerkarte Support und Downloads
herunter.
SNMP
eco PDUs unterstützen jede V1, V2 & V3 SNMP Manager Software von Drittanbietern.
Um die Software zu installieren, scannen Sie den QR-Code der ATEN-Website, um die
Produktwebseite zu besuchen, und laden Sie danach das Installationsprogramm von der
Registerkarte Support und Downloads herunter.
6
Netz-LED
7
Erdungsklemme
8
Netzbuchse
9
LAN-Anschluss
10
Energiesensoranschlüsse
11
Umgebungssensoranschlüsse
A
Reseña del hardware
1
Sección de lectura
2
Ledes de los sensores de energía y
medioambiente
3
Ledes de selección
4
Pulsador de selección
5
Interruptor de restablecimiento
B
Montaje
El dispositivo EC1000 puede montarse en un bastidor de 1u de 19 in o en una
confi guración 0U montada en un lateral del bastidor.
Montaje en bastidor: frontal
1
Utilice los 3 tornillos de cabeza hexagonal Phillips M3 x 8 suministrados con el kit
de montaje en bastidor para atornillar los soportes de montaje del bastidor en los
laterales cerca de la parte frontal de la unidad.
2
Coloque la unidad en la parte frontal del bastidor y alinee los agujeros de los soportes
de montaje con los agujeros del bastidor.
3
Atornille los soportes de montaje al bastidor.
Controlador energético EC1000 con monitorización de potencia en tiempo real
www.aten.com
Montaje en bastidor: lateral
1
Utilice los 2 tornillos de cabeza hexagonal Phillips M3 x 8 suministrados con el kit
de montaje en bastidor para atornillar los soportes de montaje del bastidor en los
laterales, en la parte media de la unidad.
2
Coloque la unidad en la parte frontal exterior del bastidor y alinee los agujeros de los
soportes de montaje con los agujeros del bastidor.
3
Atornille los soportes de montaje al bastidor.
C
Instalación
1
Utilice un cable de toma a tierra para establecer la conexión a tierra del dispositivo EC1000
conectando un extremo del cable al terminal de toma a tierra y el otro extremo del cable a
un objeto adecuadamente conectado a tierra.
Nota: No omita este paso. Una puesta a tierra apropiada ayuda a evitar que se dañe
la unidad debido a sobrecargas o a electricidad estática.
2
Utilice un cable RJ-45 (incluido con el producto) para conectar el controlador
energético EC1000 a cada PDU que desee conectar.
3
Utilice un cable Ethernet para conectar el controlador energético a la red de área local
(LAN).
4
Para incorporar sensores durante la instalación de su controlador energético EC1000,
conéctelos a los puertos para sensores medioambientales ubicados en la parte posterior.
5
Conecte el adaptador de alimentación del dispositivo EC1000 a una fuente de
alimentación CA.
Nota: Le recomendamos encarecidamente que no enchufe el dispositivo EC1000 a
una alargadera multienchufe, ya que podría no recibir el amperaje sufi ciente para
funcionar debidamente.
Funcionamiento
El controlador energético EC1000 cuenta con varios métodos para acceder a su instalación
y gestionarla: Panel frontal, navegador, eco DC (Interfaz gráfi ca de usuario web de
gestión de la energía y de la infraestructura del centro de datos) y protocolo simple de
administración de red (SNMP).
Panel frontal
La sección de lectura en el panel frontal muestra el puerto de energía, el puerto
medioambiental y la confi guración de la dirección IP. Accione el pulsador de selección para
recorrer estos ajustes.
Navegador
1
En un navegador web, introduzca la dirección IP del controlador energético EC1000.
Consulte la sección Determinación de la dirección IP en el manual de usuario.
Nota: La dirección IP predeterminada es 192.168.0.60
2
Si aparece una alerta de seguridad, acepte el certifi cado, ya que puede confi ar en él.
Aparece la página de inicio de sesión.
3
Introduzca un nombre de usuario y una contraseña válidos y, seguidamente, seleccione
un idioma.
Nota: Las credenciales predeterminadas de inicio de sesión son administrator y password.
4
Haga clic en Iniciar sesión para acceder a la página principal.
eco DC
El controlador energético EC1000 es compatible con eco DC (interfaz de usuario gráfi ca
web de gestión de energía y la infraestructura del centro de datos). eco DC le proporciona
un método fácil para gestionar varios dispositivos, ofreciendo una interfaz de usuario
gráfi ca intuitiva y fácil de usar que le permite confi gurar los dispositivos eco PDU y
monitorizar el estado de alimentación de todos los equipos conectados. Para instalar el
software, escanee el código QR de eco DC a fi n de visitar la página web del producto y,
seguidamente, descargue el instalador desde la pestaña “Asistencia y descargas”.
SNMP
eco PDU es compatible con el software de terceros V1, V2 & V3 SNMP Manager. Para
instalar el software, escanee el código QR del sitio web de ATEN a fi n de visitar la página
web del producto y, seguidamente, descargue el instalador desde la pestaña “Asistencia y
descargas”.
6
Indicador led de alimentación
7
Borne de tierra
8
Conector de alimentación
9
Puerto de red de área local (LAN)
10
Puertos para los sensores de energía
11
Puertos para los sensores
medioambientales
A
Panoramica hardware
1
sezione di lettura
2
LED dei sensori di monitoraggio dei
consumi energetici e ambientali
3
LED di selezione
4
pulsante di selezione
5
interruttore di ripristino
B
Montaggio
L'unità EC1000 può essere montata in un rack da 19" (1U) o in una confi gurazione da 0U
montata a lato del rack.
Montaggio su rack – Parte anteriore
1
Utilizzare tre delle viti a croce a testa esagonale M3 x 8 fornite con il kit di montaggio
su rack per avvitare le staffe di montaggio su rack sui lati vicino alla parte anteriore
dell'unità.
2
Posizionare l'unità nella parte anteriore del rack e allineare i fori nelle staffe di
montaggio con i fori nel rack.
3
Avvitare le staffe di montaggio sul rack.
Energy Box EC1000 con monitoraggio dei consumi energetici in tempo reale
www.aten.com
Montaggio su rack - Parte laterale
1
Utilizzare due delle viti a croce a testa esagonale M3 x 8 fornite con il kit di montaggio
su rack per avvitare le staffe di montaggio su rack nelle apposite staffe sui lati al
centro dell'unità.
2
Posizionare l'unità sulla parte anteriore esterna del rack e allineare i fori nelle staffe di
montaggio con il foro nel rack.
3
Avvitare le staffe di montaggio sul rack.
C
Installazione
1
Utilizzare un cavo di messa a terra per la messa a terra dell'unità EC1000 collegando
un'estremità del cavo al relativo terminale di terra e l'altra estremità del cavo a un
oggetto con messa a terra adatto.
Note: eseguire sempre questo passaggio. Un'adeguata messa a terra permette di
evitare danni all'unità dovuti a sovratensioni o elettricità statica
2
Per ogni PDU che si desidera collegare, utilizzare il cavo RJ-45 incluso nella confezione
per collegare l'Energy Box EC1000 alle PDU.
3
Utilizzare un cavo Ethernet per collegare l'Energy Box alla rete LAN.
4
Per utilizzare i sensori nel sistema in uso per l'Energy Box EC1000, collegarli alle porte
posteriori dei sensori ambientali.
5
Collegare l'adattatore di alimentazione dell'EC1000 a una sorgente di alimentazione
CA.
Note: si consiglia vivamente di non collegare l'EC1000 a una prolunga multipresa,
poiché potrebbe non ricevere abbastanza amperaggio per funzionare correttamente.
Funzionamento
L'Energy Box EC1000 offre diversi metodi per accedere e gestire il sistema in uso: Pannello
frontale, browser, eco DC (GUI Web per la gestione di consumi energetici e DCIM) e
SNMP.
Pannello frontale
La sezione di lettura sul pannello frontale mostra le impostazioni relative alla porta per
il monitoraggio dei consumi energetici, alla porta per il monitoraggio ambientale e
all'indirizzo IP. Premere il pulsante di selezione per scorrere queste impostazioni.
Browser
1
In un browser Web, digitare l'indirizzo IP dell'Energy Box EC1000. Consultare la
sezione Individuazione dell'indirizzo IP del manuale dell'utente.
Nota: L'indirizzo IP predefi nito è 192.168.0.60
2
Se si visualizza un avviso di sicurezza, accettare il certifi cato in quanto attendibile.
Verrà visualizzata la pagina di accesso.
3
Immettere un nome utente e una password validi, quindi selezionare una lingua.
Nota: Le credenziali di accesso predefi nite sono administrator e password.
4
Fare clic su Accedi per visualizzare la pagina principale.
eco DC
L'Energy box EC1000 supporta l'interfaccia eco DC (GUI Web per la gestione energetica
e del DCMI). L'interfaccia eco DC fornisce un modo semplice per gestire più dispositivi,
offrendo una GUI intuitiva e facile da usare che consente di confi gurare le unità eco PDU
e monitorare lo stato di alimentazione di tutte le apparecchiature che vi sono collegate.
Per installare il software, eseguire la scansione del codice QR eco DC per visitare la pagina
Web del prodotto, quindi scaricare il programma di installazione dalla scheda Supporto e
Download.
SNMP
Le unità eco PDU supportano qualsiasi software SNMP Manager V1, V2 e V3 di terze
parti. Per installare il software, eseguire la scansione del codice QR del sito Web ATEN per
visitare la pagina Web del prodotto, quindi scaricare il programma di installazione dalla
scheda Supporto e Download.
6
LED di alimentazione
7
terminale di messa a terra
8
Presa di alimentazione
9
porta LAN
10
porte dei sensori di monitoraggio dei consumi
energetici
11
porte dei sensori di monitoraggio ambientale
A
Обзор оборудования
1
Секция индикаторов
2
Индикаторы питания и датчика
окружающей среды
3
Индикаторы выбора
4
Кнопка выбора
5
Кнопка сброса
B
Монтаж
Устройство EC1000 может быть установлено в стойку 19" (1U) или установлено
сбоку стойки в конфигурации 0U .
Монтаж в стойке — Передняя сторона
1
Установите монтажные кронштейны, вкрутив три шестигранных винта Phillips
M3 x 8, входящие в комплект крепления стойки, в отверстия рядом с передней
панелью устройства.
2
Установите устройство в стойку спереди и совместите отверстия в монтажных
кронштейнах с отверстиями в стойке.
3
Прикрутите монтажные кронштейны к стойке.
EC1000 Устройство интеллектуального мониторинга питания в реальном времени Energy Box
www.aten.com
Монтаж в стойке — Установка сбоку
1
Установите монтажные кронштейны, вкрутив два шестигранных винта Phillips
M3 x 8, входящие в комплект крепления стойки, в отверстия в средней части
устройства.
2
Установите устройство на стойку снаружи и совместите отверстия в
монтажных кронштейнах с отверстиями в стойке.
3
Прикрутите монтажные кронштейны к стойке.
C
Установка
1
Выполните заземление устройства EC1000, соединив один конец
заземляющего провода с клеммой заземления, а другой конец — с
подходящим заземляющим предметом.
Примечание: Не пропускайте этот шаг. Надлежащее заземление защищает
устройство от повреждений, вызванных скачками напряжения и статическим
электричеством.
2
Используйте входящий в комплект поставки кабель RJ-45 для каждого
устройства PDU, которое вы хотите подключить к энергетическому блоку
EC1000.
3
Для подключения энергетического блока к сети LAN используется кабель
Ethernet.
4
Чтобы использовать датчики в энергетическом блоке EC1000, подключите их к
портам для датчиков окружающей среды на задней панели устройства.
5
Подключите блок питания EC1000 к источнику переменного тока.
Примечание: Настоятельно не рекомендуется подключать EC1000 к
удлинителю с несколькими розетками, так как устройство может не получать
ток достаточной силы для надлежащей работы.
Эксплуатация
Модели EC1000 поддерживают несколько способов доступа к установленной
системе и управления ее работой: Передняя панель, браузер, eco DC (веб-
интерфейс управления питанием и DCIM) и протокол SNMP.
Передняя панель
В индикаторной секции на передней панели показаны порты датчиков
энергосбережения и экологических датчиков, а также заданный IP-адрес.
Нажимайте на кнопку выбора, чтобы переключаться между этими настройками.
Браузер
1
В веб-браузере введите IP-адрес устройства EC1000 Energy Box. См. раздел
«Определение IP-адреса» в руководстве пользователя.
Примечание: IP-адрес по умолчанию: 192.168.0.60
2
При появлении оповещения системы безопасности примите сертификат —
ему можно доверять. Появится страница входа в систему.
3
Введите действительное имя пользователя и пароль, затем выберите язык.
Примечание: Учетные данные для входа по умолчанию: administrator и
password.
4
Нажмите Войти, чтобы перейти на главную страницу.
eco DC
Устройство EC1000 Energy Box поддерживает технологию eco DC (веб-интерфейс
управления электропитанием и DCIM). eco DC — это удобный способ управления
несколькими устройствами с интуитивным графическим интерфейсом, в котором
можно настраивать eco PDU и отслеживать состояние питания подключенного
оборудования. Для установки этого ПО сканируйте QR-код eco DC, чтобы перейти
на веб-страницу продукта. Затем загрузите установщик во вкладке Support and
Downloads (Поддержка и загрузки).
Протокол SNMP
Устройства eco PDU поддерживают любое стороннее ПО для управления по
протоколу SNMP версий V1, V2 или V3. Для установки этого ПО отсканируйте QR-
код веб-сайта ATEN, чтобы перейти на веб-страницу продукта. Затем скачайте
установщик на вкладке Support and Downloads (Поддержка и загрузки).
6
Светодиодный индикатор питания
7
Клемма заземления
8
Разъем питания
9
Порт LAN (локальной сети)
10
Порты для датчиков энергосбережения
11
Порты для датчиков окружающей среды
A
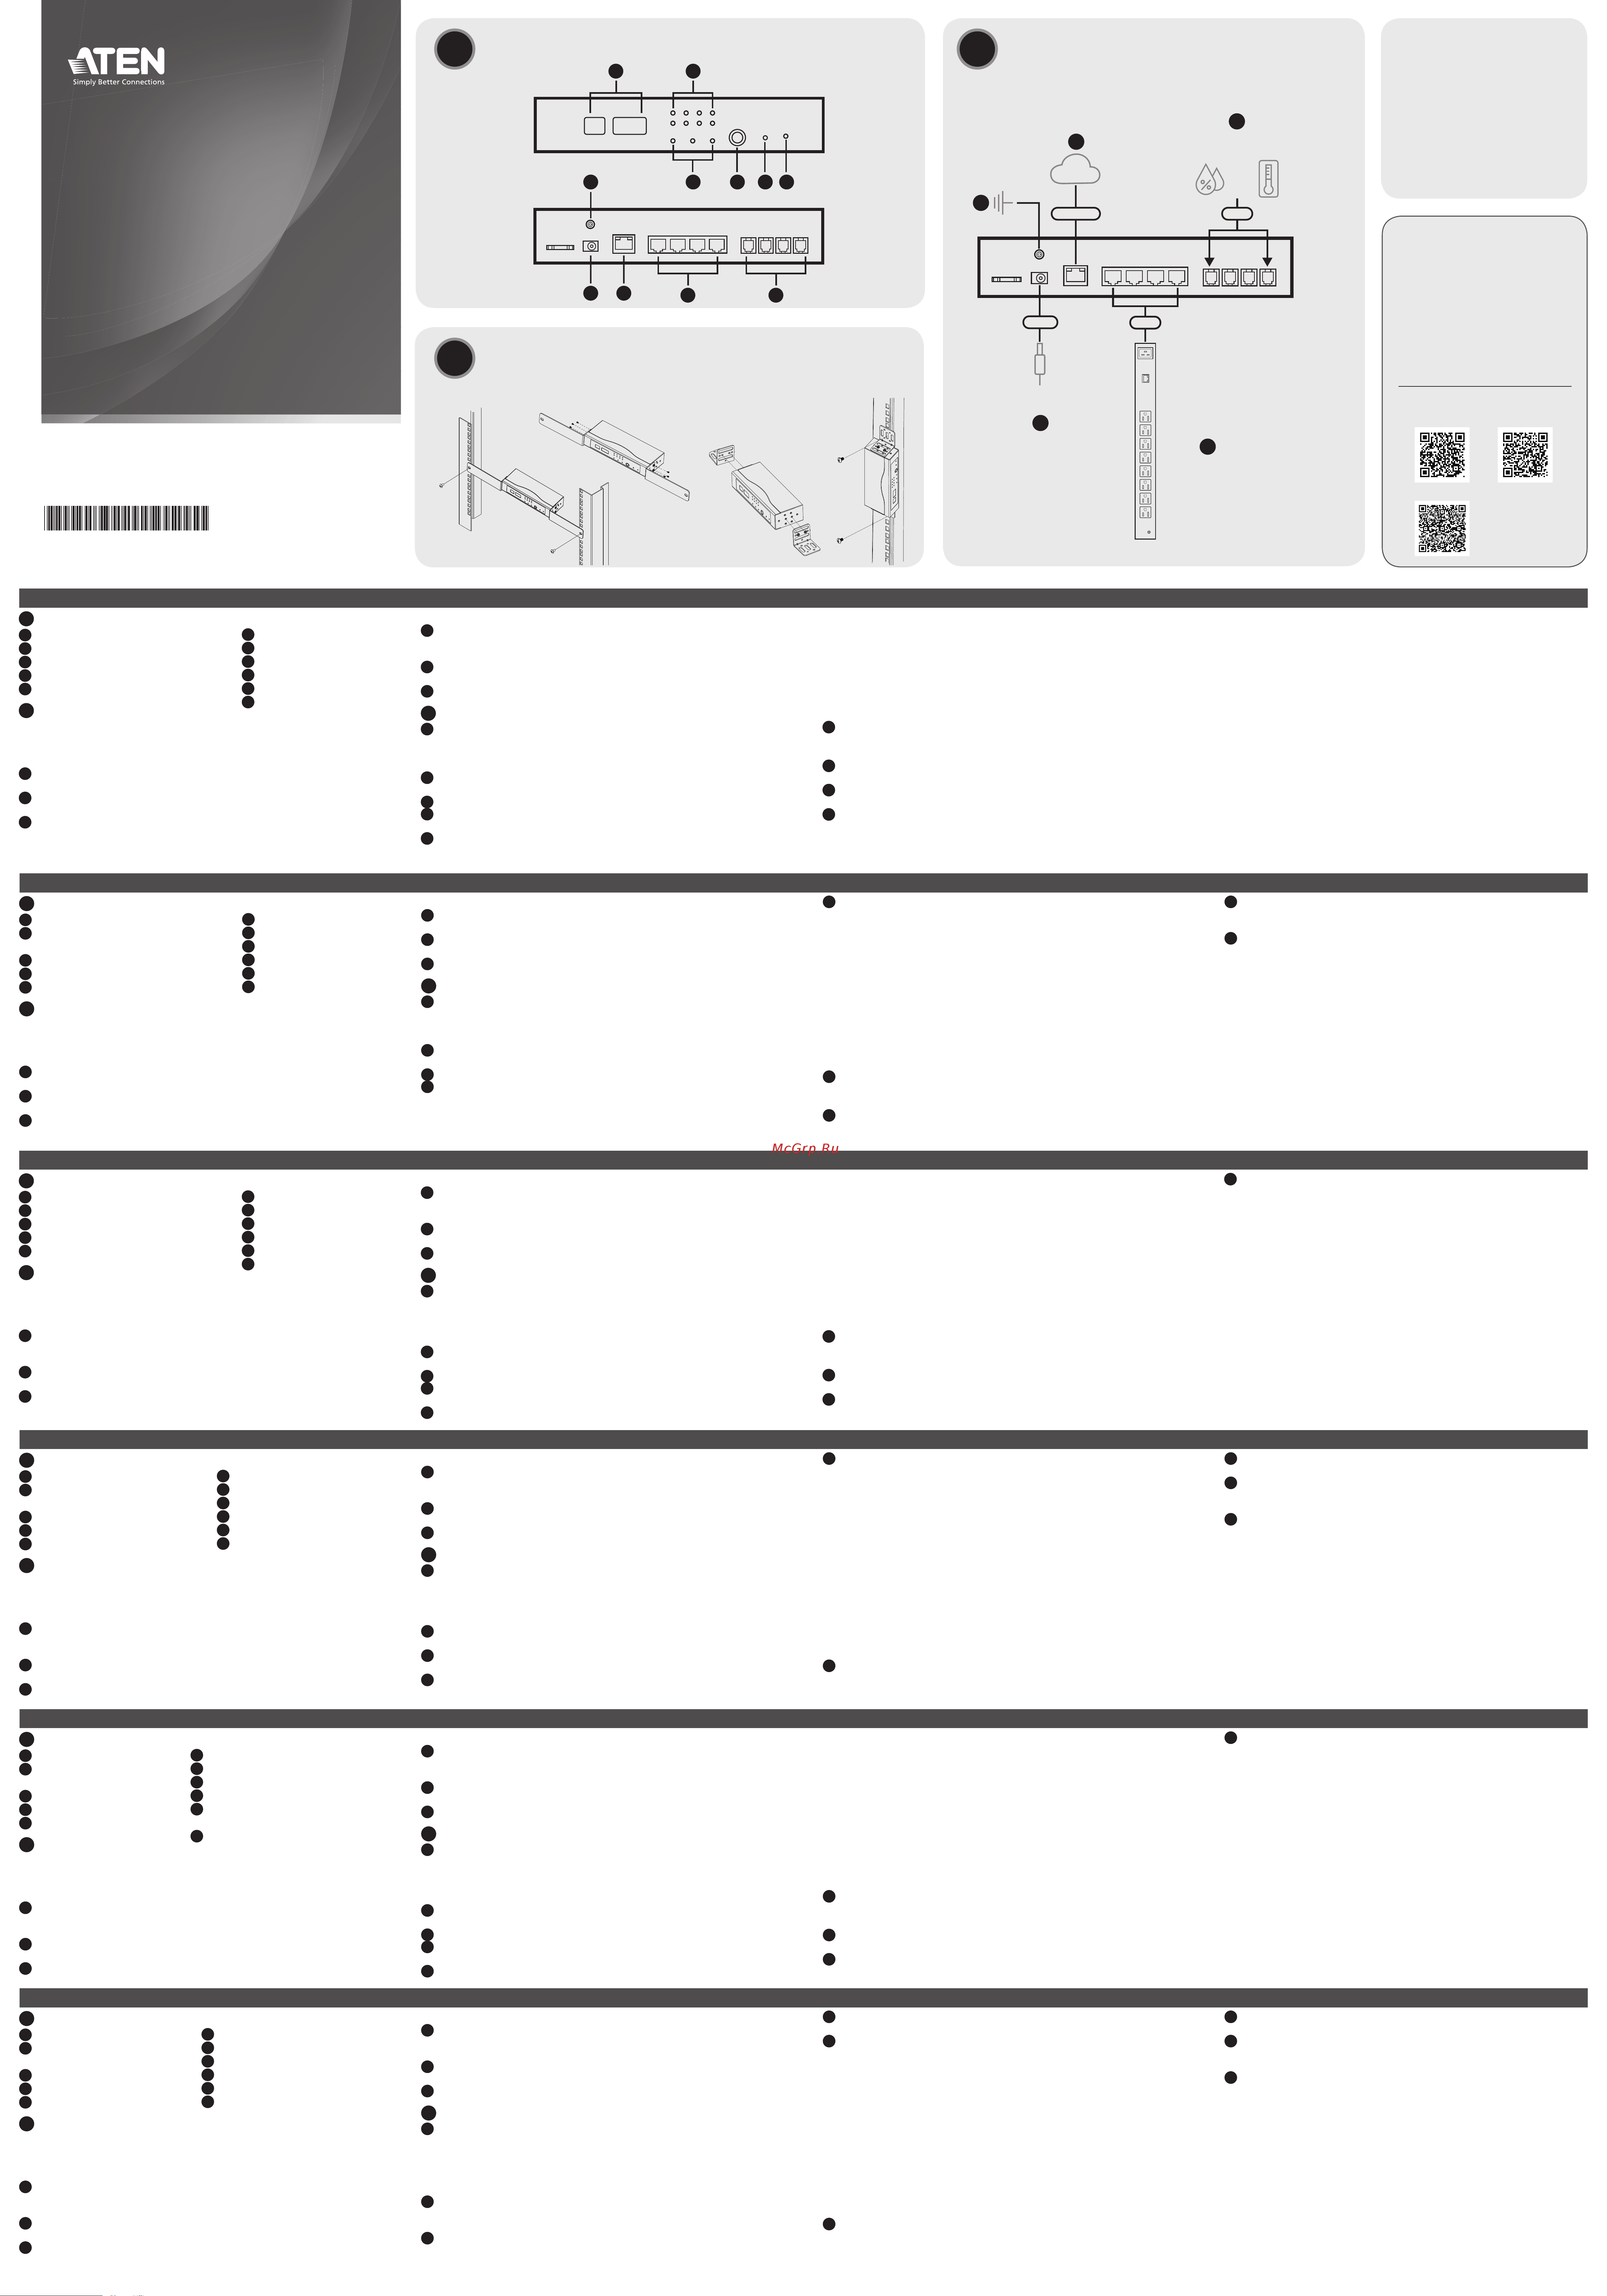
Hardware Overview
1
readout section
2
energy and environmental sensor LEDs
3
selection LEDs
4
select pushbutton
5
reset switch
B
Mounting
The EC1000 can be mounted in a 19” (1U) rack or a 0U confi guration mounted to the
side of the rack.
Rack Mounting – Front
1
Use three M3 x 8 Phillips hex head screws supplied with the rack mounting kit to screw the
rack mounting brackets into the sides near of the front of the unit.
2
Position the unit in the front of the rack and align the holes in the mounting brackets
with the holes in the rack.
3
Screw the mounting brackets to the rack.
EC1000 Energy Box with Real-time Power Monitoring
www.aten.com
Rack Mounting – Side
1
Use two M3 x 8 Phillips hex head screws supplied with the rack mounting kit to screw
the rack mounting brackets into the rack mounting brackets into the sides at the
middle of the unit.
2
Position the unit on the outer front of the rack and align the holes in the mounting
brackets with the hole in the rack.
3
Screw the mounting brackets to the rack.
C
Installation
1
Use a grounding wire to ground the EC1000 by connecting one end of the wire to its
grounding terminal, and the other end of the wire to a suitable grounded object.
Note: Do not omit this step. Proper grounding helps to prevent damage to the unit
from surges or static electricity.
2
For each PDU you want to connect, use an RJ-45 cable included with the package to
connect from the EC1000 Energy Box to the PDUs.
3
Use an Ethernet cable to connect the Energy Box to LAN.
4
To use sensors in your EC1000 Energy Box installation, connect them to the rear
environmental sensor ports.
5
Connect the EC1000’s power adapter to an AC power source.
Note: We strongly advise that you do not plug the EC1000 into a multi socket
extension cord, since it may not receive enough amperage to operate correctly.
Operation
EC1000 Energy Box provides several methods to access and manage your installation:
Front Panel, Browser, eco DC (Energy & DCIM Management Web GUI), and SNMP.
Front Panel
The readout section on the front panel shows energy port, environmental port, and IP
address setting. Press the select pushbutton to cycle through these settings.
Browser
1
In a web browser, type the IP address of the EC1000 Energy Box. See the IP Address
Determination section of the user manual.
Note: The default IP address is 192.168.0.60
2
If a security alert appears, accept the certifi cate -- it can be trusted. The login page
appears.
3
Enter a valid username and password, and then select a language.
Note: The default login credentials are administrator and password.
4
Click Log In to bring up the main page.
eco DC
EC1000 Energy Box supports eco DC (Energy & DCIM Management Web GUI). eco DC
provides you with an easy method for managing multiple devices, offering an intuitive
and user-friendly GUI that allows you to confi gure eco PDUs and monitor power status
of all equipment connected. To install the software, scan the eco DC QR code to visit the
product web page, and then download the installer from the Support and Downloads tab.
SNMP
eco PDUs support any 3rd party V1, V2 & V3 SNMP Manager Software. To install the
software, scan the ATEN Website QR code to visit the product web page, and then
download the installer from the Support and Downloads tab.
6
power LED
7
grounding terminal
8
power jack
9
LAN port
10
energy sensor ports
11
environment sensor ports
A
Description de l’appareil
1
section de lecture
2
Voyants de capteurs
d’énergie et d’environnement
3
Voyants de sélection
4
bouton-poussoir de sélection
5
interrupteur de réinitialisation
B
Montage
L’EC1000 peut être monté dans un bâti 19" (1 U) ou dans une confi guration 0 U montée
sur le côté du bâti.
Montage sur l’avant du bâti
1
Utilisez trois vis à tête hexagonale M3 x 8 Phillips fournies dans le kit de montage sur
bâti pour visser les supports de montage sur les côtés près de la façade de l'unité.
2
Positionnez l'unité à l'avant du bâti et alignez les trous des supports de montage avec
les trous du bâti.
3
Vissez les supports de montage au bâti.
Energy Box EC1000 avec surveillance de l’alimentation en temps réel
www.aten.com
Montage sur le côté du bâti
1
Utilisez deux vis à tête hexagonale M3 x 8 Phillips fournies dans le kit de montage sur
bâti pour visser les supports de montage sur les côtés au milieu de l'unité.
2
Positionnez l'unité à l'avant externe du bâti et alignez les trous des supports de
montage avec les trous du bâti.
3
Vissez les supports de montage au bâti.
C
Installation
1
Utilisez un fi l de mise à la terre pour raccorder l'EC1000 à la terre en reliant une
extrémité du fi l à sa borne de terre et l'autre extrémité à un objet adapté mis à la terre.
Remarque : n’ignorez pas cette étape. Une mise à la terre correcte permet d’éviter
d’endommager l’appareil en cas de surtension ou d’électricité statique.
2
Pour chaque PDU que vous souhaitez connecter, utilisez un câble RJ-45 inclus dans
l'emballage pour connecter l'Energy Box EC1000 aux PDU.
3
Utilisez un câble Ethernet pour connecter l'Energy Box au réseau local.
4
Pour utiliser des capteurs dans votre installation Energy Box EC1000, connectez-les
aux ports de capteurs d'environnement arrière.
5
Branchez l'adaptateur d'alimentation de l'EC1000 à une source d'alimentation secteur.
Remarque : nous vous recommandons fortement de ne pas brancher l’EC1000 sur
une rallonge multiprise, car elle pourrait ne pas recevoir le courant nécessaire à son
bon fonctionnement.
Fonctionnement
L'Energy Box EC1000 offre plusieurs modes d'accès et de gestion de votre installation :
panneau avant, navigateur, eco CC (interface graphique Web de gestion de l’énergie et
de l’ICD) et SNMP.
Panneau avant
La section de lecture sur le panneau avant indique le port d'énergie, le port
d'environnement et le réglage de l'adresse IP. Appuyez sur le bouton-poussoir de sélection
pour faire défi ler ces paramètres.
Navigateur
1
Dans un navigateur Web, saisissez l’adresse IP de l’Energy Box EC1000. Reportez-vous au
paragraphe « Détermination de l’adresse IP » du manuel d’utilisation.
Remarque : l’adresse IP par défaut est 192.168.0.60
2
Si une alerte de sécurité apparaît, acceptez le certifi cat, il est fi able. La page de
connexion apparaît.
3
Saisissez un nom d’utilisateur et un mot de passe valides, puis sélectionnez une
langue.
Remarque : les identifi ants de connexion par défaut sont administrator et password.
4
Cliquez sur Connexion pour faire apparaître la page principale.
eco DC
L’Energy Box EC1000 prend en charge le mode eco CC (interface graphique Web de
gestion de l’énergie et de l’ICD). Le mode eco CC vous permet de gérer facilement
plusieurs appareils, grâce à une interface graphique intuitive et conviviale qui vous permet
de confi gurer les eco PDU et de surveiller l’état de l’alimentation de tous les équipements
connectés. Pour installer le logiciel, scannez le code QR eco DC pour visiter la page Web
du produit, puis téléchargez le programme d’installation à partir de l’onglet Support et
téléchargements.
SNMP
Les unités eco PDUs supportent tout logiciel de gestion SNMP V1, V2 et V3 de tierce
partie. Pour installer le logiciel, scannez le code QR du site Web ATEN pour visiter la page
Web du produit, puis téléchargez le programme d’installation à partir de l’onglet Support
et téléchargements.
6
Voyant d’alimentation
7
borne de terre
8
Prise d’alimentation
9
Port LAN
10
ports de capteur d'énergie
11
ports du capteur d'environnement
Содержание
- Bedienung 1
- Browser 1
- Description de l appareil 1
- Ec1000 1
- Energy box with real time power monitoring quick start guide 1
- Fonctionnement 1
- Front panel 1
- Front view 1
- Frontpanel 1
- Funcionamiento 1
- Funzionamento 1
- Hardware overview 1
- Hardwareübersicht 1
- Humidity sensor 1
- Instalación 1
- Installation 1
- Installazione 1
- Montage 1
- Montage sur l avant du bâti 1
- Montage sur le côté du bâti 1
- Montaggio 1
- Montaggio su rack parte anteriore 1
- Montaggio su rack parte laterale 1
- Montaje 1
- Montaje en bastidor frontal 1
- Montaje en bastidor lateral 1
- Mounting 1
- Navegador 1
- Navigateur 1
- Operation 1
- Panel frontal 1
- Panneau avant 1
- Pannello frontale 1
- Panoramica hardware 1
- Pdu x 4 1
- Power adapter 1
- Rack mounting front 1
- Rack mounting front rack mounting side 1
- Rack mounting side 1
- Rackmontage seite 1
- Rackmontage vorderseite 1
- Rear view 1
- Reseña del hardware 1
- Support and documentation notice 1
- Technical support 1
- Temperature sensor 1
- Браузер 1
- Монтаж 1
- Монтаж в стойке передняя сторона 1
- Монтаж в стойке установка сбоку 1
- Обзор оборудования 1
- Передняя панель 1
- Протокол snmp 1
- Установка 1
- Эксплуатация 1
- Análise do hardware 2
- Browser 2
- Donanım i ncelemesi 2
- Eco dc 2
- Instalacja 2
- Instalare 2
- Instalação 2
- Kurulumu 2
- Montagem 2
- Montagem na prateleira frente 2
- Montagem na prateleira lateral 2
- Montaj 2
- Montare 2
- Montare pe rack frontal 2
- Montare pe rack lateral 2
- Montaż 2
- Montaż na szafie bok 2
- Montaż w szafie przód 2
- Obsługa 2
- Operare 2
- Operação 2
- Opis urządzenia 2
- Painel dianteiro 2
- Panel przedni 2
- Panoul frontal 2
- Prezentare generală hardware 2
- Przeglądarka 2
- Raf montajı yan 2
- Raf montajı ön 2
- Tarayıcı 2
- Çalıştırma 2
- Ön panel 2
- Браузер 2
- Експлуатація 2
- Монтаж 2
- Монтаж у стійці бічна сторона 2
- Монтаж у стійці передня сторона 2
- Огляд апаратного забезпечення 2
- Передня панель 2
- Установлення 2
- ハードウェアの概要 2
- フロントパネル 2
- ブラウザ 2
- マウント 2
- ラックマウント 側面 2
- ラックマウント 正面 2
- 前面板 2
- 安装 2
- 安裝 2
- 操作 2
- 机架安装 侧面 2
- 机架安装 正面 2
- 機架安裝 2
- 機架安裝 側面 2
- 機架安裝 正面 2
- 浏览器 2
- 瀏覽器 2
- 硬件概览 2
- 硬體檢視 2
- 設置 2
- 랙 설치 전면 2
- 랙 설치 측면 2
- 브라우저 2
- 설치 2
- 작동 2
- 장착하기 2
- 전면 2
- 하드웨어 개요 2
Похожие устройства
- Aten EHS-127870-19 Руководство пользователя
- Aten RS22U80 Руководство пользователя
- Aten UC8000 Краткое руководство по установке
- Aten UC8000 Руководство пользователя
- Aten StreamLIVE PRO UC9040 RESTful API Инструкция
- Aten StreamLIVE PRO UC9040 Руководство пользователя
- Aten StreamLIVE PRO UC9040 Краткое руководство по установке
- Aten StreamLIVE PRO UC9040 Руководство пользователя 2
- Aten CAMLIVE PRO UC3022 Краткое руководство по установке
- Aten CAMLIVE PRO UC3022 Руководство пользователя
- Aten CAMLIVE + UC3021 Краткое руководство по установке
- Aten CAMLIVE + UC3021 Руководство пользователя
- Aten StreamLIVE HD UC9020 RESTful API Инструкция
- Aten StreamLIVE HD UC9020 Руководство по программному обеспечению
- Aten StreamLIVE HD UC9020 Краткое руководство по установке
- Aten StreamLIVE HD UC9020 Руководство пользователя
- Aten CAMLIVE UC3020 Краткое руководство по установке
- Aten CAMLIVE UC3020 Руководство пользователя
- Aten US3342 Краткое руководство по установке
- Aten US3342 Руководство пользователя