![Behringer DEQ1024 — обзор цифрового эквалайзера с фильтрами и управлением стерео [6/12]](/img/pdf.png)
Behringer DEQ1024 — обзор цифрового эквалайзера с фильтрами и управлением стерео [6/12]
![Behringer DEQ1024 [6/12] Rear panel](/views2/1990153/page6/bg6.png)
6 ULTRAGRAPH DIGITAL DEQ1024
(9) The DEQ1024 features a LOW CUT and HIGH CUT lter in its FILTER section,
allowing you to limit the entire frequency spectrum upward or downward.
TheHIGH CUT control is used to determine the cut-o frequency above which
the high frequency range is lowered (2.5 - 16 kHz). When turned all the
way to the right, the lter is deactivated (OFF). The LOW CUT control is used
to determine the cut-o frequency above which the low frequency range
is lowered (20 - 160 Hz). When turned all the way to the left, the lter is
deactivated (OFF).
(10) Use the GAIN control in the MASTER section to determine the output
volume of the ULTRAGRAPH DIGITAL in the range between -9 to +9 dB.
Inaddition, there is also a stereo imager function that lets you adjust the
stereo width and therefore the separation between the left and the right
stereo side. When the STEREO IMAGE control is turned all the way to the
right, you achieve the maximum widening of the stereo signal (WIDE);
whenthe control is turned all the way to the left, the stereo signal is
transformed into a mono signal (MONO). When the STEREO IMAGE control is
in its middle position, your signal is not processed (STEREO).
(11) When you keep the CONFIG switch depressed for a few seconds, youcan
select the operating mode of your DEQ1024: ANALOG (green LED),
DIGITAL(yellow LED), PRE EQ (yellow LED) or POST EQ (yellow LED). Whenin
the PRE EQ or POST EQ mode, you can use the rear panel digital connectors as
inserts, for example for an additional dynamics processor. When the unit is in
PRE EQ mode, the insert point is located pre EQ; when the unit is in POST EQ
mode, the insert point is located post EQ (see g. 2.5 and2.6).
Fig. 2.4: Input/output wiring depending on operating mode
CONFIG 1 2 3
Pink Noise ON
1 2 3
Analog B A A A A A
Digital C A A A A A
Pre EQ C B A A B A
Post EQ B A B A A B
Tab. 2.1: Input/output wiring depending on operating mode
Fig. 2.5: Signal ow in PRE EQ mode
Fig. 2.6: Signal ow in POST EQ mode
(12) When you keep the CLOCK switch depressed for a few seconds, you can
select the desired sample rate with which your DEQ1024 is working: 44.1 kHz,
48 kHz or 96 kHz (green LEDs). To synchronise your DEQ1024 with the sample
rate of an external unit (e. g. through a digital mixing console), you have to
select the DIG IN setting (yellow LED lights up).
◊ If you select the DIG IN setting, although no signal is connected to
the digital input, the DEQ1024 is not able to synchronise with any
sample frequency (yellow DIG IN LED is blinking). In this case the
ULTRAGRAPH DIGITAL switches to the sample frequency last connected
to the digital input. If you connect a signal to the digital input while
operating in the unsynchronised mode, your DEQ1024 switches back to
normal mode and synchronises with the connected sample frequency
(yellow LED lights up).
To select the word length of the digital output signal (16 bit or 24 bit),
keep the CONFIG and CLOCK switches simultaneously pressed.
The 24-bit setting is shown by means of the -24 dB LEDs in the METER
display (see (13)). When the 16-bit setting is selected, no METER LED
lights up. This way, the DEQ1024 can be adjusted to the 16-bit inputs of
DAT and CD recorders or sound cards. The analog output signal is always
converted with 24 bit, independent of the above setting.
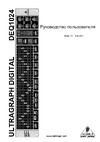
2.2 Rear panel
(20) (16) (15)(18)(19) (17) (17)
(22)
(21) (23)
Fig. 2.7: Rear panel control elements and connectors
Содержание
- User manual p.1
- Ultragraph digital deq1024 p.1
- Thank you p.2
- Table of contents p.2
- Limited warranty p.3
- Legal disclaimer p.3
- Important safety instructions p.3
- Front panel p.4
- Control elements p.4
- Before you get started p.4
- 14 2 4 5 6 7 11 13 10 3 p.4
- 12 8 9 p.4
- The user s manual p.4
- Introduction p.4
- Rear panel p.6
- 22 21 23 p.6
- 20 16 15 18 19 17 17 p.6
- Master equalizer in sound reinforcement systems p.7
- Applications p.7
- Equalizer in the monitor path p.8
- Of course you can also connect equipment featuring un balanced outputs to this end use either mono jacks or connect ring and sleeve of the stereo jack bridge pin 1 and pin 3 when using xlr connectors p.9
- Installation p.9
- For general sound processing p.9
- Be it in the studio on the stage or in radio plays the ultragraph digital can become an indispensable tone tool you can for example change the sound of a voice so that it sounds like it s coming through the phone or you can prominently filter the sound of instruments so that they fit well into an existing mix p.9
- You will need many different cables for the various applications the following illustrations show how these cables should be laid out please use exclusively high grade cabels p.9
- Audio connections p.9
- You can perform graphic equalization of your monitor sound besides you can supress narrow band room resonances an analyzer such as the one integrated into the behringer digital equalizer ultracurve pro deq2496 can help you in your search for room resonances and a linear frequency response p.9
- As equalizer for your studio monitors p.9
- Using the ultragraph digital in the studio p.9
- Also please make sure that sufficient ventilation of the unit is provided for and never put the device onto an amp or similar equipment to avoid overheating p.9
- To disconnect your deq1024 from the mains please pull the power cord p.9
- Additional applications of your deq1024 are possible in the studio your imagination has no limits here are only some of the examples p.9
- The following tables represent the connection between frequencies and their acoustic meaning they should encourage you to start using your deq1024 in many creative ways p.9
- The equalizer lets you process both individual and sum signals to process individual signals you should connect the ultragraph digital via the channel insert on your mixing console to control several signals either use a subgroup or a main insert especially in mastering studios the sound of a finished mix is nowadays still processed with equalizers often the mixes are not evened out meaning certain frequency ranges are featured too prominently while others can hardly be heard a graphic equalizer lets you even out the intensity of such frequency ranges so you end up with a homogenous sound characteristics p.9
- The behringer ultragraph digital requires two height units 2 hu for being installed into a 19 rack please allow at least an extra 4 of space for the connectors on the rear panel p.9
- The audio connectors of the ultragraph digital are electronically balanced and ensure automatic hum and noise reduction p.9
- Special sound effects p.9
- Rack mounting p.9
- Please use m6 machine screws and nuts to install your deq1024 into a rack p.9
- Out of the socket when your unit is operational always make sure you can easily access the power socket if you install your deq1024 into a rack please make sure that you can easily unplug the unit out of the wall socket or that you are using an extension cord with a power switch p.9
- Specifications p.10
- Digital connections aes ebu and s pdif p.10
Похожие устройства
-
 Behringer ULTRAGRAPH DIGITAL DEQ 1024Руководство по эксплуатации
 -
 Behringer ULTRAGRAPH PRO FBQ 6200Руководство по эксплуатации
 -
 Behringer FBQ6200Руководство по эксплуатации
 -
 Behringer DEQ2496Руководство по эксплуатации
 -
 Behringer FBQ3102Руководство по эксплуатации
 -
 Behringer FBQ800Руководство по эксплуатации
 -
 Behringer FBQ1502Руководство по эксплуатации
 -
 Alto CONTROL30Руководство по эксплуатации
 -
 Alesis Alesis DEQ830Руководство по эксплуатации
 -
 EUROSOUND EQ-1215Руководство по эксплуатации
 -
 EUROSOUND EQ-3231FРуководство по эксплуатации
 -
 EUROSOUND EX-1000Руководство по эксплуатации
Изучите возможности цифрового эквалайзера с функциями LOW CUT и HIGH CUT, регулировкой громкости и управления стерео. Оптимизируйте звук с помощью различных режимов работы.