![Behringer DEQ1024 — оптимизация звуковой системы: советы по эквализации и настройке [8/12]](/img/pdf.png)
Behringer DEQ1024 — оптимизация звуковой системы: советы по эквализации и настройке [8/12]
![Behringer DEQ1024 [8/12] Equalizer in the monitor path](/views2/1990153/page8/bg8.png)
8 ULTRAGRAPH DIGITAL DEQ1024
After this editing, you have a basic setup; now, you can do some manual
ne-tuning, if necessary.
The following is true:
A linear response curve is not ideal for every application. For example,
whendealing with voice transmission, being able to understand the speaker is
the most important factor. Therefore, the response curve should drop away in the
bass range, since the voice can carry subsonic noise and oor rumble.
As a rule, extremely low and extremely high frequencies are transmitted much
weaker. It makes no sense to burden a small P.A. system with frequencies below
50 Hz; the only result in addition to the higher power consumption would most
likely be expensive repair costs.
◊ Always keep in mind where the physical limitations of your system are.
Upon setting up your system as accurately as possible to the desired response
curve, walk around the listening area so you can get an idea what your system
sounds like from various positions. Don’t forget to implement frequent pauses
and a various music selection into your program. You will get a better feeling
forthe transmission characteristic of your system as well as of the room/
auditorium itself.
◊ Achieving good EQ settings requires a lot of time and patience!
If extreme settings of your EQ are required in order to produce a useful
frequency response, this should be seen as an alarm sign that a serious
error or defect is present somewhere in your sound system, be it in
room acoustics or in your equipment.
An equalizer is no solution that can make up for a poor P.A. system, but it is an
extremely useful and eective sound tool for musical ne tuning. Fine tuning
often lets you create amazing results and improvements in acoustic penetration
and in the overall quality of your sound.
3.2 Equalizer in the monitor path
Basically, the on-stage volume level should be kept as low as possible, because:
1. it will be easier on your hearing,
2. there are less feedback problems, and
3. it’s easier to achieve a good front-of-house sound.
Often, the volume of the monitor speakers is raised as a concert goes on.
Usebreaks and pauses to reduce all monitor paths by about 3 dB. The musicians
will not or hardly hear that the volume has been reduced, because during a break
their hearing can relax a bit. This gives you valuable headroom in your system.
Extremely low frequencies are usually faded out completely to avoid a “muddy”
sound on stage caused by low-frequency feedback. Use the low-cut lter for this
purpose and set it up in such a way so that extremely deep feedback disappears,
creating a transparent-sounding monitor sound.
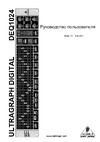
EUROPOWER EP1500
Aux sends
1 & 2
Outputs
L & R
EUROLIVE F1520 Floor monitors
ULTRAGRAPH DIGITAL DEQ1024
EURORACK UB2222FX-PRO
Fig. 3.2: The ULTRAGRAPH DIGITAL DEQ1024 in a monitor system
3.2.1 Priming a monitor system
Priming describes the process of detecting and suppressing feedback frequencies.
After placing and setting up your microphones and monitor speakers (including
ampliers), you should crank up the aux send controls on all the channels of your
mixing console needed for the monitor mix.
Now, activate the feedback detection system by pressing the FB INDICATOR
switch (4). The fader LEDs (11) indicate the intensity of the individual frequency
bands. Then, use the aux send master controls to increase the amplication on
your mixing console until you rst begin to notice feedback. Possible feedback
frequencies are now indicated on the fader LEDs that are lit up most brightly.
Frequency ranges that cause feedback can now be lowered by using the
respective EQ faders. Repeat this procedure to detect additional feedback
frequencies. After having worked on all critical frequencies, when you crank
up the aux send master control, you will be able to hear only negligible
multi- frequency feedback. Your monitor system has now achieved its
maximum volume.
Leave the other faders in the middle position as long as there is no need to
proceed with frequency correction (e.g. measuring with a real-time analyzer).
Now, adjust the desired stage volume, and you will have tons of available
headroom without causing feedback problems.
Содержание
- User manual p.1
- Ultragraph digital deq1024 p.1
- Thank you p.2
- Table of contents p.2
- Limited warranty p.3
- Legal disclaimer p.3
- Important safety instructions p.3
- Front panel p.4
- Control elements p.4
- Before you get started p.4
- 14 2 4 5 6 7 11 13 10 3 p.4
- 12 8 9 p.4
- The user s manual p.4
- Introduction p.4
- Rear panel p.6
- 22 21 23 p.6
- 20 16 15 18 19 17 17 p.6
- Master equalizer in sound reinforcement systems p.7
- Applications p.7
- Equalizer in the monitor path p.8
- Of course you can also connect equipment featuring un balanced outputs to this end use either mono jacks or connect ring and sleeve of the stereo jack bridge pin 1 and pin 3 when using xlr connectors p.9
- Installation p.9
- For general sound processing p.9
- Be it in the studio on the stage or in radio plays the ultragraph digital can become an indispensable tone tool you can for example change the sound of a voice so that it sounds like it s coming through the phone or you can prominently filter the sound of instruments so that they fit well into an existing mix p.9
- You will need many different cables for the various applications the following illustrations show how these cables should be laid out please use exclusively high grade cabels p.9
- Audio connections p.9
- You can perform graphic equalization of your monitor sound besides you can supress narrow band room resonances an analyzer such as the one integrated into the behringer digital equalizer ultracurve pro deq2496 can help you in your search for room resonances and a linear frequency response p.9
- As equalizer for your studio monitors p.9
- Using the ultragraph digital in the studio p.9
- Also please make sure that sufficient ventilation of the unit is provided for and never put the device onto an amp or similar equipment to avoid overheating p.9
- To disconnect your deq1024 from the mains please pull the power cord p.9
- Additional applications of your deq1024 are possible in the studio your imagination has no limits here are only some of the examples p.9
- The following tables represent the connection between frequencies and their acoustic meaning they should encourage you to start using your deq1024 in many creative ways p.9
- The equalizer lets you process both individual and sum signals to process individual signals you should connect the ultragraph digital via the channel insert on your mixing console to control several signals either use a subgroup or a main insert especially in mastering studios the sound of a finished mix is nowadays still processed with equalizers often the mixes are not evened out meaning certain frequency ranges are featured too prominently while others can hardly be heard a graphic equalizer lets you even out the intensity of such frequency ranges so you end up with a homogenous sound characteristics p.9
- The behringer ultragraph digital requires two height units 2 hu for being installed into a 19 rack please allow at least an extra 4 of space for the connectors on the rear panel p.9
- The audio connectors of the ultragraph digital are electronically balanced and ensure automatic hum and noise reduction p.9
- Special sound effects p.9
- Rack mounting p.9
- Please use m6 machine screws and nuts to install your deq1024 into a rack p.9
- Out of the socket when your unit is operational always make sure you can easily access the power socket if you install your deq1024 into a rack please make sure that you can easily unplug the unit out of the wall socket or that you are using an extension cord with a power switch p.9
- Specifications p.10
- Digital connections aes ebu and s pdif p.10
Похожие устройства
-
 Behringer ULTRAGRAPH DIGITAL DEQ 1024Руководство по эксплуатации
 -
 Behringer ULTRAGRAPH PRO FBQ 6200Руководство по эксплуатации
 -
 Behringer FBQ6200Руководство по эксплуатации
 -
 Behringer DEQ2496Руководство по эксплуатации
 -
 Behringer FBQ3102Руководство по эксплуатации
 -
 Behringer FBQ800Руководство по эксплуатации
 -
 Behringer FBQ1502Руководство по эксплуатации
 -
 Alto CONTROL30Руководство по эксплуатации
 -
 Alesis Alesis DEQ830Руководство по эксплуатации
 -
 EUROSOUND EQ-1215Руководство по эксплуатации
 -
 EUROSOUND EQ-3231FРуководство по эксплуатации
 -
 EUROSOUND EX-1000Руководство по эксплуатации
Узнайте, как правильно настраивать эквалайзер для улучшения качества звука. Советы по управлению частотами и минимизации проблем с обратной связью.