
Maxwell MW-1503 W Инструкция по эксплуатации онлайн
TOASTER
The unit is intended for making toasts.
Description
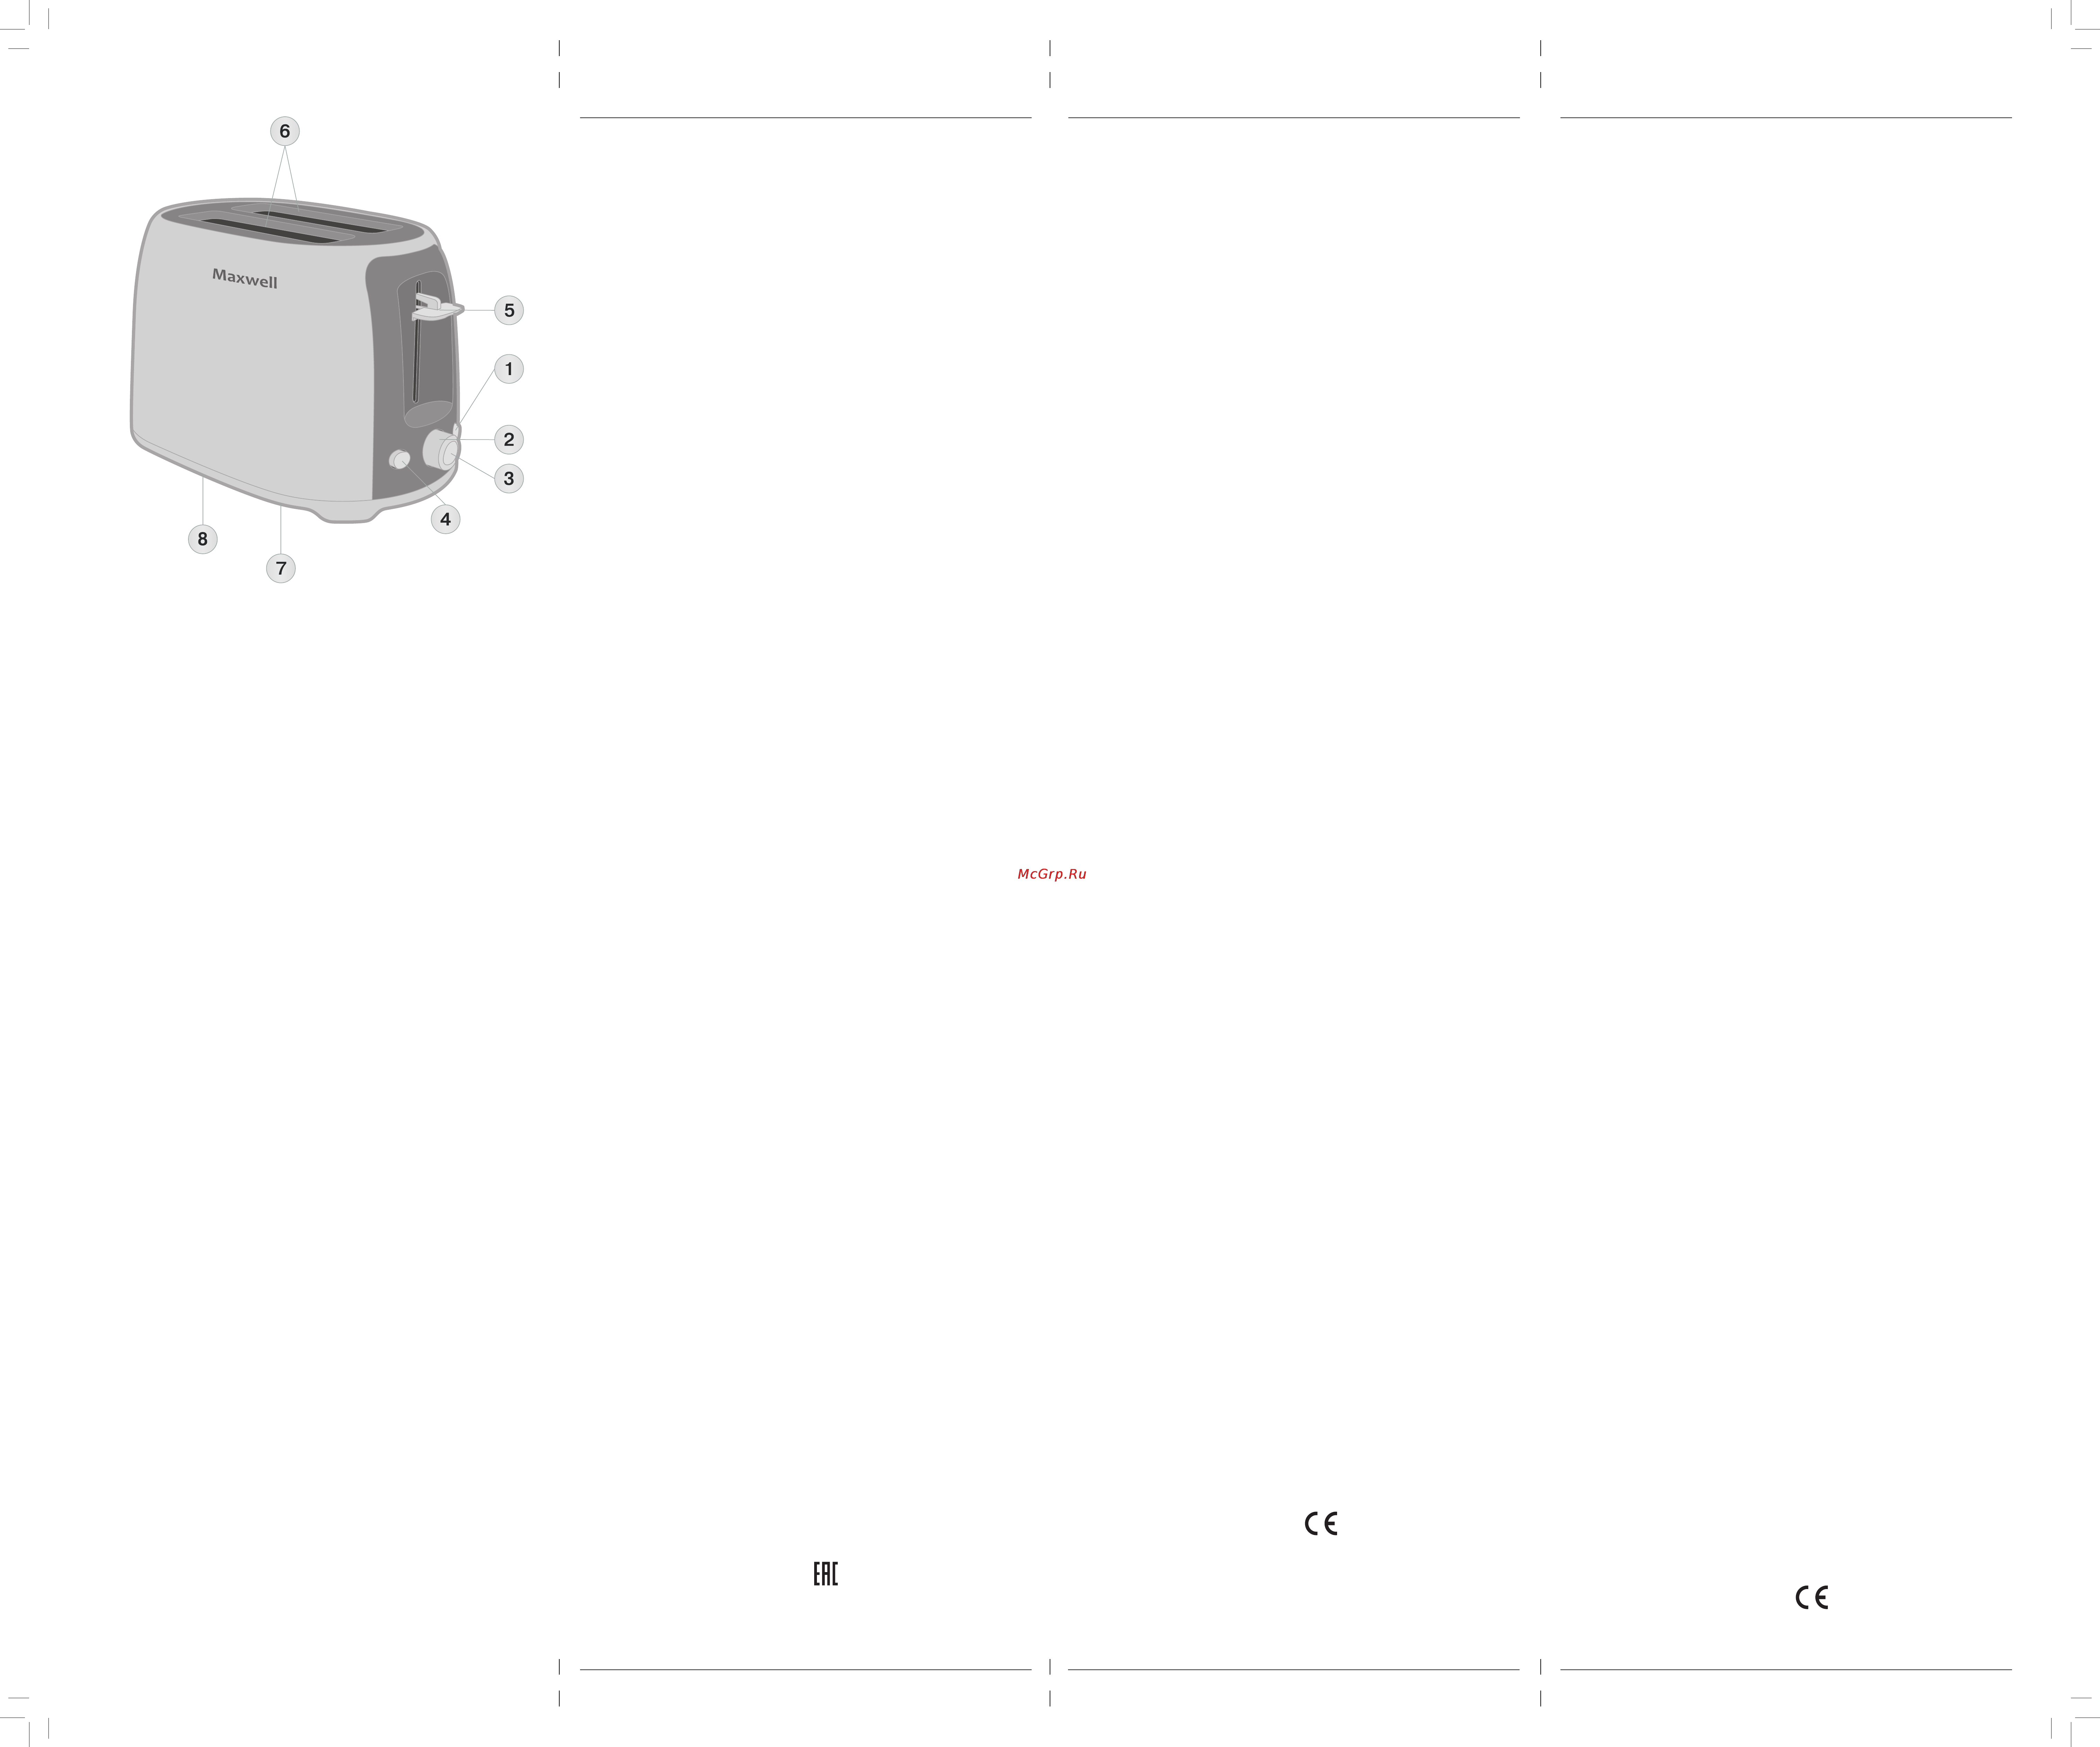
1. «Defrost» button
2. Toasting level control knob
3. Cancel button
4. «Reheat» button
5. Carriage control lever
6. Slots for bread toasting
7. Cord storage
8. Folding crumb tray
ATTENTION!
For additional protection it is reasonable to install
a residual current device (RCD) with nominal
operation current not exceeding 30 mA into the
mains of the kitchen; to install RCD, contact a
specialist.
SAFETY MEASURES
Before using the unit, read this instruction manual
carefully and keep it for future reference.
Use the unit for intended purposes only, as
specified in this manual. Mishandling the unit can
lead to its breakage and cause harm to the user or
damage to his/her property.
• Before switching the unit on for the first time,
make sure that the mains voltage corresponds
to the voltage specified on the unit body.
• The power cord is equipped with a “europlug”;
plug it into the socket with a reliable ground-
ing contact.
• To avoid fire, do not use adapters for connect-
ing the unit to the mains.
• Before switching the toaster on or plugging it in,
make sure that your hands are dry.
• Do not use the toaster outdoors.
• Place the unit on a flat steady surface.
• Provide enough space around the toaster for
proper ventilation.
Attention! Set the required toasting level
correctly, the bread can catch fire if you toast
it too long.
• Do not use the toaster near curtains, walls
covered with wallpapers, near clothes, kitchen
towels or any other inflammable materials and
surfaces that can be damaged by high tem-
perature.
• Do not use the toaster for toasting products
with too much sugar or filled with jam or mar-
malade.
• To avoid the risk of fire, do not put oversized
food and food wrapped in metal foil package
into the toaster.
• Never cover the toaster during making toasts.
• Always switch the toaster off and unplug it after
operation or before cleaning.
• Before cleaning the toaster, make sure that it
has cooled down.
• Clean the tray regularly. Provide that no crumbs
accumulate on the tray.
• To avoid fire or electric shock, do not immerse
the power cord, the power plug or the unit itself
into water or any other liquids.
• Do not use abrasives or solvents to clean the
toaster.
• Provide that the power cord does not contact
with hot surfaces or sharp furniture edges.
• Do not allow children to touch the unit body and
the power cord during the unit operation.
• Do not leave children unattended to prevent
using the unit as a toy.
• For children safety reasons do not leave poly-
ethylene bags used as packaging unattended.
Attention! Do not allow children to play with
polyethylene bags or packaging film. Danger of
suffocation!
• This unit is not intended for usage by children
under 8 years of age.
• Children aged 8 and over as well as disabled
persons can use this unit only under supervi-
sion of a person who is responsible for their
safety, if they are given all the necessary and
understandable instructions concerning the
safe usage of the unit and information about
danger that can be caused by its improper
usage.
• Never pull the power cord when disconnecting
the unit from the mains, take the power plug
and carefully remove it from the mains socket.
• Never use the toaster if the power cord or the
plug is damaged, if the unit works improperly or
after it was dropped.
• Do not disassemble the unit by yourself, if any
malfunction is detected or after the unit was
dropped, apply to the nearest authorized ser-
vice center.
• Transport the unit in the original package only.
• Keep the unit out of reach of children and dis-
abled persons.
THE UNIT IS INTENDED FOR HOUSEHOLD USAGE
ONLY
CAUTION! Metal parts of the toaster heat up
strongly during operation, do not touch them.
WARNING:
• Never try to take jammed toasts out of the
operating toaster with your hands or with a
metal object, as contact of the metal object with
the heating element under voltage may cause
electric shock.
• Unplug the toaster, wait until it cools down and
only then remove the toasts carefully with a
suitable wooden or plastic spatula.
• To avoid burns, keep your hands and other
open parts of your body away from the metal
parts of the toaster during the unit operation.
BEFORE THE FIRST USE
After unit transportation or storage under cold
(winter) conditions, it is necessary to keep
it for at least two hours at room temperature
before switching on.
• Before the first use of the toaster, remove any
package materials and stickers that can pre-
vent normal operation of the unit.
• Make sure that the mains voltage corresponds
to the voltage specified on the unit body.
• There is a cord storage (7) on the bottom of
the unit body. You can adjust the optimal power
cord length by folding the cord in the cord stor-
age in a corresponding way.
• Without loading toasts, plug the unit in, set
the toasting level control knob (2) to the posi-
tion «6» and switch the unit on by pressing the
lever (5).
• During the first switching on the heating ele-
ments burn, therefore occurrence of a small
amount of smoke or foreign smell is possible.
It is normal.
• If necessary, switch the toaster on for several
times.
TIPS
• The toasting level depends on the thickness of
the bread slice, bread sort and quality. Never
toast too thin or too thick slices; the thickness
of the toast should not exceed 20 mm.
• If the toasts are jammed in the slot, press the
Cancel button (3), unplug the unit and let it cool
down. Use a suitable wooden spatula to remove
the toasts. Do not touch the heating elements
to avoid damaging them.
MAKING TOASTS
• Put one or two slices of bread into the slots for
bread toasting (6).
• Insert the power plug into the mains socket.
• Set the required toasting level using the knob
(2):
«1» - minimal toasting level;
«6» - maximal toasting level.
Note: Set the control knob (2) to the needed
position.
• Press the lever (5) until clamping.
• When the toasts are ready, the unit will be
switched off automatically, the carriage control
lever (5) will return to its initial position.
• To remove small toasts, carefully move the car-
riage control lever (5) upwards.
«Reheat» BUTTON
If necessary, you can warm up cold toasts; to do
this, put the toasts into the slots for bread toasting
(6) and press the carriage control lever (5). Press
the «Reheat» button (4). In this mode you can warm
up toasts without additional browning.
Cancel BUTTON
If you want to stop the process of toasting, press
the Cancel button (3).
«Defrost» BUTTON
To toast frozen toasts, put them into the slots
for bread toasting (6), set the required toasting
level with the control knob (2), press the carriage
control lever (5) until clamping and then press the
«Defrost» button (1).
CRUMB TRAY
The toaster is equipped with a crumb tray (8).
• Switch the unit off and let it cool down.
• Move the tray (8) sideways to delink it from the
unit body.
• Unfold the tray (8), clean the tray (8) and the
inside of the toaster body from bread crumbs.
• Close the tray (8).
Cleaning and care
• Before cleaning make sure that the unit is
unplugged.
• Wait until the toaster cools down completely.
• Clean the outer surface of the toaster body with
a damp cloth and then wipe it dry.
• Do not use coarse sponges, abrasives and sol-
vents to clean the toaster.
• To avoid damage of the unit, never insert for-
eign objects into the slots for bread toasting.
• Open the folding tray (8); clean it and the inside
of the toaster body from bread crumbs. Close
the tray (8).
• Do not immerse the unit, the power cord and
the power plug into water or any other liquids.
• To avoid injuries or damage of the unit, never
insert foreign objects into the slots for bread
toasting (6).
• Keep the unit away from children in a dry cool
place.
Technical specifications
Power supply: 220-240 V ~ 50/60 Hz
Power: 750 W
The manufacturer preserves the right to change
the specifications of the unit without a preliminary
notification.
Unit operating life is 3 years
Guarantee
Details regarding guarantee conditions can be
obtained from the dealer from whom the appliance
was purchased. The bill of sale or receipt must be
produced when making any claim under the terms
of this guarantee.
This product conforms to the EMC-
Requirements as laid down by the Council
Directive 2004/108/ЕС and to the Low
Voltage Regulation (2006/95/ЕС)
TOASTER
Das Gerät ist für Zubereitung von Toasts bestimmt.
Beschreibung
1. «Auftauen»-Taste
2. Regler des Röstgrads
3. Stopptaste
4. «Aufwärmen»-Taste
5. Betriebshebel
6. Toastschächte
7. Kabelaufbewahrung
8. Aufklappbare Krümelschale
ACHTUNG!
Als zusätzlicher Schutz ist es zweckmäßig, den
FI-Schalter mit Nennstrom maximal bis 30 mA im
Stromversorgungskreis der Küche aufzustellen;
wenden Sie sich dafür an einen Spezialisten.
SICHERHEITSMAßNAHMEN
Vor der ersten Inbetriebnahme des Elektrogeräts lesen
Sie diese Bedienungsanleitung aufmerksam durch
und bewahren Sie diese für weitere Referenz auf.
Benutzen Sie das Gerät nur bestimmungsmäßig
und laut dieser Bedienungsanleitung. Nicht
ordnungsgemäße Nutzung des Geräts kann zu
seiner Störung führen, einen gesundheitlichen oder
materiellen Schaden beim Nutzer hervorrufen.
• Vergewissern Sie sich vor dem ersten Einschalten
des Geräts, dass die Netzspannung und die
Spannung am Gerätegehäuse übereinstimmen.
• Das Netzkabel ist mit einem „Eurostecker“ ausge-
stattet; stecken Sie diesen in die Steckdose mit
sicherer Erdung ein.
• Verwenden Sie keine Adapterstecker beim
Anschließen des Geräts an die elektrische
Steckdose, um Brandrisiko zu vermeiden.
• Bevor Sie den Toaster einschalten oder den
Netzstecker in die elektrische Steckdose ein-
stecken, vergewissern Sie sich, dass Ihre Hände
trocken sind.
• Benutzen Sie den Toaster draußen nicht.
• Stellen Sie das Gerät auf einer ebenen standfes-
ten Oberfläche auf.
• Um den Toaster herum soll es immer genug Platz
für eine gute Belüftung geben.
Achtung! Stellen Sie den Röstgrad richtig ein, bei
langem Rösten können sich die Toasts entzünden.
• Benutzen Sie den Toaster in der Nähe von
Vorhängen, mit Tapeten bedeckten Wänden,
Kleidung, Küchentüchern oder anderen leicht
entflammbaren Stoffen, sowie neben den
Oberflächen, die durch hohe Temperatur beschä-
digt werden können, nicht.
• Benutzen Sie den Toaster zum Rösten der
Nahrungsmittel, die zu große Menge Zucker ent-
halten oder mit Marmelade oder Konfitüre gefüllt
sind, nicht.
• Um Entzündungsrisiko zu vermeiden, legen Sie zu
große oder in Folie eingewickelte Nahrungsmittel
in den Toaster nicht ein.
• Decken den Toaster während der Zubereitung von
Toasts auf keinen Fall ab.
• Jedesmal nach der Beendigung des Betriebs oder
vor der Reinigung schalten Sie den Toaster aus
und trennen Sie ihn vom Stromnetz ab.
• Bevor Sie den Toaster reinigen, vergewissern Sie
sich, dass er abgekühlt ist.
• Reinigen Sie die Krümelschale regelmäßig.
Achten Sie darauf, dass sich keine Krümel in der
Krümelschale ansammeln.
• Tauchen Sie den Netzstecker, das Netzkabel
und das Gerät selbst ins Wasser oder jegliche
andere Flüssigkeiten nicht ein, um Brand- oder
Stromschlagrisiko zu vermeiden.
• Es ist nicht gestattet, Abrasiv- oder Lösungsmittel
für die Reinigung des Toasters zu benutzen.
• Vermeiden Sie die Berührung des Netzkabels mit
heißen Oberflächen und scharfen Möbelkanten.
• Lassen Sie Kinder das Gerätegehäuse und das
Netzkabel während des Betriebs nicht berühren.
• Beaufsichtigen Sie Kinder, damit sie das Gerät als
Spielzeug nicht benutzen.
• Aus Kindersicherheitsgründen lassen Sie die
Plastiktüten, die als Verpackung verwendet wer-
den, nie ohne Aufsicht.
Achtung! Lassen Sie Kinder mit Plastiktüten oder
Verpackungsfolien nicht spielen. Erstickungsgefahr!
• Dieses Gerät ist nicht für den Gebrauch von
Kindern unter 8 Jahren geeignet.
• Dieses Gerät darf von Kindern ab 8 Jahren und
behinderten Personen nur dann genutzt werden,
wenn sie sich unter Aufsicht der für ihre Sicherheit
verantwortlichen Person befinden, und wenn ihnen
entsprechende und verständliche Anweisungen
über sichere Nutzung des Geräts und die Gefahren
bei seiner falschen Nutzung gegeben wurden.
• Wenn Sie das Gerät vom Stromnetz abtren-
nen, ziehen Sie das Netzkabel nicht, halten Sie
den Netzstecker und ziehen Sie diesen aus der
Steckdose vorsichtig heraus.
• Es ist nicht gestattet, den Toaster zu benut-
zen, wenn das Netzkabel oder der Netzstecker
beschädigt ist, wenn das Gerät nicht richtig funkti-
oniert oder heruntergefallen ist.
• Es ist nicht gestattet, das Gerät selbständig aus-
einanderzunehmen, bei der Feststellung von
Beschädigung oder im Sturzfall wenden Sie sich
an den nächstliegenden autorisierten (bevoll-
mächtigten) Kundendienst.
• Transportieren Sie das Gerät nur in der
Fabrikverpackung.
• Bewahren Sie das Gerät an einem für Kinder und
behinderte Personen unzugänglichen Ort auf.
DAS GERÄT IST NUR FÜR DEN GEBRAUCH IM
HAUSHALT GEEIGNET
VORSICHT! Während des Betriebs erhitzen sich
die Metallteile des Toasters stark, berühren Sie
diese nicht.
WARNUNG:
• Es ist nicht gestattet, eingeklemmte Toasts aus
dem eingeschalteten Toaster mit den Händen
oder mit einem metallischen Gegenstand her-
auszuholen, weil die Berührung des metalli-
schen Gegenstands mit dem Heizelement unter
Spannung zum Stromschlag führen kann.
• Trennen Sie den Toaster vom Stromnetz ab, war-
ten Sie ab, bis das Gerät abkühlt, und erst dann
nehmen Sie die Toasts mit einer passenden Holz-
oder Plastikschaufel vorsichtig heraus.
• Um Verbrennung zu vermeiden, berühren Sie die
Metallteile des Toasters mit den Händen oder
offenen Körperteile während seines Betriebs
nicht.
VOR DER ERSTEN INBETRIEBNAHME
Falls das Gerät unter winterlichen (kalten)
Bedingungen transportiert oder aufbewahrt
wurde, lassen Sie es bei der Raumtemperatur
nicht weniger als zwei Stunden bleiben.
• Vor der ersten Nutzung des Toasters entfernen Sie
alle Verpackungsmaterialien und Aufkleber, die
den normalen Gerätebetrieb stören.
• Vergewissern Sie sich, dass die Netzspannung und
die am Gerätegehäuse angegebene Spannung
übereinstimmen.
• Am Gehäuseboden befindet sich die
Kabelaufbewahrung (7). Wählen Sie die optima-
le Länge des Netzkabels, indem Sie es richtig
auflegen.
• Ohne Toasts einzulegen, stecken Sie den
Netzstecker in die Steckdose ein, stellen Sie den
Regler des Röstgrads (2) in die Position «6» ein
und schalten Sie das Gerät ein, indem Sie den
Hebel (5) drücken.
• Die Heizelemente verbrennen beim ersten
Einschalten, das kann zur Entstehung von einer
kleinen Menge Rauch und Fremdgeruch führen.
Es ist normal.
• Bei der Notwendigkeit schalten Sie den Toaster
mehrmals ein.
NUTZHINWEISE
• Der Röstgrad des Toasts hängt von seiner Dicke
und von der Sorte und Qualität des Brots ab.
Rösten Sie nie zu feine oder zu dicke Brotscheiben,
die Toastdicke soll 20 mm nicht übersteigen.
• Wenn die Toasts eingeklemmt sind, drücken
Sie die Stopptaste (3), ziehen den Netzstecker
aus der Steckdose heraus und lassen Sie den
Toaster abkühlen. Benutzen Sie eine passen-
de Holzschaufel zum Herausziehen der Toasts.
Berühren Sie die Heizelemente nicht, um ihre
Beschädigung zu vermeiden.
ZUBEREITUNG VON TOASTS
• Legen Sie eine oder zwei Brotscheiben in die
Toastschächte(6)ein.
• SteckenSiedenNetzsteckerindieSteckdoseein.
• Stellen Sie den Röstgrad der Toasts mit dem
Regler(2):
«1» - minimaler Röstgrad;
«6» - maximaler Röstgrad.
Anmerkung: Stellen Sie den Regler (2) in die Position,
die Ihren Bedürfnissen entspricht, ein.
• Drücken Sie den Betriebshebel (5) bis zur seinen
Fixierung.
• Wenn die Toasts fertig sind, schaltet sich das
Gerät automatisch aus, der Hebel (5) nimmt die
Anfangsstellung ein.
• Zum Herausziehen von kleinen Toasts heben Sie
den Betriebshebel (5) vorsichtig auf.
«Aufwärmen»-TASTE
Bei der Notwendigkeit können Sie abgekühlte
Toasts aufwärmen, legen Sie dafür die Toasts in
den Toastschacht (6) ein und drücken Sie den
Betriebshebel (5). Drücken Sie die «Aufwärmen»-
Taste (4). In diesem Betrieb kann man die Toasts ohne
zusätzliches Rösten aufwärmen.
STOPPTASTE
Wenn Sie das Rösten unterbrechen möchten, drücken
Sie die Stopptaste (3).
«Auftauen»-TASTE
Zum Rösten von gefrorenen Toasts legen Sie sie in die
Toastschächte (6) ein, stellen Sie den notwendigen
Röstgrad mit dem Regler (2) ein, drücken Sie den
Betriebshebel (5) bis zur seinen Fixierung und dann
drücken Sie die «Auftauen»-Taste (1).
KRÜMELSCHALE
Der Toaster ist mit einer Krümelschale (8) ausgestattet.
• Schalten Sie das Gerät aus und lassen Sie es
abkühlen.
• Schieben Sie die Krümelschale (8) seitwärts bis zu
ihrem Ausrasten aus dem Gehäuse.
• Klappen Sie die Krümelschale (8) auf, reinigen Sie
die Krümelschale (8) und das Gehäuseinnere von
Brotkrümeln.
• Machen Sie die Krümelschale (8) zu.
Reinigung und Pflege
• Vor der Reinigung vergewissern Sie sich, dass das
Gerät vom Stromnetz abgetrennt ist.
• Warten Sie ab, bis der Toaster völlig abkühlt.
• Wischen Sie die Außenoberfläche des
Toastergehäuses mit einem angefeuchteten Tuch,
dann trocknen Sie es ab.
• Es ist nicht gestattet, harte Schwämme, abra-
sive Waschmittel, sowie Lösungsmittel für die
Reinigung des Toasters zu benutzen.
• Um die Gerätebeschädigung zu vermeiden, ste-
cken Sie keine fremden Gegenstände in die
Toastschächte ein.
• Machen Sie die aufklappbare Krümelschale
(8) auf, reinigen Sie diese und das Innere des
Toastergehäuses von Brotkrümeln. Machen Sie
die Krümelschale (8) zu.
• Tauchen Sie den Netzstecker, das Netzkabel und
das Gerät selbst ins Wasser oder jegliche andere
Flüssigkeiten nicht ein.
• Um Verletzungen oder Gerätebeschädigung
zu vermeiden, stecken Sie keine fremden
Gegenstände in die Toastschächte (6) ein.
• Bewahren Sie das Gerät an einem trockenen, küh-
len und für Kinder unzugänglichen Ort auf.
Technische Eigenschaften
Stromversorgung: 220-240 V ~ 50/60 Hz
Leistung: 750 W
Der Hersteller behält sich das Recht vor, Design
und technische Eigenschaften der Geräte ohne
Vorbenachrichtigung zu verändern
Nutzungsdauer des Geräts beträgt 3 Jahre
Gewährleistung
Ausführliche Bedingungen der Gewährleistung kann
man beim Dealer, der diese Geräte verkauft hat, bekom-
men. Bei beliebiger Anspruchserhebung soll man wäh-
rend der Laufzeit der vorliegenden Gewährleistung den
Check oder die Quittung über den Ankauf vorzulegen.
Das vorliegende Produkt entspricht den
Forderungen der elektromagnetischen
Verträglichkeit, die in 2004/108/EC – Richtlinie
des Rates und den Vorschriften 2006/95/EC
über die Niederspannungsgeräte vorgese-
hen sind.
432
ТОСТЕР
Устройство предназначено для приготовления
тостов.
Описание
1. Кнопка «Разморозка»
2. Регулятор степени поджаривания тостов
3. Кнопка «Отмена»
4. Кнопка «Подогрев»
5. Рычаг включения тостера
6. Отверстия для тостов
7. Место намотки сетевого шнура
8. Откидной поддон для крошек
ВНИМАНИЕ!
Для дополнительной защиты в цепи питания
кухни целесообразно установить устройство
защитного отключения (УЗО) с номинальным
током срабатывания, не превышающим 30 мА; при
установке следует обратиться к специалисту.
МЕРЫ БЕЗОПАСНОСТИ
Перед началом эксплуатации электроприбора
внимательно прочитайте настоящее руководство
и сохраните его для использования в качестве
справочного материала.
Используйте устройство только по его прямому
назначению, как изложено в данном руководстве.
Неправильное обращение с устройством может
привести к его поломке, причинению вреда
пользователю или его имуществу.
• Перед первым включением устройства убеди-
тесь в том, что напряжение электрической сети
соответствует напряжению, указанному на кор-
пусе устройства.
• Сетевой шнур снабжён «евровилкой»; включайте
её в электрическую розетку, имеющую надёж-
ный контакт заземления.
• Во избежание риска возникновения пожара не
используйте переходники при подключении
устройства к электрической розетке.
• Прежде чем включить тостер или вставить сете-
вую вилку в электрическую розетку, убедитесь в
том, что ваши руки сухие.
• Не пользуйтесь тостером вне помещения.
• Устанавливайте устройство на ровной устойчи-
вой поверхности.
• Вокруг тостера всегда должно быть достаточно
места для хорошей вентиляции.
Внимание! Правильно устанавливайте степень
поджаривания тостов, при длительном
поджаривании тосты могут воспламениться.
• Не используйте тостер рядом со шторами, близ-
ко от стен, покрытых обоями, рядом с одеж-
дой, кухонными полотенцами или любыми дру-
гими легковоспламеняющимися материалами,
а также рядом с поверхностями, которые могут
быть повреждены высокой температурой.
• Не используйте тостер для поджаривания про-
дуктов, содержащих большое количество саха-
ра, с начинкой в виде джема или варенья.
• Во избежание риска возгорания не помещайте в
тостер продукты очень большого размера и про-
дукты, завёрнутые в фольгу.
• Во время приготовления тостов ни в коем случае
не накрывайте тостер.
• Всякий раз после окончания работы или перед
чисткой обязательно выключайте тостер и
отключайте его от электросети.
• Прежде чем приступить к чистке тостера, убеди-
тесь в том, что он остыл.
• Регулярно очищайте поддон. Следите за тем,
чтобы на поддоне не скапливались крошки.
• Во избежание пожара или получения удара элек-
трическим током запрещается погружать вилку
сетевого шнура, сетевой шнур и сам прибор в
воду или в любые другие жидкости.
• Для чистки тостера не используйте абразивные
чистящие средства или растворители.
• Не допускайте соприкосновения сетевого шнура
с горячими поверхностями или острыми кром-
ками мебели.
• Не разрешайте детям прикасаться к корпусу
устройства и к сетевому шнуру во время работы.
• Осуществляйте надзор за детьми, чтобы не
допустить использования устройства в качестве
игрушки.
• Из соображений безопасности детей не остав-
ляйте полиэтиленовые пакеты, используемые в
качестве упаковки, без присмотра.
Внимание! Не разрешайте детям играть с
полиэтиленовыми пакетами или упаковочной
плёнкой. Опасность удушья!
• Данное устройство не предназначено для
использования детьми младше 8 лет.
• Дети старше 8 лет и люди с ограниченными воз-
можностями могут пользоваться устройством
только в том случае, если они находятся под
присмотром лица, отвечающего за их безопас-
ность, при условии, что им были даны соответ-
ствующие и понятные инструкции о безопас-
ном пользовании устройством и тех опасностях,
которые могут возникать при его неправильном
использовании.
• Отключая устройство от электросети, никогда
не тяните за сетевой шнур, возьмитесь за вилку
сетевого шнура и аккуратно извлеките её из
электрической розетки.
• Запрещается пользоваться тостером при нали-
чии повреждений сетевого шнура или вилки
сетевого шнура, если устройство работает с
перебоями, а также после падения устройства.
• Не разбирайте устройство самостоятельно, в слу-
чае обнаружения неисправности или после паде-
ния устройства обратитесь в ближайший авторизо-
ванный (уполномоченный) сервисный центр.
• Перевозите устройство только в заводской упа-
ковке.
• Храните устройство в местах, недоступных для
детей и людей с ограниченными возможностями.
УСТРОЙСТВО ПРЕДНАЗНАЧЕНО ТОЛЬКО ДЛЯ
БЫТОВОГО ИСПОЛЬЗОВАНИЯ
ОСТОРОЖНО! Во время работы металлические
детали тостера сильно нагреваются, не
прикасайтесь к ним.
ПРЕДУПРЕЖДЕНИЕ:
• Никогда не пытайтесь вытащить зажатые тосты
из включённого тостера руками или исполь-
зуя какой-либо металлический предмет, так как
соприкосновение металлического предмета с
нагревательным элементом, находящимся под
напряжением, может стать причиной удара элек-
трическим током.
• Отключите тостер от электрической сети, подо-
ждите, пока устройство остынет, и только после
этого осторожно извлеките тосты с помощью под-
ходящей деревянной или пластиковой лопатки.
• Во избежание ожога не прикасайтесь руками
или открытыми участками тела к металлическим
деталям тостера во время его работы.
ПЕРЕД ПЕРВЫМ ИСПОЛЬЗОВАНИЕМ После
транспортировки или хранения устройства
в холодных (зимних) условиях необходимо
выдержать его при комнатной температуре не
менее двух часов.
• Перед первым использованием тостера удалите
все упаковочные материалы и наклейки, мешаю-
щие нормальной работе устройства.
• Убедитесь в том, что напряжение электрической
сети соответствует напряжению, указанному на
корпусе устройства.
• На днище корпуса имеется место для намот-
ки сетевого шнура (7). Подберите оптимальную
длину сетевого шнура, уложив шнур соответ-
ствующим образом.
• Не загружая тосты, вставьте вилку сетевого
шнура в электрическую розетку, установите регу-
лятор степени поджаривания (2) в положение «6»
и включите устройство, нажав на рычаг (5).
• При первом включении нагревательные эле-
менты обгорают, поэтому возможно появление
небольшого количества дыма и постороннего
запаха. Это нормальное явление.
• При необходимости включите тостер несколь-
ко раз.
ПОЛЕЗНЫЕ СОВЕТЫ
• Степень поджаривания тоста зависит от его тол-
щины, сорта и качества хлеба. Никогда не под-
жаривайте слишком тонкие или толстые ломти-
ки, толщина тоста не должна превышать 20 мм.
• Если тосты застряли, нажмите на кнопку (3)
«Отмена», извлеките вилку сетевого шнура из
электрической розетки и дайте тостеру остыть.
Используйте подходящую деревянную лопатку
для извлечения тостов. Не прикасайтесь к нагре-
вательным элементам во избежание их повреж-
дения.
ПРИГОТОВЛЕНИЕ ТОСТОВ
• Поместите один или два ломтика хлеба в отвер-
стия для тостов (6).
• Вставьте вилку сетевого шнура в электрическую
розетку.
• Установите степень поджаривания тостов регу-
лятором (2):
«1» - минимальная степень поджаривания;
«6» - максимальная степень поджаривания.
Примечание: Устанавливайте регулятор (2) в
положение, соответствующее вашим потребностям.
• Нажмите на рычаг включения (5) до его фик-
сации.
• Когда тосты приготовятся, устройство автома-
тически отключится, рычаг (5) займёт исходное
положение.
• Для извлечения тостов небольшого размера
аккуратно поднимите рычаг включения (5) вверх.
КНОПКА «Подогрев»
При необходимости вы можете подогреть остывшие
тосты, для этого загрузите тосты в отверстие
для тостов (6) и нажмите на рычаг включения (5).
Нажмите на кнопку (4) «Подогрев». В этом режиме
тосты можно подогреть без дополнительного
поджаривания.
КНОПКА «Отмена»
Если вы хотите прервать процесс поджаривания
тостов, нажмите на кнопку (3) «Отмена».
КНОПКА «Разморозка»
Для поджаривания замороженных тостов опустите их
в отверстия для тостов (6), установите необходимую
степень поджаривания регулятором (2), нажмите
на рычаг включения (5) до его фиксации, а затем
нажмите на кнопку (1) «Разморозка».
ПОДДОН ДЛЯ СБОРА КРОШЕК
Тостер снабжён поддоном для сбора крошек (8).
• Выключите устройство и дайте ему остыть.
• Сдвиньте поддон (8) в сторону, до выхода его из
зацепления с корпусом.
• Откиньте поддон (8), очистите поддон (8) и вну-
треннее пространство корпуса от хлебных крошек.
• Закройте поддон (8).
Чистка и уход
• Перед чисткой убедитесь в том, что устройство
отключено от электрической сети.
• Дождитесь, когда тостер полностью остынет.
• Протрите внешнюю поверхность корпуса тосте-
ра влажной тканью, затем вытрите его насухо.
• Запрещается для чистки тостера использовать
жёсткие губки, абразивные чистящие средства,
а также растворители.
• Во избежание повреждения устройства никогда
не помещайте посторонние предметы в отвер-
стия для тостов.
• Откройте откидной поддон (8) очистите его и
внутреннее пространство корпуса тостера от
хлебных крошек. Закройте поддон (8).
• Запрещается погружать вилку сетевого шнура,
сетевой шнур или сам прибор в воду или в
любые другие жидкости.
• Во избежание получения травм или поврежде-
ния устройства никогда не помещайте посторон-
ние предметы в отверстия для тостов (6).
• Храните устройство в сухом прохладном месте,
недоступном для детей.
Технические характеристики
Электропитание: 220-240 В ~ 50/60 Гц
Мощность: 750 Вт
Производитель оставляет за собой право изменять
характеристики устройств без предварительного
уведомления
Срок службы устройства – 3 года
Данное изделие соответствует всем требу-
емым европейским и российским стандар-
там безопасности и гигиены.
Изготовитель: Стар Плюс Лимитед, Гонконг
Адрес: оф. 1902-03, Ист Таун Билдинг,
41 Локхарт Роуд, Ванчай, Гонконг
Сделано в КНР
РУССКИЙ ENGLISH
DEUTSCH
Содержание
- Always switch the toaster off and unplug it after operation or before cleaning 1
- Attention for additional protection it is reasonable to install a residual current device rcd with nominal operation current not exceeding 30 ma into the mains of the kitchen to install rcd contact a specialist 1
- Before cleaning make sure that the unit is unplugged 1
- Before cleaning the toaster make sure that it has cooled down 1
- Before switching the toaster on or plugging it in make sure that your hands are dry 1
- Before switching the unit on for the first time make sure that the mains voltage corresponds to the voltage specified on the unit body 1
- Before the first use after unit transportation or storage under cold winter conditions it is necessary to keep it for at least two hours at room temperature before switching on 1
- Before the first use of the toaster remove any package materials and stickers that can pre vent normal operation of the unit 1
- Cancel button 1
- Cancel button if you want to stop the process of toasting press the cancel button 3 1
- Carriage control lever 1
- Caution metal parts of the toaster heat up strongly during operation do not touch them 1
- Children aged 8 and over as well as disabled persons can use this unit only under supervi sion of a person who is responsible for their safety if they are given all the necessary and understandable instructions concerning the safe usage of the unit and information about danger that can be caused by its improper usage 1
- Clean the outer surface of the toaster body with a damp cloth and then wipe it dry 1
- Clean the tray regularly provide that no crumbs accumulate on the tray 1
- Cleaning and care 1
- Close the tray 8 1
- Cord storage 1
- Crumb tray the toaster is equipped with a crumb tray 8 1
- Defrost button 1
- Defrost button to toast frozen toasts put them into the slots for bread toasting 6 set the required toasting level with the control knob 2 press the carriage control lever 5 until clamping and then press the defrost button 1 1
- Description 1
- Do not allow children to touch the unit body and the power cord during the unit operation 1
- Do not disassemble the unit by yourself if any malfunction is detected or after the unit was dropped apply to the nearest authorized ser vice center 1
- Do not immerse the unit the power cord and the power plug into water or any other liquids 1
- Do not leave children unattended to prevent using the unit as a toy 1
- Do not use abrasives or solvents to clean the toaster 1
- Do not use coarse sponges abrasives and sol vents to clean the toaster 1
- Do not use the toaster for toasting products with too much sugar or filled with jam or mar malade 1
- Do not use the toaster near curtains walls covered with wallpapers near clothes kitchen towels or any other inflammable materials and surfaces that can be damaged by high tem perature 1
- Do not use the toaster outdoors 1
- During the first switching on the heating ele ments burn therefore occurrence of a small amount of smoke or foreign smell is possible it is normal 1
- Folding crumb tray 1
- For children safety reasons do not leave poly ethylene bags used as packaging unattended attention do not allow children to play with polyethylene bags or packaging film danger of suffocation 1
- Guarantee details regarding guarantee conditions can be obtained from the dealer from whom the appliance was purchased the bill of sale or receipt must be produced when making any claim under the terms of this guarantee 1
- If necessary switch the toaster on for several times 1
- If the toasts are jammed in the slot press the cancel button 3 unplug the unit and let it cool down use a suitable wooden spatula to remove the toasts do not touch the heating elements to avoid damaging them 1
- Insert the power plug into the mains socket 1
- Keep the unit away from children in a dry cool place 1
- Keep the unit out of reach of children and dis abled persons 1
- Make sure that the mains voltage corresponds to the voltage specified on the unit body 1
- Making toasts 1
- Move the tray 8 sideways to delink it from the unit body 1
- Never cover the toaster during making toasts 1
- Never pull the power cord when disconnecting the unit from the mains take the power plug and carefully remove it from the mains socket 1
- Never try to take jammed toasts out of the operating toaster with your hands or with a metal object as contact of the metal object with the heating element under voltage may cause electric shock 1
- Never use the toaster if the power cord or the plug is damaged if the unit works improperly or after it was dropped 1
- Open the folding tray 8 clean it and the inside of the toaster body from bread crumbs close the tray 8 1
- Place the unit on a flat steady surface 1
- Press the lever 5 until clamping 1
- Provide enough space around the toaster for proper ventilation attention set the required toasting level correctly the bread can catch fire if you toast it too long 1
- Provide that the power cord does not contact with hot surfaces or sharp furniture edges 1
- Put one or two slices of bread into the slots for bread toasting 6 1
- Reheat button 1
- Reheat button if necessary you can warm up cold toasts to do this put the toasts into the slots for bread toasting 6 and press the carriage control lever 5 press the reheat button 4 in this mode you can warm up toasts without additional browning 1
- Safety measures before using the unit read this instruction manual carefully and keep it for future reference use the unit for intended purposes only as specified in this manual mishandling the unit can lead to its breakage and cause harm to the user or damage to his her property 1
- Set the required toasting level using the knob 2 1 minimal toasting level 6 maximal toasting level note set the control knob 2 to the needed position 1
- Slots for bread toasting 1
- Switch the unit off and let it cool down 1
- Technical specifications power supply 220 240 v 50 60 hz power 750 w 1
- The manufacturer preserves the right to change the specifications of the unit without a preliminary notification 1
- The power cord is equipped with a europlug plug it into the socket with a reliable ground ing contact 1
- The toasting level depends on the thickness of the bread slice bread sort and quality never toast too thin or too thick slices the thickness of the toast should not exceed 20 mm 1
- The unit is intended for household usage only 1
- There is a cord storage 7 on the bottom of the unit body you can adjust the optimal power cord length by folding the cord in the cord stor age in a corresponding way 1
- This unit is not intended for usage by children under 8 years of age 1
- To avoid burns keep your hands and other open parts of your body away from the metal parts of the toaster during the unit operation 1
- To avoid damage of the unit never insert for eign objects into the slots for bread toasting 1
- To avoid fire do not use adapters for connect ing the unit to the mains 1
- To avoid fire or electric shock do not immerse the power cord the power plug or the unit itself into water or any other liquids 1
- To avoid injuries or damage of the unit never insert foreign objects into the slots for bread toasting 6 1
- To avoid the risk of fire do not put oversized food and food wrapped in metal foil package into the toaster 1
- To remove small toasts carefully move the car riage control lever 5 upwards 1
- Toaster the unit is intended for making toasts 1
- Toasting level control knob 1
- Transport the unit in the original package only 1
- Unfold the tray 8 clean the tray 8 and the inside of the toaster body from bread crumbs 1
- Unit operating life is 3 years 1
- Unplug the toaster wait until it cools down and only then remove the toasts carefully with a suitable wooden or plastic spatula 1
- Wait until the toaster cools down completely 1
- Warning 1
- When the toasts are ready the unit will be switched off automatically the carriage control lever 5 will return to its initial position 1
- Without loading toasts plug the unit in set the toasting level control knob 2 to the posi tion 6 and switch the unit on by pressing the lever 5 1
- Русский english deutsch 1
- Mw 1503 w 2
- Ооо голдер электроникс 2014 golder electronics llc 2014 2
- Тостер 2
- Українська 2
- Қазақша 2
Похожие устройства
- Leica D-lux 6 Glossy Black Инструкция по эксплуатации
- Maxwell MW-1502 ST Инструкция по эксплуатации
- Prology iMAP-7200 TAB Инструкция по эксплуатации
- Maxwell MW-1501 W Инструкция по эксплуатации
- Kenwood KMM-100AY Инструкция по эксплуатации
- Kenwood KMM-361SDED Инструкция по эксплуатации
- Maxwell MW-3752 W Инструкция по эксплуатации
- Maxwell MW-3751 W Инструкция по эксплуатации
- Acer Liquid Z5 Duo (Z150) Grey Инструкция по эксплуатации
- Benq W1070 Инструкция по эксплуатации
- Maxwell MW-1852 BK Инструкция по эксплуатации
- LG NB3531A Инструкция по эксплуатации
- Maxwell MW-1851 BK Инструкция по эксплуатации
- LG DKS-2000H Инструкция по эксплуатации
- Maxwell MW-1960 ST Инструкция по эксплуатации
- Attitude UNI BBT Инструкция по эксплуатации
- Maxwell MW-1990 ST Инструкция по эксплуатации
- AEG AMS7500I Инструкция по эксплуатации
- Maxwell MW-2217 BK Инструкция по эксплуатации
- Sony SLV-GA59 Инструкция по эксплуатации