
Cooler Master GeminII M4 Инструкция по эксплуатации онлайн
Содержание
Похожие устройства
- Panasonic Lumix DMC-GX7 Инструкция по эксплуатации
- Philips 190B1CB Инструкция по эксплуатации
- Cooler Master Blizzard T2 Инструкция по эксплуатации
- Philips 190B1CS Инструкция по эксплуатации
- Panasonic Lumix DMC-LZ40 Инструкция по эксплуатации
- Bort BSS-1600-P Инструкция по эксплуатации
- Cooler Master Blizzard T2 mini Инструкция по эксплуатации
- Philips 19S1SB Инструкция по эксплуатации
- Philips FC8636/01 Инструкция по эксплуатации
- Cooler Master Nepton 120XL Инструкция по эксплуатации
- Philips 19S1SS Инструкция по эксплуатации
- Cooler Master Nepton 140XL Инструкция по эксплуатации
- Miele SBAD0 Classic C1 White Lotus Инструкция по эксплуатации
- Philips 19B1CS Инструкция по эксплуатации
- Cooler Master Nepton 240M Инструкция по эксплуатации
- Miele SGFA0 Complete C3 Total Care Brown Havana Инструкция по эксплуатации
- Philips 240S1SB Инструкция по эксплуатации
- Cooler Master Nepton 280L Инструкция по эксплуатации
- Miele SGJA0 Complete C3 Brilliant Bronze/Brown Matt Инструкция по эксплуатации
- Philips 17S1SB Инструкция по эксплуатации
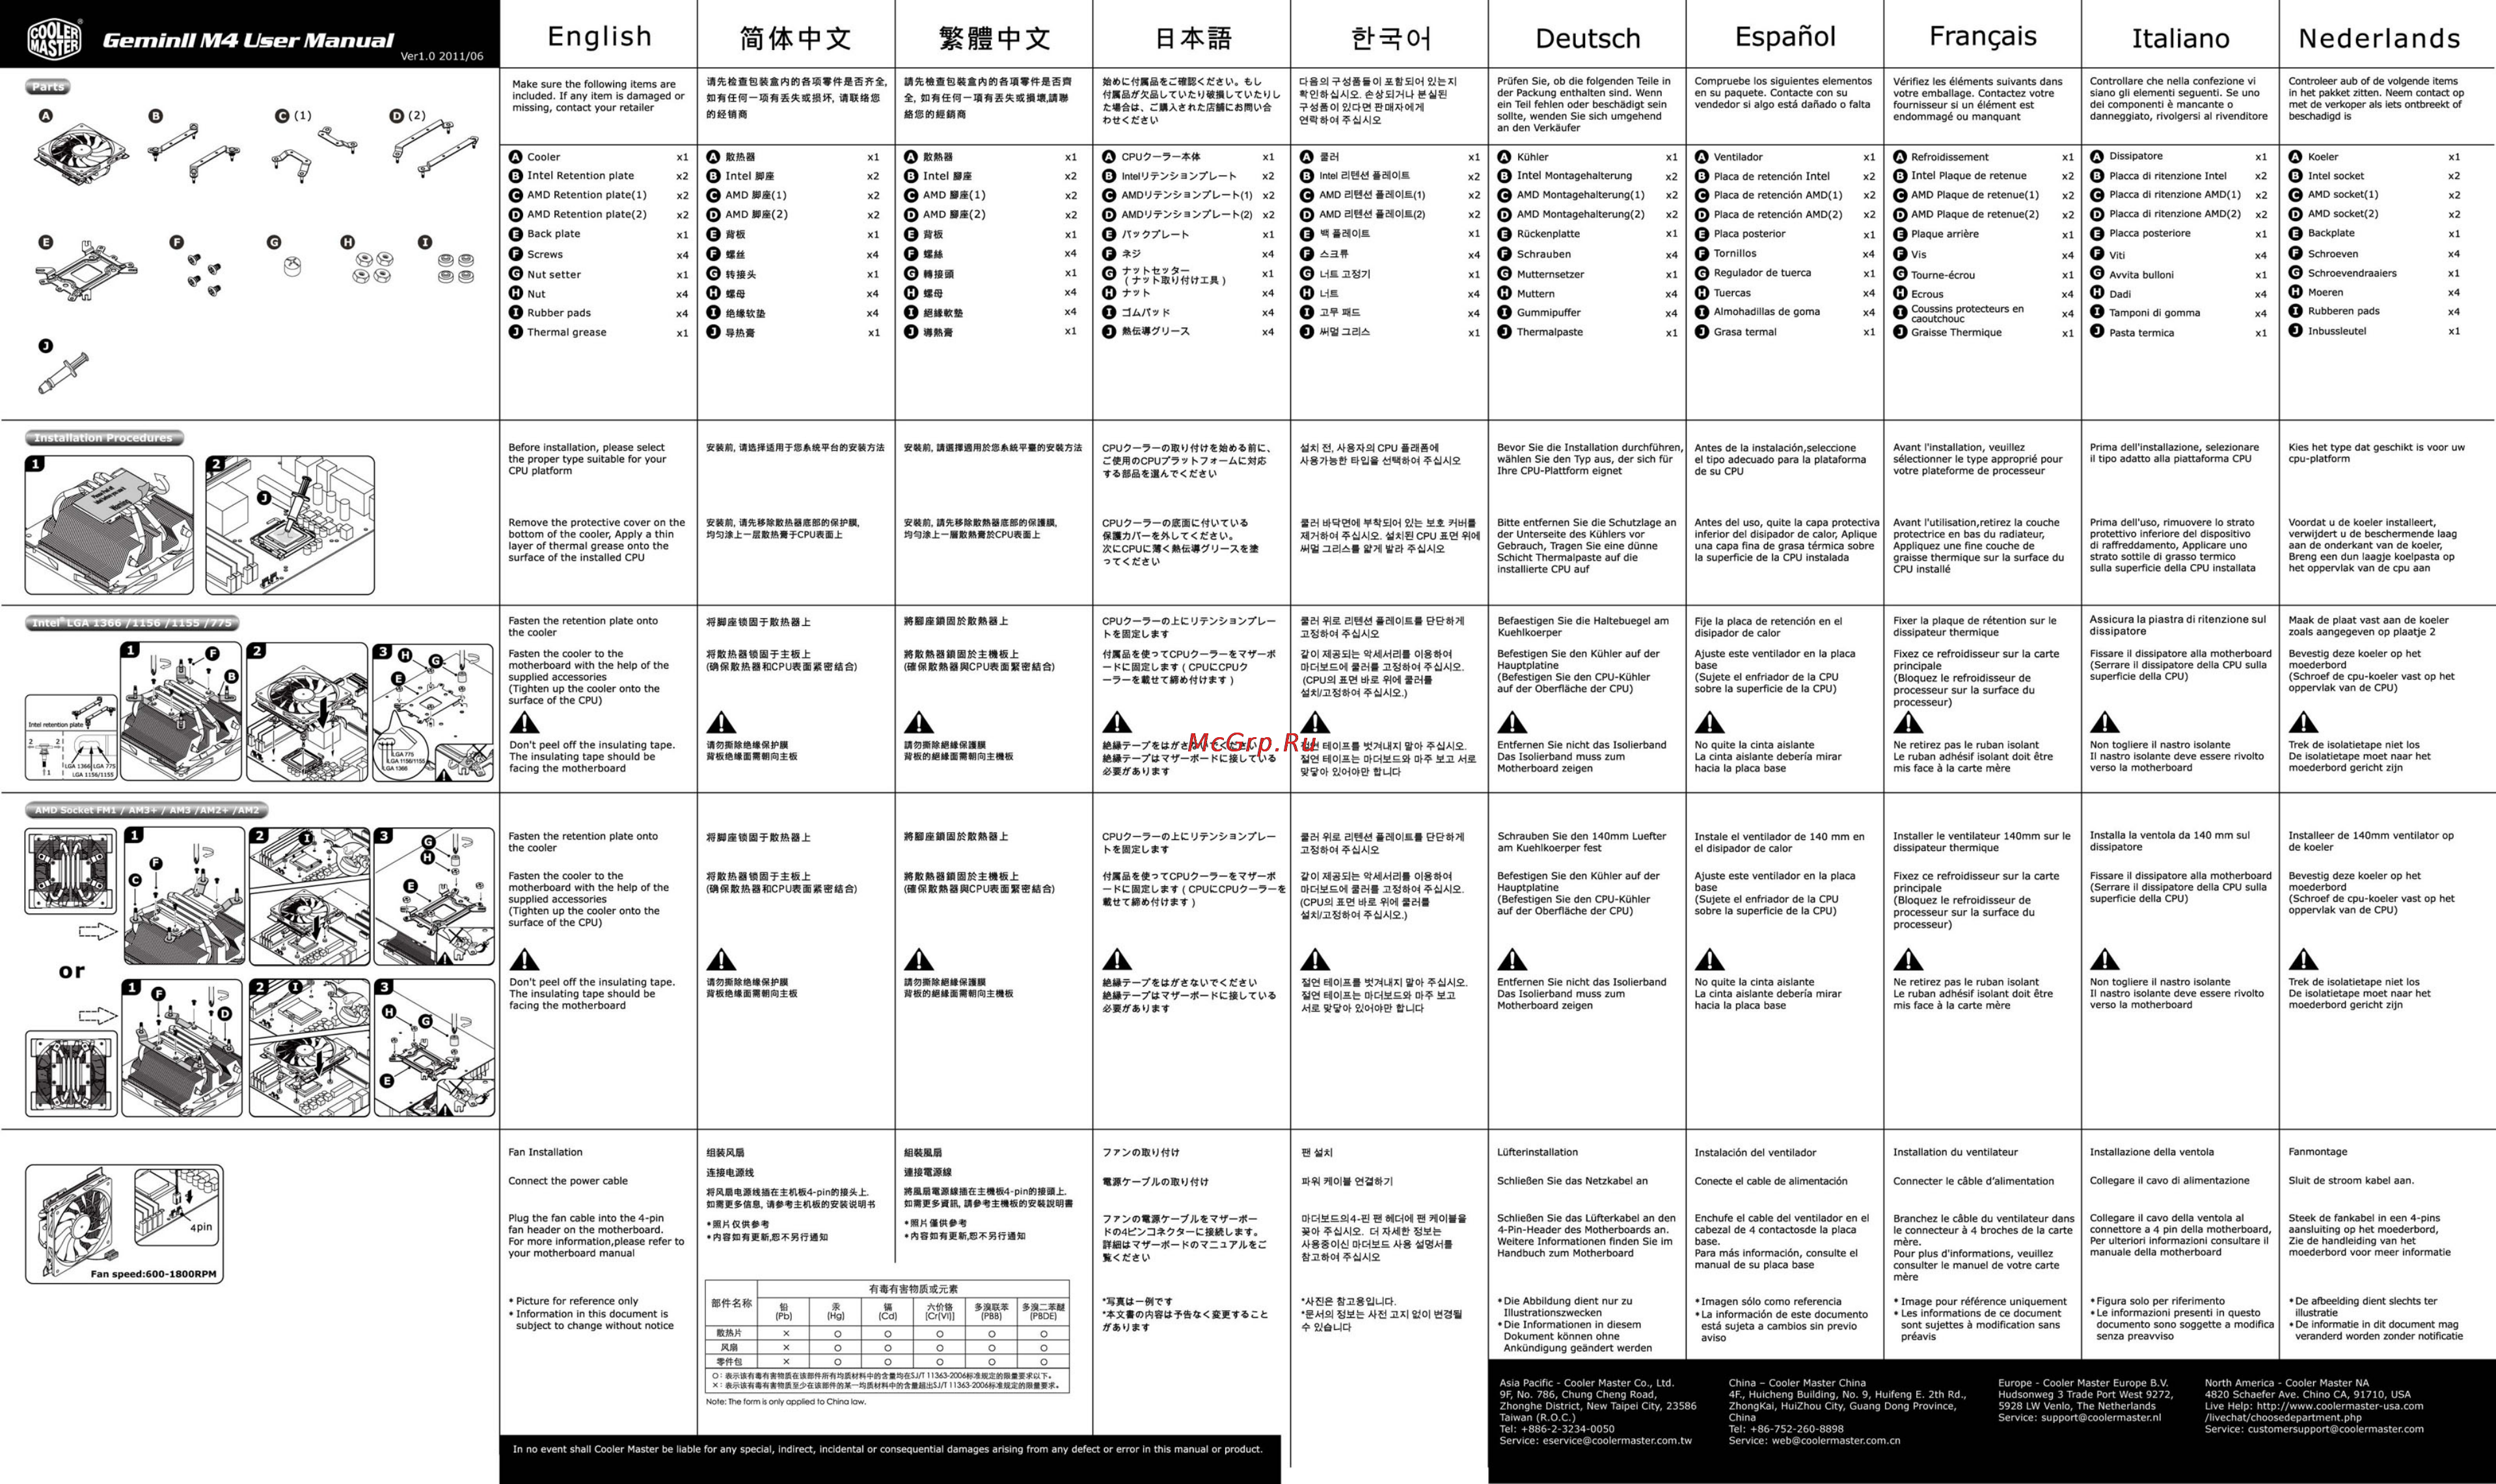
English ÍMÍCTEB Geminll M4 User Manual Español Deutsch Français Italiano Nederlands Verl O 2011 06 O Cooler 0 Intel Retention plate 0 AMD Retention plate l 0 AMD Retention plate 2 0 Back plate 0 Screws xl x2 t tt CSL O as Q Intel MS xi 0 ÜS xl x2 Intel S x2 x2 0AMDMB 1 x2 x2 AMDMS 2 x2 x4 0 S 0 Bit xl Rt8 xl 0 Nut setter Nut x4 0 Rubber pads x4 0 Thermal grease 4Ba xauTL tu suTL tuu KtBJS mas xl Before installation please select the proper type suitable for your CPU platform Remove the protective cover on the bottom of the cooler Apply a thin layer of thermal grease onto the surface of the installed CPU Fasten the retention plate onto the cooler Fasten the cooler to the motherboard with the help of the supplied accessories Tighten up the cooler onto the surface of the CPU A 0AMDMS 1 0 AMD MB 2 0 B 0 SK 0 MSS as 0 8BK5 0 M xl x4 xl 9 O 0 x4 x4 Xl Fasten the cooler to the motherboard with the help of the supplied accessories Tighten up the cooler onto the surface of the CPU x2 xl X4 xl O CPU7 7 0 lntelU7 3 7 U l x2 0 AMDUT 5 a 7 b h 1 x2 0 AMDU 3 7U h 2 x2 0 AS 77 D h 0 xl xl 0 M6M7U 7 Vérifiez les éléments suivants dans votre emballage Contactez votre fournisseur si un élément est endommagé ou manquant x4 o Kühler 0 Intel Montagehalterung 0 AMD Montagehalterung l x2 0 AMD Montagehalterung 2 x2 0 Rückenplatte 0 Schrauben Xl Muttemsetzer xl O Ventilador 0 Placa de retención Intel 0 Placa de retención AMD l x2 0 Placa de retención AMD 2 x2 0 Placa posterior 0 Tornillos 0 Regulador de tuerca 0 Refroidissement Q Intel Plaque de retenue 0 AMD Plaque de retenue l x2 0 AMD Plaque de retenue 2 x2 0 Plaque arrière 0 Vis 0 Toume écrou x4 Muttem x4 Tuercas xl intei asa saioia X2 x4 xi USES7I x4 X4 US O HE x4 OwaziaA xl Q 7 F Si S x4 Compruebe los siguientes elementos en su paquete Contacte con su vendedor si algo está dañado o falta O 0 AMD asa saioia i 0 AMD asa saioi 2 Q HSBIOIS 0 a û T 0 ÙA Î7 K x4 KRM aiSBäSTBASTaKSRsai s m a w aK ai Kis s X2 X2 xl x4 xi 0 Gummipuffer 0 Thermalpaste xl x2 xl x4 x4 xl Q Almohadillas de goma 0 Grasa termal xl x2 xl x4 xl x4 x4 xl Ecrous Coussins protecteurs en v caoutchouc Graisse Thermique xl x2 Contrallare che nella confezione vi siano gli elementi seguenti Se uno dei componenti é mancante o danneggiato rivolgersi al rivenditore Controleer aub of de volgende items in het pakket zitten Neem contact op met de verkoper a Is iets ontbreekt of beschadigd is Q Dissipatore 0 Placea di ritenzione Intel x2 0 Koeler 0 Intel socket 0 AMD socket l xl Placea di ritenzione AMD l x2 0 Placea di ritenzione AMD 2 x2 0 Placea posteriore x2 x4 x4 Vltl xl 0 Avvita bullón xl Dad x4 Moeren x4 O xl xl x4 O Tamponi di gomma O Pasta térmica x4 xl x2 x2 AMD socket 2 0 Backplate 0 Schroeven 0 Schroevendraaiers xl xl 0 Rubberen pads 0 Inbussleutel xl xl x4 x4 xl CPU7 7 U W JBÄ SC a l a A 8X O cpu s aïs A 87 SB EI2JS aa s 01 4 A 2 Bevor Sie die Installation durchführen wählen Sie den Typ aus der sich für Ihre CPU Plattform eignet Antes de la instalación seleccione el tipo adecuado para la plataforma de su CPU Avant l installation veuillez sélectionner le type approprié pour votre plateforme de processeur Prima dell installazione selezionare Il tipo adatto alla piattaforma CPU Kies het type dat geschikt is voor uw cpu platform t9a 8K i TCPuas s S3 rag K Kcpus CPU7 5 K CTfL TL ÄA kDT eiU ÄECPUCM sw U XÍ a T L sa steoii wsim as as aas xwsfoi ÜA 2 axis CPU ae o HS nSli 211 Bf 4JA 2 Bitte entfernen Sie die Schutzlage an der Unterseite des Kühlers vor Gebrauch Tragen Sie eine dünne Schicht Thermalpaste auf die installierte CPU auf Antes del uso quite la capa protectiva inferior del disipador de calor Aplique una capa fina de grasa térmica sobre la superficie de la CPU instalada Avant l utilisation retirez la couche protectrice en bas du radiateur Appliquez une fine couche de graisse thermique sur la surface du CPU installé Prima dell uso rimuovere lo strato protettivo interiore del dispositivo di raffreddamento Applicare uno strato sottile di grasso térmico sulla superficie délia CPU installata Voordat u de koeler installeert verwijdert u de beschermende laag aan de onderkant van de koeler Breng een dun laagje koelpasta op het oppervlak van de cpu aan HStmaïKasi a8 ssí ia i CPU7 7 C UT a 7L sa vis siga aoiE ee 28 Of JA 2 Befaestigen Sie die Haltebuegel am Kuehlkoerper Fije la placa de retención en el disipador de calor Fixer la plaque de rétention sur le dissipateur thermique Assicura la piastra di ritenzione sul dissipatore Maak de plaat vast aan de koeler zoals aangegeven op plaatje 2 MæKffiâKCPusœgægê Kü8SKcpuRæ æeâ 14 SÏ TCPU7 7 T V FCSæUST CPUCCPU7 EBT S WWST aoi Msat stAjAias oigitoi DIÖSE0I sas HS o 4 A 2 CPU2I a H E 0i sas s lms fo 4IA 2 Befestigen Sie den Kühler auf der Hauptplatine Befestigen Sie den CPU Kühler auf der Oberfläche der CPU Ajuste este ventilador en la placa base Sujete el enfriador de la CPU sobre la superficie de la CPU Fixez ce refroidisseur sur la carte principale Bloquez le refroidisseur de processeur sur la surface du processeur Fissare il dissipatore alia motherboard Serrare II dissipatore della CPU sulla superficie della CPU Bevestig deze koeler op het moederbord Schroef de cpu koeler vast op het oppervlak van de CPU A A A A A A A A A WMnHSM EM 7 48 fi L T f Ä L KcæuTV a szfæusv SS e o s 5J7jU x ÿo 4 A 2 sg aioiafe DJOEEB an AIE SO 2M0 Ef aUQ Entfernen Sie nicht das Isolierband Das Isolierband muss zum Motherboard zeigen No quite la cinta aislante La cinta aislante debería mirar hacia la placa base Ne retirez pas le ruban isolant Le ruban adhésif isolant doit être mis face à la carte mère Non togliere il nastro isolante II nastro isolante deve essere rivolto verso la motherboard Trek de Isolatietape niet los De isolatietape moet naar het moederbord gericht zljn CPU9 7 C U a 7UFSESUSt sa VIE SI9Ö ois ee w agifoj 4 A 2 Schrauben Sie den 140mm Luefter am Kuehlkoerper fest Instale el ventilador de 140 mm en el disipador de calor Installer le ventilateur 140mm sur le dissipateur thermique Installa la ventola da 140 mm sul dissipatore Installeer de 140mm ventilator op de koeler Bevestig deze koeler op het moederbord Schroef de cpu koeler vast op het oppervlak van de CPU Don t peel off the insulating tape The insulating tape should be facing the motherboard Fasten the retention plate onto the cooler X2 Prüfen Sie ob die folgenden Teile in der Packung enthalten sind Wenn ein Teil fehlen oder beschädigt sein sollte wenden Sie sich umgehend an den Verkäufer 0 82 0 EgfE o 2Jfex te l Ù A 2 feét l7 L feil ssoiaoe BOH x on a astâfoj 4 A 2 iBSttSBBRSPlBgSWfïSâffE Make sure the following items are included If any item is damaged or missing contact your retailer sa sisTKaai ffls s cpuæ ægê læMcpueiæsæeâ KEffi ffi TCPU7 7 VV FICHEUS CPUCCPU7 7 S aol Xilsslfe 2MIAHBIE O 8êfo D OEE0 SSS 1188101 4IA 2 CPU2IE0 H E 1011 sai S l a8 oj 4 A 2 Befestigen Sie den Kühler auf der Hauptplatine Befestigen Sie den CPU Kühler auf der Oberfläche der CPU Ajuste este ventilador en la placa base Sujete el enfriador de la CPU sobre la superficie de la CPU Fixez ce refroidisseur sur la carte principale Bloquez le refroidisseur de processeur sur la surface du processeur Fissare il dissipatore alla motherboard Serrare il dissipatore della CPU sulla superficie della CPU A A A A A A A A A A Don t peel off the insulating tape The insulating tape should be facing the motherboard a 3 ISet BaiW SWBEIÍ EM 7 SB ffe L T efeL tt T 7aW F CSL TL iSSffæUST se 0ioi TIUXI ai oi 4 A 2 se eioi OIGEEE oi 2 Aïs sfïoj eodota sua Entfernen Sie nicht das Isolierband Das Isolierband muss zum Motherboard zeigen No quite la cinta aislante La cinta aislante debería mirar hacia la placa base Ne retirez pas le ruban isolant Le ruban adhésif isolant doit être mis face à la carte mère Non togliere il nastro isolante Il nastro isolante deve essere rivolto verso la motherboard Trek de isolatietape niet los De isolatietape moet naar het moederbord gericht zljn 77 UW S I Lüfterinstallation Instalación del ventilador Installation du ventilateur Installazione della ventola Fanmontage nisi 101 gs 7i Schließen Sie das Netzkabel an Conecte el cable de alimentación Connecter le câble d alimentation Collegare II cavo di allmentazione Slult de stroom kabel aan o dMEsi4 a a soi a THOMS sot UA 2 cd 4MB safe 4880 4 ofcdBE A 8 SSAd Saijoj JA 2 Schließen Sie das Lüfterkabel an den 4 Pin Header des Motherboards an Weitere Informationen finden Sie im Handbuch zum Motherboard Enchufe el cable del ventilador en el cabezal de 4 contactosde la placa base Para más información consulte el manual de su placa base Branchez le câble du ventilateur dans le connecteur à 4 broches de la carte mère Pour plus d informations veuillez consulter le manuel de votre carte mère Collegare II cavo della ventola al connettore a 4 pin della motherboard Per ulterior Informazioni consultare il manuale della motherboard Steek de fankabel in een 4 pins aansluiting op het moederbord Zie de handleiding van het moederbord voor meer informatie Image pour référence uniquement Les informations de ce document sont sujettes à modification sans préavis Figura solo per riferimento Le Informazioni presentí in questo documento sono soggette a modifica senza preavviso Fan Installation a Connect the power cable KaH isaafeïMffi4 pinMæsa RB saaai i 4 pinw st Plug the fan cable into the 4 pin fan header on the motherboard For more information please refer to your motherboard manual 7Z 7 7 L V7 KK 4e a 75T t RU wssnsæsiÆTiSffa R e L Picture for reference only Information in this document is subject to change without notice IB Pb X X X Hg a Cd Äfft Cr VI I O O O o o o o o o PBB o o o PBDE o o o 5ÄB BfTT X B f xr u r S SET C 4 íS B p li SK 0 p s B _ K SN S h ES ss Öx Note The form is only oppsed to Chino tow In no event shall Cooler Master be liable for any special Indirect incidental or consequential damages arising from any defect or error in this manual or product t AfSg aassiuc gAd i safe A a ax ffloi saa 4 2161 14 Die Abbildung dient nur zu Illustrationszwecken Die Informationen in diesem Dokument können ohne Ankündigung geändert werden Asia Pacific Cooler Master Co Ltd 9F No 786 Chung Cheng Road Zhonghe District New Taipei City 23586 Taiwan R O C Tel 886 2 3234 0050 Service eservice coolermaster com tw 1 Imagen sólo como referencia La información de este documento está sujeta a cambios sin previo aviso China Cooler Master China 4F Huicheng Building No 9 Huifeng E 2th Rd ZhongKai HuiZhou City Guang Dong Province China Tel 86 752 260 8898 Service web coolermaster com cn Europe Cooler Master Europe B V Hudsonweg 3 Trade Port West 9272 5928 LW Venlo The Netherlands Service support coolermaster nl 1 De afbeelding dient slechts ter illustra tie De informatie in dit document mag veranderd worden zonder notificatie North America Cooler Master NA 4820 Schaefer Ave Chino CA 91710 USA Live Help http www coolermaster usa com livechat choosedepartment php Service customersupport coolermaster com