
InFocus IN5544 Руководство по замене линзы онлайн
QR77623
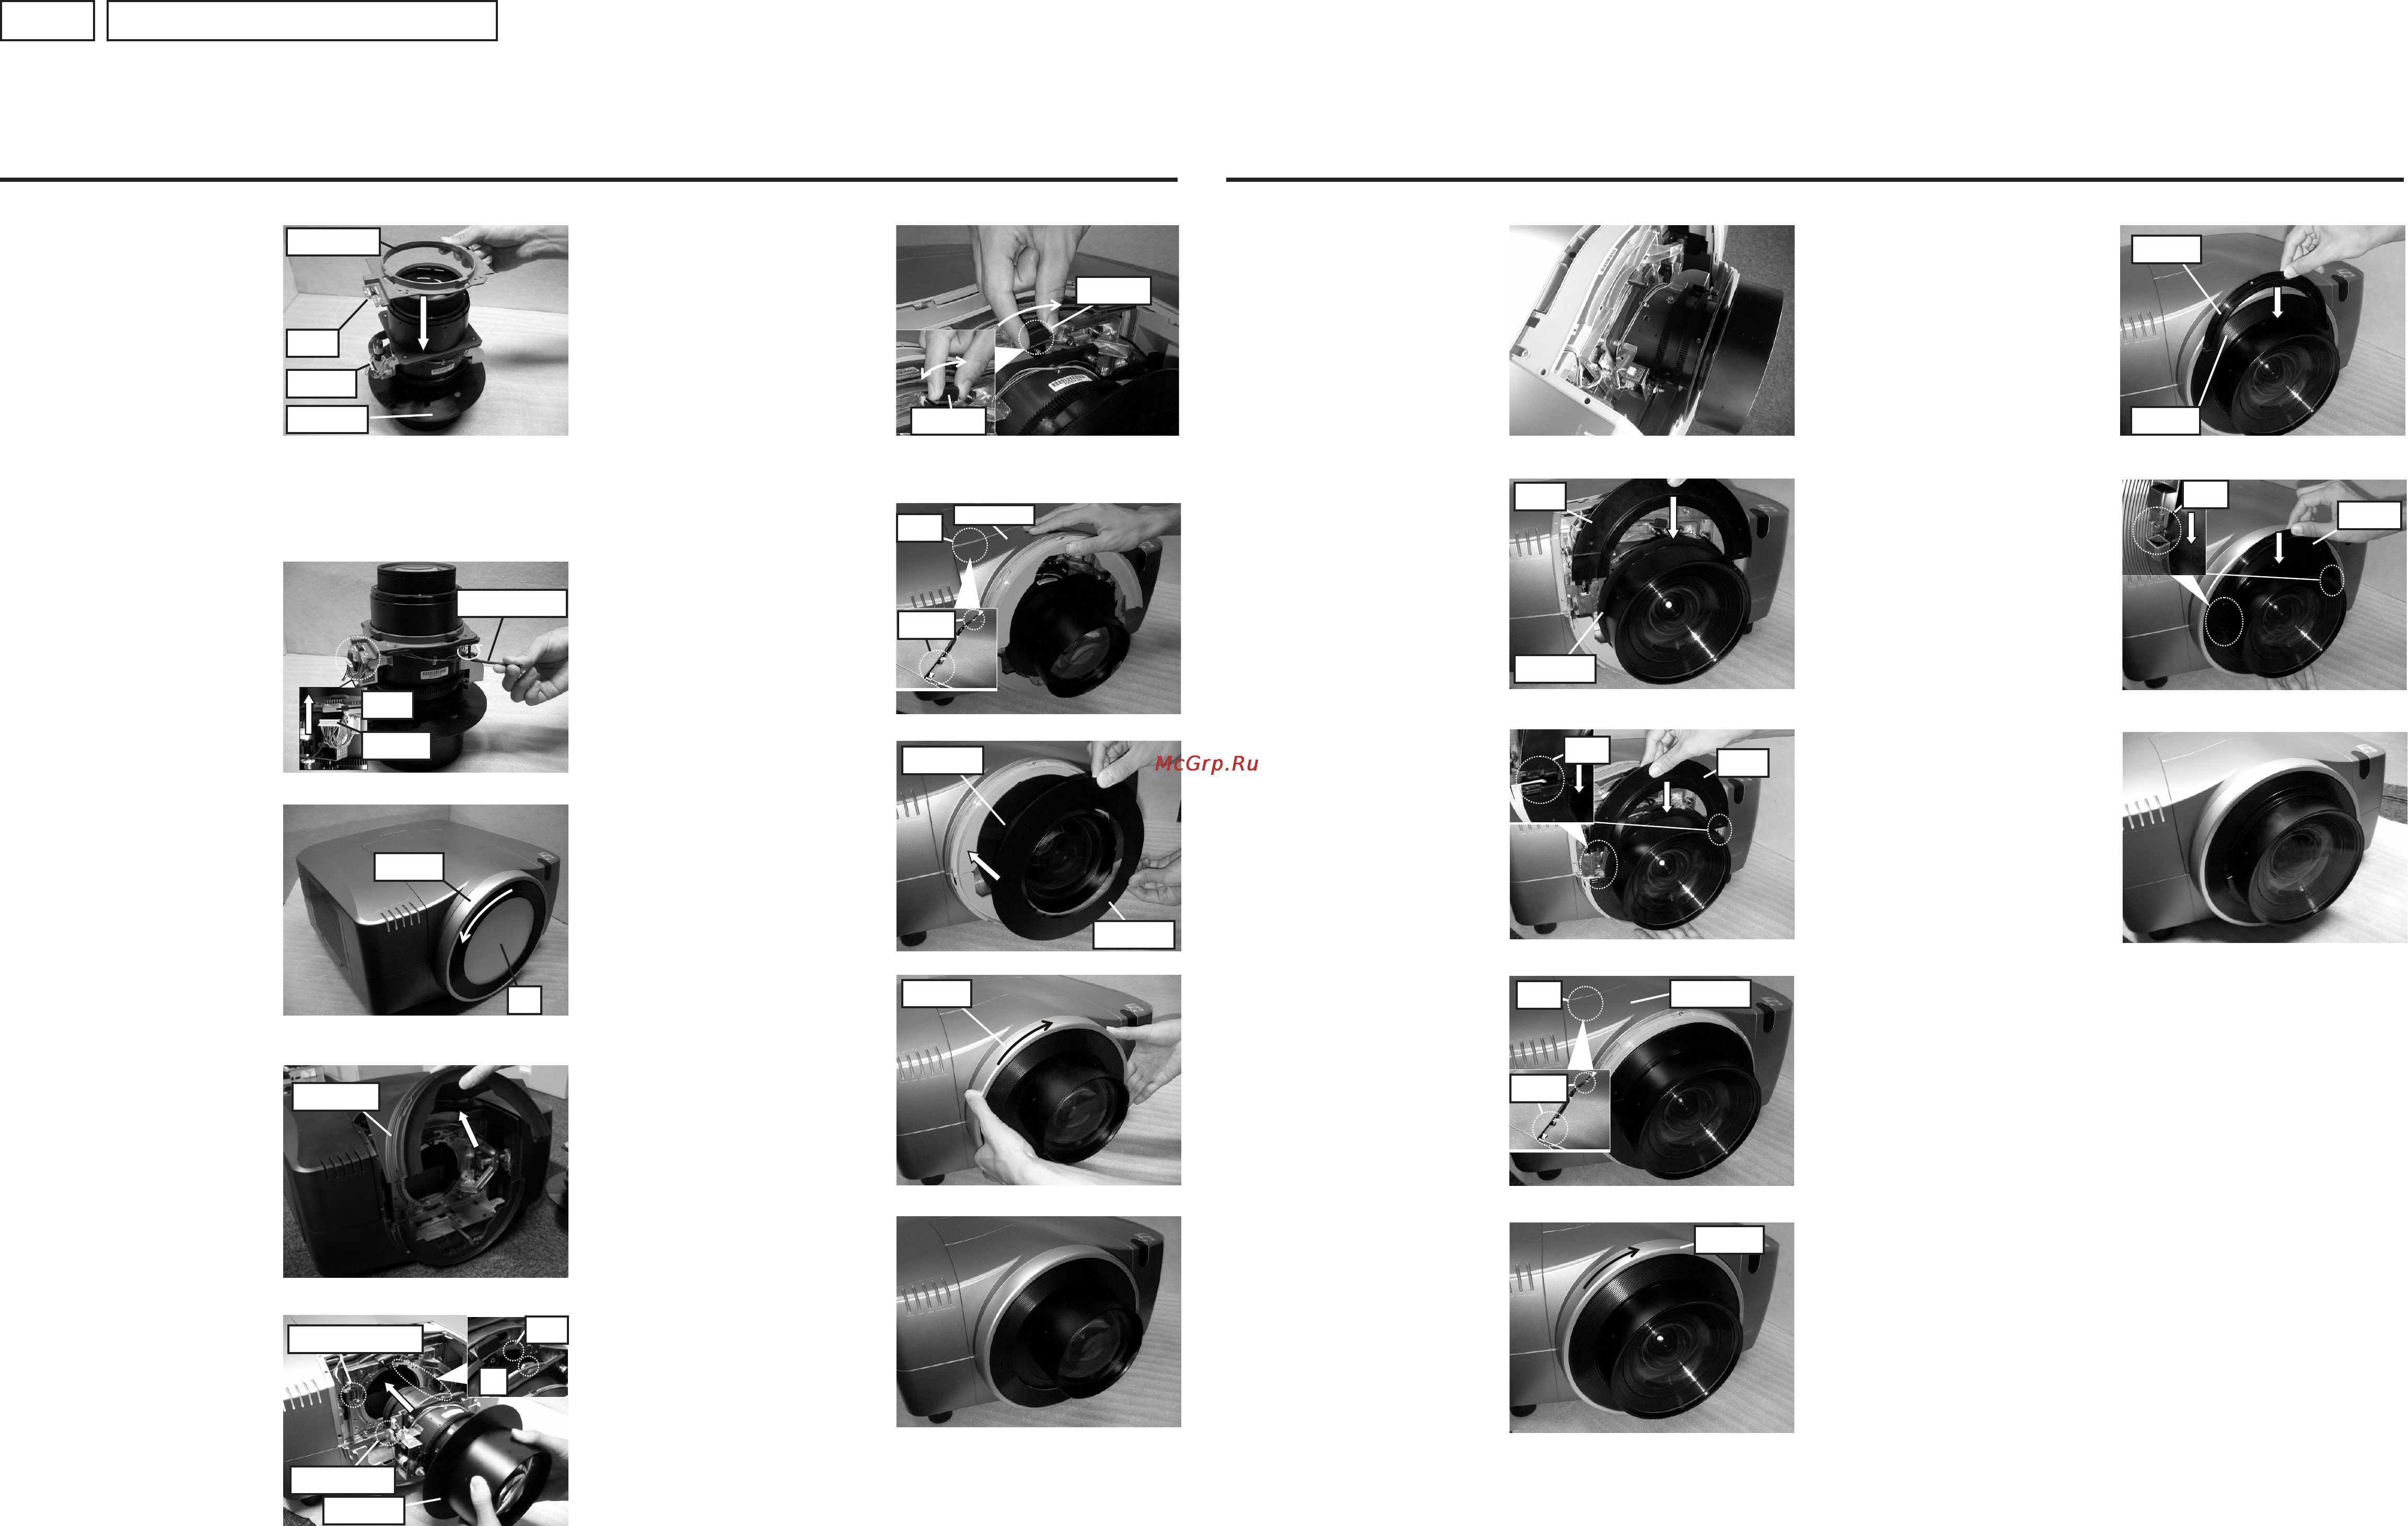
6. Attaching the lens (2)
Support the lens installed in the LCD
projector and move the lock lever on the
projector as far as it will go to the right
(until the lock lever clicks into the locked
position).
Caution:
■ To prevent the lens from falling off,
after attaching the lens, check that it
is securely mounted and that the lock
lever does not move.
Lens Replacement Manual
■ Lens replacement should be performed by a service engineer.
■ When changing the lens, place the LCD projector right way up on a horizontal surface. Do not change the lens with the projector facing upwards or downwards or when
the projector is suspended.
Attaching the LENS-062/LENS-068/LENS-064/LENS-063 Lens When Unpacking the LCD Projector
1. Preparing to attach the lens (1)
Take the lens adapter supplied with the
LCD projector and mount it so that the
connector on the lens is aligned with the
socket of the lens adapter.
Caution:
■ Be careful not to touch the surface of
the lens.
■ Do not touch the socket of the lens
adapter or subject it to impact as this
may lead to malfunction.
■ Do not hold the lens by the lens shade
as this may lead to injury or malfunction.
■ Be sure to remove the tape xing the hexagonal screw on the lens.
■ Be sure to remove the lens cap. Installing the lens in the LCD projector with the lens
cap on may lead to malfunction.
2. Preparing to attach the lens (2)
Using the hexagon wrench supplied with
the LCD projector, attach the lens adapter
with the four hexagon screws on the lens.
Connect the connector on the lens to the
socket of the lens adapter.
3. Preparing to attach the lens (3)
Unscrew the front ring from the LCD
projector and remove the cap.
4. Preparing to attach the lens (4)
Lift off the front cover to remove it.
5. Preparing to attach the lens (1)
Make sure that the terminal on the lens
and the terminal on the LCD projector are
aligned.
Support the lens with the lens adapter
attached and install it in the LCD projector
so that the adapter rib ts into the groove
of the projector.
Caution:
■ Do not hold the lens by the lens shade
as this may lead to injury or malfunction.
■ Take care to avoid hitting the surface of
the lens on the LCD projector when attaching the lens as this may lead to malfunction.
7. Assembling the main unit parts (1)
Insert the two catches on the front cover
into the LCD projector body to attach the
front cover.
8. Assembling the main unit parts (2)
Have the blind sheet supplied with the
lens ready and mount it on the lens
shade.
Mount the blind sheet with its matte side
facing out.
9. Assembling the main unit parts (3)
Screw on the front ring.
Caution:
■ Take care not to get the blind sheet
trapped when tting the front ring as this
may lead to malfunction.
10. Lens attachment is completed.
Attaching the LENS-067/LENS-066/LENS-065 Lens When Unpacking the LCD Projector
1. Lens attachment is completed.
Follow the procedures in step 1 through
step 6 for attaching the LENS-062/LENS-
068/LENS-064/LENS-063 Lens and
install the lens in the LCD projector.
3. Attaching the optional parts (2)
(LENS-066/LENS-065 only)
Rotate the attached blinder to the
underside of the lens and mount the
second blinder on the lens shade in the
same way.
Engage the two catches on these
blinders.
4. Assembling the main unit parts (1)
Insert the two catches on the front cover
into the LCD projector body to attach the
front cover.
5. Assembling the main unit parts (2)
Screw on the front ring.
Caution:
■ Take care not to get the blind sheet
trapped when tting the front ring as this
may lead to malfunction.
6. Attaching the optional parts (3)
(LENS-066/LENS-065 only)
Have the two protectors supplied with the
lens ready and insert the rst protector
between the front ring and the lens.
7. Attaching the optional parts (4)
(LENS-066/LENS-065 only)
Rotate the attached protector to the
underside of the lens and insert the
second protector in the same way
between the front ring and the lens.
Engage the two catches on the protector.
8. Lens attachment is completed.
2. Attaching the optional parts (1)
(LENS-066/LENS-065 only)
Have the two blinders supplied with the
lens ready and mount the rst blinder on
the lens shade.
Socket
Connector
Hexagon wrench
Front cover
Cap
Front ring
Terminal on projector
Terminal on lens
Lens shade
Groove
Rib
Lock lever
Lock lever
Front cover
Catch
Catches
Blind sheet
Lens shade
Front ring
Front cover
Catch
Catches
Front ring
Catch
Blinder
Protector
Front ring
Catch
Protector
Lens adapter
Socket
Connector
Lens shade
ENGLISH
Blinder
Lens shade
Caution:
■ When using the LENS-067 lens, the edges
of the projected image may appear dark or
shadows may be visible. If this happens,
use the lens shift function to adjust the
position of the projected image.
Содержание
- Attaching the lens 062 lens 068 lens 064 lens 063 lens when unpacking the lcd projector 1
- Attaching the lens 067 lens 066 lens 065 lens when unpacking the lcd projector 1
- Lens replacement manual 1
- Lens replacement should be performed by a service engineer when changing the lens place the lcd projector right way up on a horizontal surface do not change the lens with the projector facing upwards or downwards or when 1
- Qr77623 1
- The projector is suspended 1
- Changing from a lens 067 lens 066 lens 065 lens to an lens 062 lens 068 lens 064 lens 063 lens 2
- Changing from an lens 062 lens 068 lens 064 lens 063 lens to a lens 067 lens 066 lens 065 lens 2
- Qr77623 2
- Flange back adjustment lens 067 only 3
- Qr77623 3
- Die montage bzw der austausch des objektivs ist vom kundendienstpersonal durchzuführen den lcd projektor zum montieren austauschen des objektivs mit der oberseite nach oben auf eine ebene fläche stellen das objektiv nicht montieren austauschen 5
- Montage des objektivs lens 062 lens 068 lens 064 lens 063 beim auspacken des lcd projektors 5
- Montage des objektivs lens 067 lens 066 lens 065 beim auspacken des lcd projektors 5
- Objektiv montageanweisungen 5
- Qr77623 5
- Wenn der projektor nach oben oder unten geneigt steht oder unter einer decke hängt 5
- Ersetzen des objektivs lens 062 lens 068 lens 064 lens 063 durch das objektiv lens 067 lens 066 lens 065 6
- Ersetzen des objektivs lens 067 lens 066 lens 065 durch das objektiv lens 062 lens 068 lens 064 lens 063 6
- Qr77623 6
- Auflagemaß einstellung nur beim lens 067 7
- Qr77623 7
- Qr77623 9
- 交換マニュアル 9
- 日本語 9
- 本作業はサービスマンが行ってください 本作業は水平な台の上に セット底面を乗せた状態で作業してください 上向き 下向き投写 天吊り状態での作業はしないでください 9
- 液晶プロジェクタ本体開梱時の lens 062 lens 068 lens 064 lens 063 取り付け作業 9
- 液晶プロジェクタ本体開梱時の lens 067 lens 066 lens 065 取り付け作業 9
- Lens 062 lens 068 lens 064 lens 063 から lens 067 lens 066 lens 065 へ交換の場合 10
- Lens 066 lens 065 のみ 10
- Lens 067 lens 066 lens 065 から lens 062 lens 068 lens 064 lens 063 へ交換の場合 10
- Qr77623 10
- ださい レンズシフト位置の戻し方は 液晶プロジェクタ本体に同梱の取扱説明 書をご参照ください 10
- オプション部品の取り付け 1 lens 066 lens 065 のみ 10
- オプション部品の取り付け 2 lens 066 lens 065 のみ 10
- オプション部品の取り付け 3 lens 066 lens 065 のみ 10
- オプション部品の取り付け 4 lens 066 lens 065 のみ 10
- オプション部品の取り外し 1 lens 066 lens 065 のみ 10
- オプション部品の取り外し 2 lens 066 lens 065 のみ 10
- オプション部品の取り外し 3 lens 066 lens 065 のみ 10
- オプション部品の取り外し 4 10
- オプション部品の取り外し 5 10
- フロントカバーのツメ 2 個所 を液晶プ ロジェクタ本体に挿し込み フロントカ バーを取り付けます 10
- フロントカバーのツメ 2 個所 を液晶プロ ジェクタ本体に挿し込み フロントカバー を取り付けます 10
- フロントカバーを取り外します 10
- ブラインダ 2 個 を取り外します 10
- ブラインダのツメ 2 個所 を合わせては め込みます 10
- ブラインダのツメの部分を外します 10
- ブラインダを 90 度回転させ つめの部分 を真上に移動させます 10
- ブラインドシートは つや消し面を表にし てください 10
- ブラインドシートを取り外します 10
- プロテクタ 2 個 を取り外します 10
- プロテクタのツメ 2 個所 を合わせては め込みます レンズの取り付け完了です 10
- プロテクタを 90 度回転させ ツメの部分 を真上に移動させます 注意 レンズの交換作業は 必ず電源を切って 10
- レンズが正しく取り付けられているか ロックレバーが動かないことを確認して ください 10
- レンズに同梱のブラインダ 2 個 を用意 し 1 個目のブラインダをレンズシェード の前に取り付けます 10
- レンズに同梱のブラインドシートを用意 し レンズのレンズシェードの前に取り付 けます 10
- レンズに同梱のプロテクタ 2個 を用意 し 1 個目をフロントリングのとレンズの 間に差し込み 取り付けます 10
- レンズの取り付け 1 10
- レンズの取り付け 2 10
- レンズの取り外し 1 10
- レンズの取り外し 2 10
- レンズの取り外し 3 10
- レンズを支え 液晶プロジェクタ本体の ロックレバーの解除ボタン押しながら ロックレバーを左側に動かします 10
- レンズシフトの位置は 中央に戻してく 10
- 先の細い物や本体に同梱の六角レンチを使 用し プロテクタのツメの部分を押し外し ます 反対側も同様にツメを外します 10
- 反対側も同様にツメを外します 10
- 取り付けたブラインダをレンズの下側へ回 転移動させ 2 個目のブラインダも同様に レンズシェードの前に取り付けます 10
- 取り付けたプロテクタをレンズの下側へ 回転移動させ 2個目のプロテクタも同 様に フロントリングのとレンズの間に 差し込み 取り付けます 10
- 本体部品の取り外し 10
- 本体部品の取り外し 1 10
- 本体部品の取り外し 2 10
- 本体部品の取り外し 3 10
- 本体部品の組立 1 10
- 本体部品の組立 2 10
- 本体部品の組立 3 10
- 注意 レンズ脱落防止のため 取り付け後 10
- 液晶プロジェクタ本体にはめ込んだレン ズを支えながら 液晶プロジェクタ本体 のロックレバーを右側一杯に ロックレ バーがカチッとロックするまで 回転させ ます 10
- 行ってください 10
- Fb フランジバック 調整作業 lens 067 のみ 11
- Qr77623 11
Похожие устройства
- InFocus IN5544 Техническое руководство
- InFocus IN5544 Руководство по работе в сети
- Jabra BT2046 BT HDST Инструкция по эксплуатации
- Jabra SP700 Инструкция по эксплуатации
- Jabra BT2050 Инструкция по эксплуатации
- Jabra Stealth Инструкция по эксплуатации
- Jabra Move Инструкция по эксплуатации
- Jabra Boost Black Инструкция по эксплуатации
- InFocus IN5552L Инструкция по эксплуатации
- InFocus IN5552L Руководство QuickStart
- InFocus IN5552L Руководство по замене лампы
- InFocus IN5552L Руководство по замене линзы
- InFocus IN5552L Руководство очистка фильтра
- Jabra Storm Инструкция по эксплуатации
- InFocus IN5554L Инструкция по эксплуатации
- InFocus IN5554L Руководство QuickStart
- Jabra спикерфон BT. Инструкция по эксплуатации
- InFocus IN5554L Руководство по замене линзы
- Jabra JX10 HUB Инструкция по эксплуатации
- InFocus IN5554L Руководство по замене лампы
Скачать
Случайные обсуждения
Ответы 1
Какие инструкции по технике безопасности следует соблюдать при эксплуатации изделия?
1 год назад