
Vitek VT-2375 BK Инструкция по эксплуатации онлайн
432
MEN SHAVER VT-2375 BK
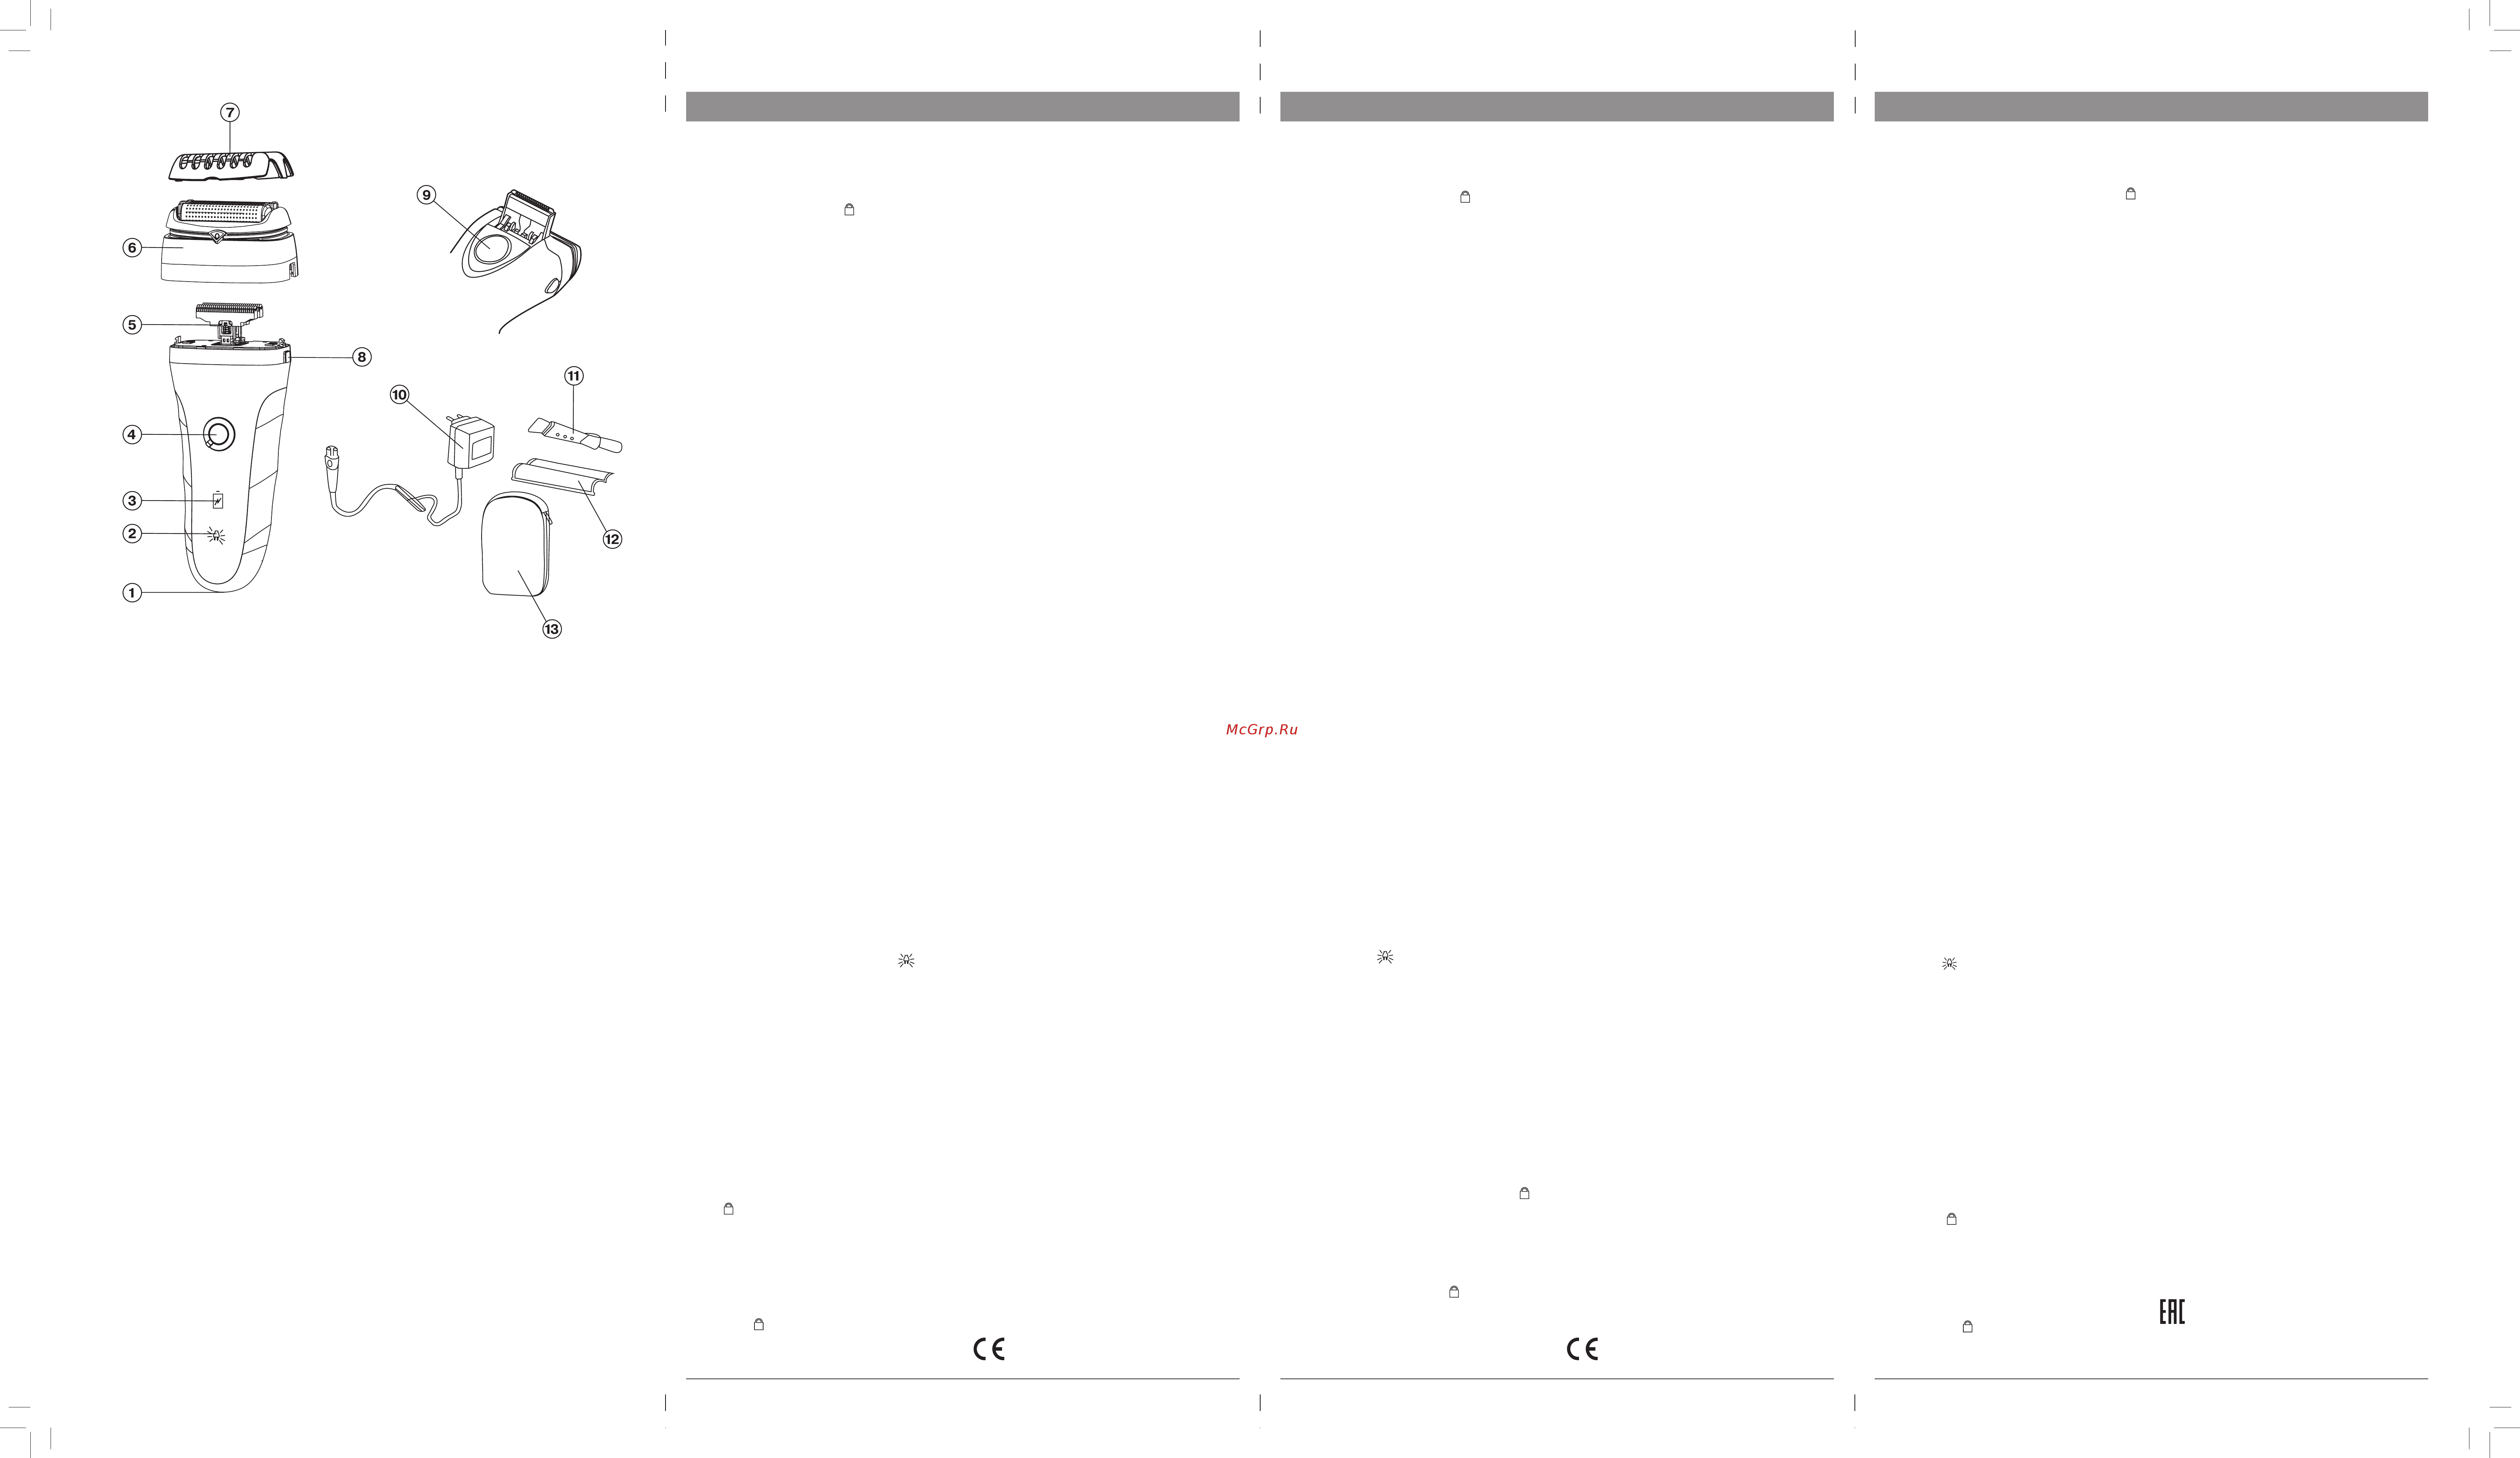
DESCRIPTION
1.
Power adapter connection socket
2.
Accumulator battery charging indicator
3.
Operation/accumulator battery discharge
indicator
4.
«ON/OFF» button with blocking «
/ »
5.
Inner cutting blades
6.
Outer block with nets
7.
Protective cap
8.
Outer block release buttons
9.
Trimmer button
10.
Power adapter
11.
Cleaning brush
12.
Replaceable nets
13.
Pouch
SAFETY MEASURES
Before using the unit, read these instructions carefully and keep them
for future reference.
Use the unit for the intended purposes only as specified in this
manual. Mishandling the unit can lead to its breakage and cause harm
to the user or damage to his/her property.
•
Before connecting the power adapter to the mains, make sure
that the mains voltage corresponds to the voltage specified on
the adapter body.
•
Do not leave the operating unit unattended.
•
Switch the shaver off during pauses in operation or when you
are not using it.
•
Do not charge the unit in places with high moisture and high
temperature. Charge the accumulator battery of the shaver at
the temperature from 0° C to +35° C and relative humidity no
more than 80%.
•
To charge the accumulator battery of the shaver, use only the
power cord supplied with the unit.
•
Do not place the connecting cord of the power adapter near hot
surfaces or open flame.
•
Outer shaving nets of the shaving system are very thin, if they are
mishandled they can be damaged easily, do not press the nets.
•
To avoid injures do not use the shaver if the shaving nets or inner
shaving blades are damaged.
•
It is allowed to wash shaving nets and inner blades under running
water jet. Never use salted or hot water for washing.
•
Never immerse the shaver completely into a container with
water.
•
Do not disassemble the shaver, otherwise you disturb the water-
proofness of the shaver body.
•
Do not allow children to use the unit as a toy.
•
For children safety reasons, do not leave polyethylene bags,
used as a packaging, unattended.
Attention! Do not allow children to play with polyethylene bags or
packaging film. Danger of suffocation!
•
This unit is not intended for usage by children under 8 years
of age.
•
Children aged 8 and over as well as disabled persons can use
this unit only under supervision of a person who is responsible
for their safety, if they are given all the necessary and under-
standable instructions concerning the safe usage of the unit and
information about danger that can be caused by its improper
usage.
•
To avoid damages, transport the unit in original package only.
•
Do not use the unit if the connection cord of the power adapter
or the power adapter itself is damaged.
•
Do not repair the unit by yourself; in case of any malfunctions of
the shaver apply to the authorized service center.
•
Keep the unit away from children in a dry cool place.
THE UNIT IS INTENDED FOR HOUSEHOLD USAGE ONLY
BEFORE THE FIRST USE
After unit transportation or storage under cold (winter)
conditions, it is necessary to keep it for at least two hours at
room temperature before switching on.
Battery charging
Full charge of the accumulator battery is enough for approximately
40 minutes of continuous operation of the shaver.
•
To charge the accumulator battery, insert the power adapter (10)
cord plug into the socket (1) and insert the power adapter into
the mains, the charging indicator (2) will light up «
».
•
Full charging of the accumulator takes 16 hours.
•
After 16 hours remove the power adapter (10) from the mains
and disconnect the power adapter (10) cord from the unit.
Notes:
–
If the indicator (3) goes out during operation of the shaver, it is
necessary to completely charge the accumulator battery.
–
Charge the accumulator batteries at the temperature from 0°
C to +35° C.
–
If you didn’t use the shaver for a month or longer, charge the
shaver completely before using.
–
Do not leave the unit plugged in for more than 24 hours.
Using the shaver
The best shaving results are achieved if your skin is dry. Your skin may
need 2-3 weeks to get used to this shaving system.
•
Remove the protective cap (7).
•
Set the blocking of the ON/OFF button (4) to the position «
».
•
Switch the shaver on by pressing the button (4), the indicator
(3) will light up.
Note:
–
When using the shaver, you may block the button (4) to avoid
accidental pressing, to do this, set the blocking to the posi-
tion «
».
•
Hold the shaver at a right angle and carefully press it against your
facial skin.
•
Pull your skin with your free hand, move the shaver to and fro
against facial hair.
•
You may increase pressure against skin as your facial skin
gets used to this shaving system. Do not press hard against
the facial skin as it will not lead to considerable improvement
of shaving results.
•
After shaving switch the unit off by pressing the button (4),
the indicator (3) will go out, set the blocking of the button (4) to
the position «
» to avoid accidental switching on of the unit.
•
Clean the shaver.
•
Cover the shaving nets with the protective cap (7) and store the
shaver away.
Using the trimmer
The trimmer is intended for trimming sideburns and mustache.
•
Shift the trimmer button (9) upwards.
•
Switch the shaver on by presing the button (4).
•
Place the trimmer at a right angle to your skin and move it gradu-
ally downwards to trim mustache or sideburns. After using the
trimmer switch the shaver off by pressing the button (4), and
shift the trimmer button (9) downwards.
CLEANING AND CARE
Regular cleaning allows to maintain operability of the shaver, prevent
growth of bacteria and unpleasant odors.
Dry cleaning
Dry cleaning is recommended after each use of the shaver.
•
Press the release buttons (8) and remove the outer block with
nets (6).
•
Clean the outer block (6) from inside and outside and clean the
inner cutting blades (5) using the cleaning brush (11).
•
Install the outer block (6) to its place until the release buttons
(8) click, cover it with the protective cap (7) and take the shaver
away for storage.
Wet cleaning
Important!
Before wet cleaning make sure that the power adapter (10) cord
plug is not inserted into the socket (1) and the power adapter
is unplugged.
•
Without removing the outer block (6), wet the nets with water and
apply some liquid soap to them.
•
Switch the shaver on for 10-20 seconds, then switch it off.
•
Remove the outer block (6) by pressing the release buttons (8)
and rinse it with running water.
•
Rinse the inner cutting blocks (5) with running water placing
the shaver horizontally to the water jet.
•
Dry the shaver and the outer block (6) thoroughly.
Note: Do not remove the remaining water from the shaving nets of
the outer block (6) and cutting blades (5) with a paper or fabric towel,
the nets or the blades may be damaged if they are pressed hard.
•
When it is completely dry, install the outer block (6) to its place,
cover it with the protective cap (7) and take the shaver away
for storage.
Trimmer
Clean the trimmer after each use.
•
Switch the shaver off.
•
Switch the trimmer button (9) upwards.
•
Clean the trimmer with the cleaning brush (11).
•
Move the trimmer button (9) downwards.
•
Every two months grease the trimmer with a drop of oil for sew-
ing machines or hair trimmers.
Replacement of shaving nets
Never use the shaver if the shaving nets (6) or the inner blades (5) are
damaged, in this case it is necessary to change the nets or the blades.
•
Press the release buttons (8) and remove the outer block (6).
•
Face the block (6) towards you.
•
The shaving nets are fixed in plastic frames which are fixed in
the block (6) by two side locks and by locks in the butt ends of
the plastic frames.
•
To remove the plastic frame with the shaving net, it is necessary
to unlock one of the side locks of the frame from the body of the
outer block (6) and to press on it until the terminal lock unlocks.
After that you may take the plastic frame with the shaving net out
of the outer block (6).
•
Remove the second shaving net the same way.
•
Before installing new shaving nets, it is necessary to define
the right position of each net for its installation into the outer
block (6).
•
As you tilt the plastic frame, lead its side locks into the block (6),
then press the edges of the plastic frame with force for com-
plete fixing of the shaving net in the block (6).
•
Insert the second shaving net into the block (6).
•
Insert the block (6) on the shaver and cover it with the protec-
tive cap (7).
STORAGE
•
Clean and dry the unit thoroughly before taking the shaver away
for storage.
•
Place the protective cap (7) on the outer block (6), put the shav-
er and the power adapter (10) into the pouch (13).
•
Keep the shaver away from children in a dry cool place.
ENVIRONMENTAL PROTECTION
The shaver is provided with a disposable battery. Before you
throw away the inoperative shaver, it is necessary to discharge the
accumulator battery completely, remove it and dispose of it according
to the hazardous waste disposal regulations of your country.
Do not throw away the shaver until you remove the built-in battery.
DELIVERY SET
Shaver – 1 pc.
Protective cap – 1 pc.
Power adapter – 1 pc.
Pouch – 1 pc.
Cleaning brush – 1 pc.
Replaceable shaving nets - 2 pcs.
Instruction manual – 1 pc.
TECHNICAL SPECIFICATIONS
Power supply of the power adapter: 230 V ~ 50 Hz
Power output of the power adapter: 3 V
Maximal power consumption: 3 W
The manufacturer reserves the right to change the specifications of
the unit without a preliminary notification.
Unit operating life is 3 years
Guarantee
Details regarding guarantee conditions can be obtained from the dealer
from whom the appliance was purchased. The bill of sale or receipt must
be produced when making any claim under the terms of this guarantee.
This product conforms to the EMC-Requirements as laid
down by the Council Directive 2004/108/ЕС and to the Low
Voltage Regulation (2006/95/ЕС)
ENGLISH
ELEKTRORASIERER VT-2375 BK
BESCHREIBUNG
1.
Anschlussstelle des Netzadapters
2.
Akkuaufladeanzeige
3.
Betriebskontrolleuchte/Entladungsanzeige der Akkubatterie
4.
Ein-/Ausschalttaste «ON/OFF» mit Sperre «
/ »
5.
Innere Schneidmesser
6.
Außeneinheit mit Netzen
7.
Schutzkappe
8.
Fixierungstasten der Außeneinheit
9.
Taste des Trimmers
10.
Netzadapter
11.
Reinigungsbürste
12.
Auswechselbare Netze
13.
Reisetasche
SICHERHEITSMAßNAHMEN
Vor der ersten Inbetriebnahme des Geräts lesen Sie diese Bedienungsanleitung
aufmerksam durch und bewahren Sie sie für weitere Referenz auf.
Benutzen Sie das Gerät nur bestimmungsgemäß und laut dieser
Bedienungsanleitung. Nicht ordnungsgemäße Nutzung des Geräts kann zu
seiner Störung führen, einen gesundheitlichen oder materiellen Schaden
beim Nutzer hervorrufen.
•
Beim Anschließen des Netzadapters in die elektrische Steckdose ver-
gewissern Sie sich, dass die Netzspannung und die am Gehäuse des
Netzadapters angegebene Spannung übereinstimmen.
•
Lassen Sie das funktionierende Gerät nie unbeaufsichtigt.
•
Schalten Sie den Rasierer während der Betriebspausen oder wenn Sie das
Gerät nicht benutzen aus.
•
Laden Sie das Gerät in den Räumen mit erhöhter Feuchtigkeit und Temperatur
nicht auf. Laden Sie den Akkumulator des Rasierers bei der Temperatur von
0°C bis +35°C und relativer Feuchtigkeit nicht mehr als 80% auf.
•
Für die Akkumulatoraufladung benutzen Sie nur den mitgelieferten
Netzadapter.
•
Halten Sie das Anschlußkabel des Netzadapters von heißen Oberflächen
oder offenem Feuer fern.
•
Die Außenrasiernetze des Rasiersystems sind sehr dünn und sind bei nach-
lässiger Nutzung leicht zu beschädigen, drücken Sie die Netze nicht auf.
•
Falls die Rasiernetze oder die inneren Rasiermesser beschädigt sind,
benutzen Sie den Rasierer nicht, um Verletzungen zu vermeiden.
•
Die Rasiernetze und die inneren Messer können unter dem
Leitungswasserstrahl abgespült werden. Es ist nicht gestattet, Salz- oder
Heißwasser zum Abspülen zu benutzen.
•
Es ist nicht gestattet, den Rasierer in einen Behälter mit Wasser voll ein-
zutauchen.
•
Nehmen Sie den Rasierer nicht auseinander, anderenfalls wird
Wasserdichtigkeit des Rasierergehäuses beschädigt.
•
Es ist nicht gestattet, Kindern das Gerät als Spielzeug zu geben.
•
Aus Kindersicherheitsgründen lassen Sie Plastiktüten, die als Verpackung
verwendet werden, nie ohne Aufsicht.
Achtung! Lassen Sie Kinder mit Plastiktüten oder Verpackungsfolien nicht
spielen. Erstickungsgefahr!
•
Dieses Gerät ist nicht für den Gebrauch von Kindern unter 8 Jahren
geeignet.
•
Dieses Gerät darf von Kindern ab 8 Jahren und behinderten Personen nur
dann genutzt werden, wenn sie sich unter Aufsicht der für ihre Sicherheit
verantwortlichen Person befinden, und wenn ihnen entsprechende und ver-
ständliche Anweisungen über sichere Nutzung des Geräts und die Gefahren
bei seiner falschen Nutzung gegeben wurden.
•
Um Beschädigungen zu vermeiden, transportieren Sie das Gerät nur in
der Fabrikverpackung.
•
Es ist nicht gestattet, das Gerät zu benutzen, wenn das Anschlußkabel des
Netzadapters oder der Netzadapter selbst beschädigt ist.
•
Es ist nicht gestattet, das Gerät selbständig zu reparieren, im Fall einer
Beschädigung wenden Sie sich an einen autorisierten (bevollmächtigten)
Kundendienst.
•
Bewahren Sie das Gerät an einem trockenen, kühlen und für Kinder unzu-
gänglichen Ort auf.
DAS GERÄT IST NUR FÜR DEN GEBRAUCH IM HAUSHALT GEEIGNET
VOR DER ERSTEN INBETRIEBNAHME
Falls das Gerät unter winterlichen (kalten) Bedingungen transportiert
oder aufbewahrt wurde, lassen Sie es bei der Raumtemperatur nicht
weniger als zwei Stunden bleiben.
Akkumulatoraufladung
Eine volle Akkumulatoraufladung reicht ungefähr für 40 Minuten Dauerbetrieb
des Rasierers.
•
Für die Akkumulatoraufladung stecken Sie den Stecker des Kabels
des Netzadapters (10) in die Anschlussstelle (1) ein und schließen Sie
den Netzadapter an die elektrische Steckdose an, dabei leuchtet die
Akkuaufladeanzeige (2) «
» auf.
•
Volle Akkumulatoraufladung nimmt 16 Stunden in Anspruch.
•
Nach 16 Stunden nehmen Sie den Netzadapter (10) aus der Steckdose
heraus und trennen Sie das Kabel des Netzadapters (10) vom Gerät ab.
Anmerkungen:
–
Erlischt die Kontrolleuchte (3) während des Rasiererbetriebs, muss der
Akkumulator voll aufgeladen werden.
–
Laden Sie den Akkumulator bei der Temperatur von 0° C bis +35° C auf.
–
Falls Sie den Rasierer einen Monat lang oder mehr nicht benutzt haben,
laden Sie den Rasierer vor der Nutzung vollständig auf.
–
Lassen Sie das Gerät nicht länger als 24 Stunden ans Stromnetz ange-
schlossen.
Nutzung des Rasierers
Die besten Ergebnisse beim Rasieren werden dann erreicht, wenn Ihre Haut tro-
cken ist. Ihre Haut kann 2-3 Wochen brauchen, um sich an dieses Rasiersystem
zu gewöhnen.
•
Nehmen Sie die Schutzkappe (7) ab.
•
Stellen Sie die Sperre der Ein-/Ausschalttaste (4) in die Position «
» ein.
•
Schalten Sie den Rasierer mit der Taste (4) ein, dabei leuchtet die
Betriebskontrolleuchte (3) auf.
Anmerkung:
–
Während der Nutzung des Rasierers können Sie die Taste (4) gegen zufälli-
ges Drücken absperren, stellen Sie dafür die Sperre in die Position «
» um.
•
Halten Sie den Rasierer winkelrecht und drücken Sie ihn vorsichtig an die
Gesichtshaut.
•
Mit der freien Hand spannen Sie die Haut und bewegen Sie den Rasierer
rückwärts/vorwärts über die Haare.
•
Nachdem sich Ihre Haut an dieses Rasiersystem gewöhnt hat, können Sie den
Druck an die Haut verstärken. Drücken Sie die Gesichtshaut stark nicht, weil
es die Qualität des Rasierens nicht merklich verbessert.
•
Nach dem Rasieren schalten Sie das Gerät aus, indem Sie die Taste
(4) drücken, dabei erlischt die Betriebskontrolleuchte (3), stellen Sie
die Sperre der Taste (4) in die Position «
» ein, um eine zufällige
Geräteeinschaltung zu vermeiden.
•
Reinigen Sie den Rasierer.
•
Decken Sie die Rasiernetze mit der Schutzkappe (7) ab und nehmen Sie
den Rasierer zur Aufbewahrung weg.
Nutzung des Trimmers
Der Trimmer ist zum Geradeschneiden der Koteletten und zur
Schnurrbartpflege bestimmt.
•
Schieben Sie die Taste des Trimmers (9) nach oben.
•
Schalten Sie den Rasierer mit der Taste (4) ein.
•
Stellen Sie den Trimmer winkelrecht zur Haut und bewegen Sie ihn allmäh-
lich nach unten, indem Sie den Schnurrbart oder die Koteletten gerade-
schneiden. Nach der Nutzung des Trimmers schalten Sie den Rasierer mit
der Taste (4) aus und schieben Sie die Taste des Trimmers (9) nach unten.
PFLEGE UND REINIGUNG
Regelmäßige Reinigung lässt die Funktionsfähigkeit des Rasierers sichern, die
Bakterienentwicklung stoppen und die Entstehung unangenehmer Gerüche
verhindern.
Trockenreinigung
Es ist empfohlen, die Trockenreinigung des Rasierers nach jeder Nutzung
durchzuführen.
•
Drücken Sie die Fixierungstasten (8) und nehmen Sie die Außeneinheit
mit den Netzen (6) ab.
•
Reinigen Sie die Außeneinheit (6) von der inneren und äußeren Seite,
sowie die inneren Schneidmesser (5) mit der Bürste (11).
•
Stellen Sie die Außeneinheit (6) zurück bis zum Knacken der
Fixierungstasten (8), decken Sie sie mit der Schutzkappe (7) ab und neh-
men Sie den Rasierer zur Aufbewahrung weg.
Naßreinigung
Wichtig!
Vor der Naßreinigung vergewissern Sie sich, dass der Stecker des Kabels
des Netzadapters (10) in die Anschlussstelle (1) nicht eingesteckt ist und
der Netzadapter an die Steckdose nicht angeschlossen ist.
•
Ohne die Außeneinheit (6) abzunehmen, feuchten Sie die Netze mit
Wasser an und tragen Sie etwas Schmierseife darauf.
•
Schalten Sie den Rasierer für 10-20 Sekunde ein, dann schalten Sie ihn aus.
•
Nachdem Sie die Fixierungstasten (8) drücken, nehmen Sie die Außeneinheit
(6) ab und spülen Sie sie unter dem fließenden Wasserstrahl ab.
•
Spülen Sie die inneren Schneideinheiten (5) unter dem fließenden Wasserstrahl
ab, indem Sie das Rasierergehäuse zum Wasserstrahl horizontal halten.
•
Trocknen Sie den Rasierer und die Außeneinheit (6) sorgfältig ab.
Anmerkung: Entfernen Sie die Wasserreste von den Rasiernetzen der
Außeneinheit (6) und den Schneidmessern (5) mit einem Papier- oder
Stofftuch nicht, die Netze oder die Messer können beim starken Druck
beschädigt werden.
•
Nach vollem Abtrocknen stellen Sie die Außeneinheit (6) zurück auf, bede-
cken Sie sie mit der Schutzkappe (7) ab und nehmen Sie den Rasierer zur
Aufbewahrung weg.
Trimmer
Reinigen Sie den Trimmer nach jeder Nutzung.
•
Schalten Sie den Rasierer aus.
•
Schieben Sie die Taste des Trimmers (9) nach oben.
•
Reinigen Sie den Trimmer mit der Bürste (11).
•
Schieben Sie die Taste des Trimmers (9) nach unten.
•
Alle zwei Monate schmieren Sie den Trimmer mit einem Tropfen Öl für
Nähmaschinen oder Haarschneidemaschinen.
Ersetzen der Rasiernetze
Es ist nicht gestattet, den Rasierer zu benutzen, wenn die Rasiernetze (6) oder
die inneren Schneidmesser (5) beschädigt sind, in diesem Fall ersetzen Sie
die Netze oder die Messer.
•
Drücken Sie die Fixierungstasten (8) und nehmen Sie die Außeneinheit
(6) ab.
•
Wenden Sie die Einheit (6) mit der Innenseite zu Ihnen.
•
Die Rasiernetze sind in Kunststoffrahmen, die in der Einheit (6) mit
zwei Seitenhalterungen und mit Halterungen in den Stirnseiten der
Kunststoffrahmen fixiert werden, befestigt.
•
Zum Abnehmen des Kunststoffrahmens mit dem Rasiernetz rasten Sie eine
von den Seitenhalterungen des Rahmens aus dem Gehäuse der Außeneinheit
(6) aus und drücken Sie diesen bis zum Ausrasten der Stirnhalterung. Danach
können Sie den Kunststoffrahmen mit dem Rasiernetz aus der Außeneinheit
(6) herausnehmen.
•
Auf solche Weise nehmen Sie das zweite Rasiernetz heraus.
•
Vor dem Aufstellen der neuen Rasiernetze ist es notwendig, die Stellung
jedes Netzes bei seinem Aufstellen in die Außeneinheit (6) richtig festzu-
stellen.
•
Nachdem Sie den Kunststoffrahmen neigen, setzen Sie seine
Seitenhalterungen in die Einheit (6) ein, dann drücken Sie die Ränder
des Kunststoffrahmens zur vollen Fixierung des Rasiernetzes in der
Einheit (6).
•
Stellen Sie das zweite Rasiernetz in die Außeneinheit (6) ein.
•
Stellen Sie die Einheit (6) auf den Rasierer auf und bedecken Sie sie mit
der Schutzkappe (7) ab.
AUFBEWAHRUNG
•
Bevor Sie den Rasierer zur Aufbewahrung wegnehmen, reinigen und trocknen
Sie das Gerät sorgfältig ab.
•
Setzen Sie die Schutzkappe (7) auf die Außeneinheit (6) auf, legen Sie den
Rasierer und den Netzadapter (10) in die Tasche (13) ein.
•
Bewahren Sie den Rasierer an einem trockenen, kühlen und für Kinder
unzugänglichen Ort auf.
UMWELTSCHUTZ
Der Rasierer enthält einen Akkumulator, der verwertet werden soll. Bevor Sie den
unbrauchbaren Elektrorasierer loswerden, entladen Sie den Akkumulator vollstän-
dig, nehmen Sie ihn heraus und handeln Sie entsprechend Ihren innerstaatlichen
Verwertungsregeln für schädliche Abfälle.
Werfen Sie den Rasierer nicht weg, bis Sie den eingebauten Akkumulator
herausnehmen.
LIEFERUMFANG
Rasierer – 1 St.
Schutzkappe – 1 St.
Netzadapter – 1 St.
Reisetasche – 1 St.
Reinigungsbürste – 1 St.
Auswechselbare Rasiernetze - 2 St.
Bedienungsanleitung – 1 St.
TECHNISCHE EIGENSCHAFTEN
Stromversorgung des Netzadapters: 230 V ~ 50 Hz
Ausgangsspannung des Netzadapters: 3 V
Maximale Aufnahmeleistung: 3 W
Der Hersteller behält sich das Recht vor, Design und technische Eigenschaften
des Geräts ohne Vorbenachrichtigung zu verändern
Nutzungsdauer des Geräts beträgt 3 Jahre
Gewährleistung
Ausführliche Bedingungen der Gewährleistung kann man beim Dealer, der
diese Geräte verkauft hat, bekommen. Bei beliebiger Anspruchserhebung soll
man während der Laufzeit der vorliegenden Gewährleistung den Check oder
die Quittung über den Ankauf vorzulegen.
Das vorliegende Produkt entspricht den Forderungen der
elektromagnetischen Verträglichkeit, die in 2004/108/EC –
Richtlinie des Rates und den Vorschriften 2006/95/EC über die
Niederspannungsgeräte vorgesehen sind.
DEUTSCH
ЭЛЕКТРИЧЕСКАЯ БРИТВА VT-2375 BK
ОПИСАНИЕ
1.
Гнездо для подключения сетевого адаптера
2.
Индикатор зарядки аккумуляторной батареи
3.
Индикатор работы/разрядки аккумуляторной батареи
4.
Кнопка включения/выключения «ON/OFF» с блокировкой «
/ »
5.
Внутренние режущие ножи
6.
Внешний блок с сетками
7.
Защитный колпачок
8.
Кнопки фиксаторов внешнего блока
9.
Клавиша триммера
10.
Сетевой адаптер
11.
Щёточка для чистки
12.
Сменные сетки
13.
Дорожный чехол
МЕРЫ БЕЗОПАСНОСТИ
Перед началом эксплуатации устройства внимательно прочитайте
настоящую инструкцию по эксплуатации и сохраните её для исполь-
зования в качестве справочного материала.
Используйте устройство только по его прямому назначению, как
изложено в настоящей инструкции. Неправильное обращение с
устройством может привести к его поломке, причинению вреда
пользователю или его имуществу.
•
Перед включением сетевого адаптера в электрическую розетку
убедитесь, что напряжение в электрической сети соответствует
напряжению, указанному на корпусе сетевого адаптера.
•
Не оставляйте работающее устройство без присмотра.
•
Выключайте бритву в перерывах в работе, а также в тех случаях,
когда не пользуетесь устройством.
•
Не заряжайте устройство в местах с повышенной влажностью и
повышенной температурой. Производите зарядку аккумулятор-
ной батареи бритвы при температуре от 0°C до +35°C и при отно-
сительной влажности не более 80%.
•
Для зарядки аккумуляторной батареи бритвы пользуйтесь только
тем сетевым адаптером, который входит в комплект поставки.
•
Не располагайте соединительный шнур сетевого адаптера
рядом с горячими поверхностями или вблизи открытого огня.
•
Внешние бреющие сетки бритвенной системы очень тонкие, при
неосторожном обращении их можно легко повредить, не нада-
вливайте на сетки.
•
При наличии повреждений бреющих сеток или внутренних брею-
щих ножей во избежание травм не пользуйтесь бритвой.
•
Разрешается промывать бреющие сетки и внутренние ножи
под струёй водопроводной воды. Запрещается для промывки
использовать солёную или горячую воду.
•
Запрещается полностью погружать бритву в ёмкость с водой.
•
Не разбирайте бритву, в противном случае будет нарушена
водонепроницаемость корпуса бритвы.
•
Не разрешайте детям использовать устройство в качестве игрушки.
•
Из соображений безопасности детей не оставляйте полиэтиле-
новые пакеты, используемые в качестве упаковки, без надзора.
Внимание! Не разрешайте детям играть с полиэтиленовыми пакета-
ми или упаковочной плёнкой. Опасность удушья!
•
Данное устройство не предназначено для использования деть-
ми младше 8 лет.
•
Дети старше 8 лет и люди с ограниченными возможностями могут
пользоваться устройством лишь в том случае, если они находят-
ся под присмотром лица, отвечающего за их безопасность, при
условии, что им были даны соответствующие и понятные инструк-
ции о безопасном пользовании устройством и тех опасностях,
которые могут возникать при его неправильном использовании.
•
Во избежание повреждений перевозите устройство только в
заводской упаковке.
•
Не используйте устройство при наличии повреждений соедини-
тельного шнура сетевого адаптера или самого сетевого адаптера.
•
Запрещается самостоятельно ремонтировать устройство, в слу-
чае неисправности бритвы обратитесь в авторизованный (упол-
номоченный) сервисный центр.
•
Храните устройство в сухом прохладном месте, недоступном
для детей.
УСТРОЙСТВО ПРЕДНАЗНАЧЕНО ТОЛЬКО ДЛЯ ДОМАШНЕГО
ИСПОЛЬЗОВАНИЯ
ПЕРЕД ПЕРВЫМ ИСПОЛЬЗОВАНИЕМ
После транспортировки или хранения устройства в холодных
(зимних) условиях необходимо выдержать его при комнатной
температуре не менее двух часов.
Зарядка аккумуляторной батареи
Полного заряда аккумуляторной батареи хватает приблизительно на
40 минут непрерывной работы бритвы.
•
Для зарядки аккумуляторной батареи вставьте штекер шнура
сетевого адаптера (10) в гнездо (1) и вставьте сетевой адап-
тер в электрическую розетку, при этом загорится индикатор
зарядки (2) «
».
•
Полная зарядка аккумуляторной батареи занимает 16 часов.
•
Спустя 16 часов извлеките сетевой адаптер (10) из электри-
ческой розетки и отсоедините шнур сетевого адаптера (10) от
устройства.
Примечания:
–
Если во время использования бритвы погас индикатор (3), необ-
ходимо провести полную зарядку аккумуляторной батареи.
–
Производите зарядку аккумуляторов при температуре от 0° C
до +35° C.
–
Если вы не пользовались бритвой в течение месяца или более,
полностью зарядите бритву перед использованием.
–
Не оставляйте устройство включённым в сеть более 24 часов.
Использование бритвы
Наилучшие результаты бритья достигаются в том случае, если ваша
кожа сухая. Вашей коже может потребоваться 2-3 недели для того,
чтобы привыкнуть к данной бритвенной системе.
•
Снимите защитный колпачок (7).
•
Установите блокировку кнопки включения/выключения (4) в
положение «
».
•
Включите бритву, нажав на кнопку (4), при этом загорится инди-
катор (3).
Примечание:
–
Во время использования бритвы вы можете заблокировать кноп-
ку (4) от случайного нажатия, для этого переведите блокировку
в положение « ».
•
Держите бритву под прямым углом и осторожно прижимайте её
к коже лица.
•
Свободной рукой натягивайте кожу, перемещайте бритву назад/
вперед по волосяному покрову.
•
По мере привыкания кожи лица к данной бритвен-
ной системе вы можете усилить нажим на кожу.
Не нажимайте сильно на кожу лица, так как это не приведёт к значи-
тельному улучшению качества бритья.
•
По окончании бритья выключите устройство, нажав на кнопку (4),
при этом индикатор (3) погаснет, установите блокировку кнопки
(4) в положение « », чтобы предотвратить случайное включе-
ние устройства.
•
Проведите чистку бритвы.
•
Закройте бреющие сетки защитным колпачком (7) и уберите
бритву на хранение.
Использование триммера
Триммер предназначен для подравнивания висков и для ухода за
усами.
•
Сдвиньте клавишу триммера (9) по направлению вверх.
•
Включите бритву, нажав на кнопку (4).
•
Расположите триммер под прямым углом к коже и постепенно
передвигайте его по направлению вниз, подравнивая усы или
виски. Закончив использования триммера, выключите бритву,
нажав на кнопку (4), и сдвиньте клавишу триммера (9) по направ-
лению вниз.
УХОД И ЧИСТКА
Регулярная чистка позволяет поддерживать работоспособность брит-
вы, прекращать развитие бактерий и предотвращать появление
неприятных запахов.
Сухая чистка
Рекомендуется проводить сухую чистку бритвы после каждого её
использования.
•
Нажмите на кнопки фиксаторов (8) и снимите внешний блок с
сетками (6).
•
Используя щёточку (11), прочистите внешний блок (6) с вну-
тренней и внешней сторон, прочистите внутренние режущие
ножи (5).
•
Установите внешний блок (6) на место до щелчка фиксаторов
(8), закройте его защитным колпачком (7) и уберите бритву на
хранение.
Влажная чистка
Важно!
Перед проведением влажной чистки убедитесь в том, что ште-
кер шнура сетевого адаптера (10) не вставлен в гнездо (1) и
сетевой адаптер не вставлен в розетку электросети.
•
Не снимая внешний блок (6), смочите сетки водой и нанесите на
них немного жидкого мыла.
•
Включите бритву на 10-20 секунд, затем выключите.
•
Нажав на кнопки фиксаторов (8), снимите внешний блок (6) и
промойте его под струёй проточной воды.
•
Промойте внутренние режущие блоки (5) под струёй проточной
воды, расположив корпус бритвы горизонтально к струе воды.
•
Тщательно просушите бритву и внешний блок (6).
Примечание: Не удаляйте остатки воды с бреющих сеток внешнего
блока (6) и режущих ножей (5) с помощью бумажного или ткане-
вого полотенца, при сильном нажиме на сетки или ножи их можно
повредить.
•
После полного высыхания установите внешний блок (6) на место,
закройте его защитным колпачком (7) и уберите бритву на хра-
нение.
Триммер
Очищайте триммер после каждого использования.
•
Выключите бритву.
•
Сдвиньте клавишу триммера (9) по направлению вверх.
•
Очистите триммер с помощью щёточки (11).
•
Сдвиньте клавишу триммера (9) по направлению вниз.
•
Каждые два месяца смазывайте триммер каплей масла для швей-
ных машин или машинок для стрижки.
Замена бреющих сеток
Запрещается использовать бритву при наличии повреждений брею-
щих сеток (6) или внутренних ножей (5), в этом случае необходимо
произвести замену сеток или ножей.
•
Нажмите на кнопки фиксаторов (8) и снимите внешний блок (6).
•
Расположите блок (6) внутренней стороной к себе.
•
Бреющие сетки закреплены в пластмассовых рамках, которые
фиксируются в блоке (6) двумя боковыми фиксаторами и фикса-
торами в торцах пластмассовых рамок.
•
Для снятия пластмассовой рамки с бреющей сеткой необхо-
димо вывести один из боковых фиксаторов рамки из заце-
пления с корпусом внешнего блока (6) и надавить на неё до
выхода из зацепления торцевого фиксатора. После этого
можно вынуть пластмассовую рамку с бреющей сеткой из
внешнего блока (6).
•
Таким же образом извлеките вторую бреющую сетку.
•
Перед установкой новых бреющих сеток необходимо правильно
определить местоположение каждой сетки при её установке во
внешний блок (6).
•
Наклонив пластмассовую рамку, заведите её боковые фик-
саторы внутрь блока (6), затем с усилием надавите на края
пластмассовой рамки для полной фиксации бреющей сетки
в блоке (6).
•
Установите вторую бреющую сетку в блок (6).
•
Установите блок (6) на бритву и закройте его защитным кол-
пачком (7).
ХРАНЕНИЕ
•
Прежде чем убрать бритву на хранение, произведите чистку
устройства и тщательно его просушите.
•
Установите защитный колпачок (7) на внешний блок (6), помести-
те бритву и сетевой адаптер (10) в чехол (13).
•
Храните бритву в сухом прохладном месте, недоступном для
детей.
ЗАЩИТА ОКРУЖАЮЩЕЙ СРЕДЫ
Бритва содержит аккумуляторную батарею, подлежащую утилизации.
Прежде чем избавиться от пришедшей в негодность электробритвы,
необходимо полностью разрядить и после этого извлечь аккумуля-
торную батарею, действуя по принятым в вашей стране правилам
утилизации вредных отходов.
Не выбрасывайте бритву, пока не удалите из неё встроенную акку-
муляторную батарею.
КОМПЛЕКТАЦИЯ
Бритва – 1 шт.
Защитный колпачок – 1 шт.
Сетевой адаптер – 1 шт.
Дорожный чехол – 1 шт.
Щёточка для чистки – 1 шт.
Сменные бреющие сетки – 2 шт.
Инструкция – 1 шт.
ТЕХНИЧЕСКИЕ ХАРАКТЕРИСТИКИ
Электропитание сетевого адаптера: 230 В ~ 50 Гц
Выходное напряжение сетевого адаптера: 3 В
Максимальная потребляемая мощность: 3 Вт
Производитель оставляет за собой право изменять характеристики
устройства без предварительного уведомления
Срок службы устройства – 3 года
Данное изделие соответствует всем требуемым европей-
ским и российским стандартам безопасности и гигиены.
АН-ДЕР ПРОДАКТС ГмбХ, Австрия
Нойбаугюртель 38/7А, 1070 Вена, Австрия
Сделано в Китае
РУССКИЙ
VT-2375.indd 1 28.05.2014 15:52:12
Содержание
- Accumulatorbatterychargingindicator 1
- After shaving switch the unit off by pressing the button 4 theindicator 3 willgoout settheblockingofthebutton 4 to theposition toavoidaccidentalswitchingonoftheunit 1
- After16hoursremovethepoweradapter 10 fromthemains anddisconnectthepoweradapter 10 cordfromtheunit 1
- Asyoutilttheplasticframe leaditssidelocksintotheblock 6 thenpress the edges of the plastic frame withforceforcom pletefixingoftheshavingnetintheblock 6 1
- Before installing new shaving nets it is necessary to define the right position of each net for its installation into the outer block 6 1
- Before the first use after unit transportation or storage under cold winter conditions it is necessary to keep it for at least two hours at room temperature before switching on battery charging fullchargeoftheaccumulatorbatteryisenoughforapproximately 40minutesofcontinuousoperationoftheshaver 1
- Beforeconnectingthepoweradaptertothemains makesure thatthemainsvoltagecorrespondstothevoltagespecifiedon theadapterbody 1
- Charge the accumulator batteries at the temperature from 0 c to 35 c 1
- Childrenaged8andoveraswellasdisabledpersonscanuse thisunitonlyundersupervisionofapersonwhoisresponsible for their safety if they are given all the necessary and under standableinstructionsconcerningthesafeusageoftheunitand information about danger that can be caused by its improper usage 1
- Cleananddrytheunitthoroughlybeforetakingtheshaveraway forstorage 1
- Cleaning and care regularcleaningallowstomaintainoperabilityoftheshaver prevent growthofbacteriaandunpleasantodors 1
- Cleaningbrush 1
- Cleantheouterblock 6 frominsideandoutsideandcleanthe innercuttingblades 5 usingthecleaningbrush 11 1
- Cleantheshaver 1
- Cleanthetrimmerwiththecleaningbrush 11 1
- Covertheshavingnetswiththeprotectivecap 7 andstorethe shaveraway 1
- Delivery set shaver 1pc protectivecap 1pc poweradapter 1pc pouch 1pc cleaningbrush 1pc replaceableshavingnets 2pcs instructionmanual 1pc 1
- Description 1
- Deutsch 1
- Do not charge the unit in places with high moisture and high temperature chargetheaccumulatorbatteryoftheshaverat the temperature from 0 c to 35 c and relative humidity no morethan80 1
- Do not leave the unit plugged in for more than 24 hours 1
- Donotallowchildrentousetheunitasatoy 1
- Donotdisassembletheshaver otherwiseyoudisturbthewater proofnessoftheshaverbody 1
- Donotleavetheoperatingunitunattended 1
- Donotplacetheconnectingcordofthepoweradapternearhot surfacesoropenflame 1
- Donotrepairtheunitbyyourself incaseofanymalfunctionsof theshaverapplytotheauthorizedservicecenter 1
- Donotusetheunitiftheconnectioncordofthepoweradapter orthepoweradapteritselfisdamaged 1
- Dry cleaning drycleaningisrecommendedaftereachuseoftheshaver 1
- Drytheshaverandtheouterblock 6 thoroughly note do not remove the remaining water from the shaving nets of the outer block 6 and cutting blades 5 with a paper or fabric towel the nets or the blades may be damaged if they are pressed hard 1
- English 1
- Environmental protection the shaver is provided with a disposable battery before you throwawaytheinoperativeshaver itisnecessarytodischargethe accumulatorbatterycompletely removeitanddisposeofitaccording tothehazardouswastedisposalregulationsofyourcountry donotthrowawaytheshaveruntilyouremovethebuilt inbattery 1
- Everytwomonthsgreasethetrimmerwithadropofoilforsew ingmachinesorhairtrimmers 1
- Facetheblock 6 towardsyou 1
- For children safety reasons do not leave polyethylene bags usedasapackaging unattended attention do not allow children to play with polyethylene bags or packaging film danger of suffocation 1
- Fullchargingoftheaccumulatortakes16hours 1
- Guarantee detailsregardingguaranteeconditionscanbeobtainedfromthedealer fromwhomtheappliancewaspurchased thebillofsaleorreceiptmust beproducedwhenmakinganyclaimunderthetermsofthisguarantee 1
- Holdtheshaveratarightangleandcarefullypressitagainstyour facialskin 1
- If the indicator 3 goes out during operation of the shaver it is necessary to completely charge the accumulator battery 1
- If you didn t use the shaver for a month or longer charge the shaver completely before using 1
- Important before wet cleaning make sure that the power adapter 10 cord plug is not inserted into the socket 1 and the power adapter is unplugged 1
- Innercuttingblades 1
- Inserttheblock 6 ontheshaverandcoveritwiththeprotec tivecap 7 1
- Insertthesecondshavingnetintotheblock 6 1
- Installtheouterblock 6 toitsplaceuntilthereleasebuttons 8 click coveritwiththeprotectivecap 7 andtaketheshaver awayforstorage 1
- Itisallowedtowashshavingnetsandinnerbladesunderrunning waterjet neverusesaltedorhotwaterforwashing 1
- Keeptheshaverawayfromchildreninadrycoolplace 1
- Keeptheunitawayfromchildreninadrycoolplace 1
- Men shaver vt 2375 bk 1
- Movethetrimmerbutton 9 downwards 1
- Never immerse the shaver completely into a container with water 1
- On off buttonwithblocking 1
- Operation accumulatorbatterydischarge indicator 1
- Outerblockreleasebuttons 1
- Outerblockwithnets 1
- Outershavingnetsoftheshavingsystemareverythin iftheyare mishandledtheycanbedamagedeasily donotpressthenets 1
- Placetheprotectivecap 7 ontheouterblock 6 puttheshav erandthepoweradapter 10 intothepouch 13 1
- Placethetrimmeratarightangletoyourskinandmoveitgradu allydownwardstotrimmustacheorsideburns afterusingthe trimmer switch the shaver off by pressing the button 4 and shiftthetrimmerbutton 9 downwards 1
- Poweradapter 1
- Poweradapterconnectionsocket 1
- Pressthereleasebuttons 8 andremovetheouterblock 6 1
- Pressthereleasebuttons 8 andremovetheouterblockwith nets 6 1
- Protectivecap 1
- Pullyourskinwithyourfreehand movetheshavertoandfro againstfacialhair 1
- Removetheouterblock 6 bypressingthereleasebuttons 8 andrinseitwithrunningwater 1
- Removetheprotectivecap 7 1
- Removethesecondshavingnetthesameway 1
- Replaceablenets 1
- Replacement of shaving nets neverusetheshaveriftheshavingnets 6 ortheinnerblades 5 are damaged inthiscaseitisnecessarytochangethenetsortheblades 1
- Rinsetheinnercuttingblocks 5 withrunningwater placing the shaver horizontally to the water jet 1
- Safety measures beforeusingtheunit readtheseinstructionscarefullyandkeepthem forfuturereference use the unit for the intended purposes only as specified in this manual mishandlingtheunitcanleadtoitsbreakageandcauseharm totheuserordamagetohis herproperty 1
- Settheblockingoftheon offbutton 4 totheposition 1
- Shiftthetrimmerbutton 9 upwards 1
- Storage 1
- Switchtheshaveroff 1
- Switchtheshaveroffduringpausesinoperationorwhenyou arenotusingit 1
- Switchtheshaveronbypresingthebutton 4 1
- Switchtheshaveronbypressingthebutton 4 theindicator 3 willlightup note 1
- Switchtheshaveronfor10 20seconds thenswitchitoff 1
- Switchthetrimmerbutton 9 upwards 1
- Technical specifications powersupplyofthepoweradapter 230v 50hz poweroutputofthepoweradapter 3v maximalpowerconsumption 3w 1
- The manufacturer reserves the right to change the specifications of the unit without a preliminary notification 1
- The unit is intended for household usage only 1
- Theshavingnetsarefixedinplasticframeswhicharefixedin theblock 6 bytwosidelocksandbylocksinthebuttendsof theplasticframes 1
- This product conforms to the emc requirements as laid down by the council directive 2004 108 ес and to the low voltage regulation 2006 95 ес 1
- This unit is not intended for usage by children under 8 years ofage 1
- Toavoiddamages transporttheunitinoriginalpackageonly 1
- Toavoidinjuresdonotusetheshaveriftheshavingnetsorinner shavingbladesaredamaged 1
- Tochargetheaccumulatorbattery insertthepoweradapter 10 cordplugintothesocket 1 andinsertthepoweradapterinto themains thechargingindicator 2 willlightup 1
- Tochargetheaccumulatorbatteryoftheshaver useonlythe powercordsuppliedwiththeunit 1
- Toremovetheplasticframewiththeshavingnet itisnecessary tounlockoneofthesidelocksoftheframefromthebodyofthe outerblock 6 andtopressonituntiltheterminallockunlocks afterthatyoumaytaketheplasticframewiththeshavingnetout oftheouterblock 6 1
- Trimmer cleanthetrimmeraftereachuse 1
- Trimmerbutton 1
- Unit operating life is 3 years 1
- Using the shaver thebestshavingresultsareachievedifyourskinisdry yourskinmay need2 3weekstogetusedtothisshavingsystem 1
- Using the trimmer thetrimmerisintendedfortrimmingsideburnsandmustache 1
- Wet cleaning 1
- When using the shaver you may block the button 4 to avoid accidental pressing to do this set the blocking to the posi tion 1
- Whenitiscompletelydry installtheouterblock 6 toitsplace cover it with the protective cap 7 and take the shaver away forstorage 1
- Withoutremovingtheouterblock 6 wetthenetswithwaterand applysomeliquidsoaptothem 1
- You may increase pressure against skin as your facial skin getsusedtothisshavingsystem donotpresshardagainst thefacialskinasitwillnotleadtoconsiderableimprovement ofshavingresults 1
- Русский 1
- Men shaver 2
- Vt 2375 bk 2
- Оооголдер электроникс 2014 golder electronicsllc 2014 2
- Українська 2
- Электрическая бритва 2
- Қазақша 2
Похожие устройства
- Vitek VT-2374 BK Инструкция по эксплуатации
- Vitek VT-8070 MC Инструкция по эксплуатации
- Vitek VT-8069 MC Инструкция по эксплуатации
- Vitek VT-8066 GY Инструкция по эксплуатации
- Vitek VT-8065 MC Инструкция по эксплуатации
- Vitek VT-8024 BK Инструкция по эксплуатации
- Vitek VT-8023 PK Инструкция по эксплуатации
- Vitek VT-1984 VT Инструкция по эксплуатации
- Vitek VT-1989 R Инструкция по эксплуатации
- Vitek VT-1985 BK Инструкция по эксплуатации
- Vitek VT-1985 W Инструкция по эксплуатации
- Vitek VT-1982 BK Инструкция по эксплуатации
- Vitek VT-1980 G Инструкция по эксплуатации
- Vitek VT-1975 Y Инструкция по эксплуатации
- Vitek VT-1970 SR Инструкция по эксплуатации
- Vitek VT-1968 P Инструкция по эксплуатации
- Vitek VT-1957 OG Инструкция по эксплуатации
- Vitek VT-6602 BK Инструкция по эксплуатации
- Vitek VT-6602 W Инструкция по эксплуатации
- Vitek VT-6607 GY Инструкция по эксплуатации