![ASRock A320M-HDV — настройка перемычек и сброс CMOS для системных параметров [31/66]](/img/pdf.png)
ASRock A320M-HDV — настройка перемычек и сброс CMOS для системных параметров [31/66]
![ASRock A320M-HDV [31/66] Jumpers setup](/views2/1253648/page31/bg1f.png)
English
26
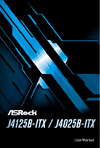
2.5 Jumpers Setup
e illustration shows how jumpers are setup. When the jumper cap is placed on
the pins, the jumper is “Short”. If no jumper cap is placed on the pins, the jumper
is “Open”. e illustration shows a 3-pin jumper whose pin1 and pin2 are “Short”
when a jumper cap is placed on these 2 pins.
Clear CMOS Jumper
(CLRCMOS1)
(see p.6, 7, No. 12)
CLRCMOS1 allows you to clear the data in CMOS. To clear and reset the system
parameters to default setup, please turn o the computer and unplug the power
cord from the power supply. Aer waiting for 15 seconds, use a jumper cap to
short pin2 and pin3 on CLRCMOS1 for 5 seconds. However, please do not clear
the CMOS right aer you update the BIOS. If you need to clear the CMOS when
you just nish updating the BIOS, you must boot up the system rst, and then shut
it down before you do the clear-CMOS action. Please be noted that the password,
date, time, and user default prole will be cleared only if the CMOS battery is
removed.
If you clear the CMOS, the case open may be detected. Please adjust the BIOS option
“Clear Status” to clear the record of previous chassis intrusion status.
Clear CMOSDefault
Содержание
- California usa only p.2
- Disclaimer p.2
- Copyright notice p.2
- Australia only p.3
- Chapter 1 introduction 1 p.4
- Chapter 2 installation 12 p.4
- Contents p.4
- Chapter 3 software and utilities operation 35 p.4
- Chapter 4 uefi setup utility 42 p.5
- Ab350m hdv a320m hdv a320m dgs p.6
- English p.6
- Package contents p.6
- Chapter 1 introduction p.6
- Expansion slot p.7
- English p.7
- Specifications p.7
- Platform p.7
- Memory p.7
- Graphics p.7
- Chipset p.7
- Rear panel i o p.8
- Ab350m hdv a320m hdv a320m dgs p.8
- English p.8
- Connector p.9
- Bios feature p.9
- Hardware monitor p.9
- English p.9
- Storage p.9
- English p.10
- Ab350m hdv a320m hdv a320m dgs p.10
- Certifica tions p.10
- Motherboard layout p.11
- Atxpwr1 p.11
- Ab350m hdv a320m hdv p.11
- English p.11
- A320m dgs p.12
- Ddr4_a2 64 bit 288 pin module p.12
- Ab350m hdv a320m hdv a320m dgs p.12
- Ddr4_a1 64 bit 288 pin module p.12
- Atxpwr1 p.12
- English p.12
- English p.13
- I o panel p.14
- English p.14
- Ab350m hdv a320m hdv p.14
- Ab350m hdv a320m hdv a320m dgs p.14
- A320m dgs p.15
- English p.15
- Ab350m hdv a320m hdv a320m dgs p.16
- English p.16
- Chapter 2 installation p.17
- English p.17
- Pre installation precautions p.17
- Installing the cpu p.18
- English p.19
- Installing the cpu box cooler sr1 p.20
- Ab350m hdv a320m hdv a320m dgs p.20
- Installing the cpu fan and heatsink p.20
- English p.20
- English p.21
- Ab350m hdv a320m hdv a320m dgs p.22
- Installing the am4 box cooler sr2 p.22
- English p.22
- English p.23
- Installing the am4 box cooler sr3 p.25
- English p.25
- English p.26
- Ab350m hdv a320m hdv a320m dgs p.26
- English p.27
- Ryzen cpus p.28
- Ddr4 udimm maximum frequency support p.28
- Ab350m hdv a320m hdv a320m dgs p.28
- A series apus p.28
- Installing memory modules dimm p.28
- English p.28
- English p.29
- Expansion slots pci express slots p.30
- English p.30
- Ab350m hdv a320m hdv a320m dgs p.30
- Jumpers setup p.31
- English p.31
- Onboard headers and connectors p.32
- Connect the power switch reset switch and system status indicator on the chassis to this header according to the pin assignments below note the positive and negative pins before connecting the cables p.32
- System panel header 9 pin panel1 see p 7 no 13 p.32
- English p.32
- Ab350m hdv a320m hdv a320m dgs p.32
- English p.33
- Ab350m hdv a320m hdv a320m dgs p.34
- English p.34
- English p.35
- M _ssd ngff module installation guide p.36
- Installing the m _ssd ngff module p.36
- English p.36
- Ab350m hdv a320m hdv a320m dgs p.36
- English p.37
- English p.38
- Ab350m hdv a320m hdv a320m dgs p.38
- M _ssd ngff module support list p.39
- English p.39
- Installing drivers p.40
- English p.40
- Drivers menu p.40
- Chapter 3 software and utilities operation p.40
- Ab350m hdv a320m hdv a320m dgs p.40
- Utilities menu p.40
- Running the support cd p.40
- English p.41
- Ui overview p.41
- Asrock live update app shop p.41
- Installing an app p.42
- English p.42
- Ab350m hdv a320m hdv a320m dgs p.42
- English p.43
- Upgrading an app p.44
- English p.44
- Ab350m hdv a320m hdv a320m dgs p.44
- English p.45
- Installing bios or drivers p.45
- Bios drivers p.45
- Ab350m hdv a320m hdv a320m dgs p.46
- Setting p.46
- English p.46
- Chapter 4 uefi setup utility p.47
- Uefi menu bar p.47
- Introduction p.47
- English p.47
- Navigation keys p.48
- English p.48
- Ab350m hdv a320m hdv a320m dgs p.48
- Main screen p.49
- English p.49
- Oc tweaker screen p.50
- Full hd uefi p.51
- English p.51
- Advanced screen p.51
- Active page on entry p.51
- Uefi configuration p.51
- Svm mode p.52
- English p.52
- Cpu configuration p.52
- Cool n quiet p.52
- C6 mode p.52
- Amd ftpm switch p.52
- Ab350m hdv a320m hdv a320m dgs p.52
- North bridge configuration p.53
- Front panel p.54
- South bridge configuration p.54
- Restore on ac power loss p.54
- Onboard hd audio p.54
- English p.54
- Deep sleep p.54
- Ab350m hdv a320m hdv a320m dgs p.54
- Storage configuration p.55
- Super io configuration p.56
- Suspend to ram p.57
- Rtc alarm power on p.57
- Ps 2 keyboard power on p.57
- Pcie devices power on p.57
- English p.57
- Acpi hpet table p.57
- Acpi configuration p.57
- Trusted computing p.58
- Instant flash p.59
- English p.59
- Internet flash dhcp auto ip auto p.59
- Easy raid installer p.59
- Chassis fan 1 setting p.61
- Case open feature p.61
- Over temperature protection p.61
- Hardware health event monitoring screen p.61
- English p.61
- Cpu fan 1 setting p.61
- Chassis fan 1 temp source p.61
- Secure boot p.62
- English p.62
- User password p.62
- Supervisor password p.62
- Security screen p.62
- Ab350m hdv a320m hdv a320m dgs p.62
- Boot screen p.63
- English p.63
- Bootup num lock p.63
- Boot from onboard lan p.63
- Boot beep p.63
- Setup prompt timeout p.63
- Full screen logo p.63
- Fast boot p.63
- Ab350m hdv a320m hdv a320m dgs p.64
- Launch video oprom policy p.64
- Launch storage oprom policy p.64
- Launch pxe oprom policy p.64
- English p.64
- Csm compatibility support module p.64
- Addon rom display p.64
- Load uefi defaults p.65
- Launch efi shell from filesystem device p.65
- Exit screen p.65
- English p.65
- Discard changes and exit p.65
- Discard changes p.65
- Save changes and exit p.65
- English p.66
- Contact information p.66
- Asrock incorporation p.66
- Asrock europe b v p.66
- Asrock america inc p.66
- Ab350m hdv a320m hdv a320m dgs p.66
Похожие устройства
-
 ASRock B850 Steel Legend WiFiИнструкция по работе
 -
 ASRock B850M Pro RSРуководство пользователя
 -
ASRock B850M Pro RS WiFiИнструкция по работе
-
 ASRock X870 Riptide WiFiЭксплуатационная инструкция
 -
 ASRock B650 Pro RSИнструкция по применению
 -
 ASRock B650M Pro X3DРуководство по настройке
 -
ASRock B650M Pro X3D WiFiРуководство по использованию
-
 ASRock Z490 Steel LegendРуководство по настройке
 -
 ASRock B650M-HDV/M.2 WhiteИнструкция по работе
 -
 ASRock B760M PG Lightning/D4Инструкция пользователя
 -
 ASRock B760 Pro RSЭксплуатационная инструкция
 -
 ASRock J4025B-ITXЭксплуатационная инструкция
Узнайте, как правильно настроить перемычки и выполнить сброс CMOS для восстановления системных параметров. Подробные инструкции и советы по безопасному выполнению.