
Pulsar FN 42 мм Инструкция по эксплуатации онлайн
Gli adattori ad anello FN 42/50/56 mm sono progettati per collegare il dispositivo digitale Forward
F135/155 e Forward FN 135/155; Forward F135/155 e Forward FN 135/155 sulle lenti dei
cannocchiali diurni. L'adattatore viene fornito con inserti, coperchio anteriore e chiavi a brugola.
Installazione:
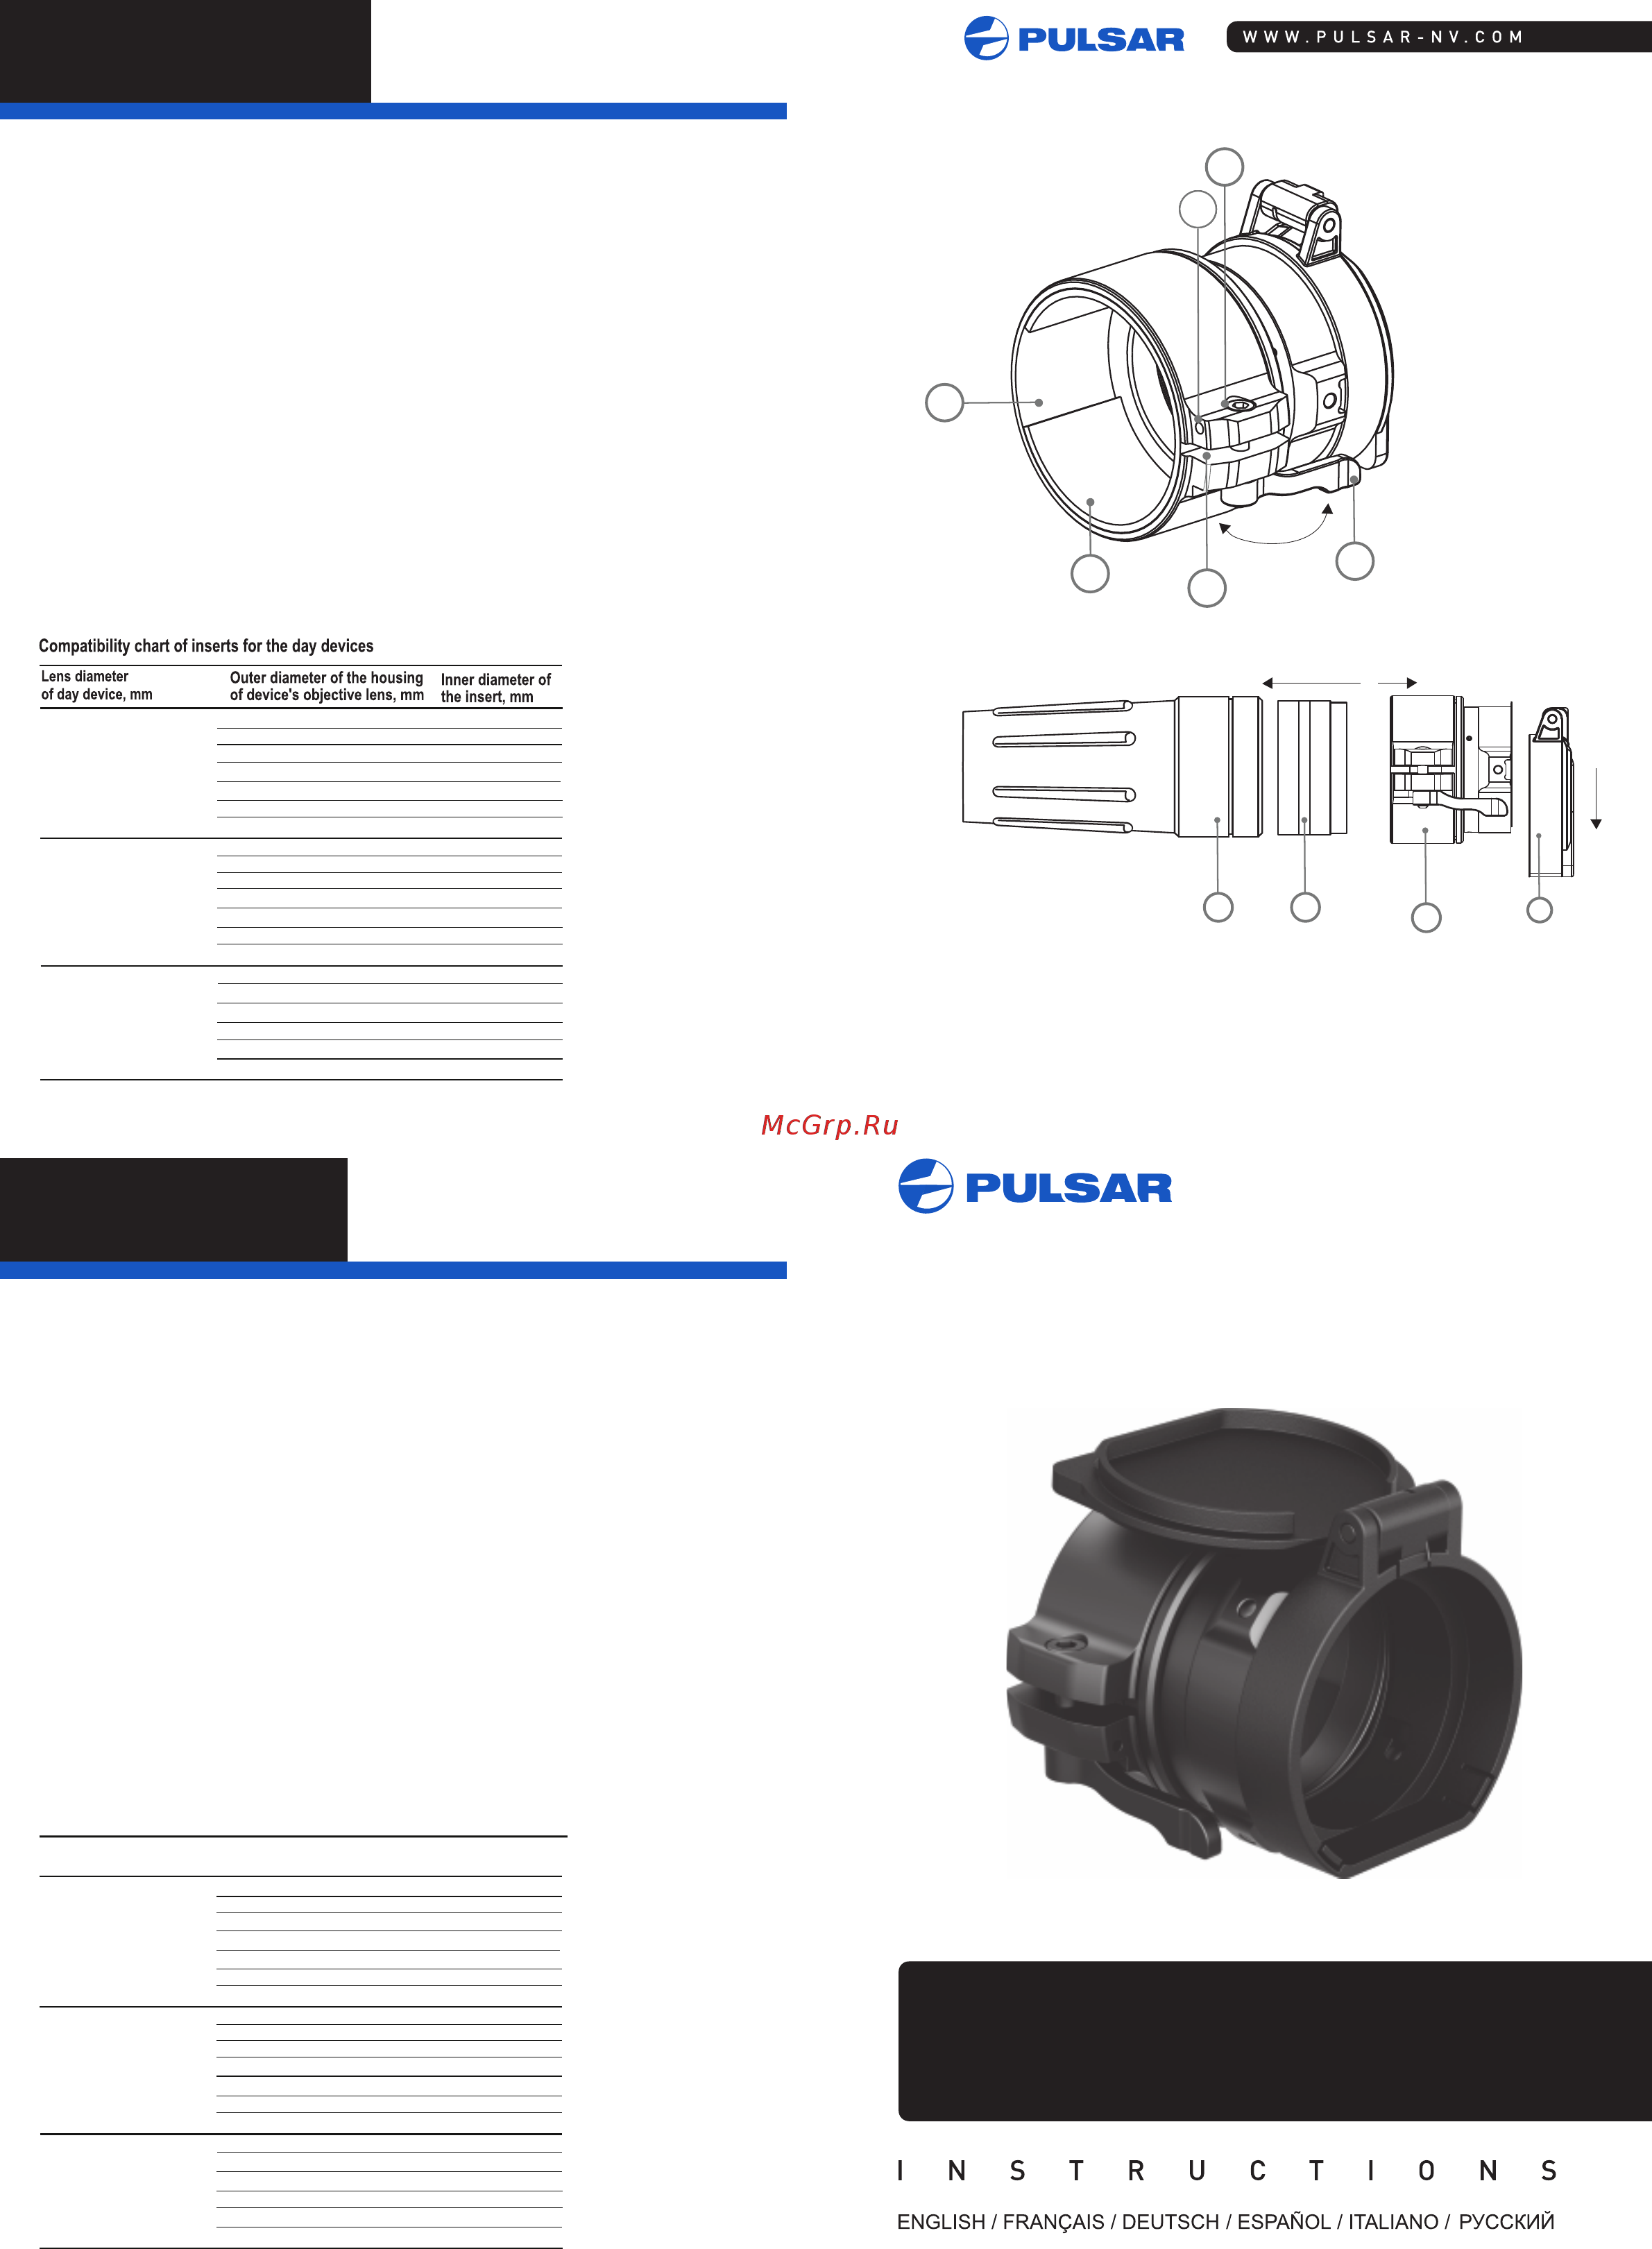
џ Selezionare un inserto (1) del diametro richiesto, in base alla tabella di compatibilità con le lenti
del cannocchiale.
џ Posizionare l'inserto nell'adattatore (8) in modo che la fessura (2) dell'inserto sia di fronte alla
fessura (3) dell'adattatore (vedi fig.1).
џ Installare saldamente l'adattatore con l'inserto sulla lente dell'obiettivo (4) del cannocchiale
diurno (fig 2).
џ Far scattare la leva (5) dalla posizione iniziale di apertura alla posizione (CLOSE)(fig.1).
џ Verificare che l'adattatore sia inserito saldamente sulla lente dell'obiettivo. Se c'è gioco:
- Allentare la vite di bloccaggio (6) con la chiave esagonale (S=2 mm)
- Serrare la vite (7) con chiave (S=4 mm). La forza di serraggio raccomandata è di
0,7-1 N·m (può essere controllato con l'aiuto di un cacciavite con misuratore nanometrico).
- Serrare la vite di bloccaggio (6).
џ Rimuovere il coperchio (9) dall'adattatore (8) ruotando in senso antiorario.
џ Togliere il coperchio dall'adattatore ruotandolo in senso antiorario.
џ Inserire il Forward nell'adattatore in modo che i denti dell'adattatore entrino nelle tacche del
dispositivo digitale. Girare il dispositivo in senso antiorario contro l'arresto. La marcatura a forma
di triangolo sul corpo del dispositivo e l'adattatore deve corrispondere.
џ Per allineare il dispositivo spostare la leva (5) nella posizione APERTO e allineare il dispositivo in
senso orizzontale.
Adattatore FN42 mm (79171)
Adattatore FN50 mm (79172)
Adattatore FN56 mm (79173)
ITALIANO
Diametro lenti dis-
positivo diurno, mm
Diametro esterno della
campana, mm
Diametro
dell'inserto, mm
Tabella di compatibilità con le lenti del cannocchiale
42
50
56
59,7-60,6
60,7-61,6
61,7-62,6
60
61
62
62,7-63,6
63
64
63,7-64,6
65
64,7-65,6
46,7-47,6
47,7-48,6
48,7-49,6
47
48
49
49,7-50,6
50
54,7-55,6
55,7-56,6
56,7-57,6
55
56
57
57,7-58,6
58
59
58,7-59,6
45,5
45,5
46
46
46,5
46,5
51,6
51,6
53,4
53,4
Cover Ring Adapter
42
50
56
59.7-60.6
60.7-61.6
61.7-62.6
60
61
62
62.7-63.6
63
64
63.7-64.6
65
64.7-65.6
46.7-47.6
47.7-48.6
48.7-49.6
47
48
49
49.7-50.6
50
54.7-55.6
55.7-56.6
56.7-57.6
55
56
57
57.7-58.6
58
59
58.7-59.6
45.5
45.5
46
46
46.5
46.5
51.6
51.6
53.4
53.4
4 1
8
9
Pic.2
OPEN
CLOSE
6
7
Pic.1
3
FN 42 mm Cover Ring Adapter (79171)
FN 50 mm Cover Ring Adapter (79172)
FN 56 mm Cover Ring Adapter (79173)
ENGLISH
v.0317
FN 42/50/56 mm Cover Ring Adapters are designed to attach the digital attachments Forward
F135/155 and Forward FN 135/155, digital devices Forward F135/155 and Forward FN 135/155
onto objective lenses of daylight optical equipment. Adapters are supplied with inserts, front cover
and hex-nut wrenches.
How to install:
џ Select an insert (1) of the required diameter, based on the compatibility chart as below.
џ Install the insert into the adapter (8) all the way in so that the slit (2) of the insert locates opposite
the slit (3) of the adapter (see Pic.1).
џ Install firmly the adapter with the insert onto the objective
џ lens (4) of a day device (Pic.2).
џ Snap the lever (5) from the original OPEN position to the CLOSE position (Pic.1)
џ Check that the adapter firmly fits the objective lens.
џ If you see there is a clearance, please:
- Loosen the locking screw (6) with the hex-nut wrench (S=2mm).
- Tighten the screw (7) with hex-nut wrench (S=4mm). Recommended clamping force is
0.7- 1 N·m (can be checked with the help of a torque screwdriver).
- Tighten the locking screw (6).
џ Remove the cover (9) from the adapter (8) by turning it counterclockwise.
џ Insert the digital Forward into the adapter so that the teeth in the adapter's body enter the notches
of the digital device. Turn the device counterclockwise against the stop. Triangle-shaped marking
on the attachment and the adapter should match.
џ To align the attachment, move the lever (5) to the OPEN position and align horizontally.
5
1
2
Содержание
- Cover ring adapter 1
- English 1
- Italiano 1
- Deckel adapter fn42 mm 79171 deckel adapter fn50 mm 79172 deckel adapter fn56 mm 79173 2
- Deutsch 2
- Español 2
- Français 2
- Tapa adaptador fn42 mm 79171 tapa adaptador fn50 mm 79172 tapa adaptador fn56 mm 79173 2
- Крышка адаптер fn 42 мм 79171 крышка адаптер fn 50 мм 79172 крышка адаптер fn 56 мм 79173 2
Похожие устройства
- Pulsar DN 42 мм Инструкция по эксплуатации
- Pulsar FN 50 мм Инструкция по эксплуатации
- Pulsar DN 50 мм Инструкция по эксплуатации
- Pulsar FN 56 мм Инструкция по эксплуатации
- Pulsar DN 56 мм Инструкция по эксплуатации
- Pulsar Weaver QD112 Инструкция по эксплуатации
- Pulsar Dovetail CZ550 Инструкция по эксплуатации
- Pulsar Weaver Инструкция по эксплуатации
- Pulsar Prism 14/200 Инструкция по эксплуатации
- Pulsar Лось Инструкция по эксплуатации
- Pulsar Боковой кронштейн Инструкция по эксплуатации
- Pulsar МАК Инструкция по эксплуатации
- Pulsar NV50 1.5x Инструкция по эксплуатации
- Pulsar NV60 1.5x Инструкция по эксплуатации
- Pulsar Компакт Инструкция по эксплуатации
- Pulsar RCC Инструкция по эксплуатации
- Pulsar TSD1 Инструкция по эксплуатации
- CTV CTV-IPD4028 MFA Инструкция по быстрому запуску
- CTV CTV-IPD4028 MFE Инструкция по быстрому запуску
- CTV CTV-IPD4036 FLE Инструкция по быстрому запуску