![LG RL-JA20 [15/68] Remote control](/img/pdf.png)
LG RL-JA20 [15/68] Remote control
Содержание
- And quote 1
- A class b digital device 2
- Any changes or modifications not expressly approved by the party responsible for 2
- Compliance could void the user s authority to operate the equipment 2
- Fcc notice 2
- Lcd ctor 2
- Warning 2
- After reading this manual please keep it in a safe place for future reference 3
- Basic functions 3
- Connection 3
- Contents 3
- Information 3
- Installation and composition 3
- Introduction 3
- Positioning 3
- Rs 232c 3
- Special functions 3
- Tracking 3
- Ndoor installation notes 4
- Warning 4
- À indoor installation warning 4
- Indoor installation notes 5
- Only use a suitable stand 5
- Outdoor installation warning 5
- Than 30cm 5
- Outdoor installation notes 6
- Main body 12
- Rear connecting part 13
- Control panel 14
- Nput select 14
- Remote control 15
- Projector status indicators 16
- Accessories 17
- Optional extras 17
- Don t place the projector where it can be covered with dust 18
- Place this projector in adequate temperature and humidity conditions 18
- Provide proper ventilation for this projector 18
- Basic operation of the projector 20
- Projection distance based on the picture format 20
- Http wwww kensington com 21
- Using kensington security system 21
- Volume 22
- Focus and position of the screen image 24
- Hen an image appears on the screen check if it is in focus and fits well to the screen 24
- Ill be distorted 24
- Pushing foot adjuster button as below 24
- Raise or lower the image on the screen extend or retract the foot at the bottom of the projector 24
- The projector is installed on a place that is not stable or horizontal the projected screen shape 24
- Input select 25
- Volume 25
- A rgb1 26
- A rgb2 d rgb 26
- A rgb1 27
- A rgb1 28
- A how to use 29
- Adjusting letter 29
- Adjusting number 29
- B notes for connecting to the macintosh powerbook 29
- How to use the macintosh desktop adaptor 29
- A rgb1 31
- Audio port 35
- Component dvd dtv 35
- Color r color g color b 37
- Horizontal vertical 37
- Volume 37
- Language 39
- Then use a 39
- Volume 39
- Color temp r 41
- Temp g 41
- Then use 41
- Blank image 43
- Selecting blank image color 43
- Flip horizontal 44
- Flip horizontal function 44
- Flip horizontal 45
- Flip vertical function 45
- Then use 45
- How to use twin picture 46
- Win picture function 46
- Changing the picture of main and sub picture 47
- Using still function in twin picture mode 47
- Horizontal 48
- Horizontal vertical 48
- The volume 48
- Vertical 48
- H keystone 49
- Keystone 49
- V keystone 49
- Volume 49
- Volume 50
- Brightness 52
- Contrast 52
- Volume 52
- Apc auto picture control 53
- Auto tracking 54
- Auto tracking function 54
- Auto tracking if 54
- Clock phase function 55
- Phase function 55
- Desired 56
- Set id 56
- Then use a button to select the menu 56
- Volume 56
- Communication parameter setup 57
- How to connect external control equipment 57
- Command reference list 58
- Communication protocol 58
- Error acknowledge 58
- External control device setup 58
- Aspect ratio command2 1 0 command2 2 2 59
- Command2 1 0 command2 2 4 59
- Input select command2 1 0 command2 2 1 59
- Power command2 1 0 command2 2 0 59
- Rs 232c 59
- Screen mute command2 1 0 command2 2 3 59
- Sub input select 59
- Brightness command2 1 3 command2 2 1 60
- Color command2 1 3 command2 2 2 60
- Contrast command2 1 3 command2 2 0 60
- External control device setup 60
- Sharpness command2 1 3 command2 2 4 60
- Tint command2 1 3 command2 2 3 60
- Color b adjustment 61
- Color g adjustment 61
- Color r adjustment command2 1 3 command2 2 6 61
- Color temp b 61
- Color temp g 61
- Color temp r 61
- Command2 1 3 command2 2 7 61
- Command2 1 3 command2 2 8 61
- Command2 1 3 command2 2 9 61
- Command2 1 3 command2 2 a 61
- Command2 1 3 command2 2 b 61
- Rs 232c 61
- Command2 1 4 command2 2 1 62
- Command2 1 9 command2 2 0 62
- Command2 1 9 command2 2 1 62
- External control device setup 62
- Osd lock mode 62
- Remote control lock mode 62
- Twin picture mode select 62
- Volume control command2 1 5 command2 2 0 62
- Volume mute command2 1 5 command2 2 4 62
- Informa 63
- Supported monitor display 63
- Cleaning the air filter 64
- Cleaning the lens 64
- Cleaning the projector case 64
- Maintenance 64
- Ошэ л 65
- Narifiratinne 67
- Operating condition 67
- Projection lamp 67
Похожие устройства
- LG RD-JT90 Руководство пользователя
- Daewoo DGB-100 MSC Инструкция по эксплуатации
- Daewoo DGB-130 MSC Инструкция по эксплуатации
- Daewoo DGB-160 MSC Инструкция по эксплуатации
- Daewoo DGB-200 MSC Инструкция по эксплуатации
- Daewoo DGB-250 MSC Инструкция по эксплуатации
- Daewoo DGB-300 MSC Инструкция по эксплуатации
- Daewoo DGB-350 MSC Инструкция по эксплуатации
- Daewoo DGB-400 MSC Инструкция по эксплуатации
- Kiturami KSO 100 Инструкция по эксплуатации
- Kiturami KSO 50 Инструкция по эксплуатации
- Kiturami Turbo HI FIN 13 Инструкция по эксплуатации
- Kiturami Turbo HI FIN 17 Инструкция по эксплуатации
- Kiturami Turbo HI FIN 21 Инструкция по эксплуатации
- Kiturami Turbo HI FIN 25 Инструкция по эксплуатации
- Kiturami Turbo HI FIN 30 Инструкция по эксплуатации
- Kiturami KSOG 50 Инструкция по эксплуатации
- Kiturami KSOG 70 Инструкция по эксплуатации
- Kiturami KSOG 100 Инструкция по эксплуатации
- Kiturami KSOG 150 Инструкция по эксплуатации
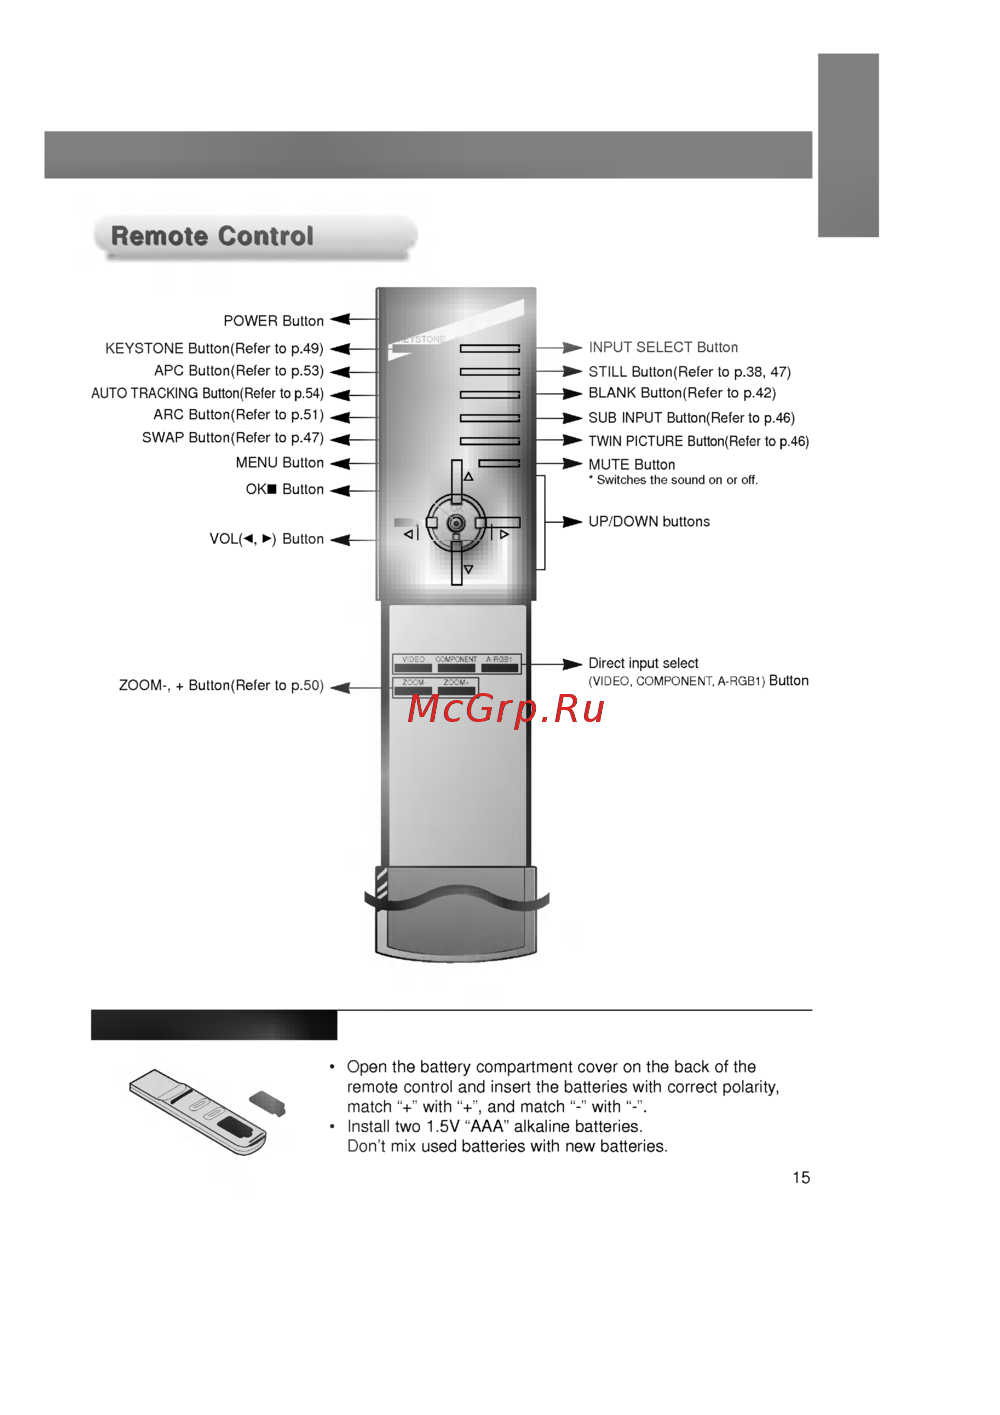
Remote Control POWER Button KEYSTONE ButtonfRefer to p 49 APC Button Refer to p 53 AUTO TRACKING Button Refer to p 54 ARC Button Refer to p 51 J STILL ButtonfRefer to p 38 47 SWAP Button Refer to p 47 d BLANK Button Refer to p 42 SUB INPUT Button Refer to p 46 TWIN PICTURE Button Refer to p 46 Switches the sound on or off Direct input select VIDEO COMPONENT A RGB1 Button ZOOM Button Refer to p 50 Open the battery compartment cover on the back of the remote control and insert the batteries with correct polarity match V with and match with Install two 1 5V AAA alkaline batteries Don t mix used batteries with new batteries 15