![LG RL-JA20 [31/68] A rgb1](/img/pdf.png)
LG RL-JA20 [31/68] A rgb1
Содержание
- And quote 1
- A class b digital device 2
- Any changes or modifications not expressly approved by the party responsible for 2
- Compliance could void the user s authority to operate the equipment 2
- Fcc notice 2
- Lcd ctor 2
- Warning 2
- After reading this manual please keep it in a safe place for future reference 3
- Basic functions 3
- Connection 3
- Contents 3
- Information 3
- Installation and composition 3
- Introduction 3
- Positioning 3
- Rs 232c 3
- Special functions 3
- Tracking 3
- Ndoor installation notes 4
- Warning 4
- À indoor installation warning 4
- Indoor installation notes 5
- Only use a suitable stand 5
- Outdoor installation warning 5
- Than 30cm 5
- Outdoor installation notes 6
- Main body 12
- Rear connecting part 13
- Control panel 14
- Nput select 14
- Remote control 15
- Projector status indicators 16
- Accessories 17
- Optional extras 17
- Don t place the projector where it can be covered with dust 18
- Place this projector in adequate temperature and humidity conditions 18
- Provide proper ventilation for this projector 18
- Basic operation of the projector 20
- Projection distance based on the picture format 20
- Http wwww kensington com 21
- Using kensington security system 21
- Volume 22
- Focus and position of the screen image 24
- Hen an image appears on the screen check if it is in focus and fits well to the screen 24
- Ill be distorted 24
- Pushing foot adjuster button as below 24
- Raise or lower the image on the screen extend or retract the foot at the bottom of the projector 24
- The projector is installed on a place that is not stable or horizontal the projected screen shape 24
- Input select 25
- Volume 25
- A rgb1 26
- A rgb2 d rgb 26
- A rgb1 27
- A rgb1 28
- A how to use 29
- Adjusting letter 29
- Adjusting number 29
- B notes for connecting to the macintosh powerbook 29
- How to use the macintosh desktop adaptor 29
- A rgb1 31
- Audio port 35
- Component dvd dtv 35
- Color r color g color b 37
- Horizontal vertical 37
- Volume 37
- Language 39
- Then use a 39
- Volume 39
- Color temp r 41
- Temp g 41
- Then use 41
- Blank image 43
- Selecting blank image color 43
- Flip horizontal 44
- Flip horizontal function 44
- Flip horizontal 45
- Flip vertical function 45
- Then use 45
- How to use twin picture 46
- Win picture function 46
- Changing the picture of main and sub picture 47
- Using still function in twin picture mode 47
- Horizontal 48
- Horizontal vertical 48
- The volume 48
- Vertical 48
- H keystone 49
- Keystone 49
- V keystone 49
- Volume 49
- Volume 50
- Brightness 52
- Contrast 52
- Volume 52
- Apc auto picture control 53
- Auto tracking 54
- Auto tracking function 54
- Auto tracking if 54
- Clock phase function 55
- Phase function 55
- Desired 56
- Set id 56
- Then use a button to select the menu 56
- Volume 56
- Communication parameter setup 57
- How to connect external control equipment 57
- Command reference list 58
- Communication protocol 58
- Error acknowledge 58
- External control device setup 58
- Aspect ratio command2 1 0 command2 2 2 59
- Command2 1 0 command2 2 4 59
- Input select command2 1 0 command2 2 1 59
- Power command2 1 0 command2 2 0 59
- Rs 232c 59
- Screen mute command2 1 0 command2 2 3 59
- Sub input select 59
- Brightness command2 1 3 command2 2 1 60
- Color command2 1 3 command2 2 2 60
- Contrast command2 1 3 command2 2 0 60
- External control device setup 60
- Sharpness command2 1 3 command2 2 4 60
- Tint command2 1 3 command2 2 3 60
- Color b adjustment 61
- Color g adjustment 61
- Color r adjustment command2 1 3 command2 2 6 61
- Color temp b 61
- Color temp g 61
- Color temp r 61
- Command2 1 3 command2 2 7 61
- Command2 1 3 command2 2 8 61
- Command2 1 3 command2 2 9 61
- Command2 1 3 command2 2 a 61
- Command2 1 3 command2 2 b 61
- Rs 232c 61
- Command2 1 4 command2 2 1 62
- Command2 1 9 command2 2 0 62
- Command2 1 9 command2 2 1 62
- External control device setup 62
- Osd lock mode 62
- Remote control lock mode 62
- Twin picture mode select 62
- Volume control command2 1 5 command2 2 0 62
- Volume mute command2 1 5 command2 2 4 62
- Informa 63
- Supported monitor display 63
- Cleaning the air filter 64
- Cleaning the lens 64
- Cleaning the projector case 64
- Maintenance 64
- Ошэ л 65
- Narifiratinne 67
- Operating condition 67
- Projection lamp 67
Похожие устройства
- LG RD-JT90 Руководство пользователя
- Daewoo DGB-100 MSC Инструкция по эксплуатации
- Daewoo DGB-130 MSC Инструкция по эксплуатации
- Daewoo DGB-160 MSC Инструкция по эксплуатации
- Daewoo DGB-200 MSC Инструкция по эксплуатации
- Daewoo DGB-250 MSC Инструкция по эксплуатации
- Daewoo DGB-300 MSC Инструкция по эксплуатации
- Daewoo DGB-350 MSC Инструкция по эксплуатации
- Daewoo DGB-400 MSC Инструкция по эксплуатации
- Kiturami KSO 100 Инструкция по эксплуатации
- Kiturami KSO 50 Инструкция по эксплуатации
- Kiturami Turbo HI FIN 13 Инструкция по эксплуатации
- Kiturami Turbo HI FIN 17 Инструкция по эксплуатации
- Kiturami Turbo HI FIN 21 Инструкция по эксплуатации
- Kiturami Turbo HI FIN 25 Инструкция по эксплуатации
- Kiturami Turbo HI FIN 30 Инструкция по эксплуатации
- Kiturami KSOG 50 Инструкция по эксплуатации
- Kiturami KSOG 70 Инструкция по эксплуатации
- Kiturami KSOG 100 Инструкция по эксплуатации
- Kiturami KSOG 150 Инструкция по эксплуатации
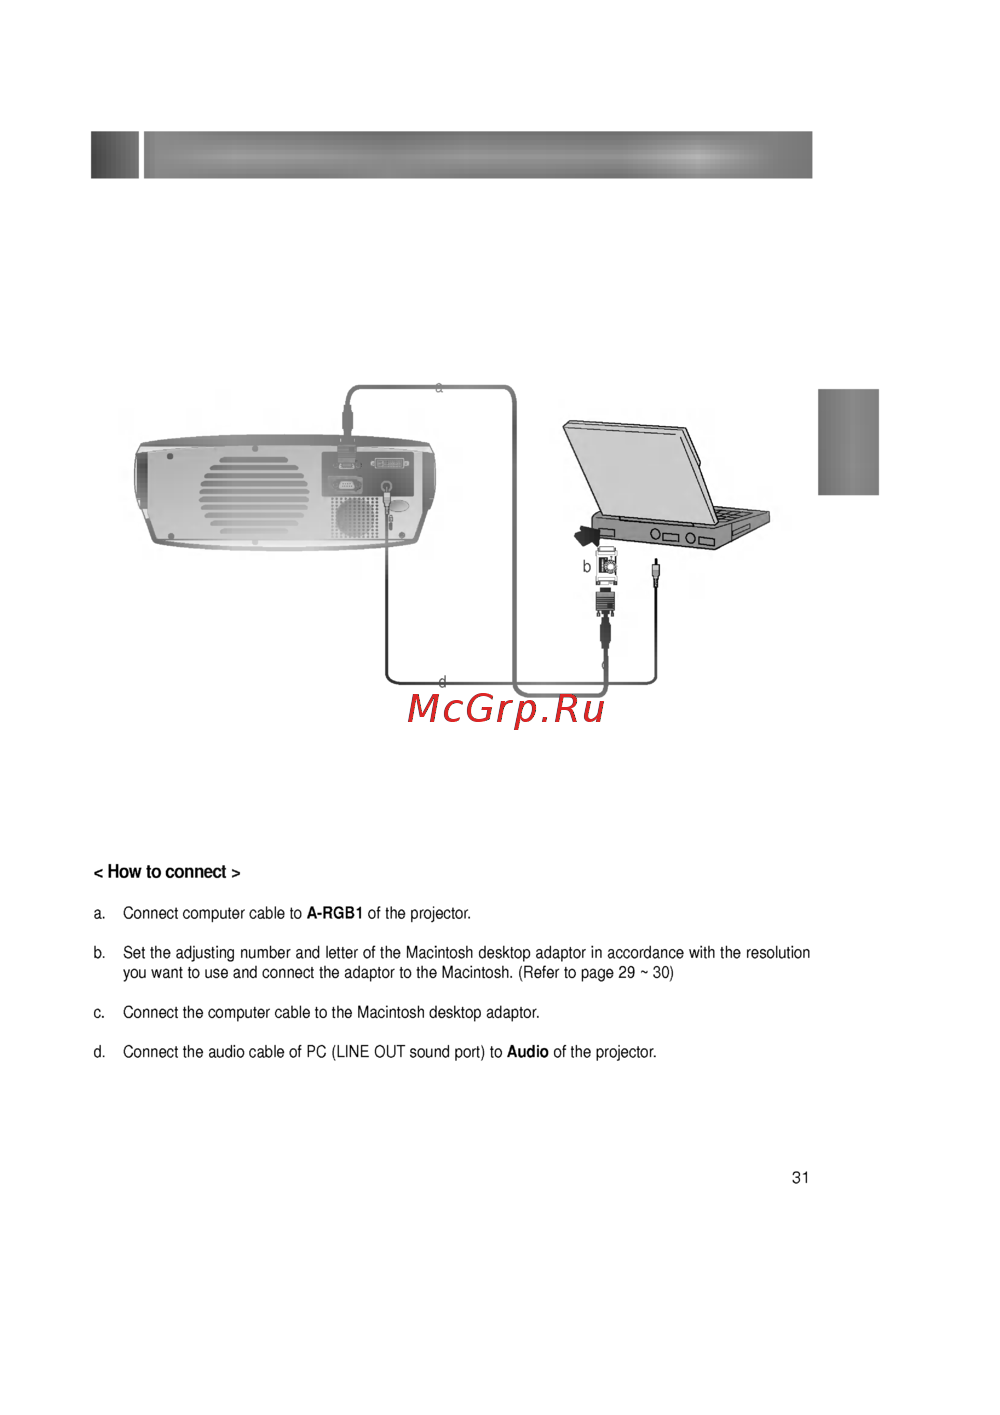
How to connect a Connect computer cable to A RGB1 of the projector b Set the adjusting number and letter of the Macintosh desktop adaptor in accordance with the resolution you want to use and connect the adaptor to the Macintosh Refer to page 29 30 c Connect the computer cable to the Macintosh desktop adaptor d Connect the audio cable of PC LINE OUT sound port to Audio of the projector 31