![Pioneer DEH-X8700BT — установка и подключение автомобильного аудиооборудования [3/32]](/img/pdf.png)
Pioneer DEH-X8700BT — установка и подключение автомобильного аудиооборудования [3/32]
![Pioneer DEH-X8700BT [3/32] Power amp sold separately](/views2/1467337/page3/bg3.png)
3En
English
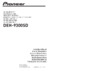
Blue/white
Connect to the system control terminal
of the power amp (max. 300 mA 12 V
DC).
Blue/white
Connect to the auto-antenna relay
control terminal (max. 300 mA 12 V DC).
Speaker leads
White: Front left
White/black: Front left
Gray: Front right
Gray/black: Front right
Green: Rear left or subwoofer
Green/black: Rear left or subwoofer
Violet: Rear right or subwoofer
Violet/black: Rear right or subwoofer
Orange/white
Connect to a car’s illumination signal.
ISO connector
In some vehicles, the ISO connector
may be divided into two. In this case, be
sure to connect to both connectors.
NOTES
• Change the initial menu of this unit. Refer
to [S/W control]. The subwoofer output of
this unit is monaural.
• When using a subwoofer of 70 W (2 Ω), be
sure to connect the subwoofer to the
violet and violet/black leads of this unit.
Do not connect anything to the green
and green/black leads.
Power amp (sold separately)
Perform these connections when using the
optional amplifier.
System remote control
Connect to blue/white cable.
Power amp (sold separately)
Connect with RCA cables (sold
separately)
To rear output
Rear speaker
To front output
Front speaker
To subwoofer output
Subwoofer
Important
• Check all connections and systems before
final installation.
• Do not use unauthorized parts as this
may cause malfunctions.
• Consult your dealer if installation requires
drilling of holes or other modifications to
the vehicle.
• Do not install this unit where:
– it may interfere with operation of the
vehicle.
– it may cause injury to a passenger as a
result of a sudden stop.
Installation
• The semiconductor laser will be damaged
if it overheats. Install this unit away from
hot places such as near the heater outlet.
• Optimum performance is
obtained when the unit is
installed at an angle of less
than 60°.
• When installing, to ensure proper heat
dispersal when using this unit, make sure
you leave ample space behind the rear
panel and wrap any loose cables so they
are not blocking the vents.
DIN front/rear mount
This unit can be properly installed using
either front-mount or rear-mount
installation.
Use commercially available parts when
installing.
DIN Front-mount
1 Insert the mounting sleeve into the
dashboard.
For installation in shallow spaces, use
the supplied mounting sleeve. If there is
enough space, use the mounting sleeve
that came with the vehicle.
2 Secure the mounting sleeve by using a
screwdriver to bend the metal tabs
(90°) into place.
Dashboard
Mounting sleeve
• Make sure that the unit is installed
securely in place. An unstable
installation may cause skipping or
other malfunctions.
DIN Rear-mount
1 Determine the appropriate position
where the holes on the bracket and
the side of the unit match.
2 Tighten two screws on each side.
Tapping screw (5 mm × 8 mm)
Mounting bracket
Dashboard or console
Removing the unit
1 Remove the trim ring.
Trim ring
Notched tab
• Releasing the front panel allows easier
access to the trim ring.
• When reattaching the trim ring, point
the side with the notched tab down.
2 Insert the supplied extraction keys
into both sides of the unit until they
click into place.
3 Pull the unit out of the dashboard.
Leave ample
space
5 cm
5 cm
Содержание
- Deh x8700dab deh x8700bt p.1
- Installation manual manuel d installation manuale d installazione manual de instalación installationsanleitung installatiehandleiding руководство по установке p.1
- Cd rds receiver autoradio cd rds sintolettore cd rds reproductor de cd con receptor rds cd rds empfänger cd rds ontvanger cd rds приемник p.1
- Connections p.2
- Connections installation p.2
- This unit p.2
- Power cord p.2
- Power amp sold separately p.3
- Installation p.3
- Din front rear mount p.3
- To install on the sun visor p.4
- To install on the steering column p.4
- Installing the microphone p.4
- Raccordements installation p.6
- Raccordements p.6
- Cordon d alimentation p.6
- Cet appareil p.6
- Installation p.7
- Montage avant arrière din p.7
- Amplificateur de puissance vendu séparément p.7
- Installation du microphone p.8
- Pour installer l appareil sur le pare soleil p.8
- Pour installer l appareil sur la colonne de direction p.8
- L unità p.10
- Connessioni installazione p.10
- Connessioni p.10
- Cavo di alimentazione p.10
- Montaggio din anteriore posteriore p.11
- Installazione p.11
- Amplificatore di potenza venduto separatamente p.11
- Per l installazione sul piantone dello sterzo p.12
- Per l installazione sul parasole p.12
- Installazione del microfono p.12
- Esta unidad p.14
- Conexiones instalación p.14
- Conexiones p.14
- Cable de alimentación p.14
- Soporte din frontal trasero p.15
- Instalación p.15
- Amplificador vendido por separado p.15
- Instalación en la visera p.16
- Instalación en la columna de dirección p.16
- Instalación del micrófono p.16
- Stromkabel p.18
- Dieses gerät p.18
- Anschlüsse einbau p.18
- Anschlüsse p.18
- Leistungsverstärker separat erhältlich p.19
- Einbau p.19
- Din montage von vorn hinten p.19
- Anbringen des mikrofons p.20
- Anbringen an der sonnenblende p.20
- Anbringen an der lenksäule p.20
- Verbindingen installatie p.22
- Verbindingen p.22
- Stroomkabel p.22
- Dit toestel p.22
- Installatie p.23
- Eindversterker afzonderlijk verkocht p.23
- Din voor of achterchassis p.23
- Installeren op de zonneklep p.24
- Installeren op de stuurkolom p.24
- De microfoon installeren p.24
- Подключения p.26
- Данное устройство p.26
- Шнур питания p.26
- Подключения установка p.26
- Установка p.27
- Усилитель приобретается отдельно p.27
- Передняя задняя установка din p.27
- Установка на солнцезащитный козырек p.28
- Установка на рулевую колонку p.28
- Установка микрофона p.28
Похожие устройства
-
 Pioneer DEH-X9500SDРуководство по эксплуатации
 -
 Pioneer DEH-X9500SDКраткое руководство
 -
 Pioneer DEH-X8700BTКраткое руководство
 -
 Pioneer DEH-X8500BTКраткое руководство
 -
 Pioneer DEH-X8500BTРуководство по установке
 -
 Pioneer DEH-X5800BTРуководство по установке
 -
 Pioneer DEH-X5800BTКраткое руководство
 -
 Pioneer DEH-P55BTРуководство по установке
 -
 Pioneer DEH-9300SDКраткое руководство
 -
 Pioneer DEH-9300SDРуководство по установке
 -
 Pioneer DEH-8400BTКраткое руководство
 -
 Pioneer DEH-8400BTРуководство по установке
Подробное руководство по установке и подключению автомобильного аудиооборудования. Узнайте, как правильно подключить динамики и усилители для оптимального звучания.