![Tascam DR-100MKIII — как подключить аудиоустройство к компьютеру для передачи файлов [45/52]](/img/pdf.png)
Tascam DR-100MKIII — как подключить аудиоустройство к компьютеру для передачи файлов [45/52]
Превью страниц
Страница 45 /
52
![Tascam DR-100MKIII [45/52] Transferring files from a computer](/views2/1553228/page45/bg2d.png)
TASCAM DR-100MKIII
45
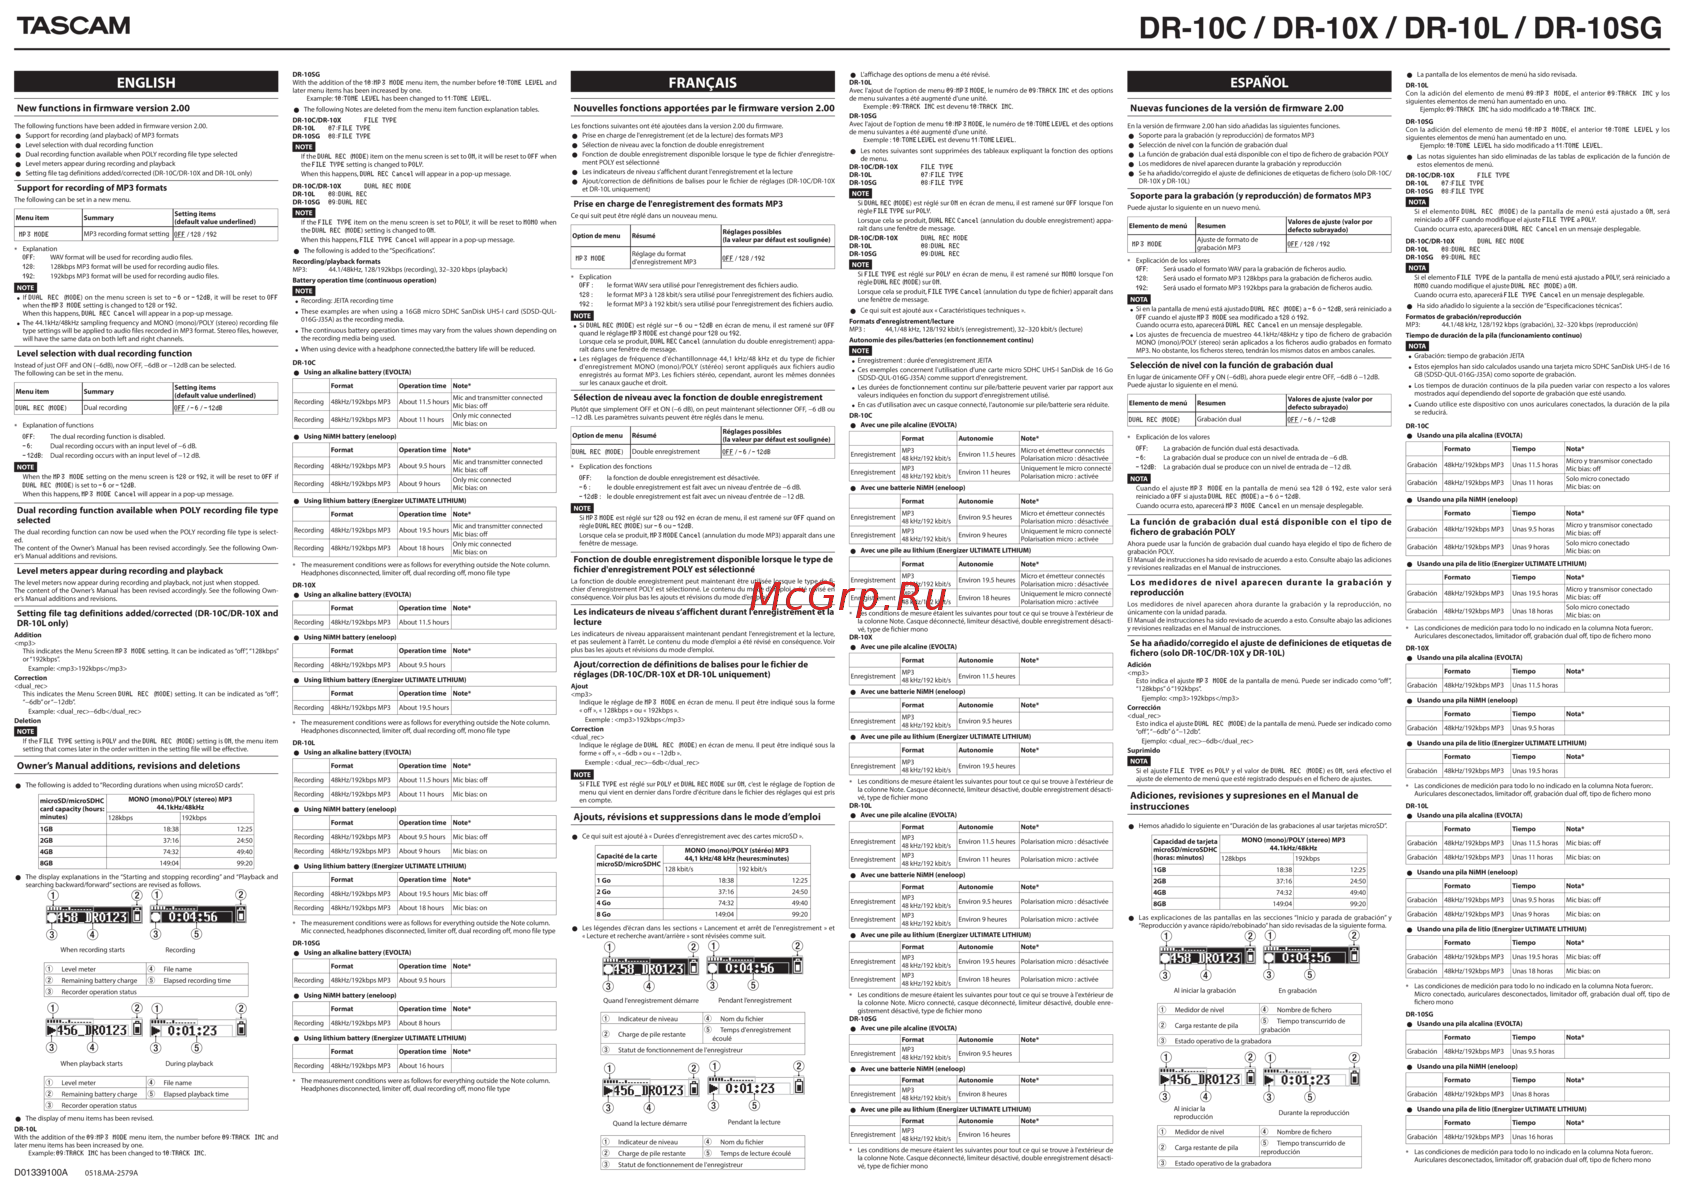
9 – Connecting with a Computer
By connecting this unit with a computer using a commercial-
ly-available USB cable, you can transfer audio files on the SD
card in the unit to a computer, as well as transfer audio files on
the computer to the SD card in the unit.
This unit can handle audio files of the following formats.
WAV (BWF): 44.1/48/88.2/96/176.4/192kHz, 16/24-bit
MP3: 44.1/48kHz, 128/192/256/320kbps
NOTE
•
We recommend connecting this unit to a computer that
supports USB 2.0 HIGH SPEED mass storage class.
•
Instead of using USB to connect the unit and a computer,
you can also conduct the same operations by removing
the SD card from the unit and connecting it directly to a
computer that has a built-in SD card slot or by using a card
reader.
•
Both WAV and BWF files use the same ".wav" extension.
1. Use a USB cable (A to Micro-B) to connect a computer to the
unit's USB port.
Micro-B USB plug
Computer
CAUTION
The unit should be connected directly with the computer
instead of via a USB hub.
2. Select the SYSTEM screen USB STORAGE item, and press
the ENTER/MARK button to open a screen confirming
connection with the computer. (See “Basic menu operation
procedures” on page 10.)
3. Select YES to continue execution or select NO to cancel. Then,
press the ENTER/MARK button.
The unit enters USB storage mode and connects with the
computer
Make sure that the SD card is inserted in the unit properly.
4. This unit appears on the computer as an external drive
named “DR-100MKIII" (if the card was formatted by this
unit).
NOTE
Power is supplied from the USB port if the USB cable is
connected to the unit even if it contains batteries. (USB bus
power is prioritized.)
Transferring files to a computer
1. Click the "DR-100MKIII" drive on the computer screen to
show the "MUSIC" and "UTILITY" folders.
2. Open the "MUSIC" folder and drag and drop the files that
you want to transfer to the computer to destinations of your
choice.
Transferring files from a computer
1. Click the "DR-100MKIII" drive on the computer screen to
show the "MUSIC" and "UTILITY" folders.
2. Copy the audio files on the computer that you want to the
"MUSIC" folder.
TIP
•
You can manage the "MUSIC" folder from the computer.
•
You can create subfolders in the "MUSIC" folder up to the
second level for use with this unit. Subfolders can be made
to two levels. The unit cannot recognize subfolders and
audio files on the third level or below.
•
If you name the subfolders and music files, these names will
appear on the screen of this unit.
Disconnecting from a computer
Before disconnecting the USB cable, use the proper procedures
for your computer to unmount the unit (as an external drive).
See the computer’s operation manual for instructions about
how to unmount an external volume.
Press the ENTER/MARK button to disconnect from the
computer and return to the Home Screen.
Содержание
304- Playback 0
- Names and functions of parts
- Introduction
- Contents
- Working with files and folders 2
- Recording 0
- Preparation 4
- Transferring files to a computer 5 transferring files from a computer 5 disconnecting from a computer 5
- Specifications 0
- Settings and information 0
- Restoring factory default settings 3 formatting sd cards 3 power on recording function 4 attenuating the output 4
- Ratings 0 input output ratings 0
- Moving between marks mark skipping 9 deleting marks 9
- Messages 7
- Mark types 8 adding marks 8
- Mark functions 8
- Making power and display settings 0
- Contents
- Viewing information 1
- Connecting with a computer 5
- Using the remote jack 6
- Audio performance 0 general 1 dimensional drawings 1
- Using a remote control tascam rc 10 6
- Using a footswitch tascam rc 3f 6
- Troubleshooting 9
- Trademarks and copyrights
- Recycling lithium ion rechargeable batteries
- Li ion00
- Introduction
- Features
- Conventions used in this manual
- Precautions for use
- Introduction
- About sd cards
- Names and functions of parts
- Caution
- Names and functions of parts
- Left side
- Right side
- Names and functions of parts
- Home screen
- Caution
- Bottom
- Names and functions of parts
- Names and functions of parts
- Basic menu operation procedures
- Switching on off settings
- Require confirmation
- Names and functions of parts
- Changing settings and executing functions that
- Menu list
- Caution
- Names and functions of parts
- Names and functions of parts
- Function menu list
- Using the built in battery
- Using both battery power supplies together
- Using aa batteries
- Preparation
- Powering the unit
- Charging the built in battery
- Caution
- Sd card write protection switches
- Removing the card
- Preparation
- Inserting the card
- Inserting and removing sd cards
- Caution
- Using an external battery pack sold separately
- Using an ac adapter sold separately
- Turning the unit on
- Turning the unit off putting it in standby
- Turning the power on and off putting it in standby
- Selecting the language
- Resume function
- Preparation
- If you accidentally select the wrong language
- Hold function for preventing accidental operation
- Caution
- Record
- Preparing the recording inputs
- Preparing an sd card for use
- Preparation
- Caution
- Using the built in omnidirectional mics omni mic
- Using the built in directional mics uni mic to
- To record
- Setting the date and time
- Recording with the built in mics
- Recording with connected mics
- Recording from digital devices
- Recording external devices
- Preparation
- Using the built in speaker for playback
- Preparation
- Connecting monitoring equipment
- Connecting cameras
- Adjusting playback volume
- Listening while recording monitoring
- Caution
- Remaining recording time display
- Recording
- Recording
- Setting where to save files
- Setting the sampling frequency
- Setting the file format and sampling frequency
- Setting the file format
- Setting recording input sources
- Recording in mono file type setting
- Using plug in power
- Using phantom power
- Setting the phantom power voltage
- Setting power used by mics
- Recording
- Caution
- Recording
- Using the limiter
- Using the level control function
- Setting the low cut filter
- Using mid side microphones
- Setting the characteristics of the digital filter a d
- Recording
- Starting recording automatically auto rec function
- Recording in level mode
- Recording
- Improving recording signal to noise dual adc function
- Recording in digital mode
- Recording
- Create a new file while continuing to record file incrementing function
- Create a new file manually while recording
- Capturing the moment before recording starts pre rec function
- Creating new files automatically at a set time interval
- Recording with two different formats dual format recording
- Recording two files simultaneously dual rec function
- Recording at two different levels dual level recording
- Recording
- Using the auto tone function
- Turning xri data recording on off
- Recording
- Names of backup files when using dual recording
- Recording times
- Recording
- Searching backward and forward
- Repeat playback loop play
- Playing recordings
- Playback
- Pausing playback
- Changing the playback position
- Stopping playback
- Selecting files for playback skipping
- Playback
- Changing the speed of playback vsa playback
- Caution
- Folder
- File information
- Opening folders
- Open folder
- New folder
- Music folder
- Icons on the browse screen
- File operations
- Closing folders
- Basic browse screen operations
- Audio file
- Working with files and folders
- Selecting folders
- Selecting files
- Opening the browse screen
- Working with files and folders
- Folder operations
- Folder delete
- File delete
- Clr all marks
- Change protect
- All files delete
- Dividing files manually divide function
- Dividing files
- Deleting files
- Creating new folders
- Caution
- Working with files and folders
- Protecting files
- Working with files and folders
- Dividing files at marks mark divide function
- Caution
- Working with files and folders
- Setting the word item
- Setting the file name format
- Working with files and folders
- Resetting file numbers
- Mark types
- Mark functions
- Adding marks manually
- Adding marks automatically
- Adding marks
- Adding marks at peak levels
- Moving between marks mark skipping
- Mark functions
- Deleting marks
- Turning indicators off
- Settings and information
- Setting the backlight brightness
- Setting the backlight
- Setting the automatic power saving function
- Setting the aa battery type
- Set the priority battery type
- Making power and display settings
- Caution
- Adjusting the display contrast
- File information page
- Clearing held peak levels
- Channel
- Viewing information
- Settings and information
- Setting the peak level value
- Setting the peak level function
- Setting the peak hold time
- Format
- Version
- Used size
- Total size
- Total folder
- Total file
- Settings and information
- Remain size
- Firmware version page
- Deleting xri data
- Card information page
- Xri date the information page
- Settings and information
- Restoring factory default settings
- Formatting sd cards
- Caution
- Settings and information
- Restricting the line output level
- Restricting the headphone output level
- Power on recording function
- Attenuating the output
- Transferring files to a computer
- Transferring files from a computer
- Disconnecting from a computer
- Connecting with a computer
- Caution
- Setting up a remote control
- Using the remote jack
- Using the remote control
- Using the footswitch
- Using a remote control tascam rc 10
- Using a footswitch tascam rc 3f
- Setting up the footswitch
- Messages
- Messages
- The output sounds unnatural
- The input sound is extremely quiet or loud
- The chg indicator alternately lights orange and
- Shown accurately
- Recording is not possible
- No sound is output
- I cannot erase a file
- I accidentally set the wrong language
- Troubleshooting
- This unit s files do not appear on the computer
- The unit will not turn on
- The unit turns off automatically
- The unit does not function
- The sd card is not recognized
- The remaining charge of the built in battery is not
- Ext in jack can provide plug in power
- Equivalent input noise ein
- Distortion
- Usb port
- Digital input
- Specifications
- Digital in connector
- S n ratio
- Control input output ratings
- Remote jack
- Built in speaker
- Recording playback formats
- Audio performance
- Recording media
- Analog audio input and output ratings
- Ratings
- Number of channels
- Mic line in jacks xlr support phantom power
- Line out jack
- Input output ratings
- Headphone jack
- Frequency response
- Dimensional drawings
- Charging time
- Battery operation time continuous operation
- Weight
- Specifications
- Power consumption
- Operating temperature range
- General
- Dimensions
- Teac uk ltd
- Teac sales trading shenzhen co ltd
- Teac mexico s a de c v
- Teac europe gmbh
- Teac corporation
- Teac america inc
Похожие устройства
-
 Tascam DR-100MKIIIИнструкция по работе
 -
 Tascam DR-05 version 2Руководство по эксплуатации
 -
 Tascam DR-07 MKIIРуководство по эксплуатации
 -
 Tascam DR-680MKIIРуководство пользователя
 -
 Tascam DR-60DMKIIРуководство пользователя
 -
 Tascam DR-60DMKIIРуководство по эксплуатации
 -
 Tascam DR-40XРуководство пользователя
 -
 Tascam DR-40XРуководство по эксплуатации
 -
 Tascam DR-40XРуководство по эксплуатации, Rev C
 -
 Tascam DR-10XРуководство пользователя
 -
 Tascam DR-10XПриложение
 -
 Tascam DR-10SGРуководство пользователя
Узнайте, как правильно подключить аудиоустройство к компьютеру для передачи файлов. Подробные инструкции по использованию USB и SD-карт.