
JVC RC-M102 Инструкция по эксплуатации онлайн
ПОДГОТОВКА К ЭКСПЛУАТАЦИИ
èÓʇÎÛÈÒÚ‡, ÒÓı‡ÌflÈÚ ‚Ò˛ ËÌÙÓχˆË˛ ‰Îfl ‰‡Î¸ÌÂÈ¯Â„Ó ËÒÔÓθÁÓ‚‡ÌËfl.
РАБОТА ОТ ПЕРЕМЕННОГО ТОКА
Ç˚·Ó ̇ÔflÊÂÌËfl
è‰ ÚÂÏ, Í‡Í ‚ÒÚ‡‚ÎflÚ¸ ‚ËÎÍÛ ‚ ÓÁÂÚÍÛ, ۷‰ËÚÂÒ¸, ˜ÚÓ ÔÂÂÍβ˜‡ÚÂθ ̇ÔflÊÂÌËfl (110V-
127V/220V-240V) ÛÒÚ‡ÌÓ‚ÎÂÌ ‚ ÚÂı ԉ·ı, ÍÓÚÓ˚ ÒÓÓÚ‚ÂÚÒÚ‚Û˛Ú Ì‡ÔflÊÂÌ˲ ‚ ‚‡¯ÂÈ
ÏÂÒÚÌÓÒÚË.
èËϘ‡ÌËÂ:
• ä ˝ÚÓÏÛ ÔË·ÓÛ ÔË·„‡ÂÚÒfl ‡‰‡ÔÚ ‚ËÎÍË AC. èÓθÁÛÈÚÂÒ¸ ËÏ ‚ ÒÎÛ˜‡Â
ÌÂÓ·ıÓ‰ËÏÓÒÚË.
èÓ‰ÒÓ‰ËÌÂÌËÂ Í ÒÂÚË
ÇÒÚ‡‚¸Ú ӉËÌ ÍÓ̈ ‚ıÓ‰fl˘Â„Ó ‚ ÍÓÏÔÎÂÍÚ ¯ÌÛ‡ ‚ ÒÓÓÚ‚ÂÚÒÚ‚Û˛˘Â „ÌÂÁ‰Ó ̇ ÍÓÔÛÒÂ,
‡ ‰Û„ÓÈ - ‚ ÓÁÂÚÍÛ AC IN (ÔÂÂÏÂÌÌÓ„Ó ÚÓ͇).
èËϘ‡ÌËfl:
• ÖÒÎË Ì‡ ÔÓÚflÊÂÌËË ‰ÓÎ„Ó„Ó ‚ÂÏÂÌË ‚˚ Ì ËÒÔÓθÁÛÂÚ ÛÒÚÓÈÒÚ‚Ó, ÓÚÍβ˜‡ÈÚÂ
Â„Ó ËÁ ÒÂÚË.
• чÊ ÔË Ì‡Î˘ËË ·‡Ú‡ÂÈ ‚ ·‡Ú‡ÂÈÌÓÏ ÓÚÒÂÍ ÛÒÚÓÈÒÚ‚Ó ·Û‰ÂÚ ÔÂÂÍβ˜‡Ú¸Òfl
̇ ÂÊËÏ ‡·ÓÚ˚ ÓÚ ÒÂÚË, Í‡Í ÚÓθÍÓ ·Û‰ÂÚ ÔÓËÁ‚Ó‰ËÚ¸Òfl ÔÓ‰Íβ˜ÂÌËÂ Í ÒÂÚË.
РАБОТА ОТ ПОСТОЯННОГО ТОКА
éÚÍÓÈÚ ÓÚÒÂÍ ‰Îfl ·‡Ú‡ÂÂÍ Ë ÛÒÚ‡ÌÓ‚ËÚ 4 ·‡Ú‡ÂÈÍË SUM-1 (‡ÁÏÂÓÏ “D”, HP2, R20),
Òӷ≇fl ÔÓÎflÌÓÒÚ¸, Í‡Í Û͇Á‡ÌÓ Ì‡ ÓÚÒÂÍ ‰Îfl ·‡Ú‡ÂÂÍ.
èËϘ‡ÌËfl:
èË ÌÂÔ‡‚ËθÌÓÏ ‡ÒÔÓÎÓÊÂÌËË ·‡Ú‡ÂË ÏÓ„ÛÚ ÔÓÚ˜¸ ËÎË ‚ÁÓ‚‡Ú¸Òfl Ë ÚÂÏ Ò‡Ï˚Ï
Ôӂ‰ËÚ¸ ‰‡ÌÌÓ ÛÒÚÓÈÒÚ‚Ó. èÓÏÌËÚÂ:
• çÂθÁfl ËÒÔÓθÁÓ‚‡Ú¸ ÌÓ‚˚Â Ë ÒÚ‡˚ ·‡Ú‡ÂË Ó‰ÌÓ‚ÂÏÂÌÌÓ
• Ç˚ÌËχÈÚ ·‡Ú‡ÂË, ÂÒÎË ‚˚ Ì Ô·ÌËÛÂÚ ËÒÔÓθÁÓ‚‡Ú¸ ÛÒÚÓÈÒÚ‚Ó ‚ Ú˜ÂÌËÂ
ÏÂÒflˆ‡ ËÎË ·ÓÎÂÂ.
РАБОТА РАДИО
1. ìÒÚ‡ÌÓ‚ËÚ ÔÂÂÍβ˜‡ÚÂθ FUNCTION (ÇõÅéê îìçäñàâ) ‚ ÔÓÁËˆË˛ RADIO
(êÄÑàé).
2. Ç˚·ÂËÚ Ê·ÂÏ˚È BAND (êÄÑàé-ÑàÄèÄáéç).
3. ç‡ÒÚÓÈÚÂÒ¸ ̇ Ê·ÂÏÛ˛ ‡‰ËÓÒÚ‡ÌˆË˛ ÔË ÔÓÏÓ˘Ë Û˜ÍË TUNING
(çÄëíêéâäÄ).
4. éÚ„ÛÎËÛÈÚ ÛÓ‚Â̸ VOLUME (Éêéåäéëíà) ÔË ÔÓÏÓ˘Ë Â„ÛÎflÚÓ‡ „ÓÏÍÓÒÚË.
5. ÑÎfl ÚÓ„Ó, ˜ÚÓ·˚ ‚˚Íβ˜ËÚ¸ ‡‰ËÓ, ÔÓÏÂÒÚËÚ ÔÂÂÍβ˜‡ÚÂθ FUNCTION (ÇÇõÅéê
îìçäñàâ) ‚ ÔÓÁËˆË˛ TAPE (åÄÉçàíîéç).
èËϘ‡ÌËfl:
• ÑÎfl ̇ÒÚÓÈÍË Ì‡ FM Ë SW ‰Ë‡Ô‡ÁÓÌ˚ ËÒÔÓθÁÛÈÚ ‚˚‰‚ËÊÌÛ˛ ‡ÌÚÂÌÌÛ, ÛÒÚ‡ÌÓ‚Ë‚
Âfi ‚ ÔÓÁˈËË, ÔË ÍÓÚÓÓÈ ‰ÓÒÚË„‡ÂÚÒfl ̇˷ÓΠÓÔÚËχθÌ˚È ÔËfiÏ.
• ÑÎfl ̇ÒÚÓÈÍË Ì‡ MW ‰Ë‡Ô‡ÁÓÌ˚ ËÒÔÓθÁÛÂÚÒfl ‚ÒÚÓÂÌ̇fl ÙÂËÚÓ‚‡fl
‡ÌÚÂÌ̇. èÓÒÍÓθÍÛ ˝ÚÓ Ì‡Ô‡‚ÎÂÌ̇fl ‡ÌÚÂÌ̇, ÛÒÚ‡ÌÓ‚ËÚ ‰‡ÌÌÓ ÛÒÚÓÈÒÚ‚Ó ‚
Ú‡ÍÓ ÔÓÎÓÊÂÌËÂ, ÔË ÍÓÚÓÓÏ ‰ÓÒÚË„‡ÂÚÒfl ̇˷ÓΠÓÔÚËχθÌ˚È ÔËfiÏ.
Регулировка FINE TUNING (УЛУЧШЕННОЙ НАСТРОЙКИ)
èË Ì‡ÒÚÓÈÍ ̇ SW Ú‡ÌÒÎflˆË˛ ËÒÔÓθÁÛÈÚ „ÛÎflÚÓ FINE TUNING (ìãìóòÖççéâ
çÄëíêéâäà) ‰Îfl ·ÓΠÚÓ˜ÌÓÈ Ì‡ÒÚÓÈÍË.
ОБРАЩЕНИЕ С КАССНТАМИ
ВОСПРОИЗВЕДЕНИЕ
1. ç‡ÊÏËÚ ÍÌÓÔÍÛ § STOP/EJ (éëíÄçéÇäÄ ãÖçíõ/éíäêõÇÄçàÖ
äÄëëÖíéÑÖêÜÄíÖãü) ‰Îfl ÚÓ„Ó, ˜ÚÓ·˚ ÓÚÍ˚Ú¸ Í˚¯ÍÛ Í‡ÒÒÂÚÓ‰ÂʇÚÂÎfl.
ÇÒÚ‡‚¸Ú ͇ÒÒÂÚÛ Ï‡„ÌËÚÌÓÈ ÎÂÌÚÓÈ ‚‚Âı.
2. á‡ÍÓÈÚ Í˚¯ÍÛ Í‡ÒÒÂÚÓ‰ÂʇÚÂÎfl ÛÍÓÈ.
3. ìÒÚ‡ÌÓ‚ËÚ ÔÂÂÍβ˜‡ÚÂθ ‚˚·Ó FUNCTION (îìçäñàâ) ‚ ÔÓÁËˆË˛ TAPE
(åÄÉçàíîéç).
4. ç‡ÊÏËÚ ÍÌÓÔÍÛ 2 PLAY (ÇéëèêéàáÇÖÑÖçàÖ).
5. ç‡ÒÚÓÈÚ ÛÓ‚Â̸ „ÓÏÍÓÒÚË ÔË ÔÓÏÓ˘Ë Â„ÛÎflÚÓ‡ VOLUME (Éêéåäéëíà).
6. ÑÎfl ÔËÓÒÚ‡ÌÓ‚ÍË ‚ÓÒÔÓËÁ‚‰ÂÌËfl ̇ÊÏËÚ ÍÌÓÔÍÛ § STOP/EJ (éëíÄçéÇäÄ
ãÖçíõ/éíäêõÇÄçàÖ äÄëëÖíéÑÖêÜÄíÖãü).
7. ÑÎfl ËÁ˙flÚËfl ͇ÒÒÂÚ˚ ̇ÊÏËÚ ÍÌÓÔÍÛ § STOP/EJ (éëíÄçéÇäÄ ãÖçíõ/
éíäêõÇÄçàÖ äÄëëÖíéÑÖêÜÄíÖãü).
ПЕРЕМОТКА ВПЕРЁД И НАЗАД
1. ç‡ÊÏËÚ 1 ÍÌÓÔÍÛ FF ‰Îfl ·˚ÒÚÓÈ ÔÂÂÏÓÚÍË ÎÂÌÚ˚ ‚ÔÂfi‰.
2. ç‡ÊÏËÚ ¡ ÍÌÓÔÍÛ REW ‰Îfl ·˚ÒÚÓÈ ÔÂÂÏÓÚÍË ÎÂÌÚ˚ ̇Á‡‰.
ЗАПИСЬ С РАДИО
1. ìÒÚ‡ÌÓ‚ËÚ ÔÂÂÍβ˜‡ÚÂθ ‚˚·Ó FUNCTION (îìçäñàâ) ‚ ÔÓÁËˆË˛ RADIO
(êÄÑàé) Ë ‚˚·ÂËÚ ÌÛÊÌÛ˛ ‚‡Ï ‡‰ËÓÒÚ‡ÌˆË˛.
2. ç‡ÊÏËÚ ÍÌÓÔÍÛ § STOP/EJ (éëíÄçéÇäÄ ãÖçíõ/éíäêõÇÄçàÖ
äÄëëÖíéÑÖêÜÄíÖãü) ‰Îfl ÚÓ„Ó, ˜ÚÓ·˚ ÓÚÍ˚Ú¸ Í˚¯ÍÛ Í‡ÒÒÂÚÓ‰ÂʇÚÂÎfl.
3. ÇÒÚ‡‚¸Ú ͇ÒÒÂÚÛ Ï‡„ÌËÚÌÓÈ ÎÂÌÚÓÈ ‚‚Âı.
4. á‡ÍÓÈÚ Í˚¯ÍÛ Í‡ÒÒÂÚÓ‰ÂʇÚÂÎfl ÛÍÓÈ.
5. ç‡ÊÏËÚ ÍÌÓÔÍÛ 8 PAUSE (èÄìáÄ), ‡ Á‡ÚÂÏ ÍÌÓÔÍÛ ¶ REC (áÄèàëú) (ÍÌÓÔ͇) 2
PLAY (ÇÓÒÔÓËÁ‚‰ÂÌËÂ) ·Û‰ÂÚ Á‡‰ÂÈÒÚ‚Ó‚‡Ì‡ Ó‰ÌÓ‚ÂÏÂÌÌÓ.
6. ÑÎfl ̇˜‡Î‡ Á‡ÔËÒË ÓÚÓÊÏËÚ ÍÌÓÔÍÛ 8 PAUSE (èÄìáÄ).
7. ÑÎfl ÔËÓÒÚ‡ÌÓ‚ÍË Á‡ÔËÒË Ì‡ÊÏËÚ ÍÌÓÔÍÛ § STOP/EJ (éëíÄçéÇäÄ ãÖçíõ/
éíäêõÇÄçàÖ äÄëëÖíéÑÖêÜÄíÖãü). ÑÎfl ËÁ˙flÚËfl ͇ÒÒÂÚ˚ ̇ÊÏËÚ ˝ÚÛ ÍÌÓÔÍÛ
¢fi ‡Á.
ЗАПИСЬ ПРИ ПОМОЩИ ВСТРОЕННОГО
МИКРОФОНА
1. ìÒÚ‡ÌÓ‚ËÚ ÔÂÂÍβ˜‡ÚÂθ ‚˚·Ó FUNCTION (îìçäñàâ) ‚ ÔÓÁËˆË˛ TAPE
(åÄÉçàíîéç).
2. ç‡ÊÏËÚ ÍÌÓÔÍÛ § STOP/EJ (éëíÄçéÇäÄ ãÖçíõ/éíäêõÇÄçàÖ
äÄëëÖíéÑÖêÜÄíÖãü) ‰Îfl ÚÓ„Ó, ˜ÚÓ·˚ ÓÚÍ˚Ú¸ Í˚¯ÍÛ Í‡ÒÒÂÚÓ‰ÂʇÚÂÎfl.
3. ÇÒÚ‡‚¸Ú ͇ÒÒÂÚÛ Ï‡„ÌËÚÌÓÈ ÎÂÌÚÓÈ ‚‚Âı.
4. á‡ÍÓÈÚ Í˚¯ÍÛ Í‡ÒÒÂÚÓ‰ÂʇÚÂÎfl ÛÍÓÈ.
5. ç‡ÊÏËÚ ÍÌÓÔÍÛ 8 PAUSE (èÄìáÄ), ‡ Á‡ÚÂÏ ÍÌÓÔÍÛ ¶ REC (áÄèàëú) (ÍÌÓÔ͇ 2
PLAY (ÇéëèêéàáÇÖÑÖçàÖ) ·Û‰ÂÚ Á‡‰ÂÈÒÚ‚Ó‚‡Ì‡ Ó‰ÌÓ‚ÂÏÂÌÌÓ)
6. ÑÎfl ̇˜‡Î‡ Á‡ÔËÒË ÓÚÓÊÏËÚ 8 PAUSE (èÄìáÄ).
7. ÑÎfl ÔËÓÒÚ‡ÌÓ‚ÍË Á‡ÔËÒË Ì‡ÊÏËÚ ÍÌÓÔÍÛ § STOP/EJ (éëíÄçéÇäÄ ãÖçíõ/
éíäêõÇÄçàÖ äÄëëÖíéÑÖêÜÄíÖãü). ÑÎfl ËÁ˙flÚËfl ͇ÒÒÂÚ˚ ̇ÊÏËÚ ˝ÚÛ ÍÌÓÔÍÛ
¢fi ‡Á.
èËϘ‡ÌËfl:
• ìÓ‚Â̸ Á‡ÔËÒË Ì‡Òڇ˂‡ÂÚÒfl ‡‚ÚÓχÚ˘ÂÒÍË. ìÓ‚Â̸ „ÓÏÍÓÒÚË Ì ‚ÎËflÂÚ Ì‡
ÛÓ‚Â̸ Á‡ÔËÒË.
• èÎÓıÓÈ Á‚ÛÍ ‚Ó ‚ÂÏfl ‚ÓÒÔÓËÁ‚‰ÂÌËfl ҉·ÌÌÓÈ Á‡ÔËÒË ÏÓÊÂÚ ·˚Ú¸ ‚˚Á‚‡Ì ÚÂÏ,
˜ÚÓ ÏËÍÓÙÓÌ ·˚Î ‡ÒÔÓÎÓÊÂÌ ÒÎ˯ÍÓÏ ·ÎËÁÍÓ ÓÚ Á‡ÔËÒ˚‚‡ÂÏÓ„Ó Ó·˙ÂÍÚ‡.
èÓÏÂÒÚËÚ ‰‡ÌÌÓ ÛÒÚÓÈÒÚ‚Ó ‚ ‰Û„Ó ÏÂÒÚÓ Ë ÔÓ‚ÚÓËÚ ‚˚¯ÂÓÔËÒ‡ÌÌ˚Â
ÓÔ‡ˆËË Â˘fi ‡Á.
АВТОМАТИЧЕСКАЯ ПРИОСТАНОВКА
Ç ÏÓÏÂÌÚ, ÍÓ„‰‡ Á‡Í‡Ì˜Ë‚‡ÂÚÒfl ‚ÓÒÔÓËÁ‚‰ÂÌËÂ, Á‡ÔËÒ¸, ÔÂÂÏÓÚ͇ ‚ÔÂfi‰ ËÎË Ì‡Á‡‰
(Á‡Í‡Ì˜Ë‚‡ÂÚÒfl ÎÂÌÚ‡) ‰‡ÌÌÓ ÛÒÚÓÈÒÚ‚Ó ‡‚ÚÓχÚ˘ÂÒÍË ÓÚÍβ˜‡ÂÚÒfl, ÔË ˝ÚÓÏ
̇ʇÚ˚ ÍÌÓÔÍË ‚ÓÁ‚‡˘‡˛ÚÒfl ‚ ËÒıÓ‰ÌÛ˛ ÔÓÁËˆË˛.
ЗАПИСЫВАЮЩИЙ СТЕРЕО/РАДИО/КАССЕТНЫЙ МАГНИТОФОН
RC-M102
For Customer Use:
Enter below the Model No. and Serial
No. which are located either on the rear,
bottom or side of the cabinet. Retain this
information for future reference.
Model No.
Serial No.
ИНСТРУКЦИЯ
Русский
LVT0635-001A[U, UX]
601-828800-010
НАЗВАНИЯ ДЕТАЛЕЙ
1
2
34
5
6
7
8
9
0
-=
220-
230 V
110-
115 V
AC
~
!
@
ЗАЩИТА ОТ СТИРАНИЯ
ÇÓ ‚ÂÏfl Á‡ÔËÒË ‡‚ÚÓχÚ˘ÂÒÍË ÒÚˇÂÚÒfl Á‡ÔËÒ¸, ҉·Ì̇fl ̇ ‰‡ÌÌÓÈ Í‡ÒÒÂÚ ‡ÌÂÂ.
ÑÎfl Á‡˘ËÚ˚ ÓÚ ÒÎÛ˜‡ÈÌÓ„Ó ÒÚˇÌËfl Û‰‡ÎËÚ Á‡˘ËÚÌ˚ Ô·ÒÚËÌÍË, ‡ÒÔÓÎÓÊÂÌÌ˚ ̇
‚ÂıÌÂÏ Â·Â Í‡ÒÒÂÚ˚. ÖÒÎË ‚˚ Û‰‡ÎËÚ Ô·ÒÚËÌÍÛ ÒÚÓÓÌ˚ Ä. íÓ ÚÓ„‰‡ Á‡ÔËÒ¸ ̇ ˝ÚÓÈ
ÒÚÓÓÌ ·Û‰ÂÚ Ì‚ÓÁÏÓÊ̇. ÖÒÎË Ê ‚˚ Á‡ıÓÚËÚ ÔÓËÁ‚ÂÒÚË Á‡ÔËÒ¸ ̇ Ú‡ÍÓÈ Í‡ÒÒÂÚÂ,
Á‡ÍÎÂÈÚ ÍÎÂÈÍÓÈ ÎÂÌÚÓÈ Ó·‡ÁÓ‚‡‚¯ËÂÒfl ÓÍÓ¯ÍË.
ГНЕЗДО ДЛЯ НАУШНИКОВ
ÑÎfl Ë̉˂ˉۇθÌÓ„Ó ÔÓÒÎۯ˂‡ÌËfl, ‚ÒÚ‡‚¸Ú ‚ËÎÍÛ Ì‡Û¯ÌËÍÓ‚ ‚ „ÌÂÁ‰Ó EAR (‰Îfl
̇ۯÌËÍÓ‚), ‡ÒÔÓÎÓÊÂÌÌÓ ̇ ÍÓÔÛÒ ÔË·Ó‡. èË ˝ÚÓÏ ‚ÒÚÓÂÌÌ˚È ‰Ë̇ÏËÍ
‡‚ÚÓχÚ˘ÂÒÍË ÓÚÍβ˜‡ÂÚÒfl.
УХОД И ЭКСПЛУАТАЦИЯ
• èӂ¸ÚÂ, ıÓÓ¯Ó ÎË ÒÏÓڇ̇ χ„ÌËÚ̇fl ÎÂÌÚ‡. «èÓ‰ÏÓÚ‡ÈÚ»
‚˚ÎÂÁ¯Ë ۘ‡ÒÚÍË Ï‡„ÌËÚÌÓÈ ÎÂÌÚ˚ Ò ÔÓÏÓ˘¸˛ ͇‡Ì‰‡¯‡ Ô‰ ÚÂÏ,
Í‡Í ‚ÒÚ‡‚ÎflÚ¸ ͇ÒÒÂÚÛ.
• ç ËÒÔÓθÁÛÈÚ ͇ÒÒÂÚ˚ Ò ÔÓ‰ÓÎÊËÚÂθÌÓÒÚ¸˛ Á‚Û˜‡ÌËfl 120 ÏËÌ. (ËÎË
‰Óθ¯Â).
• ç ÔÓ‰‚„‡ÈÚ ‰‡ÌÌÓ ÛÒÚÓÈÒÚ‚Ó ÔÂÂÓı·ʉÂÌ˲ ËÎË ÔÂÂ̇„‚Û.
• é˜Ë˘‡ÈÚ ‰ÂÚ‡ÎË, Ò ÍÓÚÓ˚ÏË ÍÓÌÚ‡ÍÚËÛÂÚ Ï‡„ÌËÚ̇fl ÎÂÌÚ‡
(‚ÓÒÔÓËÁ‚Ó‰fl˘‡fl/Á‡ÔËÒ˚‚‡˛˘‡fl „ÓÎӂ͇, ÔËÊËÏÌÓÈ ÓÎËÍ Ë
‚Â‰Û˘ËÈ ‚‡ÎËÎ), ÔÓÒΠ͇ʉ˚ı 40 ˜‡ÒÓ‚ ˝ÍÒÔÎÛ‡Ú‡ˆËË Ò ÔÓÏÓ˘¸˛
ıÎÓÔ˜‡ÚÓ·ÛχÊÌÓÈ Ï‡ÚÂËË, ÔÓÔËÚ‡ÌÌÓÈ ‰Â̇ÚÛËÓ‚‡ÌÌ˚Ï ÒÔËÚÓÏ.
• 옇ÒÚÍË ÒËθÌ˚ı Á‡„flÁÌÂÌËÈ ÔÓÚˇÈÚ Ïfl„ÍÓÈ Ú̸͇˛, ÒÏÓ˜ÂÌÌÓÈ
ÌÂÈڇθÌ˚Ï ÏÓ˛˘ËÏ Ò‰ÒÚ‚ÓÏ.
• èÓÚˇÈÚ ÍÓÔÛÒ Ïfl„ÍÓÈ Ú̸͇˛, Ì ËÒÔÓθÁÛfl ÔË ˝ÚÓÏ ıËÏ˘ÂÒÍËÂ
‚¢ÂÒÚ‚‡.
ТЕХНИЧЕСКИЕ ХАРАКТЕРИСТИКИ
ÇÓÁÏÓÊÌ˚ ÒËÚÛ‡ˆËË, ÍÓ„‰‡ ÔÂÂÔËÒ˚‚‡ÌË ËÎË ‚ÓÒÔÓËÁ‚‰ÂÌËÂ
χÚ¡ÎÓ‚, Óı‡ÌflÂÏ˚ı ‡‚ÚÓÒÍËÏ Ô‡‚ÓÏ ·ÂÁ ‡Á¯ÂÌËfl ‚·‰Âθˆ‡
Ô‡‚‡, ·Û‰ÂÚ Ò˜ËÚ‡Ú¸Òfl ÌÂÁ‡ÍÓÌÌ˚Ï.
МЕРЫ ПРЕДОСТОРОЖНОСТИ:
• При любых обстоятельствах никогда не открывайте корпус. Никогда не используйте данную
продукцию без корпуса. Любой ремонт внутренних частей должен производиться только опытным
специалистом технического обслуживания.
• Не прикасайтесь к плейеру влажными руками. В случае попадания какой-либо жидкости в
корпус плейера, отнесите его опытному техническому специалисту для проверки.
ВЕИМАНИЕ:
ВО ИЗБЕЖАЕИЕ ВОСПЛАМЕНЕЕИЯ, А
ТАК ЖЕ ЖЛЯ ПРЕДОТВРАЩЕНИЯ
УДВРВ ТОКОМ НЕ ВЫСТАВЛЯЙТЕ
ДАННОЕ УСТРОЙСТВО ПОД ДОЖЛЬ
ИЛИ ЖЕ В МЕСТА ПОСЫШЕННОЙ
ВЛАЖЕОСТИ.
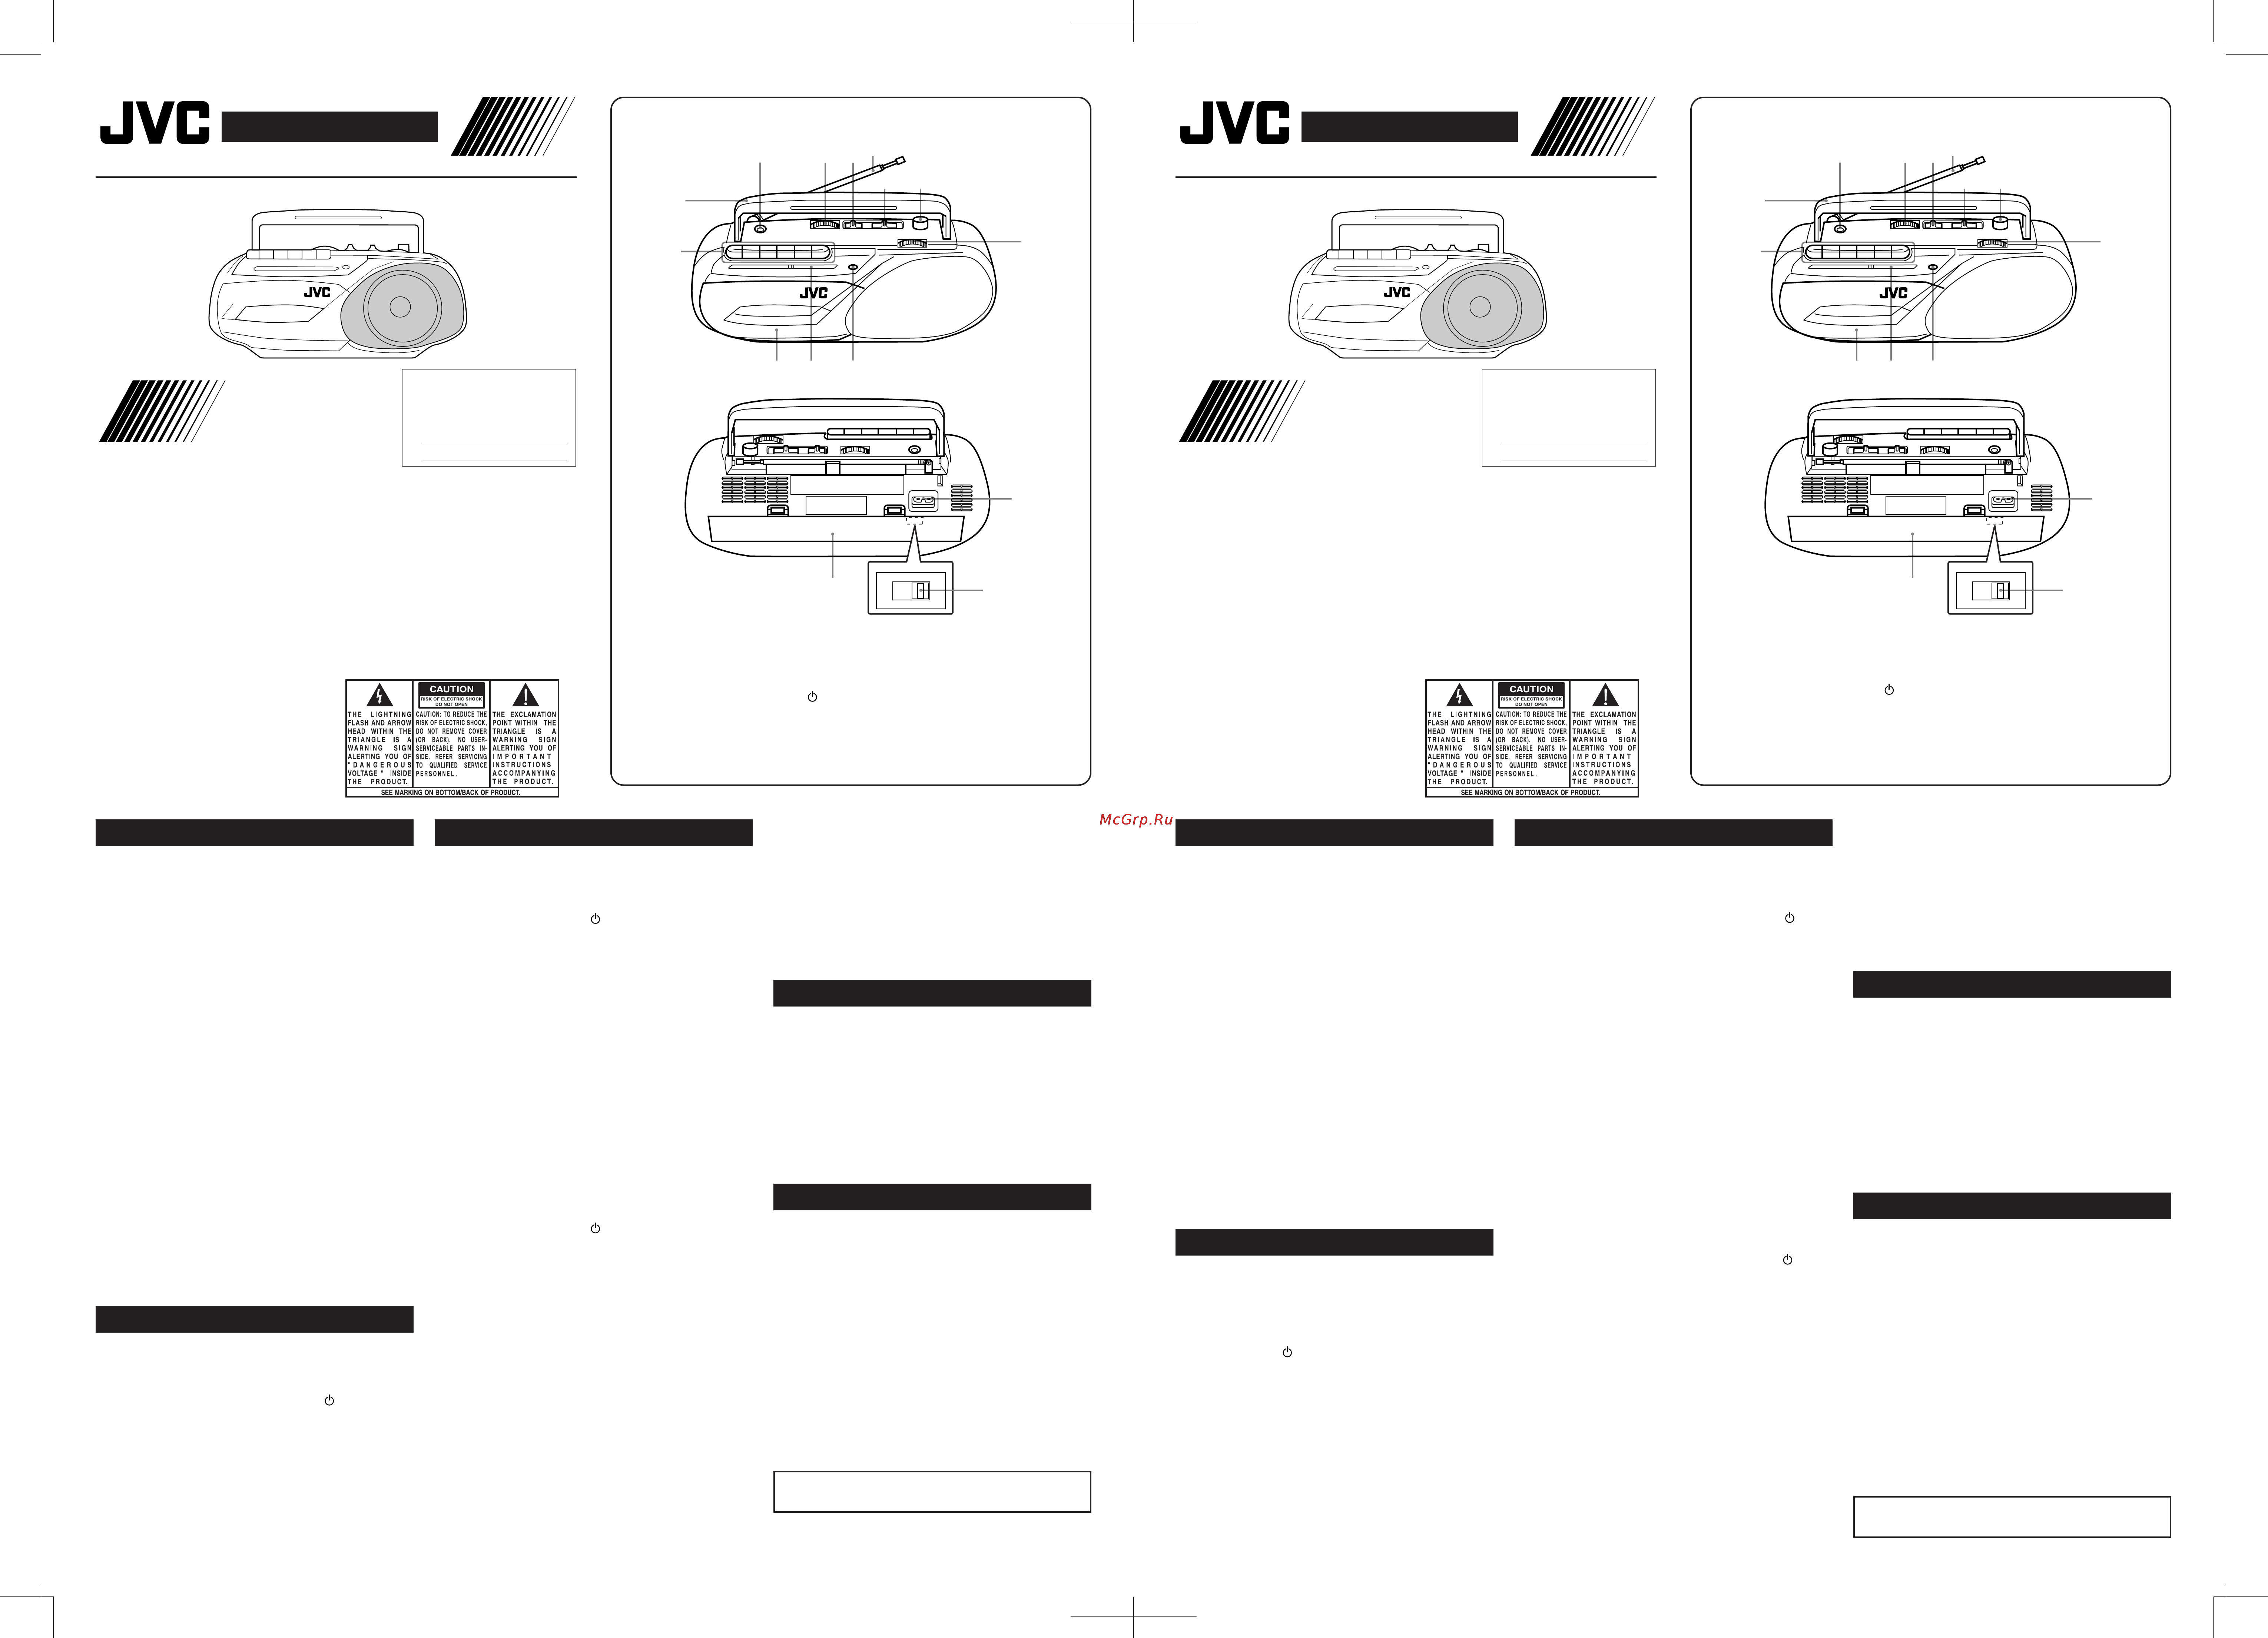
1 äÌÓÔÍË ÛÔ‡‚ÎÂÌËfl ͇ÒÒÂÚÌ˚Ï
ÓÚ‰ÂÎÂÌËÂÏ
äÌÓÔ͇ 8 PAUSE (èÄìáõ)
äÌÓÔ͇ § STOP/EJ (éëíÄçéÇäÄ
ãÖçíõ/éíäêõÇÄçàÖ
äÄëëÖíéÑÖêÜÄíÖãü)
äÌÓÔ͇ 1 FF (èÖêÖåéíäÄ
ÇèÖê›Ñ)
äÌÓÔ͇ ¡ REW (èÖêÖåéíäÄ
çÄáÄÑ)
äÌÓÔ͇ 2 PLAY
(ÇéëèêéàáÇÖÑÖçàÖ)
äÌÓÔ͇ ¶ REC (áÄèàëú)
2 ê͇ۘ ‰Îfl ÔÂÂÌÓÒ‡
3 ÉÌÂÁ‰Ó EAR (‰Îfl ̇ۯÌËÍÓ‚)
4 ê„ÛÎflÚÓ VOLUME (Éêéåäéëíà)
5 Ç˚·Ó FUNCTION (îìçäñàâ)
( TAPE/RADIO) (åÄÉçàíéîéç)
6 Ç˚‰‚ËÊ̇fl ‡ÌÚÂÌ̇
7 Ç˚·Ó BAND (êÄÑàé ÑàÄèÄáéçÄ)
(MW/SW/FM)
8 ê„ÛÎflÚÓ FINE TUNING (ìãìóòÖççéâ
çÄëíêéâäà)
9 TUNING (çÄëíêéâäÄ)
0 MIC (ÇëíêéÖççõâ åàäêéîéç)
- ò͇· ̇ÒÚÓÈÍË
= ä˚¯Í‡ ͇ÒÒÂÚÓ‰ÂʇÚÂÎfl
~ ÉÌÂÁ‰Ó ‰Îfl AC IN (èèéÑäãûóÖçàü ä
èÖêÖåÖççéåì íéäì)
! Ç˚·Ó ̇ÔflÊÂÌËfl
(AC 110 V~127 V/220 V~240 V)
@ éÚ‰ÂÎÂÌË ‰Îfl ·‡Ú‡ÂÈ
êÄÑàé
MW 530-1600 kHz
SW 6,0-18,0 MHz
FM 88-108 MHz
ÄçíÖççÄ
MW îÂËÚÓ‚‡fl ‡ÌÚÂÌ̇
SW/FM Ç˚‰‚ËÊ̇fl ‡ÌÚÂÌ̇
åÄÉçàíçÄü ãÖçíÄ
ëÍÓÓÒÚ¸ ÎÂÌÚ˚ 4,75 ÒÏ/ÒÂÍ
åéôçéëíú
èÖêÖåÖççõâ íéä (AC) 110V-127V/
220V-240V/
50Hz/60Hz
ÇÓÁÏÓÊÂÌ
‚˚·Ó
èéëíéüççõâ íéä (DC) 6V, 4 SUM-1
(‡ÁÏÂÓÏ “D”,
HP2, R20)
éÅôàÖ èéäÄáÄíÖãà
Ç˚ıӉ̇fl ÏÓ˘ÌÓÒÚ¸ 0,6 W
(10 % THD)
ÑË̇ÏËÍË 89 ÏÏ, 4 éÏ
ê‡ÁÏÂ˚ 310 ı130 ı 104ÏÏ
(ò x Ç x É)
ÇÂÒ èË·Î. 1,2 Í„ (·ÂÁ
·‡Ú‡ÂflÏË)
èË̇‰ÎÂÊÌÓÒÚË òÌÛ ‰Îfl
ÔÓ‰Íβ˜ÂÌËfl Í ÒÂÚË
ĉ‡ÔÚÌ
* ëÔˆËÙË͇ˆËfl ÏÓÊÂÚ ·˚Ú¸ ËÁÏÂÌÂ̇.
PRECAUTIONS:
• Never open the cabinet under any circumstances. Never operate this product with the
cabinet removed. Any repairs of internal adjustments should be made only by a trained
service technician.
• Do not touch the recorder with wet hands. If any liquid enters the recorder cabinet, take
the recorder to a trained service technician for inspection.
PREPARATION FOR USE
Please keep all information for future reference.
AC POWER OPERATION
Setting the Voltage selector
Before inserting the plug into the AC outlet, make sure to set the voltage
selector (AC 110 V~127 V/220 V~240 V) to the voltage that is appropriate
for your area.
Note:
• For this unit, the AC plug adaptor is provided. If required, use it.
Connection of power
Connect one end of the supplied AC power cord to the AC IN jack, and the
other end, to household AC outlet.
Notes:
• When you do not use the unit for long period of time, be sure to unplug
the unit from the AC outlet.
• Even if the batteries are loaded, the unit switches over to AC power
whenever you plug it into an AC power source.
DC POWER OPERATION
Open the battery compartment and install four SUM-1 (“D” size,HP2, R20)
with + and - poles facing in the correct directions as indicated in the
battery compartment.
Notes:
Incorrectly using the batteries can cause them to leak or burst, and may
damage the unit. Note the following;
• Do not mix new batteries with old ones.
• Remove the batteries when you do not plan to use the unit for a month
or more.
RADIO OPERATION
1. Set the FUNCTION selector to RADIO.
2. Set the BAND selector to the desired band.
3. Tune to the desired station by turning the TUNING control.
4. Adjust the VOLUME control to your comfortable listening level.
5. To turn the radio off, the FUNCTION selector to
TAPE.
Notes:
• For FM and SW reception, extend the telescopic antenna and turn its
direction at which the reception becomes optimal.
• For MW reception, a ferrite-bar antenna is built-in. Since this antenna
is direction oriented, turn the entire unit to a direction at which the
reception becomes optimal.
FINE TUNING control
When tuning SW broadcast, use the FINE TUNING control for precise tuning.
CASSETTE OPERATION
PLAYBACK
1. Press the 7/0 STOP/EJ button to open the cassette compartment
door. Insert a cassette with the exposed portion facing upward.
2. Close the cassette compartment door by hand.
3. Set the FUNCTION selector to
TAPE.
4. Press the 2 PLAY button.
5. Adjust the VOLUME control to your comfortable listening level.
6. To stop the tape, press the 7/0 STOP/EJ button.
7. To eject the cassette, press the 7/0 STOP/EJ button again.
FAST FORWARD AND REWIND
1. Press the 1 FF button to rapidly advance the tape forward.
2. Press the ¡ REW button to rapidly wind the tape backward.
RECORDING FROM THE RADIO
1. Set the FUNCTION selector to RADIO and turn to the desired station.
2.
Press the 7/0 STOP/EJ button to open the cassette compartment door.
3. Insert a cassette with the exposed portion facing upward.
4. Close the cassette compartment door by hand.
5. Press the 8 PAUSE button, and then press the ¶ REC button (2 PLAY
button will engage simultaneously).
6. To start recording, press the 8 PAUSE button to release.
7. To stop recording, press the 7/0 STOP/EJ button. To eject the
cassette, press the button again.
RECORDING FROM BUILT-IN MICROPHONE
1. Set the FUNCTION selector to TAPE.
2.
Press the 7/0 STOP/EJ button to open the cassette compartment door.
3. Insert a cassette with the exposed portion facing upward.
4. Close the cassette compartment door by hand.
5. Press the 8 PASUE button and then press the ¶ REC button (2 PLAY
button will engage simultaneously).
6. To start recording, press the 8 PAUSE button to release.
7. To stop recording, press the 7/0 STOP/EJ button. To eject the
cassette, press the button again.
Notes:
• The recording level is adjusted automatically. The VOLUME level does
not affect the recording level.
• If the sound on playback is distorted, the microphone may have been
placed too near the recording source. Re-position the unit and run
through the above procedure again.
AUTOMATIC STOP
When the tape reaches the end during playback, recording, fast forward or
rewind, the unit will automatically shut itself off and return the buttons to
their off position.
RADIO CASSETTE RECORDER
RC-M102
For Customer Use:
Enter below the Model No. and Serial
No. which are located either on the rear,
bottom or side of the cabinet. Retain this
information for future reference.
Model No.
Serial No.
INSTRUCTIONS
English
LVT0635-001A[U, UX]
601-828800-010
NAMES OF PARTS
1 Cassette control buttons
8 PAUSE button
7/0 STOP/EJ (Stop/Eject) button
1 FF (Fast Forward) button
¡ REW (Rewind) button
2 PLAY button
¶ REC (Record) button
2 Carrying handle
1
2
34
5
6
7
8
9
0
-=
220-
230 V
110-
115 V
AC
~
!
@
3 EAR (Earphone) jack
4 VOLUME control
5 FUNCTION selector
( TAPE/RADIO)
6 Telescopic antenna
7 BAND selector (MW/SW/FM)
8 FINE TUNING control
9 TUNING control
0 MIC
(Condenser Microphone)
- Tuning scale
= Cassette compartment door
~ AC IN jack
! Voltage selector (AC 110 V~
127 V/220 V~240 V)
@ Battery compartment
ERASE PROTECTION
During recording, any previous recordings on the tape are automatically
erased. To avoid accidental erasure, remove the erase protection tab on the
cassette’s back edge. If you break the side A’s tab, you cannot record on side
A. If you want to record on the tape, cover the tab’s hole with a piece of
plastic adhesive tape.
EARPHONE JACK
For private listening, insert the earphone’s plug into the EAR (Earphone)
jack of the unit. This automatically disconnects the built-in speaker.
CARE AND MAINTENANCE
• Check that there are no loose layers of tape.
“Take up” these loose layers using a pencil before inserting the
cassette into the unit.
• Do not use the C-120 (or longer) cassettes.
• Do not expose the unit to extremes of temperature.
• Clean the tape handling parts (Play/record head, pinch roller and
capstans) after every 40 hours of operation with a cotton swab
moistened with denatured alcohol.
• Wipe away tough dirt with a soft cloth soaked in a neutral detergent.
• Clean the body with a soft cloth. Do not use chemicals.
SPECIFICATION
RADIO
MW 530-1600 kHz
SW 6.0-18.0 MHz
FM 88-108 MHz
ANTENNA
MW Ferrite-bar antenna
SW/FM Telescopic antenna
TAPE
Tape speed 4.75 cm/sec.
POWER REQUIREMENTS
AC
AC 110 V~127 V/220 V~240 V
50Hz/60Hz, switchable
DC 6V, 4 x
SUM-1 (“D” size,HP2, R20)
GENERAL
Output power 0.6 W
(10 % THD)
Speaker 89 mm,
4 ohms
Dimensions 310 × 130 × 104
mm (W × H × D)
Mass Approx. 1.2 kg
(without batteries)
Accessories AC power cord
AC plug adaptor
* Specifications are subject to
change without notice.
It may be unlawful to record or playback copyrighted material without
the consent of the copyright owner.
WARNING:
TO REDUCE THE RISK OF FIRE OR
ELECTRIC SHOCK, DO NOT EXPOSE
THIS APPLIANCE TO RAIN OR MOIS-
TURE.
VICTOR COMPANY OF JAPAN, LIMITED
1000IMMCREMTS
Содержание
- Care and maintenance 1
- Cassette operation 1
- English 1
- Instructions 1
- Names of parts 1
- Precautions 1
- Preparation for use 1
- Radio cassette recorder 1
- Radio operation 1
- Rc m102 1
- Specification 1
- Warning 1
- Веимание 1
- Записывающий стерео радио кассетный магнитофон 1
- Инструкция 1
- Меры предосторожности 1
- Названия деталей 1
- Обращение с касснтами 1
- Подготовка к эксплуатации 1
- Работа радио 1
- Русский 1
- Технические характеристики 1
- Уход и эксплуатация 1
- A d¹j 2
- Dobi² ë b¹bl²k qðui wz un 2
- E _ ul 2
- J dak ÿul ô 2
- Lo d ë l d bi 2
- Lołd² 2
- L¹d bi² 2
- N jl êu ëdjo 2
- Ql i³i 2
- Rc m102 2
- S w ul 2
- U ud w u vk un qoga 2
- U œ d qoga 2
- U œ d s qo 2
- U œ ë u do xo u q rc m102 2
- Ub èu² wdðu 2
- Ulf ö doc 2
- Uml v d êu ëdjo s qo 2
- Un k xoýuj do š udž 2
- Un k xoýuj w rj ² x r n u² 2
- U¹ ud³ do š 2
- W uob ë w umf 2
- Wh u uoi 2
- Wh u wdðu 2
- Whoþu uo²š õu²h 2
- Wio b wh u wdðu 2
- Wo uo uno m 2
- Wzuik n u 2
- Włu uo²š õu²h 2
- X u œœd² uoð wod uh uo²š õu²h x u x u øx u 2
- Xo uj qoga 2
- ¼u zw uðq k²lb¹b ë ²i b od 2
- Ã dšù ø ui¹ 2
- Ê _ u ul f i 2
- Ê _ užulý f³i 2
- Ø d œ¹u 2
- Œœd uo w u vk un qoga 2
- Œœd² uo² ušœ f³i 2
- Ÿul²ýô 2
Похожие устройства
- Karcher K 3.700 Инструкция по эксплуатации
- Braun TexStyle 515 Инструкция по эксплуатации
- JVC RC-BX25BK Инструкция по эксплуатации
- Texet TN-701BT Инструкция по эксплуатации
- Netgear WNR2200 Инструкция по эксплуатации
- Festool SRM 45 LE-EC 583288 Инструкция по эксплуатации
- Karcher K 3.500 Инструкция по эксплуатации
- Braun TexStyle 760 Инструкция по эксплуатации
- Texet TN-705 Инструкция по эксплуатации
- Braun TexStyle 540 Инструкция по эксплуатации
- Karcher K 3.550 Инструкция по эксплуатации
- Festool CTM 36 E 584000 Инструкция по эксплуатации
- JVC RC-BX15BK Инструкция по эксплуатации
- Texet TN-800BT Инструкция по эксплуатации
- Festool CTL 26 E AC 584017 Инструкция по эксплуатации
- Karcher K 3.500 Garden EU Инструкция по эксплуатации
- Braun TexStyle 780 Инструкция по эксплуатации
- JVC RC-BM5 Инструкция по эксплуатации
- Texet TN-300 Инструкция по эксплуатации
- Hyundai H-2206 Инструкция по эксплуатации
Скачать
Случайные обсуждения