
Zotek ZT-M0 Инструкция по эксплуатации онлайн
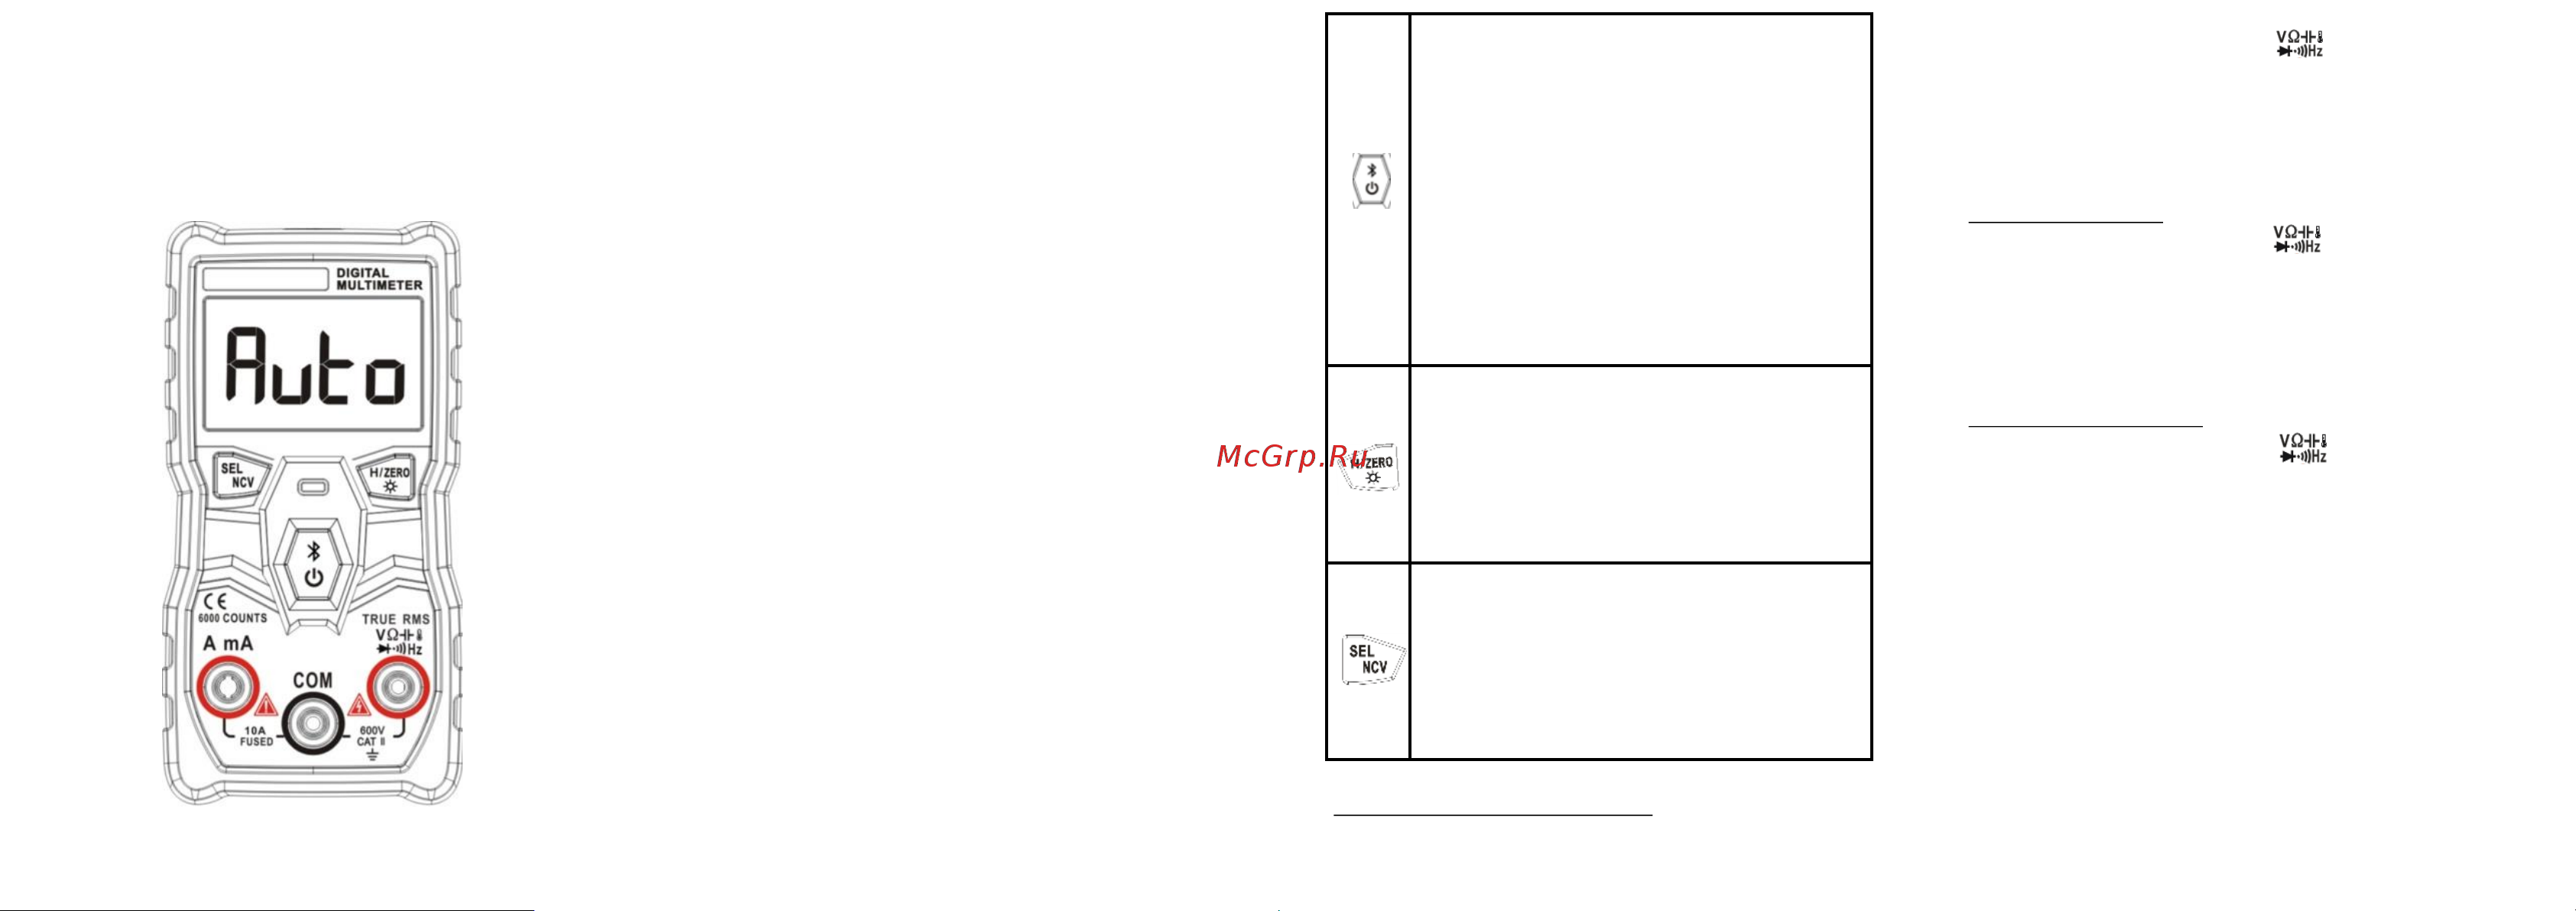
Push
this button over 2 seconds to turn on
or
turn
off the product.
The
product automatically powers off after
15
minutes
of inactivity and the built-in
beeper
beeps
5 times 1 minute before auto power off.
To
cancel auto power off, push NCV
before
turning
on the product, after 5 beeps to
cancel
the
auto power off successfully.
Short
push this button to open Bluetooth ,
the
Bluetooth
symbol shows on the screen
means
Bluetooth
function opened , can link to E-
bull
app
on the mobile; Short push again to turn
off
this
function.
Push once
to hold the current reading on the
display;
Push for more than 2 seconds to turn on the
flashlight
backlight. And long-push again to
turn off.
In capacitance mode, it can clean the reading
on the screen.
Keep
pushing this button to enter the NCV
testing
mode. In this mode, you have to push
the
button always.
It cannot use NCV function when you put the
leads
in the current terminal.
You can change modes between
continuity/diode, capacitance and frequency.
- 3 -
- 4 -
- 2 -
All rights reserved.
Specifications are subject to change without notice.
Introduction
This product is a battery-powered, auto-ranging, true
RMS digital multimeter with a 6000 counts LCD display.
Safety Information
To avoid possible electrical shock, fire, or personal injury,
please read all safety information before you use the
product. Please use the product only as specified, or the
protection supplied by the product can be compromised.
• Examine the case before you use the product. Look
for cracks or missing plastic. Carefully look at the
insulation around the terminals.
• The measurement must be made within the
allowable measuring range.
• Do not use the product around explosive gas, vapor,
or in damp or wet environments.
• When the voltage to be measured exceeds 36V DC or
25V AC, the operator shall be careful enough to avoid
electric shock.
• Misuse of mode or range can lead to hazards, be
cautious. “OL” will be shown on the display when the
input is out of range.
• Low level of a battery will result in incorrect readings.
Change the batteries when battery level is low. Do not
make measurements when the battery door is not
properly placed.
Instruction Buttons
2. Put the red lead into the terminal, put the
black lead to the COM terminal.
3. The DC or AC voltage will be auto matched.
4. Touch the probes to the correct test points of the
circuit to measure the voltage.
5. Read the measured voltage on the display.
Measure Resistance
1. Put the red lead into the terminal, put the
black lead to the COM terminal.
2. The resistance measure will be auto matched.
3. Touch the probes to the desired test points of the
circuit to measure the resistance.
4. Read the measured resistance on the display.
Test for Continuity/Diode
1. Put the red lead into the terminal, put the
black lead to the COM terminal
2. Press SEL/NCV button to enter continuity and diode
mode.
3. Touch the probes to the desired test points of the
circuit.
4. The built-in beeper will beep when the resistance is
lower than 50Ω, which indicates a short circuit while
the central LED light will light .
5. Diode test: touch the red probe to the positive
electrode of the diode to be measured, the black
probe to the negative, then read the forward bias
value which showed on the screen. If connect the
wrong electrode or the diode are damaged, “OL” will
be showed on the screen.
Measurements
Measure DC/AC Voltage (>0.8V)
1. Only when the voltage is higher than 0.8V, this
product will show the display.
User Manual
Содержание
- Black lead to the com terminal 1
- Bluetooth function opened can link to e bull 1
- Buttons 1
- Instructio 1
- Introduction 1
- Safety information 1
- User manual 1
- 0 3 600v 60 0v 0 1v 2
- Accuracy max 2
- Electrical specifications 2
- Function range 2
- Specifications 2
- V 0 01v 2
- Voltage v 2
- Bluetooth dmm application 3
- Click bluetooth dmm in the list to pair 3
- Delete multimeters at the top right corner record can 3
- Real time measurement instruction 3
- To calculate online data 3
- When you turn on it and switch to another screen on the mobile 3
Похожие устройства
- Zotek ZT922 Инструкция по эксплуатации
- Zotek ZT922SE Инструкция по эксплуатации
- Zotek VC921 Инструкция по эксплуатации
- Zotek ZT-203 Инструкция по эксплуатации
- Yli Electronic ISK-840B Спецификация
- Yli Electronic YM-500W Спецификация
- Yli Electronic YM-180N(LED) Спецификация
- Yli Electronic YM-180 Спецификация
- Yli Electronic YK-568L Инструкция по эксплуатации
- Utepo SF10P-FHM Инструкция по эксплуатации
- Utepo SF6P-FHM Инструкция по эксплуатации
- Utepo UTP3-SW08-TP120-A1 Инструкция по эксплуатации
- Utepo SFP-10G-300M Инструкция по эксплуатации
- Utepo UTP7204GE-PD Инструкция по эксплуатации
- Utepo UTP3-GSW1604S-MTP250 Инструкция по эксплуатации
- Utepo UTP7201GR-BTPOE(60) Инструкция по эксплуатации
- Utepo UTP3-SW04-TP60 Инструкция по эксплуатации
- Utepo UTP3-GSW2404TS-P420 Инструкция по эксплуатации
- Utepo UTP1-SW1602TS-POE Инструкция по эксплуатации
- Utepo UTP7202GR-BTPOE(90) Инструкция по эксплуатации