![Argox OS-2130D-SB [8/37] Preparing media](/img/pdf.png)
Argox OS-2130D-SB [8/37] Preparing media
![Argox OS-2130D-SB [8/37] Preparing media](/views2/1906674/page8/bg8.png)
4
OS-2130D & OS-2130DE User’s Manual
Loading Media
Preparing Media
In case media roll may become dirty or dusty during shipment,
handling, or storage, firstly remove the outside length of media, which
helps to avoid dragging adhesive or dirty media between the print
head and platen roller. When loading media, it must be placed onto
the media hangers.
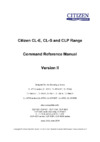
Placing Media Roll
1. Open Top Cover of the printer.
5
OS-2130D & OS-2130DE User’s Manual
2. Put the Media Hanger through media supply roll, and then
centrally align with the two Media Shields to closely lean against
the media supply roll.
Media Hanger
Media Roll
Содержание
- Os 2130d os 2130de p.1
- Rinters p.1
- Table of contents p.1
- Product improvements p.2
- Proprietary statement p.2
- Liability disclaimer p.2
- Introduction p.2
- Fcc compliance statement p.2
- Congratulations on choosing os 2130d and os 2130de printers p.3
- Industry os 2130d and os 2130de are ideally designed to easily p.3
- Getting started p.3
- Damage p.3
- Contact your local dealer p.3
- Check whether you have received the following accessories p.3
- Bring more efficiency for your business this manual will help you get p.3
- Unpacking printer p.3
- After receiving your printer please check for possible shipping p.3
- Together with the printer if there is any item missing please p.3
- To know your new printer and provide sufficient information needed p.3
- Shipping company immediately to file a claim p.3
- Safety p.3
- Open the top cover of the printer to see if all parts are in order p.3
- Note if shipping damage has been discovered contact your p.3
- Made by argox information co a leader in the world wide barcode p.3
- Inspect the outside of both the box and the printer for possible p.3
- Printer overview p.4
- Thermal print head p.6
- Release levers p.6
- Media hanger p.6
- Media guides p.6
- Interior view ii p.6
- Interior view i p.6
- Os 2130de p.7
- Os 2130d p.7
- Attaching power p.7
- Preparing media p.8
- Placing media roll p.8
- Media roll p.8
- Media hanger p.8
- Loading media p.8
- Release levers p.9
- Media compartment p.9
- Steps to start media calibration configuration p.11
- Sample of printer configuration label p.11
- Printing media calibration configuration p.11
- Printer operations p.11
- Print head test pattern p.11
- Main board dip switch settings p.12
- Resetting printer to factory defaults p.12
- Ready indicator p.13
- Printer controls and indicators p.13
- Power switch p.13
- Power indicator p.13
- Feed button p.13
- Troubleshooting by led and buzzer indicators diagnosis p.15
- Recovery p.17
- Miscellaneous p.17
- Usb interface requirements p.18
- Serial rs 232 interface requirements p.18
- Interfaces and requirements p.18
- Ethernet module status indicators p.18
- Ethernet 10 100 internal printer server option p.18
- Communications p.18
- Amber led p.19
- Green led p.19
- Communicating with the printer p.19
- Installing a plug and play printer driver for usb only p.20
- Installing a printer driver for other interfaces except usb p.23
- Print head maintenance guide p.26
- Cleaning material p.26
- Cleaning interval p.26
- Caring for your printer p.26
- Removed altered defected or made illegible under every p.27
- Product specification p.27
- Line of print head gently without excessive stress p.27
- General specification p.27
- From left to right only or from right to left only to clean heating p.27
- Do not wipe back and forth to avoid dust or dirt on cleaning cotton p.27
- Cleaning direction p.27
- Circumstance p.27
- Would be attached onto print head again p.27
- When cleaning the print head always wipe in one way direction p.27
- Warranty of print heads will be void if print head serial number is p.27
- Specification os 2130d os 2130de p.27
- Special caution p.27
- Programming p.29
- Printer programming language ppla p.29
- Printer emulation the emulations ppla and pplb are printer p.29
- Language ppla p.29
- Internal fonts p.29
- Graphics p.29
- Fonts barcodes and graphics specification p.29
- Font size p.29
- Code pages p.29
- Character p.29
- With your printer p.29
- Bar code types p.29
- The specifications of fonts bar codes and graphics depends on the p.29
- Symbol sets p.29
- Soft fonts downloadable soft fonts p.29
- Rotation p.29
- Programming languages through which the host can communicate p.29
- Rotation p.30
- Programming p.30
- Printer programming language pplb p.30
- Language pplb p.30
- Internal fonts p.30
- Graphics p.30
- Font size p.30
- Code pages p.30
- Character p.30
- Bar code types p.30
- Symbol sets p.30
- Soft fonts downloadable soft fonts p.30
- Usb series b receptacle interface p.31
- Usb interface p.31
- This is port complies with usb 2 full speed p.31
- Serial interface p.31
- Pin signal description p.31
- Interface specification p.31
- Connector terminal pin assignment p.31
- Cash drawer p.31
- Appendix i thermal print head replacement p.33
- Appendix ii cutter installation p.34
- Appendix iii dispenser kit installation p.36
- Click the middle cover back to the base housing first click in the p.37
- Board of the base housing p.37
- At that left p.37
- Secure the two screws at the bottom of the base housing p.37
- Secure back the screw on the left bracket of the chassis p.37
- Plug the sensor board s connector into the pcb s header p.37
- Left corner of the middle cover p.37
- Insert the sensor connector into its receptacle on the main logic p.37
- Guide the sensor cable connector through the hole on the upper p.37
- Front part then the rear p.37
- Connector j2 p.37
- Click the top cover back to the middle cover p.37
Похожие устройства
-
 Argox iX4-350Руководство пользователя
 -
Argox iX4-250Руководство пользователя
-
 Argox D2-250Руководство пользователя
 -
 Argox OS-2140 (D)Инструкция по эксплуатации
 -
 Argox OS-2130 DEИнструкция по эксплуатации
 -
 Argox OS-2130 DИнструкция по эксплуатации
 -
 Epson TM-T20III C31CH51011Руководство по эксплуатации
 -
 Mertech TLP100 Terra Nova 4588Руководство по эксплуатации
 -
 Brother QL-810W (QL810WUA1)Руководство по эксплуатации
 -
 G&G GG-AT 90DWEИнструкция по эксплуатации
 -
G&G GG-AT 90DWИнструкция по эксплуатации
-
 Citizen CL-E720Command Reference DMX