
Scythe Katana 2 Инструкция по эксплуатации онлайн
Содержание
- A yjxb package contains paket enthält le paquet contient 1
- Ftt l v 1
- Installation guide 1
- Jt vw ktrwrt 1
- Socket 478 1
- Socket 754 939 940 am2 1
- Cooler fan 2
- Deutsch 2
- English 2
- Français 2
- Kfcttil 2
- L s î t iui særfflxtél o y w 2
- Lga 775 2
- Scpu7 5 7 7 2
- Sß tv f wftil 2
- Tf klc u14lttts l 2
- Ïïw ttï z tz j ffli y4 l xeisl ctil 2
Похожие устройства
- Sony VAIO VPCF21Z1E Инструкция по эксплуатации
- Garmin Dash Cam 20 Инструкция по эксплуатации
- Scythe Ninja 2 Rev. B Инструкция по эксплуатации
- Samsung UE65HU7200U Инструкция по эксплуатации
- Sony VAIO VPCF13Z8E Инструкция по эксплуатации
- Samsung UE85HU8500T Инструкция по эксплуатации
- Scythe Orochi Инструкция по эксплуатации
- Sony VAIO VPCF13Z1E Инструкция по эксплуатации
- Scythe Mugen Инструкция по эксплуатации
- Supra STV-LC32ST880WL Инструкция по эксплуатации
- Scythe Ninja PLUS Rev. B Инструкция по эксплуатации
- Sony VAIO VPCF13Z0E Инструкция по эксплуатации
- Pioneer PDP-436 SXE Инструкция по эксплуатации
- Sony VAIO VPCF13S8E Инструкция по эксплуатации
- Scythe Kama Angle Rev. B Инструкция по эксплуатации
- Denon DVD-1720 S Инструкция по эксплуатации
- Sony VAIO VPCF23K1E Инструкция по эксплуатации
- Scythe Ninja 2 Инструкция по эксплуатации
- Denon AVR-1906 S Инструкция по эксплуатации
- Sony VAIO VPCF23C5E Инструкция по эксплуатации
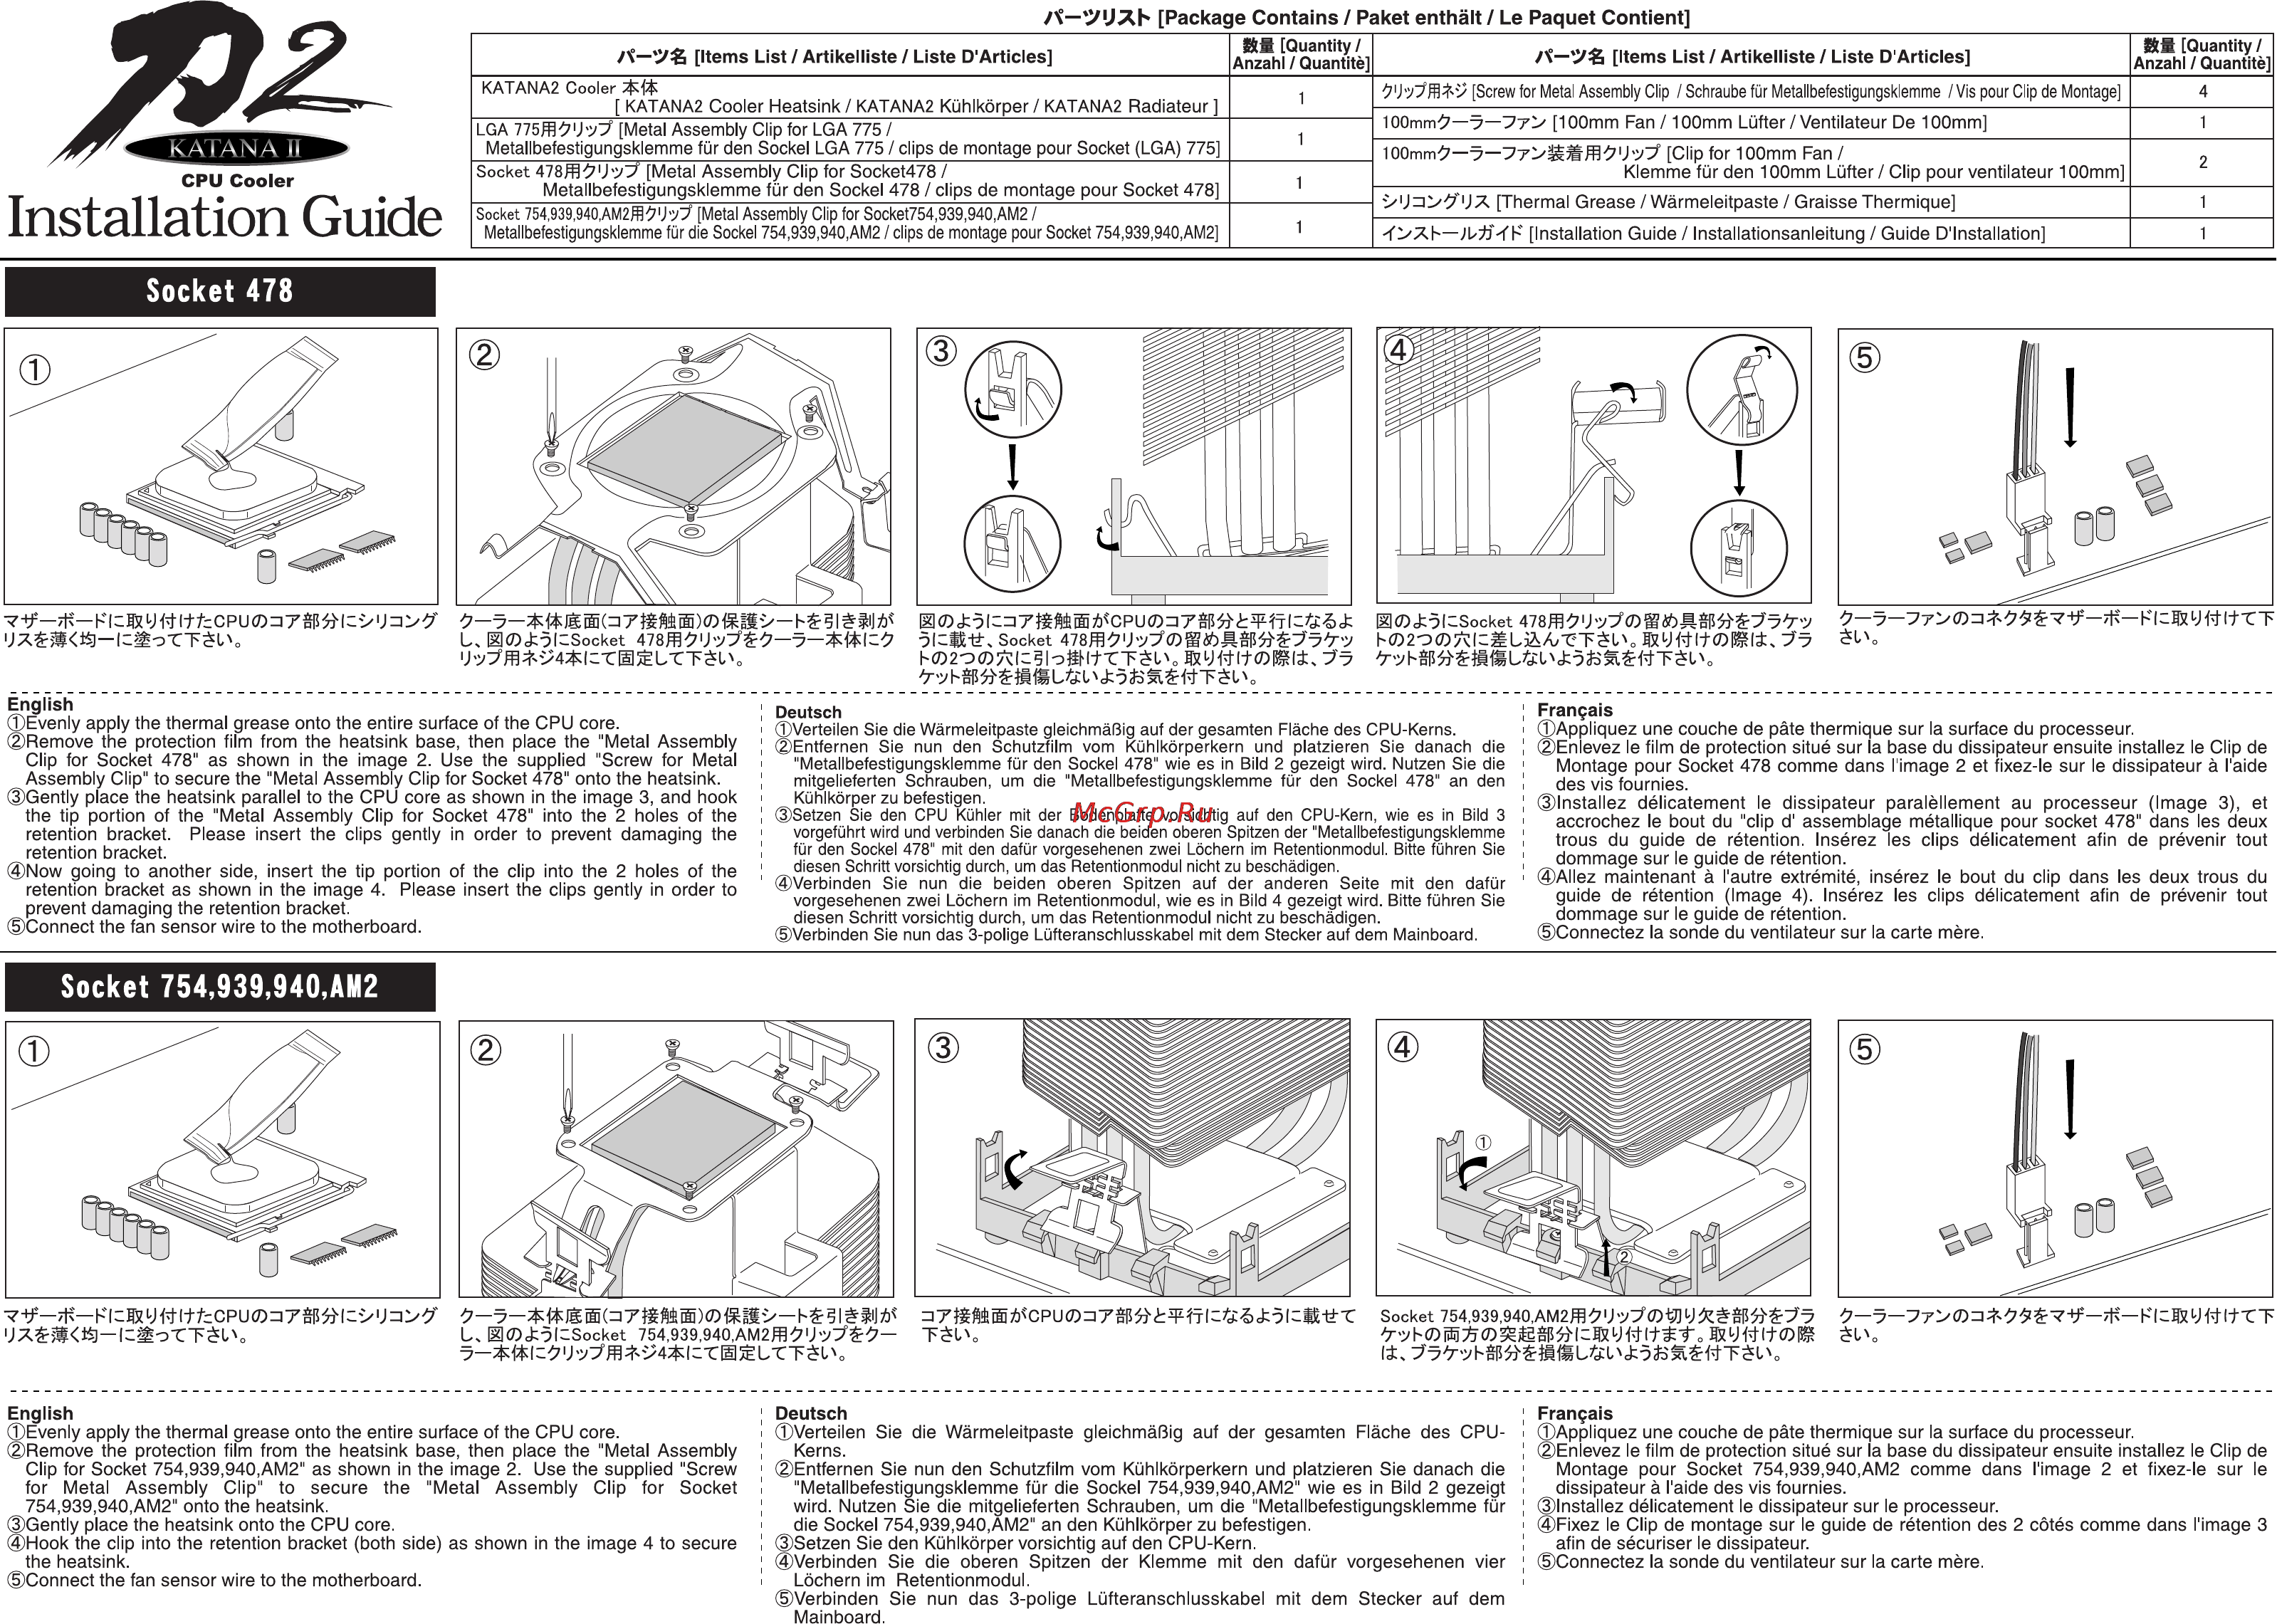
A yjXb Package Contains Paket enthält Le Paquet Contient A Items List Artikelliste Liste D Articles Sis Quantity Anzahl Quantité KATANA2 Cooler KATANA2 Cooler Heatsink KATANA2 Kühlkörper KATANA2 Radiateur CPU Cooler Installation Guide 1 LGA 775 707 Metal Assembly Clip for LG A 775 Metallbefestigungsklemme für den Sockel LGA 775 clips de montage pour Socket LGA 775 Socket 478ffi 7U Metal Assembly Clip for Socket478 Metallbefestigungsklemme für den Sockel 478 clips de montage pour Socket 478 1 Socket 754 939 940 AM2ffl7lJ y Metal Assembly Clip for Socket754 939 940 AM2 Metallbefestigungsklemme für die Sockel 754 939 940 AM2 clips de montage pour Socket 754 939 940 AM2 1 1 Items List Artikelliste Liste D Articles Screw for Métal Assembly Clip Schraube für Metallbefestigungsklemme Vis pour Clip de Montage Slit Quantity Anzahl Quantité 4 100mm 7 7 100mm Fan 100mm Lüfter Ventilateur De 100mm 1 100mm Clip for 100mm Fan 2 Klemme für den 100mm Lüfter Clip pour ventilateur 100mm Thermal Grease Wârmeleitpaste Graisse Thermique OXb Installation Guide Installationsanleitung Guide D Installation 1 1 Socket 478 v W kW Wc C P U O 7 M g 0J ÎC i7fêfeb CPU0 7 tt Socket 478ffi k02O imWo rW 7 U ElO KSocket 478ffi 7iJ 7 7 English Evenly apply the thermal grease onto the entire surface of the CPU core Remove the protection film from the heatsink base then place the Metal Assembly Clip for Socket 478 as shown in the image 2 Use the supplied Screw for Metal Assembly Clip to secure the Metal Assembly Clip for Socket 478 onto the heatsink Gently place the heatsink parallel to the CPU core as shown in the image 3 and hook the tip portion of the Metal Assembly Clip for Socket 478 into the 2 holes of the retention bracket Please insert the clips gently in order to prevent damaging the retention bracket Now going to another side insert the tip portion of the clip into the 2 holes of the retention bracket as shown in the image 4 Please insert the clips gently in order to prevent damaging the retention bracket Connect the fan sensor wire to the motherboard g0 FÖICSocket 478ffi 7lJ V 0 0Mn v y S02 0 ic LÎÀA7rTÉL OWI L T y j h JT vW KtrWrT Ufc l 5dS FtT L V Deutsch Verteilen Sie die Wärmeleitpaste gleichmäßig auf der gesamten Fläche des CPU Kerns Entfernen Sie nun den Schutzfilm vom Kühlkörperkern und platzieren Sie danach die Metallbefestigungsklemme für den Sockel 478 wie es in Bild 2 gezeigt wird Nutzen Sie die mitgelieferten Schrauben um die Metallbefestigungsklemme für den Sockel 478 an den Kühlkörper zu befestigen Setzen Sie den CPU Kühler mit der Bodenplatte vorsichtig auf den CPU Kern wie es in Bild 3 vorgeführt wird und verbinden Sie danach die beiden oberen Spitzen der Metallbefestigungsklemme für den Sockel 478 mit den dafür vorgesehenen zwei Löchern im Retentionmodul Bitte führen Sie diesen Schritt vorsichtig durch um das Retentionmodul nicht zu beschädigen Verbinden Sie nun die beiden oberen Spitzen auf der anderen Seite mit den dafür vorgesehenen zwei Löchern im Retentionmodul wie es in Bild 4 gezeigt wird Bitte führen Sie diesen Schritt vorsichtig durch um das Retentionmodul nicht zu beschädigen Verbinden Sie nun das 3 polige Lüfteranschlusskabel mit dem Stecker auf dem Mainboard Français Appliquez une couche de pâte thermique sur la surface du processeur Enlevez le film de protection situé sur la base du dissipateur ensuite installez le Clip de Montage pour Socket 478 comme dans l image 2 et fixez le sur le dissipateur à l aide des vis fournies Installez délicatement le dissipateur paralèllement au processeur Image 3 et accrochez le bout du clip d assemblage métallique pour socket 478 dans les deux trous du guide de rétention Insérez les clips délicatement afin de prévenir tout dommage sur le guide de rétention Allez maintenant à l autre extrémité insérez le bout du clip dans les deux trous du guide de rétention Image 4 Insérez les clips délicatement afin de prévenir tout dommage sur le guide de rétention Connectez la sonde du ventilateur sur la carte mère Socket 754 939 940 AM2 L El cFÔlCSocket 754 939 940 AM2ffi 7U y 7 English Evenly apply the thermal grease onto the entire surface of the CPU core Remove the protection film from the heatsink base then place the Metal Assembly Clip for Socket 754 939 940 AM2 as shown in the image 2 Use the supplied Screw for Metal Assembly Clip to secure the Metal Assembly Clip for Socket 754 939 940 AM2 onto the heatsink Gently place the heatsink onto the CPU core Hook the clip into the retention bracket both side as shown in the image 4 to secure the heatsink Connect the fan sensor wire to the motherboard Socket 754 939 940 AM2ffl y D y M É 7 TÉLV Deutsch Verteilen Sie die Wärmeleitpaste gleichmäßig auf der gesamten Fläche des CPUKerns Entfernen Sie nun den Schutzfilm vom Kühlkörperkern und platzieren Sie danach die Metallbefestigungsklemme für die Sockel 754 939 940 AM2 wie es in Bild 2 gezeigt wird Nutzen Sie die mitgelieferten Schrauben um die Metallbefestigungsklemme für die Sockel 754 939 940 AM2 an den Kühlkörper zu befestigen Setzen Sie den Kühlkörper vorsichtig auf den CPU Kern Verbinden Sie die oberen Spitzen der Klemme mit den dafür vorgesehenen vier Löchern im Retentionmodul Verbinden Sie nun das 3 polige Lüfteranschlusskabel mit dem Stecker auf dem Mainboard É0O Français Appliquez une couche de pâte thermique sur la surface du processeur Enlevez le film de protection situé sur la base du dissipateur ensuite installez le Clip de Montage pour Socket 754 939 940 AM2 comme dans l image 2 et fixez le sur le dissipateur à l aide des vis fournies Installez délicatement le dissipateur sur le processeur Fixez le Clip de montage sur le guide de rétention des 2 côtés comme dans l image 3 afin de sécuriser le dissipateur Connectez la sonde du ventilateur sur la carte mère