
Thermaltake NiC C5 Инструкция по эксплуатации онлайн
G
G
F
F
D
A
C
A x 1 B x 1
C x 1
D x 4
F x 2
G x 4
Parts List
Install LGA 2011/1366/1155/1156/1150/775 Clip
Installation Preparation
Install Heat-sink
P/N:CLP0608
E x 4
I x 2
J x 4
H x 1
Installation Manual_Intel
1366 1156/1155/1150 775
1
2
©2013 The rmal tak e Tec hnolog y Co. , Lt d. All Ri ghts Res erved.
AE61
www.thermaltake.com
M/B
O
X
3 pin
5
6
8
7
9
10
11
43
B
J
H
Installation Manual_Intel
X
2012.12
E
A
B
C
D
E
F
G
H
I
J
A
B
C
D
E
F
G
H
I
J
A
B
C
D
E
F
G
H
I
J
A
B
C
D
E
F
G
H
I
J
A
B
C
D
E
F
G
H
I
J
A
B
C
D
E
F
G
H
I
J
Application for
LGA 2011 / LGA 1366 / LGA 1155 / 1156 / 1150
LGA 775
Applicable aux processeurs suivants :
LGA 2011 / LGA 1366 / LGA 1155 / 1156 / 1150
LGA 775
Aplicación para
LGA 2011 / LGA 1366 / LGA 1155 / 1156 / 1150
LGA 775
Applicazione per
LGA 2011 / LGA 1366 / LGA 1155 / 1156 / 1150
LGA 775
Aplicação para
LGA 2011 / LGA 1366 / LGA 1155 / 1156 / 1150
LGA 775
Anwendung für
LGA 2011 / LGA 1366 / LGA 1155 / 1156 / 1150
LGA 775
English
Cooler x1
Thermal Grease x1
Back-Plate x1
Long Screws x4
Plastic Spacers x4
Intel Mounting Bars x2
Nuts x4
Mounting Plate x1
AMD Mounting Bars
(allow to change direction) x2
LGA2011 Screws x4
Kühler x1
Thermalpaste x1
Rückplatte x1
Schrauben x4
Plastik-Abstandshalter x4
Intel Befestigungsstangen x2
Mutter x4
Befestigungsplatte x1
AMD Befestigungsleiste
(Richtungsänderung zulassen) x2
LGA2011 Schrauben x4
1 Refroidisseur
1 Pâte thermo-conductible
1 Plaque arrière
4 Vis longues
4 Entretoises en plastique
2 Barres de montage Intel
4 Écrous
1 Plaque de montage
2 Barres de montage AMD
(permettant de changer le sens
de l’installation)
4 Vis pour LGA 2011
1 x refrigerador
1 x lubricante térmico
1 x placa trasera
4 x tornillos largos
4 x separadores de plástico
2 x barras de montaje Intel
4 x tuercas
1 x placa de montaje
2 x barras de montaje AMD
(permiten cambiar de dirección)
4 x tornillos LGA2011
Dissipatore x1
Grasso termico x 1
Piastra posteriore x 1
Viti lunghe x 4
Distanziatori in plastica x 4
Barre di montaggio Intel x 2
Dadi x 4
Piastra di montaggio x 1
Barre di montaggio AMD
(consentono di modificare la direzione) x 2
Viti LGA2011 x4
Refrigerador x1
Massa térmica x1
Placa traseira x1
Parafusos longos x4
Espaçadores de plástico x4
Barras de montagem Intel x2
Porcas x4
Placa de montagem x1
Barras de montagem AMD
(permitem mudar a direcção) x2
Parafusos LGA2011 x4
Parts list :
Liste des pièces:
Lista de piezas: Elenco componenti: Lista de peças:Teileliste:
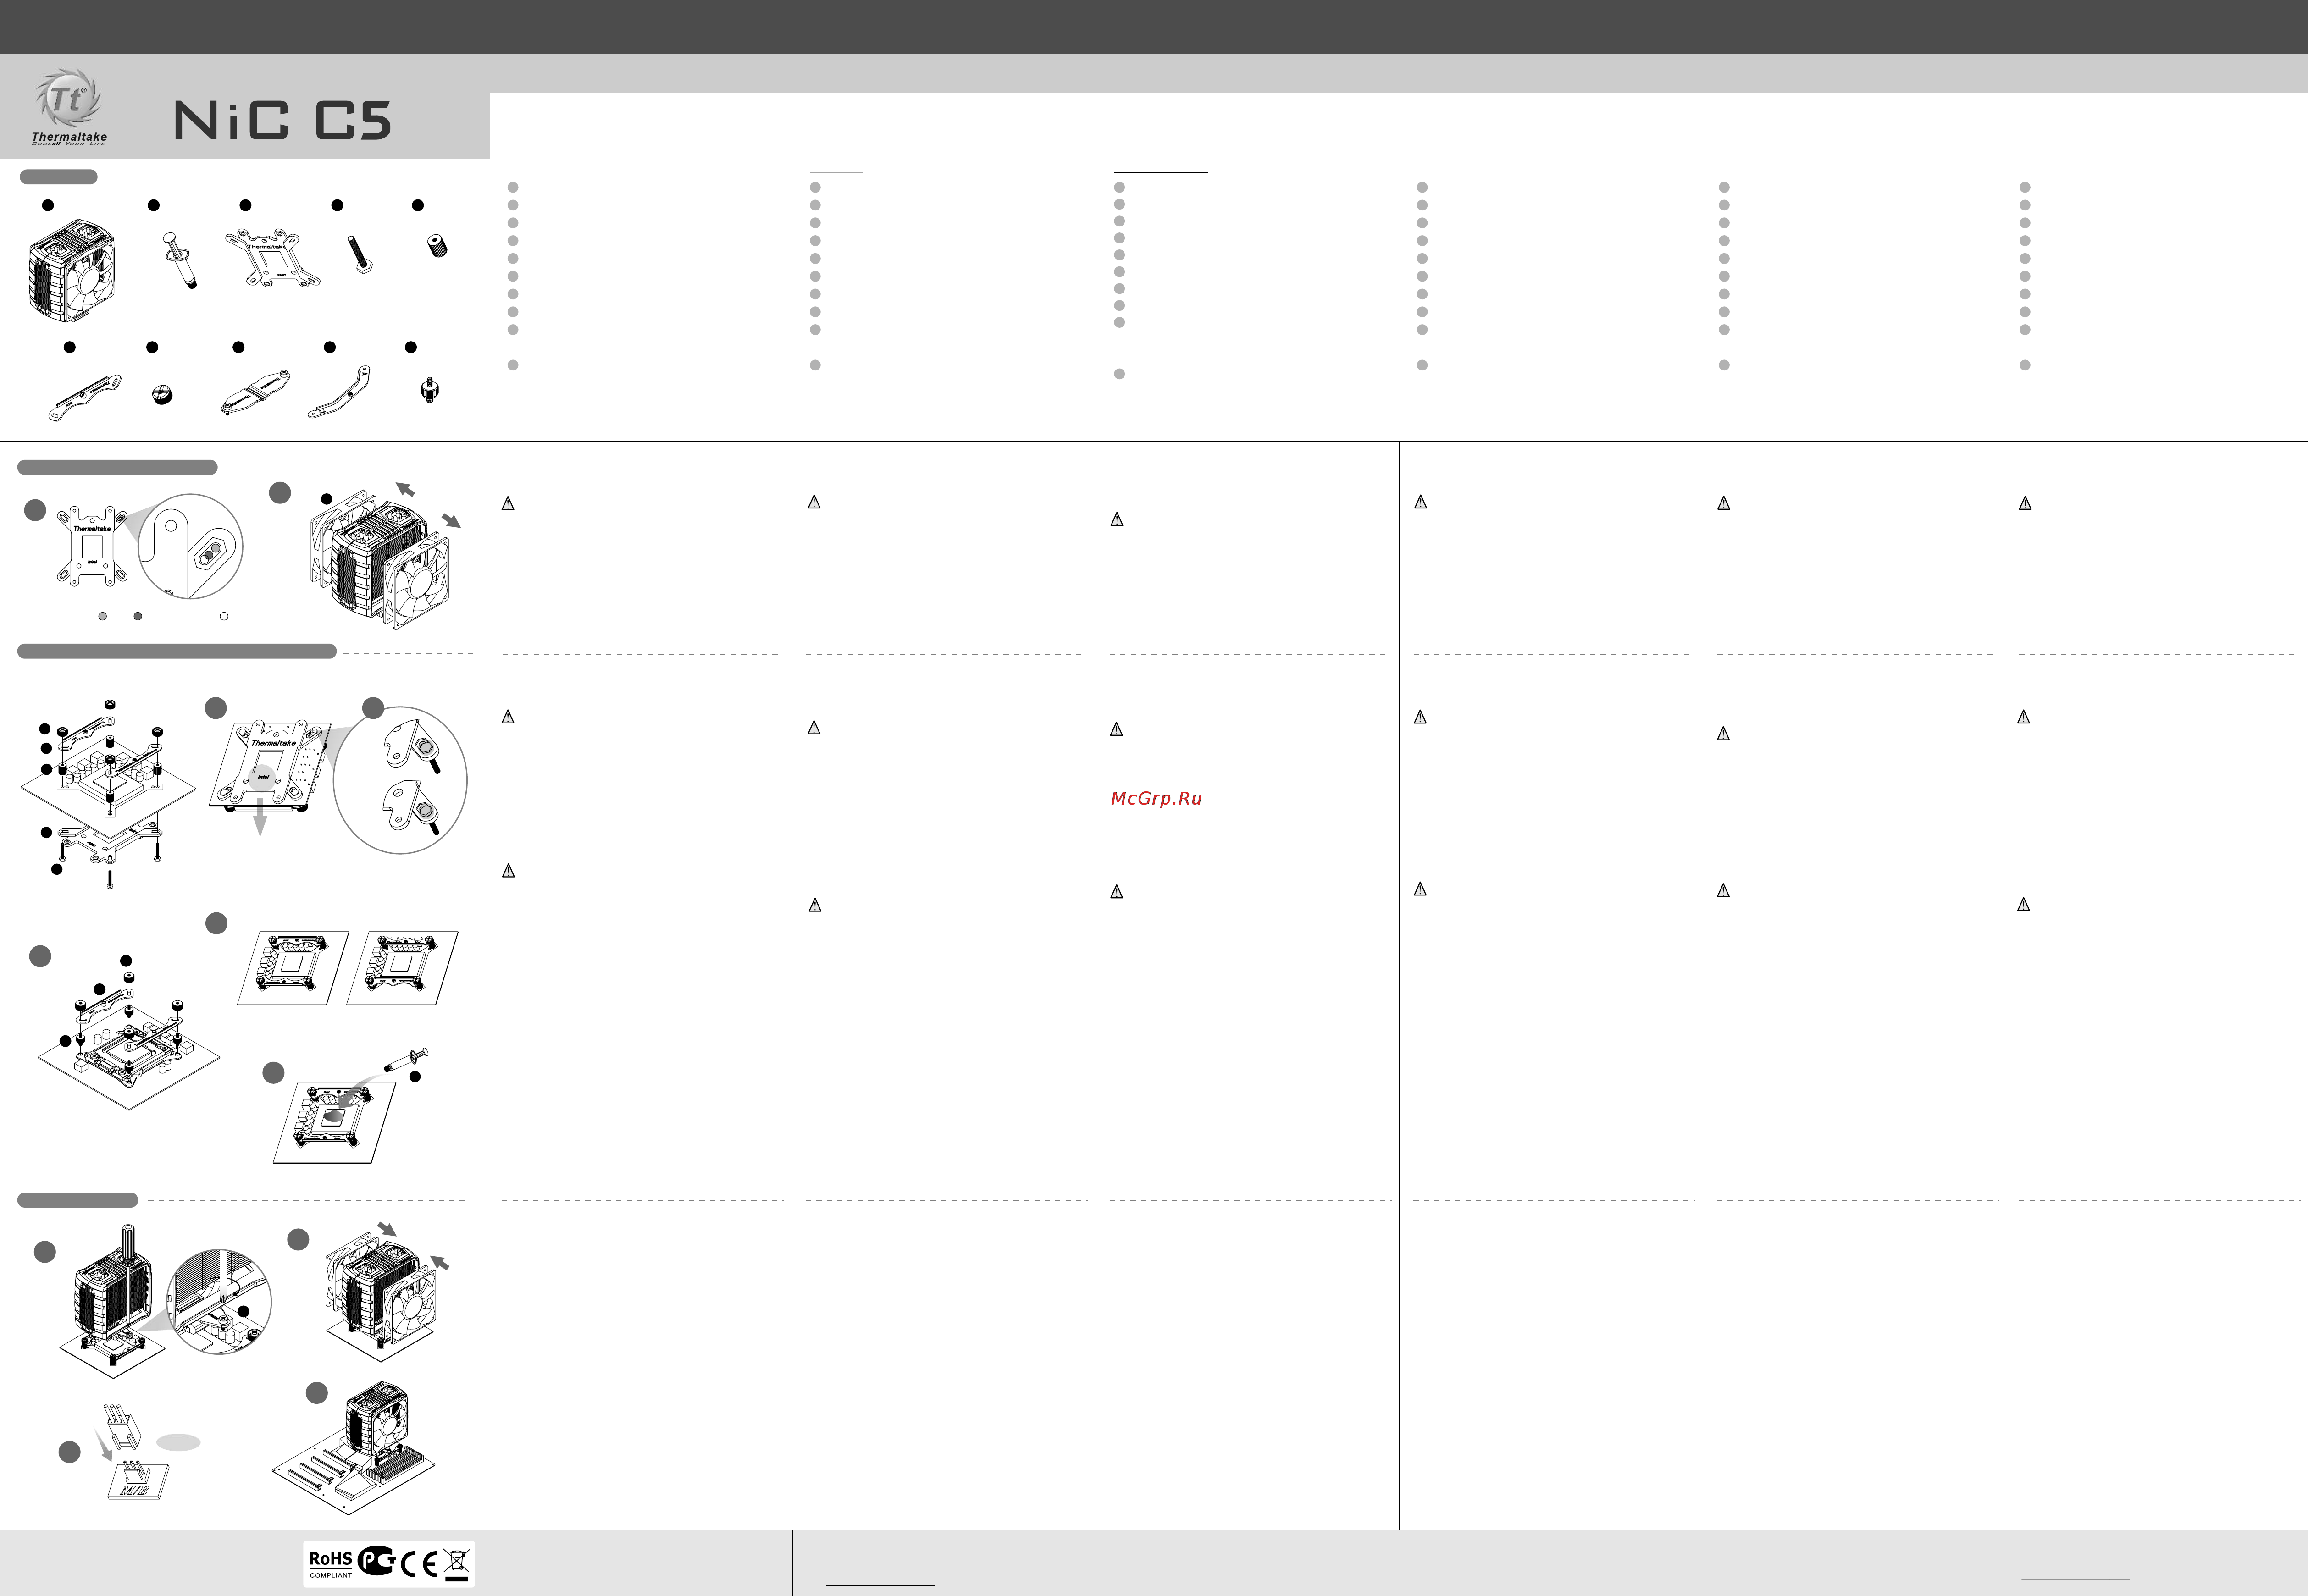
1. Before Installation, please verify the CPU
platform and select the appropriate holes for
your CPU socket.
Note:
If you want to install LGA 2011 CPU, skip this
step.
2. Removing two fans from cooler before
installation
1. Stellen Sie vor der Installation sicher, dass die
CPU-Plattform korrekt ist und wählen Sie die
richtigen Löcher für Ihren CPU-Socket.
Vorsicht:
Wenn Sie eine LGA 2011 CPU installieren
wollen, überspringen Sie diesen Schritt.
2. Entfernen von zwei Lüftern vom Kühler vor dem
Einbau
1. Antes de la instalación, verifique la plataforma
de la CPU y seleccione los orificios
correspondientes para la toma de su CPU.
Precaución:
Si desea instalar la CPU LGA 2011, salte este
paso.
2. Retire los dos ventiladores del refrigerador
antes de la instalación.
1. Antes da Instalação, verifique a plataforma
do CPU e seleccione os orifícios adequados
para a sua socket CPU.
Cuidado:
Se pretender instalar um CPU LGA 2011,
ignore esta etapa.
2. Remova as duas ventoinhas do refrigerador
antes de instalar
1. Prima dell’installazione, controllare la
piattaforma CPU e scegliere i fori appropriati
per la presa CPU.
Attenzione:
Per installare la CPU LGA 2011, saltare questa
procedura.
2. Rimuovere le due ventole dal dissipatore prima
dell’installazione
1. Avant l'installation, veuillez vérifier la
plateforme du processeur et sélectionnez les
orifices correspondant au socket de votre
processeur.
Attention :
Si vous souhaitez installer un processeur LGA
2011, ignorez cette étape.
2. Enlevez les deux ventilateurs du refroidisseur
avant l'installation
3. When you install an Intel CPU, please make sure
that the back-plate (C) side face away from the
motherboard shows the Intel Logo.
Note:
If you want to install LGA 2011 CPU,
go to step 5.
4. Insert the four long screws (D) through the back-
plate into the four holes on the motherboard and
secure them with the four plastic spacers (E)
evenly. Put the two Intel mounting bars (F) along
with the four long screws (D) and secure them
with the four nuts (G)
Note:
Please verify the four long screws are put into
the holes fully.
5. Screwing the LGA 2011 screw (J) onto
motherboard tightly and put the two Intel
mounting bars (F) on the LGA 2011 screws.
Fasten the four nuts (G) onto the mounting bars
tightly.
6. Make sure the curved side of the two mounting
bars face to each other.
7. Apply a thin layer of thermal grease (B) onto the
CPU.
3. Wenn Sie eine Intel-CPU installieren, stellen
Sie bitte sicher, dass die Rückwand (C), die
von der Hauptplatine weg zeigt, das Logo
"Intel" zeigt.
Vorsicht:
Wenn Sie eine LGA 2011 CPU installieren
wollen, gehen Sie zu Schritt 5.
4. Bringen Sie die vier langen Schrauben (D)
durch die Rückwand in die vier Löcher auf dem
Motherboard und und sichern Sie diese
gleichmäßig mit den vier Plastik-
Abstandhaltern (E). Richten Sie die beiden
Intel Befestigungsleisten (F) entlang der vier
langen Schrauben (D) aus und befestigen Sie
sie mit den vier Muttern (G)
Vorsicht:
Bitte überprüfen Sie, dass die vier langen
Schrauben vollständig in den Löchern stecken.
5. Befestigen Sie die LGA 2011 Schraube (J) auf
dem Mainboard und legen Sie die beiden Intel
Befestigungsleisten (F) auf die LGA 2011
Schrauben. Ziehen Sie die vier Muttern (G) auf
den Befestigungsleisten fest.
6. Achten Sie darauf, dass die gewölbte Seite der
beiden Befestigungsleisten sich
gegenüberliegen.
7. Bringen Sie eine dünne Schicht Thermalpaste
(B) die CPU auf.
3. Cuando instale una CPU Intel, asegúrese de
que el logotipo “Intel” de la placa trasera (C)
mira en dirección contraria a la placa base.
Precaución:
Si desea instalar la CPU LGA 2011, vaya al
paso 5.
4. Inserte los cuatro tornillos largos (D) en la
placa trasera en los cuatro orificios de la placa
base y fíjelos firmemente con los cuatro
separadores de plástico (E). Ponga las dos
barras de montaje Intel (F) junto a los cuatro
tornillos largos (D) y fíjelas con las cuatro
tuercas (G).
Precaución:
Verifique que los cuatro tornillos largos están
completamente introducidos en los orificios.
5. Atornille firmemente los tornillos LGA 2011 (J)
en la placa base y coloque las dos barras de
montaje Intel (F) sobre los tornillos LGA 2011.
Apriete firmemente las cuatro tuercas (G)
sobre las barras de montaje.
6. Asegúrese de que los lados curvos de las dos
barras de montaje estén encarados
mutuamente.
7. Aplique una fina capa de lubricante térmico (B)
en la CPU.
3. Quando instala um CPU Intel, certifique-se
que o lado da placa traseira (C) afastado da
motherboard mostra o logótipo "Intel".
Cuidado:
Se pretender instalar um CPU LGA 2011,
avance para a etapa 5.
4. Insira os quatro parafusos longos (D) através
da placa traseira nos quatro orifícios na
motherboard e fixe com os quatro
espaçadores de plástico (E) de forma
uniforme. Coloque as duas barras de
montagem Intel (F) ao longo dos quatro
parafusos longos (D) e fixe com as quatro
porcas (G).
Cuidado:
Verifique se os quatro parafusos longos
estão totalmente inseridos nos orifícios.
5. Aparafuse o parafuso LGA 2011 (J) bem à
motherboard e coloque as duas barras de
montagem Intel (F) nos parafusos LGA 2011.
Aperte bem as quatro porcas (G) às barras de
montagem.
6. Certifique-se que o lado curvado das duas
barras de montagem está virado um para o
outro.
7. Aplique uma camada fina de massa térmica
(B) no CPU.
3. Quand vous installez un processeur Intel,
veuillez vous assurer que le côté de la plaque
arrière (C) qui ne fait pas face à la carte mère
affiche le logo Intel.
Attention :
Si vous souhaitez installer un processeur LGA
2011, passez à l'étape 5.
4. Insérez les quatre vis longues (D) à travers la
plaque arrière dans les quatre orifices sur la
carte mère et fixez-les de façon égale avec les
quatre entretoises en plastique (E).
Positionnez les deux barres de montage (F)
dans les quatre vis longues (D) et fixez-les
avec les quatre écrous (G)
Attention :
Veuillez vérifier que les quatre vis longues
soient complètement enfoncées dans les
orifices.
5. Vissez solidement les vis pour LGA 2011 (J)
sur la carte mère et positionnez les deux
barres de montage Intel (F) sur les vis pour
LGA 2011. Fixez solidement les quatre écrous
(G) sur les barres de montage.
6. Assurez-vous que les côtés courbés des deux
barres de montage soient l'un en face de
l'autre.
7. Appliquez une fine couche de graisse
thermique (B) sur le processeur.
3. Quando si installa una CPU Intel, verificare
che il lato della piastra posteriore (C) rivolto
dalla parte opposta della scheda madre mostri
il logo "Intel".
Attenzione:
Per installare la CPU LGA 2011, saltare la
procedura 5.
4. Inserire le quattro viti lunghe (D) attraverso la
piastra posteriore nei quattro fori sulla scheda
madre e fissarle con i quattro distanziatori in
plastica (E). Posizionare le barre di montaggio
Intel (F) con le quattro viti lunghe (D) e fissarle
con i quattro dadi (G).
Attenzione:
verificare che le viti lunghe siano inserite
completamente nei fori.
5. Avvitare la vite LGA 2011 (J) fermamente sulla
scheda madre e posizionare le due barre di
montaggio Intel (F) sulle viti LGA 2011. Fissare
i quattro dadi (G) fermamente sulle barre di
montaggio.
6. Verificare che i lati curvi delle due barre di
montaggio siano uno di fronte all’altro.
7. Applicare uno strato sottile di grasso termico
(B) sulla CPU.
8. Screw the heat-sink onto the motherboard with
the mounting plate (H) tightly.
9. Place a fan to the fan duct at a slanted angle and
push the top of fan until hearing a “click” sound.
Repeat steps for the other fan.
10. Connect the 3-pin wire to the motherboard’s
CPU fan connector.
11. Installation is done.
8. Schrauben Sie den Kühlkörper auf dem
Motherboard mit der Montageplatte (H) fest.
9. Legen Sie ein Gebläse in einem schrägen
Winkel auf den Lüfterkanal und drücken Sie die
Spitze des Lüfters solange, bisSieein "Klick"-
Geräusch hören. Wiederholen Sie die Schritte
für das andere Gebläse
10. Verbinden Sie das 3-adrige Kabel mit dem
CPU-Ventilatoranschluss auf der Hauptplatine.
11. Die Installation ist beendet.
8. Fije el difusor de calor en la placa madre con la
placa de montaje (H) con fuerza.
9. Coloque un ventilador en el conducto del
ventilador formando un ángulo sesgado y
empuje la parte superior del ventilador hasta
que se escuche un sonido de “click”. Repita los
pasos para el otro ventilador.
10. Conecte el cable de 3 pines al conector del
ventilador de la CPU de la placa base.
11. La instalación está completada.
8. Aparafuse bem o dissipador à motherboard
com a placa de montagem (H).
9. Coloque uma ventoinha na conduta da
ventoinha num ângulo inclinado e empurre a
parte superior da ventoinha até ouvir um
"clique". Repita as etapas para a outra
ventoinha
10. Ligue o cabo de 3 pinos ao conector da
ventoinha do CPU da motherboard.
11. A instalação está terminada.
8. Vissez solidement le dissipateur thermique sur
la carte mère avec la plaque de montage (H).
9. Placez un ventilateur à un angle incliné par
rapport au conduit de ventilation et poussez le
haut du ventilateur jusqu'à entendre un « clic ».
Répétez les étapes pour l'autre ventilateur
10. Branchez le câble à 3 broches sur le
connecteur de ventilateur du processeur de la
carte mère.
11. Installation terminée.
8. Avvitare il dissipatore di calore sulla scheda
madre con la piastra di montaggio (H) in modo
fermo.
9. Posizionare una ventola sull’apposito condotto
ad un angolatura parziale e spingere la parte
superiore della ventola fino a sentire uno
scatto. Ripetere le procedure per l’altra
ventola
10. Collegare il cavo a 3 pin al connettore della
ventola della CPU della scheda madre.
11. L’installazione è completa.
Deutsch
Français
Español
Italiano
Português
Bitte besuchen Sie unsere
Kundendienstabteilung für weitere technische
Unterstützung oder Updates unter
www.thermaltake.com
Veuillez vous reporter à la Partie Support pour
un support technique ou une mise à jour sur
www.thermaltake.com
Le rogamos que visite nuestra Sección de
Soporte para más soporte técnico o
actualizaciones en www.thermaltake.com
Per maggiore assistenza tecnica o
aggiornamenti, visitare la sezione sull’assistenza
all’indirizzo www.thermaltake.com
Visite a nossa Secção de Apoio para obter mais
apoio técnico ou actualizações em
www.thermaltake.com
Please visit our Support Section for more
technical support or update at
www.thermaltake.com
Содержание
Похожие устройства
- Телефон KXT-100LM Инструкция по эксплуатации
- Canon PowerShot SX400IS Red Инструкция по эксплуатации
- Thermaltake NiC F4 Инструкция по эксплуатации
- Телефон KXT-3012LM Инструкция по эксплуатации
- Fujifilm X30 Black Инструкция по эксплуатации
- Thermaltake NiC L31 Инструкция по эксплуатации
- Телефон KXT-9950LM Инструкция по эксплуатации
- Fujifilm X30 Silver Инструкция по эксплуатации
- Thermaltake NiC L32 Инструкция по эксплуатации
- Телефон KXT-920LM Инструкция по эксплуатации
- Sony HDR-PJ620 Black Инструкция по эксплуатации
- Телефон KXT-876LM_R Инструкция по эксплуатации
- Thermaltake Contac 21 Инструкция по эксплуатации
- Texet TR-3003 Инструкция по эксплуатации
- Thermaltake Contac 30 Инструкция по эксплуатации
- Телефон KXT-872LM Инструкция по эксплуатации
- HP Envy 15-j151nr Инструкция по эксплуатации
- Телефон KXT-864LM Инструкция по эксплуатации
- Thermaltake Contac 39 Инструкция по эксплуатации
- Mad Catz V. 7 Инструкция по эксплуатации