
Pulsar IPS5 Инструкция по эксплуатации онлайн
IPS5 shown
BATTERY PACK
IPS5/IPS10
G
v.0517
Description:
Rechargeable batteries Battery Pack IPS5/IPS10 are designed to significantly extend self-contained operating
time of the digital and thermal devices Pulsar (thermal imagers Helion, thermal sights Trail, digital riflescopes
Digisight Ultra etc.)
Package contents:
џ Battery Pack IPS 5 / IPS10 џ Protective cover џ User manual
џ Warranty card
Charging:
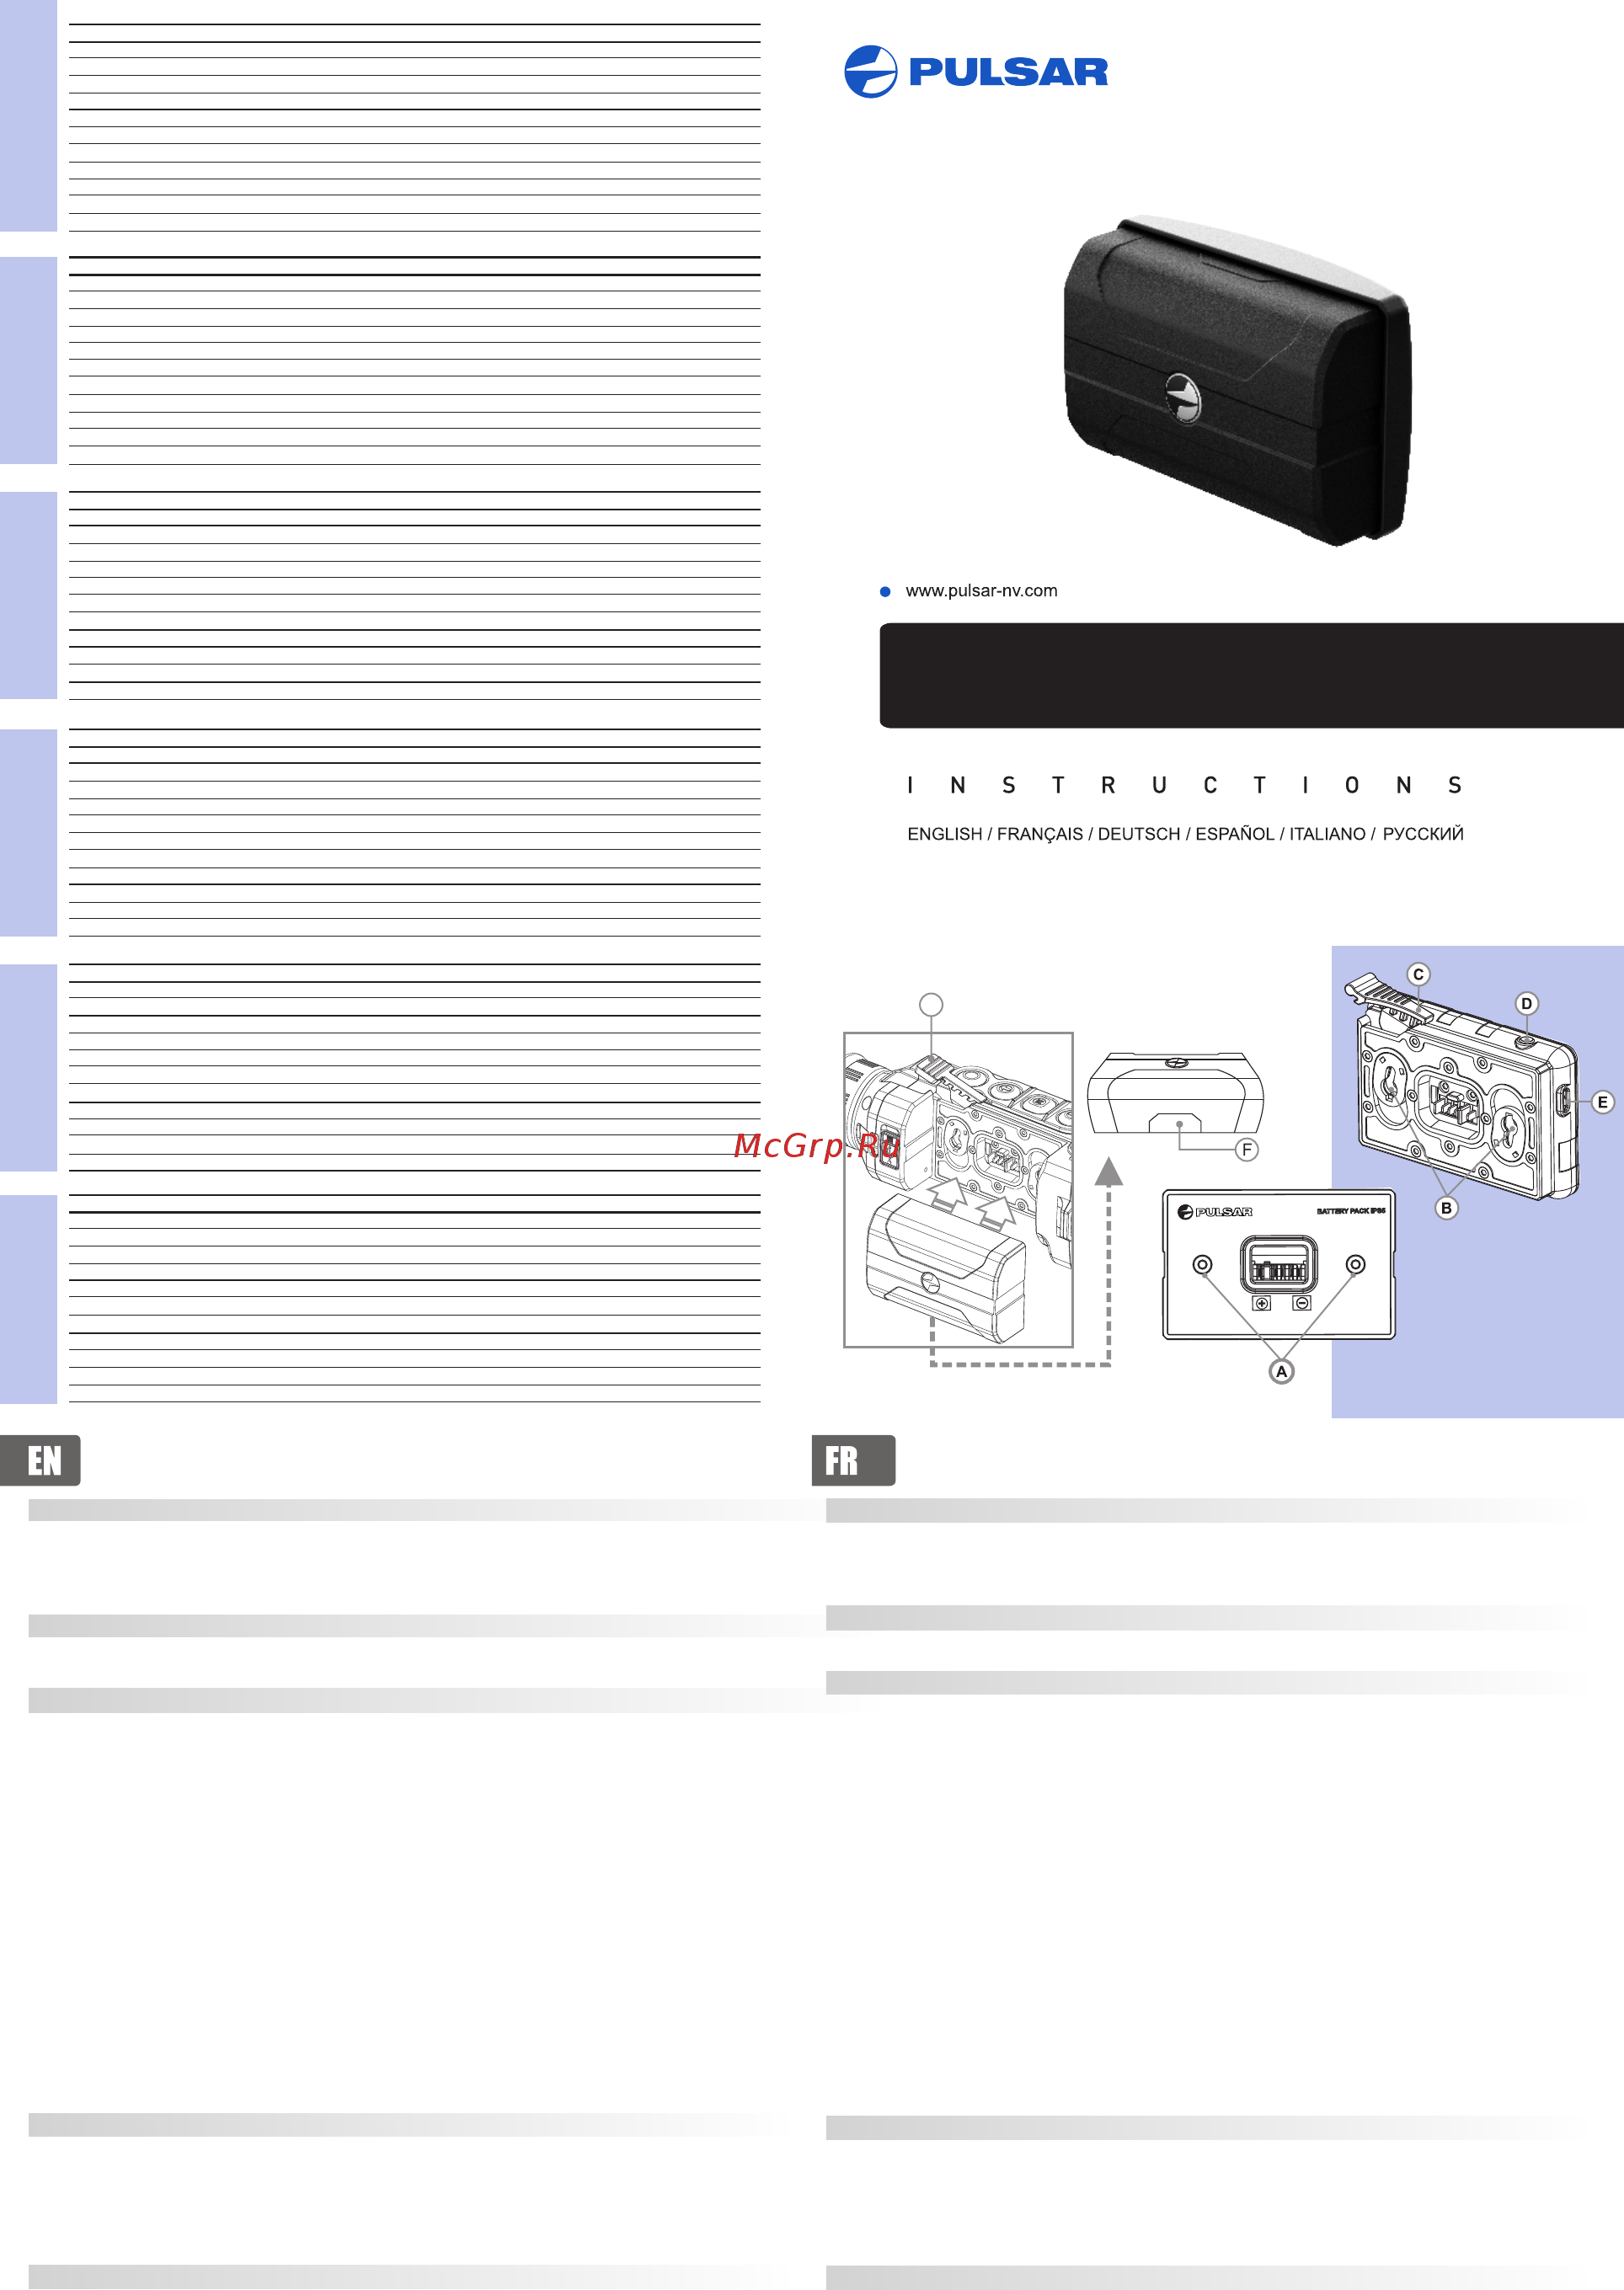
џ Lift the lever (C) of the charger.
џ Remove the protective cover from the Battery Pack.
џ Install the Battery Pack into the charger by inserting the pins (A) of the battery into the grooves (B) of the
charger – the Pulsar logo on the battery Pack should be located closer to the lever; click the lever (C)(see Pic.).
џ Upon installation, a green LED indicator (D) on the charger will start to glow and begin flashing:
- once if the battery charge ranges from 0% to 50%;
- twice if the battery charge ranges from 51% to 75%;
- three times if the battery charge ranges from 75% to 100%;
џ If the indicator glows green continuously, the battery is fully charged.
џ You can remove the battery from the charger by lifting the lever (С).
џ If the indicator of the charger lights red continuously upon battery installation, probably the battery's charge
level is lower than acceptable (the battery has been long in deep discharge). Keep the battery in the charger for
a long time (up to several hours), remove and re-insert it. If the indicator starts blinking green, the battery is
good; if it keeps lighting red it's defective. Do not use the battery!
џ Connect the Micro-USB plug of the USB cable to the port (E) of the charger.
џ Connect the Micro-USB plug to the charger.
џ Insert the plug of the charger (not included) to the 220V socket.
Installing the battery pack into device:
џ Remove the protective cover from the Battery Pack.
џ Lift the lever (G).
џ Install the battery into the dedicated slot on the device housing so that element F (see Pic.) appears from
below.
џ Fix the battery by clicking the lever.
Safety measures:
џ Only use the charger supplied with the Battery Pack. The use of any other charger may irreparably damage the
Battery Pack or the charger and may cause fire.
џ When keeping the battery for a long period, the battery should not be fully charged or fully discharged.
џ Do not charge the battery immediately after bringing the battery from cold environment to a warm one.
Wait for 30-40 minutes for the battery to get warm.
џ Do not leave a battery unattended while charging.
џ Never use a modified or damaged charger.
џ Charge the Battery Pack at a temperature ranging from 0 °C to +45 °C.
џ Otherwise battery's life will decrease significantly.
џ Do not leave the Battery Pack with a charger connected to the mains longer than 24 hours after full charge.
џ Do not expose the battery pack to high temperature or to a naked flame.
џ Do not submerge the battery in water.
џ Do not connect external device with a current consumption that exceeds permitted levels.
џ The Battery Pack is short circuit protected. However, any situation that may cause short-circuiting should be
avoided.
џ Do not dismantle or deform the Battery Pack.
џ Do not drop or hit the battery.
џ When using the battery at negative temperatures, battery's capacity decreases, this is normal and is not a
defect.
џ Do not use the battery at the temperatures above those shown in the table – this may decrease battery's life.
џ Keep the battery out of the reach of children.
Description:
Les batteries rechargeables Battery Pack IPS5/IPS10 sont conçues pour augmenter de manière importante
l'autonomie propre des appareils numériques et thermiques Pulsar (imageurs thermiques Helion, viseurs
thermiques Trail, lunettes digitaux Digisight Ultra, etc.)
Contenus de l'emballage :
џ Bloc batterie IPS 5 / IPS10
џ Couvercle de protection
Charge:
џ Soulevez le levier (C) du chargeur.
џ Enlevez le couvercle de protection sur le bloc batterie.
џ Installez le bloc batterie dans le chargeur en insérant les broches (A) de la batterie dans les rainures (B) du
chargeur. Le logo Pulsar sur le bloc batterie doit être placé plus près du levier; encliquetez le levier (C) (voir
image).
џ Au moment de l'installation, un voyant LED vert (D) sur le chargeur s'allumera et commencera à clignoter :
- Une fois si la charge de la batterie est comprise entre 0 % et 50 %.
- Deux fois si la charge de la batterie est comprise entre 51 % et 75 %.
- Trois fois si la charge de la batterie est comprise entre 75 % et 100 %.
џ Si le voyant s'allume en vert en fixe, la batterie est chargée au maximum.
џ Vous pouvez séparer la batterie du chargeur en soulevant le levier (C).
џ Si l'indicateur du chargeur s'allume en rouge en continu lors de l'installation de la batterie, le niveau de charge
de la batterie est probablement inférieur à l'acceptable (la batterie a été longtemps en décharge profonde).
Conservez la batterie dans le chargeur pendant une longue période (jusqu'à plusieurs heures), enlevez et
réinsérez-la. Si l'indicateur commence à clignoter en vert, la batterie est bonne; si elle continue à s'allumer en
rouge, elle est défectueuse. N'utilisez pas la batterie!
џ Raccordez la prise micro-USB du câble USB au port (E) du chargeur.
џ Raccordez la prise micro-USB au chargeur.
џ Insérez la fiche mâle du chargeur (non incluse) dans la prise femelle 220 V.
Installation du bloc batterie dans l'appareil
џ Enlevez le couvercle de protection sur le bloc batterie.
џ Soulevez le levier (G).
џ Installez la batterie dans la fente spéciale sur le boîtier de l'appareil afin que l'élément F (voir image)
apparaisse par en dessous.
џ Fixez la batterie en encliquetant le levier.
Mesures de sécurité :
џ Utilisez uniquement le chargeur fourni avec le bloc batterie. L'utilisation d'un autre chargeur peut endommager
définitivement le bloc batterie ou le chargeur et peut provoquer un incendie.
џ Lorsque la batterie est stockée pendant une longue période, elle ne doit pas être complètement chargée
ou complètement déchargée.
џ Ne chargez pas immédiatement la batterie après l'avoir amenée depuis un environnement froid vers un
environnement chaud. Attendez 30-40 minutes pour que la batterie se réchauffe.
џ Ne laissez pas une batterie sans surveillance pendant sa charge.
џ N'utilisez jamais un chargeur modifié ou endommagé.
џ Chargez le bloc batterie à une température entre 0 °C et +45 °C.
џ Sinon la durée de vie de la batterie diminuera considérablement.
џ Ne laissez pas le bloc batterie avec un chargeur connecté à l'alimentation secteur pendant plus de 24 heures
après une recharge complète.
џ N'exposez pas le bloc batterie à des températures élevées ou à une flamme nue.
џ N'immergez pas dans l'eau la batterie.
џ Ne connectez pas un appareil extérieur soutirant une intensité supérieure à l'intensité maximum autorisée.
џ Le bloc batterie est protégé contre les court-circuits. Cependant, il faut éviter les situations pouvant provoquer
un court-circuit.
џ Ne démontez pas et ne déformez pas le bloc batterie.
џ Ne laissez pas tomber ou ne heurtez pas la batterie.
џ Lorsque vous utilisez la batterie avec des températures négatives, sa capacité diminue, ceci est normal et n'est
pas un défaut.
џ N'utilisez pas la batterie à des températures supérieures à celles indiquées dans le tableau – ceci pourrait
diminuer la durée de vie de la batterie.
џ Conservez la batterie hors de portée des enfants.
џ Manuel d'utilisation
џ Carte de garantie
IPS5 (79114)
Li-Ion
5000
5
1,3
3,7
4
20
≤ 2
0 … +45 °С / -20 °С… +60 °С
73x47x30
0,13
Модель / SKU
Тип
Емкость, мАч
Напряжение заряда, В
Номин ок заряда, Аальный т
Номинальное напряжение, В
Время полной заряд , ча
Время полного разряда (I=250 мА) (при t=22 °С), час
Рабочий ток разряда, А
Темпер. диапазон заряда/разряда (отн. вл. 60±5%)
Габариты, мм
Вес, кг
IPS10 (79115)
Li-Ion
10000
5
1,3
3,7
8
40
≤ 2
73x47x50
0,24
Modello / SKU
Tipo
Capacità, mAh
Tensione di carica, V
Corrente nominale di carica, А
Tensione nominale, V
Tempo di ricarica completa, ore
Tempo di scarica completa (I=250 mА)(a t=22 °С), ore
Corrente di esercizio di scarica, А
Intervallo di temperatura in carica/scarica (UR 60±5%)
Dimensioni, mm
Peso, kg
IPS5 (79114)
Li-Ion
5000
5
1,3
3,7
4
20
≤ 2
0 … +45 °С / -20 °С… +60 °С
73x47x30
0,13
Modelo / SKU
Tipo
Capacidad, mAh
Tensión de carga, V
Corriente nominal de carga, A
Tensión nominal, V
Tiempo hasta carga total, h
Tiempo hasta descarga total (I=250 mА)(a t=22 °C), h
Corriente de descarga en funcionamiento, A
Rango de temperatura de carga/descarga (HR 60±5%)
Dimensiones, mm
Peso, kg
IPS5 (79114)
Li-Ion
5000
5
1,3
3,7
4
20
≤ 2
0 … +45 °С / -20 °С… +60 °С
73x47x30
0,13
IPS10 (79115)
Li-Ion
10000
5
1,3
3,7
8
40
≤ 2
73x47x50
0,24
Modell / SKU
Typ
Kapazität, mAh
Nennspannung der Aufladung, V
Nennstrom der Aufladung, А
Nennspannung, V
Vollaufladezeit, Std.
Vollentladungszeit (I=250 mА) (bei t=22 °С), Std.
Betriebsstrom der Entladung, А
Temperaturbereich Auf- / Entladung, (relat. Luftfeuchte 60±5%)
Abmessungen, mm
Gewicht, kg
IPS5 (79114)
Li-Ion
5000
5
1,3
3,7
4
20
≤ 2
0 … +45 °С / -20 °С… +60 °С
73x47x30
0,13
IPS10 (79115)
Li-Ion
10000
5
1,3
3,7
8
40
≤ 2
73x47x50
0,24
Modèle / SKU
Type
Capacité, mAh
Tension de charge V
Courant nominal de charge, A
Tension nominale, V
Durée de charge complète, h
Durée de décharge complète (I = 250 mА)(à t=22 °С), h
Courant de charge, A
Plage de températures de charge/décharge (HR 60±5 %)
Dimensions, mm
Poids, kg
IPS5 (79114)
Li-Ion
5000
5
1,3
3,7
4
20
≤ 2
0 … +45 °С / -20 °С… +60 °С
73x47x30
0,13
IPS10 79115)
Li-Ion
10000
5
1,3
3,7
8
40
≤ 2
73x47x50
0,24
Model / SKU
Type
Capacity, mAh
Charge voltage, V
Rated charge current, A
Rated voltage, V
Full charge time, h
Full discharge time (I=250 mА)(at t=22 °С), h
Operating charge current, А
Charge/discharge temperature range (RH 60±5%)
Dimensions, mm / inch
Weight, kg / oz
IPS5 (79114)
Li-Ion
5000
5
1.3
3.7
4
20
≤ 2
0 … +45 °С / -20 °С… +60 °С / 32 °F ... 113 °F / -4 °F...140 °F
73x47x30/2.9x1.7x1.2
0.13 / 4.6
IPS10 (79115)
Li-Ion
10000
5
1.3
3.7
8
40
≤ 2
73x47x50/2.9x1.8x2
0.24 / 8.5
IPS10 (79115)
Li-Ion
10000
5
1,3
3,7
8
40
≤ 2
73x47x50
0,24
SPECIFICHE
ESPECIFICACIONES
TECHNISCHE DATEN
SPÉCIFICATIONS
SPECIFICATIONS
ТЕХНИЧЕСКИЕ ХАРАКТЕРИСТИКИ
Содержание
- Apparaisse par en dessous 1
- Après une recharge complète 1
- Au moment de l installation un voyant led vert d sur le chargeur s allumera et commencera à clignoter une fois si la charge de la batterie est comprise entre 0 et 50 deux fois si la charge de la batterie est comprise entre 51 et 75 trois fois si la charge de la batterie est comprise entre 75 et 100 1
- Avoided 1
- Battery pack 1
- Battery pack ips 5 ips10 1
- Battery pack or the charger and may cause fire 1
- Bloc batterie ips 5 ips10 1
- Carte de garantie 1
- Charge 1
- Charge the battery pack at a temperature ranging from 0 c to 45 c 1
- Charger the pulsar logo on the battery pack should be located closer to the lever click the lever c see pic 1
- Chargeur le logo pulsar sur le bloc batterie doit être placé plus près du levier encliquetez le levier c voir image 1
- Chargez le bloc batterie à une température entre 0 c et 45 c 1
- Charging 1
- Connect the micro usb plug of the usb cable to the port e of the charger 1
- Connect the micro usb plug to the charger 1
- Conservez la batterie hors de portée des enfants 1
- Contenus de l emballage 1
- Couvercle de protection 1
- De la batterie est probablement inférieur à l acceptable la batterie a été longtemps en décharge profonde conservez la batterie dans le chargeur pendant une longue période jusqu à plusieurs heures enlevez et réinsérez la si l indicateur commence à clignoter en vert la batterie est bonne si elle continue à s allumer en rouge elle est défectueuse n utilisez pas la batterie 1
- Defect 1
- Description 1
- Diminuer la durée de vie de la batterie 1
- Do not charge the battery immediately after bringing the battery from cold environment to a warm one 1
- Do not connect external device with a current consumption that exceeds permitted levels 1
- Do not dismantle or deform the battery pack 1
- Do not drop or hit the battery 1
- Do not expose the battery pack to high temperature or to a naked flame 1
- Do not leave a battery unattended while charging 1
- Do not leave the battery pack with a charger connected to the mains longer than 24 hours after full charge 1
- Do not submerge the battery in water 1
- Do not use the battery at the temperatures above those shown in the table this may decrease battery s life 1
- Définitivement le bloc batterie ou le chargeur et peut provoquer un incendie 1
- Enlevez le couvercle de protection sur le bloc batterie 1
- Environnement chaud attendez 30 40 minutes pour que la batterie se réchauffe 1
- Fix the battery by clicking the lever 1
- Fixez la batterie en encliquetant le levier 1
- If the indicator glows green continuously the battery is fully charged 1
- If the indicator of the charger lights red continuously upon battery installation probably the battery s charge 1
- Insert the plug of the charger not included to the 220v socket 1
- Install the battery into the dedicated slot on the device housing so that element f see pic appears from 1
- Install the battery pack into the charger by inserting the pins a of the battery into the grooves b of the 1
- Installation du bloc batterie dans l appareil 1
- Installez la batterie dans la fente spéciale sur le boîtier de l appareil afin que l élément f voir image 1
- Installez le bloc batterie dans le chargeur en insérant les broches a de la batterie dans les rainures b du 1
- Installing the battery pack into device 1
- Insérez la fiche mâle du chargeur non incluse dans la prise femelle 220 v 1
- Ips5 ips10 1
- Keep the battery out of the reach of children 1
- Le bloc batterie est protégé contre les court circuits cependant il faut éviter les situations pouvant provoquer 1
- Les batteries rechargeables battery pack ips5 ips10 sont conçues pour augmenter de manière importante l autonomie propre des appareils numériques et thermiques pulsar imageurs thermiques helion viseurs thermiques trail lunettes digitaux digisight ultra etc 1
- Level is lower than acceptable the battery has been long in deep discharge keep the battery in the charger for a long time up to several hours remove and re insert it if the indicator starts blinking green the battery is good if it keeps lighting red it s defective do not use the battery 1
- Lift the lever c of the charger 1
- Lift the lever g 1
- Lorsque la batterie est stockée pendant une longue période elle ne doit pas être complètement chargée 1
- Lorsque vous utilisez la batterie avec des températures négatives sa capacité diminue ceci est normal et n est 1
- Manuel d utilisation 1
- Mesures de sécurité 1
- N exposez pas le bloc batterie à des températures élevées ou à une flamme nue 1
- N immergez pas dans l eau la batterie 1
- N utilisez jamais un chargeur modifié ou endommagé 1
- N utilisez pas la batterie à des températures supérieures à celles indiquées dans le tableau ceci pourrait 1
- Ne chargez pas immédiatement la batterie après l avoir amenée depuis un environnement froid vers un 1
- Ne connectez pas un appareil extérieur soutirant une intensité supérieure à l intensité maximum autorisée 1
- Ne démontez pas et ne déformez pas le bloc batterie 1
- Ne laissez pas le bloc batterie avec un chargeur connecté à l alimentation secteur pendant plus de 24 heures 1
- Ne laissez pas tomber ou ne heurtez pas la batterie 1
- Ne laissez pas une batterie sans surveillance pendant sa charge 1
- Never use a modified or damaged charger 1
- Only use the charger supplied with the battery pack the use of any other charger may irreparably damage the 1
- Otherwise battery s life will decrease significantly 1
- Ou complètement déchargée 1
- Package contents 1
- Pas un défaut 1
- Protective cover 1
- Raccordez la prise micro usb au chargeur 1
- Raccordez la prise micro usb du câble usb au port e du chargeur 1
- Rechargeable batteries battery pack ips5 ips10 are designed to significantly extend self contained operating time of the digital and thermal devices pulsar thermal imagers helion thermal sights trail digital riflescopes digisight ultra etc 1
- Remove the protective cover from the battery pack 1
- Safety measures 1
- Si l indicateur du chargeur s allume en rouge en continu lors de l installation de la batterie le niveau de charge 1
- Si le voyant s allume en vert en fixe la batterie est chargée au maximum 1
- Sinon la durée de vie de la batterie diminuera considérablement 1
- Soulevez le levier c du chargeur 1
- Soulevez le levier g 1
- The battery pack is short circuit protected however any situation that may cause short circuiting should be 1
- Un court circuit 1
- Upon installation a green led indicator d on the charger will start to glow and begin flashing once if the battery charge ranges from 0 to 50 twice if the battery charge ranges from 51 to 75 three times if the battery charge ranges from 75 to 100 1
- User manual 1
- Utilisez uniquement le chargeur fourni avec le bloc batterie l utilisation d un autre chargeur peut endommager 1
- Vous pouvez séparer la batterie du chargeur en soulevant le levier c 1
- Wait for 30 40 minutes for the battery to get warm 1
- Warranty card 1
- When keeping the battery for a long period the battery should not be fully charged or fully discharged 1
- When using the battery at negative temperatures battery s capacity decreases this is normal and is not a 1
- You can remove the battery from the charger by lifting the lever с 1
- Страница 1 1
- Страница 2 2
Похожие устройства
- Pulsar IPS10 Инструкция по эксплуатации
- Pulsar EPS3I Инструкция по эксплуатации
- Pulsar EPS5 Инструкция по эксплуатации
- Pulsar FN 42 мм Инструкция по эксплуатации
- Pulsar DN 42 мм Инструкция по эксплуатации
- Pulsar FN 50 мм Инструкция по эксплуатации
- Pulsar DN 50 мм Инструкция по эксплуатации
- Pulsar FN 56 мм Инструкция по эксплуатации
- Pulsar DN 56 мм Инструкция по эксплуатации
- Pulsar Weaver QD112 Инструкция по эксплуатации
- Pulsar Dovetail CZ550 Инструкция по эксплуатации
- Pulsar Weaver Инструкция по эксплуатации
- Pulsar Prism 14/200 Инструкция по эксплуатации
- Pulsar Лось Инструкция по эксплуатации
- Pulsar Боковой кронштейн Инструкция по эксплуатации
- Pulsar МАК Инструкция по эксплуатации
- Pulsar NV50 1.5x Инструкция по эксплуатации
- Pulsar NV60 1.5x Инструкция по эксплуатации
- Pulsar Компакт Инструкция по эксплуатации
- Pulsar RCC Инструкция по эксплуатации