Hotpoint-Ariston C3V M57 W RU — инструкция по использованию духовки: советы и рекомендации [7/24]
Содержание
101- C3vm5r
- Cooker and oven
- Care and maintenance 11
- Contents
- Description of the appliance 4
- Installation 2 3
- Operating instructions
- Â ariston
- Start up and use 5 8
- Precautions and tips 10
- Using the glass ceramic hob 9
- Installation
- Ariston
- Control panel
- Button
- Overall view
- O sc sc o
- Indicator light
- Hotplate knobs
- For the sliding racks position 5 position 4 position 3 position 2 position 1
- Description of the appliance
- Adjustable
- Â ariston
- Start up and use
- Starting the oven
- Electronic timer
- Cooking modes
- Ariston
- Temperature
- Minutes
- Fan assisted
- Cooking modes foods weight in kg
- Static
- Recommended
- Preheating time
- Position
- Oven cooking advice table
- Grilled chicken
- Fan assisted double grill
- Double grill
- Cooking
- With the rotisserie
- With multi spit rotisserie
- Â ariston
- Using the glass ceramic hob
- Switching the cooking zones on and off
- Cooking zones
- Respecting and conserving the environment
- Precautions and tips
- General safety
- Disposal
- Cleaning the oven
- Cleaning the glass ceramic hob
- Care and maintenance
- Assistance
- Â ariston
- Switching the appliance off
- Replacing the oven light bulb
- Включение и эксплуатация 16 19
- Руководство по эксплуатации
- Кухонная плита с духовым шкафом
- Описание изделия 15
- Содержание
- Техническое обслуживание и уход 22
- C3vm5r
- Стеклокерамическая варочная панель 20
- Монтаж 13 14
- Предосторожности и рекомендации 21
- 1 ariston
- Электрическое
- Оооооо о
- Расположение и нивелировка
- Й ariston
- Установка
- Подсоединение
- Панель управления
- Общий вид
- Описание изделия
- Й ariston
- Включение духового шкафа
- Включение и эксплуатация
- Электронный таймер
- Программы приготовления
- Й ariston
- Регуляция громкости звукового сигнала
- Таблица приготовления в духовом шкафу
- Й ariston
- Включение и выключение нагревательных зон
- Нагревательные зоны
- Электрическая варочная панель
- Предосторожности и рекомендации
- Экономия электроэнергии и охрана окружающей среды
- Утилизация
- Общие требования к безопасности
- Й ariston
- Замена лампочки в духовом шкафу
- Чистка духового шкафа
- Отключение электропитания
- Чистка стеклокерамическои варочной панели
- Техническое обслуживание и уход
- Техническое обслуживание
Похожие устройства
-
 Aresa AR-4703Инструкция пользователя
 -
 DEXP IRC-3600Руководство пользователя
 -
 DEXP E36-1SLVИнструкция по применению
 -
 DEXP E35-2Руководство по эксплуатации
 -
 DEXP E26-21SLVРуководство по эксплуатации
 -
 DEXP E36-1SLVРуководство по настройке
 -
 DEXP E35-2Инструкция по применению
 -
 DEXP INC-2000BPИнструкция по применению
 -
 DEXP EC50-M04CЭксплуатационная инструкция
 -
 DEXP EC50-M03DGРуководство пользователя
 -
 DEXP 1YLO56CDSИнструкция по работе
 -
DEXP 1YLO56CDWРуководство по использованию
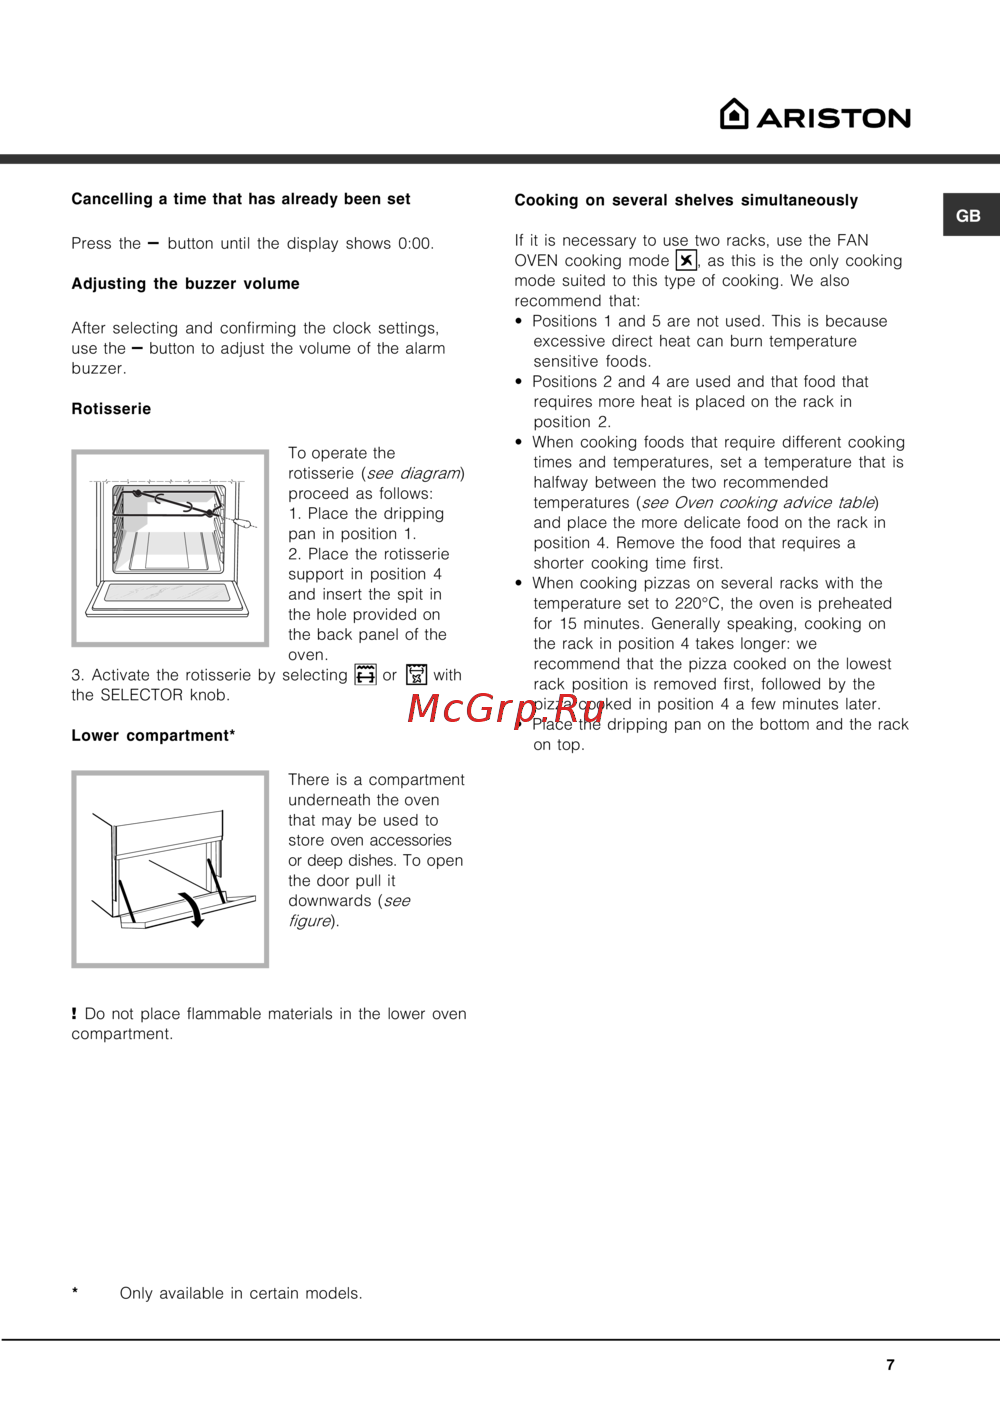
ARISTON Cancelling a time that has already been set Cooking on several shelves simultaneously GB Press the button until the display shows 0 00 Adjusting the buzzer volume After selecting and confirming the clock settings use the button to adjust the volume of the alarm buzzer Rotisserie To operate the rotisserie see diagram proceed as follows 1 Place the dripping pan in position 1 2 Place the rotisserie support in position 4 and insert the spit in the hole provided on the back panel of the oven 3 Activate the rotisserie by selecting or a with the SELECTOR knob Lower compartment If it is necessary to use two racks use the FAN OVEN cooking mode 0 as this is the only cooking mode suited to this type of cooking We also recommend that Positions 1 and 5 are not used This is because excessive direct heat can burn temperature sensitive foods Positions 2 and 4 are used and that food that requires more heat is placed on the rack in position 2 When cooking foods that require different cooking times and temperatures set a temperature that is halfway between the two recommended temperatures see Oven cooking advice table and place the more delicate food on the rack in position 4 Remove the food that requires a shorter cooking time first When cooking pizzas on several racks with the temperature set to 220 C the oven is preheated for 15 minutes Generally speaking cooking on the rack in position 4 takes longer we recommend that the pizza cooked on the lowest rack position is removed first followed by the pizza cooked in position 4 a few minutes later Place the dripping pan on the bottom and the rack on top There is a compartment underneath the oven that may be used to store oven accessories or deep dishes To open the door pull it downwards see figure Do not place flammable materials in the lower oven compartment Only available in certain models 7
Узнайте, как правильно использовать духовку, включая настройки времени, режимы готовки и советы по размещению продуктов для оптимального результата.
