![Hotpoint-Ariston C3V M57 W RU [9/24] Using the glass ceramic hob](/img/pdf.png)
Hotpoint-Ariston C3V M57 W RU [9/24] Using the glass ceramic hob
Содержание
- C3vm5r 1
- Care and maintenance 11 1
- Contents 1
- Cooker and oven 1
- Description of the appliance 4 1
- Installation 2 3 1
- Operating instructions 1
- Precautions and tips 10 1
- Start up and use 5 8 1
- Using the glass ceramic hob 9 1
- Â ariston 1
- Installation 2
- Ariston 3
- Adjustable 4
- Button 4
- Control panel 4
- Description of the appliance 4
- For the sliding racks position 5 position 4 position 3 position 2 position 1 4
- Hotplate knobs 4
- Indicator light 4
- O sc sc o 4
- Overall view 4
- Start up and use 5
- Starting the oven 5
- Â ariston 5
- Cooking modes 6
- Electronic timer 6
- Ariston 7
- Cooking 8
- Cooking modes foods weight in kg 8
- Double grill 8
- Fan assisted 8
- Fan assisted double grill 8
- Grilled chicken 8
- Minutes 8
- Oven cooking advice table 8
- Position 8
- Preheating time 8
- Recommended 8
- Static 8
- Temperature 8
- With multi spit rotisserie 8
- With the rotisserie 8
- Cooking zones 9
- Switching the cooking zones on and off 9
- Using the glass ceramic hob 9
- Â ariston 9
- Disposal 10
- General safety 10
- Precautions and tips 10
- Respecting and conserving the environment 10
- Assistance 11
- Care and maintenance 11
- Cleaning the glass ceramic hob 11
- Cleaning the oven 11
- Replacing the oven light bulb 11
- Switching the appliance off 11
- Â ariston 11
- 1 ariston 12
- C3vm5r 12
- Включение и эксплуатация 16 19 12
- Кухонная плита с духовым шкафом 12
- Монтаж 13 14 12
- Описание изделия 15 12
- Предосторожности и рекомендации 21 12
- Руководство по эксплуатации 12
- Содержание 12
- Стеклокерамическая варочная панель 20 12
- Техническое обслуживание и уход 22 12
- Й ariston 13
- Оооооо о 13
- Подсоединение 13
- Расположение и нивелировка 13
- Установка 13
- Электрическое 13
- Й ariston 15
- Общий вид 15
- Описание изделия 15
- Панель управления 15
- Включение духового шкафа 16
- Включение и эксплуатация 16
- Й ariston 17
- Программы приготовления 17
- Электронный таймер 17
- Регуляция громкости звукового сигнала 18
- Й ariston 19
- Таблица приготовления в духовом шкафу 19
- Включение и выключение нагревательных зон 20
- Нагревательные зоны 20
- Электрическая варочная панель 20
- Й ariston 21
- Общие требования к безопасности 21
- Предосторожности и рекомендации 21
- Утилизация 21
- Экономия электроэнергии и охрана окружающей среды 21
- Замена лампочки в духовом шкафу 22
- Отключение электропитания 22
- Техническое обслуживание 22
- Техническое обслуживание и уход 22
- Чистка духового шкафа 22
- Чистка стеклокерамическои варочной панели 22
Похожие устройства
- Beko WKB 50621 PT Инструкция по эксплуатации
- Inter-M MA-212 Инструкция по эксплуатации
- Bosch PSB 700 RE 0603386465 Инструкция по эксплуатации
- Casio CTK-810 Инструкция по эксплуатации
- Beko WKL 13500 D Инструкция по эксплуатации
- Gorenje GN 51101 IW Инструкция по эксплуатации
- Inter-M PA-920 Инструкция по эксплуатации
- Sturm ID2150I Инструкция по эксплуатации
- Casio CTK-900 Инструкция по эксплуатации
- Beko WKB 61021 PTMA Инструкция по эксплуатации
- Gorenje EGI 440 E Инструкция по эксплуатации
- Mystery MMD-674U Инструкция по эксплуатации
- Bosch GSB 22-2 RCE 0.601.146.761 Инструкция по эксплуатации
- Inter-M PA-935A Инструкция по эксплуатации
- Gorenje GI 62378 BW Инструкция по эксплуатации
- Casio LK-100 Инструкция по эксплуатации
- Beko WKB 61041 PTMC Инструкция по эксплуатации
- Mystery MMD-684U Инструкция по эксплуатации
- Inter-M PA-1000B Инструкция по эксплуатации
- Bosch PSB 650 RA 0603126320 Инструкция по эксплуатации
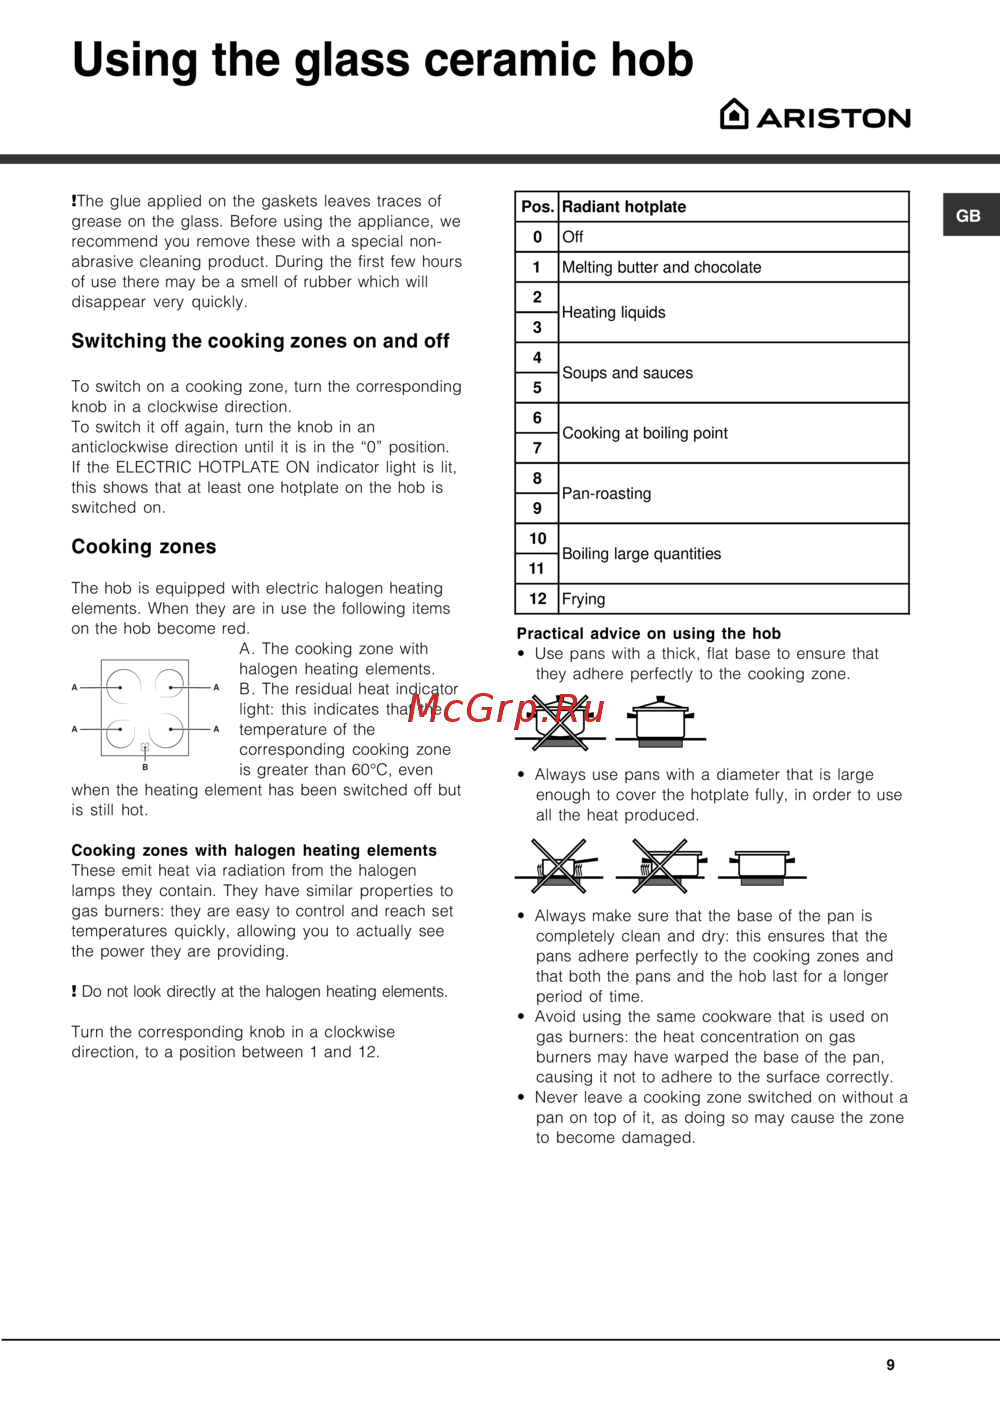
Using the glass ceramic hob â ARISTON The glue applied on the gaskets leaves traces of grease on the glass Before using the appliance we recommend you remove these with a special non abrasive cleaning product During the first few hours of use there may be a smell of rubber which will disappear very quickly Switching the cooking zones on and off Pos Radiant hotplate 0 Off 1 Melting butter and chocolate GB 2 Heating liquids 3 4 To switch on a cooking zone turn the corresponding knob in a clockwise direction To switch it off again turn the knob in an anticlockwise direction until it is in the 0 position If the ELECTRIC HOTPLATE ON indicator light is lit this shows that at least one hotplate on the hob is switched on Cooking zones Soups and sauces 5 6 Cooking at boiling point 7 8 Pan roasting 9 10 Boiling large quantities 11 The hob is equipped with electric halogen heating elements When they are in use the following items on the hob become red A The cooking zone with halogen heating elements B The residual heat indicator light this indicates that the temperature of the corresponding cooking zone is greater than 60 C even when the heating element has been switched off but is still hot Cooking zones with halogen heating elements These emit heat via radiation from the halogen lamps they contain They have similar properties to gas burners they are easy to control and reach set temperatures quickly allowing you to actually see the power they are providing Do not look directly at the halogen heating elements Turn the corresponding knob in a clockwise direction to a position between 1 and 12 12 Frying Practical advice on using the hob Use pans with a thick flat base to ensure that they adhere perfectly to the cooking zone Always use pans with a diameter that is large enough to cover the hotplate fully in order to use all the heat produced Always make sure that the base of the pan is completely clean and dry this ensures that the pans adhere perfectly to the cooking zones and that both the pans and the hob last for a longer period of time Avoid using the same cookware that is used on gas burners the heat concentration on gas burners may have warped the base of the pan causing it not to adhere to the surface correctly Never leave a cooking zone switched on without a pan on top of it as doing so may cause the zone to become damaged 9