![STATUS ALS1021SF — инструкции по эксплуатации пылесосов для работы с электроинструментами [5/22]](/img/pdf.png)
STATUS ALS1021SF — инструкции по эксплуатации пылесосов для работы с электроинструментами [5/22]
![STATUS ALS1021SF [5/22] Страница 5](/views2/1920894/page5/bg5.png)
8
4. OPERATION INSTRUCTIONS
EN
• After you have completed vacuuming and cleaning the appliance, store the acces-
sories in the corresponding holders.
OPERATION INSTRUCTIONS
These electric appliances are supplied from single-phase alternating current mains
only. The vacuum cleaners must be connected to grounded sockets. These electric
appliances are radio suppressed in compliance with EMC Directive 2004/108/EC.
These electric appliances are designed to vacuum the dust generated during
operating power tools. For this purpose they are equipped with a built-in socket (4),
for inserting the cable plug of the power tool. The vacuum cleaner will switch on
automatically as soon as you switch on the power tool.
When you switch off the power tool, the vacuum cleaner will also switch off after a
preset delay.
Prior to initial operation
• Make sure power supply voltage corresponds to the value indicated on the name
plate with technical data of the appliance.
• Make sure the cable and the plug are in order. If the replacement of the supply
cable is necessary, this has to be done by the manufacturer or his agent in order
to avoid a safety hazard.
• It is absolutely necessary for you to read, understand, and observe the section
entitled "Safety instructions for vacuum cleaners".
DRY VACUUM CLEANING
WARNING! Never vacuum up hazardous materials.
WARNING: Wet cleaning with mounted filter elements for dry cleaning is
absolutely forbidden.
If an incorrect dust bag is used, then the guarantee becomes void.
The following filter elements are used for dry cleaning:
а) The sponge filter (17) and the dust bag (18) can be used separately or together.
When they are used together the filtering effectiveness is increased.
b) The HEPA filter (16) and the dust bag (18) can be used separately or together.
When they are used separately the cartridge filter efficiency is much higher than
the dust bag efficiency.
Filter efficiency: HEPA filter - high, Sponge filter - medium, Dust bag - low
• Make sure that the appliance is not plugged into the power supply.
• Ensure that the tank (6) is clean and dry.
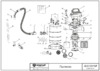
Sponge filter
Place the sponge filter (17) onto the filter basket.
HEPA filter
Place the HEPA filter onto the filter basket (Fig.B) and screw the locking cap
to close the filter basket. After prolonged use the HEPA filter must be cleaned by
tapping and brushing it.
When vacuuming concrete or similar materials generating fine dust, as well as
during automatic mode with power tools, the HEPA filter must be brushed and
dusted off more often. This is an important prerequisite for the reliable operation
and long life of your vacuum cleaner. If you notice that the suction force decreases
or in case you ascertain that the HEPA filter is damaged, you must replace it
immediately with a new one.
9
4. OPERATION INSTRUCTIONS
EN
DUST BAG
Slide the dust bag (18) flange over the hose connection (Fig.C) on the inner side of
the tank. Press it until it snaps firmly into place taking care not to damage the dust
bag.
The use of improper dust bag voids the guarantee.
Check the dust bag (18) regularly and change it when it is 2/3 full.
The bag is designed in such way that only air, and no dust, can pass through the
paper. Therefore a used dust bag may not be reused.
Do not use the dust bag for vacuuming up objects with sharp edges or wet objects.
• Place the upper section on the tank once again and close the clamps.
• Place the large end of the hose on the front air intake stub on the tank.
• Select the desired nozzle or tube; and connect it to the hose.
• Make sure that the ON/OFF switch (3) of the appliance is in "OFF" position «O»
before you insert the power plug into the socket.
• Insert the power plug into the socket.
• Switch the motor on (ON/OFF switch in position «–».
• When you have finished vacuuming, switch the motor off by putting the ON/OFF
switch (3) in „OFF" position «–».
• Unplug the vacuum cleaner.
AUTOMATIC MODE WITH POWER TOOLS
The ON/OFF switch (3) of the vacuum cleaner has 3 positions:
- ON «–»
- OFF «О»
- Operation with power tools «=»
• Unplug the vacuum cleaner from the power supply.
• Open the clamps and remove the upper section.
• Check to make sure that the tank (6) is clean and dry.
• Place the HEPA filter (16) on the filter basket and screw the the locking cap
to close the filter basket. Place the upper section back onto the tank and close the
clamps.
• Set the ON/OFF switch of the power tool you intend to operate to the "OFF"
position «О».
• Connect the vacuum cleaner hose (9) to the dust extraction of the power tool by
means of adapters (14 -15).
• Plug the power tool into the built-in socket (4) of the vacuum cleaner.
• Insert the vacuum cleaner plug into the mains supply socket.
• Set the vacuum cleaner switch (3) to the "ON" position «=».
• Switch on the power tool.
The vacuum cleaner will switch on automatically as soon as you switch on the
power tool. When you switch off the power tool, the vacuum cleaner will also switch
off after a pre-set delay.
WET VACUUM CLEANING
WARNING! Never vacuum up hazardous materials
• Make sure that the appliance is unplugged.
• Check to make sure that the tank (6) is free of dust and dirt.
• The appliance is shipped from the factory with a HEPA filter. Remove the HEPA
filter (16), which is not appropriate for wet vacuum cleaning.
Содержание
- Прахосмукачка за мокро сухо почистване p.1
- Www status tools com p.1
- Wet dry vacuum cleaner p.1
- Nass trockensauger p.1
- Aspiropolvere aspiraliquidi p.1
- Als 1021sf als 1031sf p.1
- Страница 1 p.1
- Пылесос для влажной сухой уборки p.1
- Страница 2 p.2
- Als 1021sf 31sf p.2
- Страница 3 p.3
- Safety instructions p.3
- Introduction p.3
- Страница 4 p.4
- Safety instructions p.4
- Know your product p.4
- Страница 5 p.5
- Operation instructions p.5
- Страница 6 p.6
- Operation instructions p.6
- Maintenance 6 technical specifications p.6
- Ce declaration of conformity p.6
- Страница 7 p.7
- Sicherheitshinweise p.7
- Einleitung p.7
- Страница 8 p.8
- Übersicht der gerätekomponenten p.8
- Sicherheitshinweise p.8
- Страница 9 p.9
- Arbeitshinweise p.9
- Страница 10 p.10
- Zubehör und wartung 5 technische daten p.10
- Konformitätaerklärung p.10
- Страница 11 p.11
- Introduzione p.11
- Avviertenze di sicurezza p.11
- Prima dell uso p.12
- Elementi dell apparecchio p.12
- Страница 12 p.12
- Uso dell aspirapolvere p.12
- Страница 13 p.13
- Uso dell aspirapolvere p.13
- Страница 14 p.14
- Manutenzione p.14
- Dichiarazione ce di conformità p.14
- Caratteristiche techniche p.14
- Страница 15 p.15
- Инструкции за безопасност p.15
- Указания за работа p.16
- Страница 16 p.16
- Специални изискивания за безопасност p.16
- Запознаване с електроуреда p.16
- Указания за работа p.17
- Страница 17 p.17
- Технически данни p.18
- Страница 18 p.18
- Поддръжка p.18
- Декларация за съответствие p.18
- Гаранция забележки p.18
- Страница 19 p.19
- Правила безопасности p.19
- Страница 20 p.20
- Специальные требования безопасности p.20
- Перед началом работы p.20
- Описание p.20
- Страница 21 p.21
- Работа p.21
- Работа p.22
- Производитель оставляет за собой право изменять технические параметры и комплектацию изделия без предварительного уведомления p.22
- Обслуживание p.22
- Технические данные комплектация p.22
- Страница 22 p.22
- Снимите установленный на заводе нера фильтр 17 который не подходит для влажной уборки выньте мешок для пыли 19 если до этого он использовался в пылесосе оденьте фильтр из поролона 18 на выступающую часть корпуса двигателя поставьте крышку обратно на контейнер и закройте фиксаторы вставьте штуцер шланга в патрубок контейнера возьмите необходимый наконечник 12 13 14 или трубу 11 и соедините его со шлангом 9 убедитесь в том что выключатель 3 пылесоса установлен в положение o выключен перед тем как вставить вилку шнура в электрическую розетку вставьте вилку шнура в электрическую розетку выключатель 2 установите в положение чтобы включить пылесос по завершении влажной уборки выключите пылесос переведя выключатель 3 в положение o выключен выньте вилку сетевого шнура из электрической розетки по завершении работы содержимое воду из контейнера необходимо слить и почистить контейнер 6 p.22
- Рекомендация если необходимо всосать большое количество жидкости из раковины или резервуара не погружайте наконечник в жидкость полностью а оставьте часть наконечника снаружи чтобы обеспечивать частичное всасывание воздуха пылесос снабжен предохранительным поплавком который выключает пылесос при заполнении контейнера жидкостью понять что всасывание прекратилось можно по увеличению скорости вращения электродвигателя в этом случае выключите пылесос и выньте вилку сетевого шнура из розетки необходимо учитывать что наполненный жидкостью контейнер может оказаться слишком тяжелым отверните пробку сливного отверстия 8 als1031sf и слейте собранную жидкость в подходящий сосуд или канализацию заверните обратно пробку сливного отверстия после чего работу можно продолжить после завершения влажной уборки выключите пылесос и отключите его от сети контейнер следует опорожнить почистить и высушить снаружи и внутри перед тем как оставить для будущего использования важно после влажной уборки перед тем к p.22
Похожие устройства
-
 STATUS ALS1021SFСхема
 -
 STATUS ALS1031SFИнструкция
 -
 STATUS ALS1031SFСхема
 -
 STATUS ALS1060SF-2MСхема
 -
 STATUS ALS1060SF-2MИнструкция
 -
 Finepower AFP-1425Инструкция по применению
 -
Finepower AFP-1220Руководство по настройке
-
 Finepower AFP-1425Инструкция к устройству
 -
Finepower AFP-1220Руководство пользователя
-
 Fein Dustex 35 MXИнструкция
 -
Fein Dustex 35 MX ACИнструкция
-
 Fein ASBS 18-10 ASИнструкция по эксплуатации
Узнайте, как правильно использовать пылесосы для удаления пыли от электроинструментов. Следуйте инструкциям по безопасности и обслуживанию для эффективной работы.