![Cme NeoSynth 24 — управление эффектами реверберации и хоруса для звука [25/59]](/img/pdf.png)
Cme NeoSynth 24 — управление эффектами реверберации и хоруса для звука [25/59]
![Cme NeoSynth 24 Руководство по эксплуатации онлайн [25/59] 760483](/views2/1992198/page25/bg19.png)
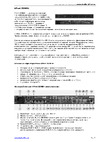
Reverb – time control
This knob controls the time of the reverb tail. Low settings have a short reverb tail, high settings make a
long reverb tail.
Reverb – delay control
This knob controls the delay time for the reverb types 6 and 7.
C
HORUS
In simple terms the chorus effect thickens a sound by adding a slightly changed copy of the orginal to the
original. The change is in the pitch of the copy. Because it is very little difference, our ears do not perceive
the sound as out of tune. Parameters like delay and pitch modulation will add to this effect. Extreme set-
tings can create real different sounds though.
Chorus – main level control
This knob controls the amount of chorus signal going to the main outputs.
Chorus – aux level control
This knob controls the amount of chorus signal going to the aux outputs.
Chorus – chorus into reverb level control
This knob controls the amount of chorus signal going back into the reverb effect.
Chorus – type control
This knob sets the type of chorus. There are 8 different types.
0. Chorus 1
1. Chorus 2
2. Chorus 3
3. Chorus 4
4. Feedback
5. Flanger
6. Short delay
7. Feedback delay
Chorus – pre-low pass filter control
This knob controls the cutoff frequency of the signal that is going into the chorus effect.
Chorus – delay control
This knob controls the delay time
Chorus – feedback control
This knob sets the amount of chorus signal that is fed back into the chorus effect.
25
Содержание
- Neosynth p.1
- User manual p.1
- Special messages section p.2
- Fcc information u s a p.4
- The patch editor software 13 p.5
- The neosynth features 39 p.5
- Table of contents p.5
- Neosynth inputs and outputs 9 p.5
- Midi implementation of the neosynth 40 p.5
- Introduction 6 p.5
- Installing the neosynth expansion board into your cme keyboard 8 p.5
- General 12 p.5
- Terminology p.6
- Introduction p.6
- What s in the box p.6
- Installing the neosynth expansion board into your cmevx or uf keyboard p.8
- Installing the neosynth expansion board into your cme keyboard p.8
- Neosynth inputs and outputs p.9
- Connections p.9
- Usb midi driver p.12
- Sound bank upgrade p.12
- Leds behaviour p.12
- General p.12
- The patch editor software p.13
- Preference screen p.14
- Routing screen p.16
- Inputs fx screen p.19
- Synth fx screen p.23
- Synth channels a screen p.28
- Synth channels b screen p.29
- Synth channels c screen p.31
- Sound bank screen p.33
- The menu items of the patch editor p.35
- The neosynth features p.39
- Midi implementation of the neosynth p.40
- Inputs see paragraph 1 for details p.40
- General p.40
- Outputs settings see paragraph 1 3 for details p.41
- Nrpn 03756h input modules on off p.42
- Nrpn 03755h effects on off p.42
- Midi output on 4 outputs p.42
- Table 4 input equalizer p.44
- Table 3 input volume and pan p.44
- Table 5 input delay p.47
- Delay presets p.48
- Table 6 midi equalizer p.49
- Table 7 midi spatializer p.50
- 4 midi spatializer p.50
- Detailed midi implementation p.51
- Control messages overview p.57
Похожие устройства
-
 AUDIENT EVO 4Руководство по настройке
 -
 AUDIENT iD4 mkIIРуководство по эксплуатации
 -
 Maono E2 Gen2Инструкция пользователя
 -
 Madboy REMIX-31Инструкция по применению
 -
 AUDIENT iD14Руководство по настройке
 -
 JBL CHARGE 5Руководство по работе с устройством
 -
 EUROSOUND Crisp-16XРуководство по использованию
 -
 ALLEN & HEATH XONE:K2Руководство по работе с устройством
 -
 Novation LAUNCHKEY 61Руководство по настройке
 -
 SUPERLUX E431UРуководство по настройке
 -
 APart MICPAT-4Инструкция по работе
 -
 Mooer STEEP IIРуководство пользователя
Изучите управление эффектами реверберации и хоруса. Узнайте, как регулировать время реверберации, уровень сигнала и типы эффектов для создания уникального звучания.