![Cme NeoSynth 24 — установка и подключение расширительной платы для синтезатора [9/59]](/img/pdf.png)
Cme NeoSynth 24 — установка и подключение расширительной платы для синтезатора [9/59]
![Cme NeoSynth 24 [9/59] Neosynth inputs and outputs](/views2/1992198/page9/bg9.png)
Step 3:
Gently insert the Neosynth expansion board into the VX or UF keyboard and place the 4 respectively 5
screws to tighten the Neosynth expansion board.
Step 4:
The quickest way to be able to make sure your Neosynth is installed correctly is to plug in a headphone
in the NeoSynth’s headphones output and play the demo on your VX or UF keyboard (see the respective
VX or UF keyboard manual how to do that. On the VX press the expansion link button).
Another way is to attach one or two audio cables from your Neosynth to your DAW, computer or ampli-
fier to be able to hear the synth.
Attach a USB cable from your Neosynth to your computer to be able to edit instruments etc. with the pro-
vided patch editor software.
Step 5:
Power on the VX or UF keyboard. While doing that watch the back of the keyboard and see if the two leds
on the Neosynth expansion board lit up (one yellow and one red one should go on for a few seconds and
then go off again). When a USB cable is connected to your computer the red led will burn.
For more information about selecting the NeoSynth and choosing the various sounds please read the
manual provided with your VX/UF keyboard.
By now it should be possible to play and hear the sounds of the Neosynth.
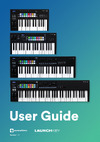
NeoSynth inputs and outputs
Connections
The Neosynth expansion board has several connection possibilities to increase the use in all kinds of set-
tings (Grey NeoSynth: UF version, Red NeoSynth: VX version).
From left to right:
9
Содержание
- Neosynth p.1
- User manual p.1
- Special messages section p.2
- Fcc information u s a p.4
- The patch editor software 13 p.5
- The neosynth features 39 p.5
- Table of contents p.5
- Neosynth inputs and outputs 9 p.5
- Midi implementation of the neosynth 40 p.5
- Introduction 6 p.5
- Installing the neosynth expansion board into your cme keyboard 8 p.5
- General 12 p.5
- Terminology p.6
- Introduction p.6
- What s in the box p.6
- Installing the neosynth expansion board into your cmevx or uf keyboard p.8
- Installing the neosynth expansion board into your cme keyboard p.8
- Neosynth inputs and outputs p.9
- Connections p.9
- Usb midi driver p.12
- Sound bank upgrade p.12
- Leds behaviour p.12
- General p.12
- The patch editor software p.13
- Preference screen p.14
- Routing screen p.16
- Inputs fx screen p.19
- Synth fx screen p.23
- Synth channels a screen p.28
- Synth channels b screen p.29
- Synth channels c screen p.31
- Sound bank screen p.33
- The menu items of the patch editor p.35
- The neosynth features p.39
- Midi implementation of the neosynth p.40
- Inputs see paragraph 1 for details p.40
- General p.40
- Outputs settings see paragraph 1 3 for details p.41
- Nrpn 03756h input modules on off p.42
- Nrpn 03755h effects on off p.42
- Midi output on 4 outputs p.42
- Table 4 input equalizer p.44
- Table 3 input volume and pan p.44
- Table 5 input delay p.47
- Delay presets p.48
- Table 6 midi equalizer p.49
- Table 7 midi spatializer p.50
- 4 midi spatializer p.50
- Detailed midi implementation p.51
- Control messages overview p.57
Похожие устройства
-
 AUDIENT EVO 4Руководство по настройке
 -
 AUDIENT iD4 mkIIРуководство по эксплуатации
 -
 Maono E2 Gen2Инструкция пользователя
 -
 Madboy REMIX-31Инструкция по применению
 -
 AUDIENT iD14Руководство по настройке
 -
 JBL CHARGE 5Руководство по работе с устройством
 -
 EUROSOUND Crisp-16XРуководство по использованию
 -
 ALLEN & HEATH XONE:K2Руководство по работе с устройством
 -
 Novation LAUNCHKEY 61Руководство по настройке
 -
 SUPERLUX E431UРуководство по настройке
 -
 APart MICPAT-4Инструкция по работе
 -
 Mooer STEEP IIРуководство пользователя
Подробное руководство по установке расширительной платы синтезатора. Узнайте, как подключить устройство, проверить работу и использовать его с вашим оборудованием.