![Cme NeoSynth 24 — установка расширяющей платы в MIDI-клавиатуру: пошаговое руководство [8/59]](/img/pdf.png)
Cme NeoSynth 24 — установка расширяющей платы в MIDI-клавиатуру: пошаговое руководство [8/59]
![Cme NeoSynth 24 [8/59] Installing the neosynth expansion board into your cmevx or uf keyboard](/views2/1992198/page8/bg8.png)
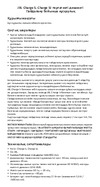
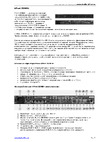
Installing the Neosynth expansion board into your CME VX or UF keyboard
First of all, be sure to unplug the power plug and USB cable from your keyboard to avoid electrical short-
cuts during installation.
Also be sure to ground yourself to avoid static electricity which could damage your NeoSynth expansion
board. Do not touch electronic parts of the expansion board either since this can damage the expansion
card as well.
Step 1:
Unscrew the metal plate on your VX or UF keyboard on the back. The plate is holded by 4 screws on the
VX keyboard and 5 screws on the UF keyboard ( next three pictures shows the VX version).
Step 2:
Locate the power/communication connector that should be connected to the Neosynth expansion board
(1 connector on the VX keyboard, 2 smaller connectors on the UF keyboard).
Connectors feature a mounting direction, the right direction must be respected, no force must be applied
while inserting the connector(s).
8
Содержание
- Neosynth p.1
- User manual p.1
- Special messages section p.2
- Fcc information u s a p.4
- The patch editor software 13 p.5
- The neosynth features 39 p.5
- Table of contents p.5
- Neosynth inputs and outputs 9 p.5
- Midi implementation of the neosynth 40 p.5
- Introduction 6 p.5
- Installing the neosynth expansion board into your cme keyboard 8 p.5
- General 12 p.5
- Terminology p.6
- Introduction p.6
- What s in the box p.6
- Installing the neosynth expansion board into your cmevx or uf keyboard p.8
- Installing the neosynth expansion board into your cme keyboard p.8
- Neosynth inputs and outputs p.9
- Connections p.9
- Usb midi driver p.12
- Sound bank upgrade p.12
- Leds behaviour p.12
- General p.12
- The patch editor software p.13
- Preference screen p.14
- Routing screen p.16
- Inputs fx screen p.19
- Synth fx screen p.23
- Synth channels a screen p.28
- Synth channels b screen p.29
- Synth channels c screen p.31
- Sound bank screen p.33
- The menu items of the patch editor p.35
- The neosynth features p.39
- Midi implementation of the neosynth p.40
- Inputs see paragraph 1 for details p.40
- General p.40
- Outputs settings see paragraph 1 3 for details p.41
- Nrpn 03756h input modules on off p.42
- Nrpn 03755h effects on off p.42
- Midi output on 4 outputs p.42
- Table 4 input equalizer p.44
- Table 3 input volume and pan p.44
- Table 5 input delay p.47
- Delay presets p.48
- Table 6 midi equalizer p.49
- Table 7 midi spatializer p.50
- 4 midi spatializer p.50
- Detailed midi implementation p.51
- Control messages overview p.57
Похожие устройства
-
 AUDIENT EVO 4Руководство по настройке
 -
 AUDIENT iD4 mkIIРуководство по эксплуатации
 -
 Maono E2 Gen2Инструкция пользователя
 -
 Madboy REMIX-31Инструкция по применению
 -
 AUDIENT iD14Руководство по настройке
 -
 JBL CHARGE 5Руководство по работе с устройством
 -
 EUROSOUND Crisp-16XРуководство по использованию
 -
 ALLEN & HEATH XONE:K2Руководство по работе с устройством
 -
 Novation LAUNCHKEY 61Руководство по настройке
 -
 SUPERLUX E431UРуководство по настройке
 -
 APart MICPAT-4Инструкция по работе
 -
 Mooer STEEP IIРуководство пользователя
Узнайте, как правильно установить расширяющую плату в вашу MIDI-клавиатуру. Следуйте пошаговым инструкциям для безопасной установки и подключения.