![Asus x99-a/usb 3.1 — инструкция по обновлению BIOS в графическом интерфейсе [141/148]](/img/pdf.png)
Asus x99-a/usb 3.1 — инструкция по обновлению BIOS в графическом интерфейсе [141/148]
![Asus x99-a/usb 3.1 [141/148] Yes no](/views2/1161776/page141/bg8d.png)
ASUS X99-A/USB 3.1
3-65
Chapter 3
Updating in GUI environment:
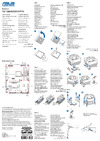
1. On the FreeDOS prompt, type bupdater /g and press <Enter>.
D:/> bupdater /pc /g
2. On the BIOS Updater screen, press <Tab> to switch from Files panel to Drives panel
then select D:.
ASUSTeK BIOS Updater for DOS V1.30 [2014/01/01]
Current ROM
BOARD: X99-A/USB 3.1
VER: 0211 (H :00 B :00)
DATE: 07/31/2014
Update ROM
BOARD: Unknown
VER: Unknown
DATE: Unknown
PATH: C:\
C:
D:
FORMAN~1 <DIR>
X99A.CAP 8390626 2014-07-31 21:14:34
Note
[Enter] Select or Load [Tab] Switch [V] Drive Info
[Up/Down/Home/End] Move [Esc] Exit
Files panelDrives panel
3. Press <Tab> to switch from Drives panel to Files panel then press <Up/Down> or
<Home/End> keys to select the BIOS le and press <Enter>.
4. After the BIOS Updater checks the selected BIOS le, select Yes to conrm the BIOS
update.
Are you sure you want to update the BIOS?
Yes No
The BIOS Backup feature is not supported due to security regulations.
2. BIOS Updater will automatically check the selected BIOS le and enter ASUS EZ Flash
2 Updater to continue the BIOS update process.
3. When BIOS update is done, select OK or press <Enter> to restart your computer.
Содержание
- E9932 first edition january 2015 p.2
- Chapter 2 basic installation p.3
- Chapter 1 product introduction p.3
- Contents p.3
- Chapter 3 bios setup p.4
- Appendices p.4
- Safety information p.5
- Operation safety p.5
- Electrical safety p.5
- Where to find more information p.6
- How this guide is organized p.6
- About this guide p.6
- Typography p.7
- Conventions used in this guide p.7
- X99 a usb 3 specifications summary p.8
- X99 a usb 3 specifications summary p.9
- X99 a usb 3 specifications summary p.10
- Powerful home server p.10
- Flagship performance p.10
- X99 a usb 3 specifications summary p.11
- Q design p.11
- Gamers and professionals p.11
- Asus ez diy p.11
- X99 a usb 3 specifications summary p.12
- Sfs stepless frequency selection p.12
- Quiet thermal design p.12
- Precision tweaker 2 p.12
- Overclocking protection p.12
- Asus 5x protection p.12
- X99 a usb 3 specifications summary p.13
- The illustrated items above are for reference only actual product specifications may vary with different models p.14
- Package contents p.14
- If any of the above items is damaged or missing contact your retailer p.14
- Check your motherboard package for the following items p.14
- Installation tools and components p.15
- The tools and components in the table above are not included in the motherboard package p.15
- Special features p.17
- Product introduction p.17
- Product highlights p.17
- Chapter 1 product introduction p.17
- Chapter 1 p.17
- Other special features p.18
- Erp ready p.18
- Dts ultrapc ii p.18
- Dts connect p.18
- Complete usb 3 integration p.18
- Chapter 1 p.18
- Motherboard overview p.19
- Chapter 1 p.19
- Before you proceed p.19
- Asus x99 a usb 3 p.19
- Take note of the following precautions before you install motherboard components or change any motherboard settings p.19
- Motherboard layout p.20
- Chapter 1 product introduction p.20
- Chapter 1 p.20
- Layout contents p.21
- Chapter 1 p.21
- The motherboard comes with a surface mount lga2011 v3 socket designed for inte p.22
- Core i7 processors p.22
- Chapter 1 product introduction p.22
- Chapter 1 p.22
- Central processing unit cpu p.22
- System memory p.23
- Recommended memory configurations p.23
- Chapter 1 p.23
- Memory configurations p.24
- Chapter 1 product introduction p.24
- Chapter 1 p.24
- You may install 2 gb 4 gb and 8 gb unbuffered and non ecc ddr4 dimms into the dimm sockets p.24
- X99 a motherboard qualified vendors lists qvl p.25
- Ddr4 3333 o c mhz capability u dimm p.25
- Ddr4 3300 o c mhz capability u dimm p.25
- Ddr4 3200 o c mhz capability u dimm p.25
- Ddr4 3000 o c mhz capability u dimm p.25
- Chapter 1 p.25
- Asus x99 a usb 3 p.25
- Ddr4 2800 o c mhz capability u dimm p.26
- Ddr4 2666 o c mhz capability u dimm p.26
- Chapter 1 product introduction p.26
- Chapter 1 p.26
- Ddr4 2400 o c mhz capability u dimm p.27
- Chapter 1 p.27
- Asus x99 a usb 3 p.27
- Ddr4 2666 o c mhz capability u dimm p.27
- Ddr4 2133 o c mhz capability u dimm p.28
- Ddr4 2400 o c mhz capability u dimm p.28
- Chapter 1 product introduction p.28
- Chapter 1 p.28
- Ddr4 2133 o c mhz capability u dimm p.29
- Ddr4 2133 o c mhz capability r dimm p.29
- Chapter 1 p.29
- Asus x99 a usb 3 p.29
- Chapter 1 product introduction p.30
- Chapter 1 p.30
- Expansion slots p.31
- Chapter 1 p.31
- Chapter 1 p.32
- Irq assignments for this motherboard p.33
- Chapter 1 p.33
- Onboard buttons and switches p.34
- Chapter 1 p.34
- Installing dimms that are not compatible with the motherboard may cause system boot failure and the diag_dram led near the memok button lights continuously press and hold the memok button until the diag_dram led starts blinking to begin automatic memory compatibility tuning p.35
- Memok button p.35
- Chapter 1 p.35
- Asus x99 a usb 3 p.35
- With its two level adjustment functions the tpu allows you to automatically adjusts the cpu ratio and clock speed for an optimal system performance p.36
- Tpu switch p.36
- Chapter 1 product introduction p.36
- Chapter 1 p.36
- Epu switch p.37
- Enable this switch to automatically detect the current pc loadings and intelligently moderate the power consumption p.37
- Chapter 1 p.37
- Asus x99 a usb 3 p.37
- Chapter 1 p.38
- Chapter 1 p.39
- Jumpers p.39
- Chapter 1 p.40
- Onboard leds p.41
- Chapter 1 p.41
- Chapter 1 p.42
- Chapter 1 p.43
- Chapter 1 p.44
- Chapter 1 p.45
- Chapter 1 p.46
- These connectors connect to serial ata 6 gb s hard disk drives via serial ata 6 gb s signal cables p.47
- Sata6g_5 sata6g_6 sataexpress sata6g_78 sata6g_910 sata6g_5 sata6g_6 sataexpress sata6g_78 sata6g_910 p.47
- Rapid storage technology through the onboard inte p.47
- Internal connectors p.47
- If you installed serial ata hard disk drives you can create a raid 0 1 5 and 10 configuration with the inte p.47
- Chapter 1 p.47
- Asus x99 a usb 3 p.47
- X99 serial ata 6 gb s connectors 7 pin sata6g_12 sata6g_34 p.47
- X99 chipset p.47
- Chapter 1 p.48
- Usb 3 connectors 20 1 pin usb3_12 usb3_34 p.49
- These connectors allow you to connect a usb 3 module for additional usb 3 front or rear panel ports with an installed usb 3 module you can enjoy all the benefits of usb 3 including faster data transfer speeds of up to 5 gb s faster charging time for usb chargeable devices optimized power efficiency and backward compatibility with usb 2 p.49
- Chapter 1 p.49
- Asus x99 a usb 3 p.49
- Usb 2 connectors 10 1 pin usb1112 us1314 p.50
- These connectors are for usb 2 ports connect the usb module cable to any of these connectors then install the module to a slot opening at the back of the system chassis these usb connectors comply with usb 2 specification that supports up to 48 mb s connection speed p.50
- Chapter 1 product introduction p.50
- Chapter 1 p.50
- Cpu cpu optional extension and chassis fan connectors p.51
- Connect the fan cables to the fan connectors on the motherboard ensuring that the black wire of each cable matches the ground pin of the connector p.51
- Chapter 1 p.51
- Asus x99 a usb 3 p.51
- 4 pin cpu_fan 4 pin cpu_opt 5 pin ext_fan 4 pin cha_fan1 4 4 pin cpu_fan 4 pin cpu_opt 5 pin ext_fan 4 pin cha_fan1 4 p.51
- These connectors are for atx power supply plugs the power supply plugs are designed to fit these connectors in only one orientation find the proper orientation and push down firmly until the connectors completely fit p.52
- Chapter 1 product introduction p.52
- Chapter 1 p.52
- Atx power connectors 24 pin eatxpwr 8 pin eatx12v p.52
- Chapter 1 p.53
- Chapter 1 p.54
- Chapter 1 p.55
- Chapter 1 p.56
- This connector is for a chassis mounted front panel audio i o module that supports either hd audio or legacy ac 97 audio standard connect one end of the front panel audio i o module cable to this connector p.57
- Front panel audio connector 10 1 pin aafp p.57
- Chapter 1 p.57
- Asus x99 a usb 3 p.57
- Chapter 1 product introduction p.58
- Chapter 1 p.58
- Building your pc system p.59
- Basic installation p.59
- Motherboard installation p.59
- Chapter 2 basic installation p.59
- Chapter 2 p.59
- Chapter 2 p.60
- Cpu installation p.61
- Chapter 2 p.61
- Cpu heatsink and fan assembly installation p.62
- Chapter 2 p.62
- To install the cpu heatsink and fan assembly p.63
- Chapter 2 p.63
- Dimm installation p.64
- Chapter 2 p.64
- Chapter 2 p.65
- Atx power connection p.65
- Sata device connection p.66
- Chapter 2 p.66
- Reset sw p.67
- Hdd led p.67
- Front i o connector p.67
- Chapter 2 p.67
- Expansion card installation p.68
- Chapter 2 p.68
- Usb bios flashback p.69
- To use usb bios flashback p.69
- Shut down your computer p.69
- Press the bios flashback button for three seconds until the flashback led blinks three times indicating that the bios flashback function is enabled p.69
- Place the bundled support dvd to the optical drive and install the usb bios flashback wizard follow the onscreen instructions to complete the installation p.69
- Launch the usb bios flashback wizard to automatically download the latest bios version p.69
- Insert the usb storage device to the usb flashback port p.69
- Chapter 2 p.69
- Bios update utility p.69
- Asus x99 a usb 3 p.69
- Wait until the light goes out indicating that the bios updating process is completed p.69
- Usb bios flashback allows you to easily update the bios without entering the existing bios or operating system simply insert a usb storage device to the usb port the usb port hole marked in green on the i o shield then press the usb bios flashback button for three seconds to automatically update the bios p.69
- Rear i o connection p.70
- Motherboard rear and audio connections p.70
- Chapter 2 p.70
- Lan ports led indications p.71
- Chapter 2 p.71
- Audio 2 4 6 or 8 channel configuration p.71
- Chapter 2 p.72
- Audio i o connections p.72
- Connect to 5 channel speakers p.73
- Connect to 4 channel speakers p.73
- Chapter 2 p.73
- Asus x99 a usb 3 p.73
- Connect to 7 channel speakers p.74
- Chapter 2 p.74
- Starting up for the first time p.74
- Turning off the computer p.75
- Chapter 2 p.75
- Chapter 2 basic installation p.76
- Chapter 2 p.76
- Knowing bios p.77
- Chapter 3 bios setup p.77
- Chapter 3 p.77
- Bios setup p.77
- Key to enter bios p.78
- Entering bios setup after post p.78
- Entering bios at startup p.78
- Chapter 3 bios setup p.78
- Chapter 3 p.78
- Bios setup program p.78
- Bios menu screen p.78
- Use the bios setup to update the bios or configure its parameters the bios screen include navigation keys and brief onscreen help to guide you in using the bios setup program p.78
- To enter bios setup after post p.78
- The bios setup program can be used under two modes ez mode and advanced mode you can change modes from the exit menu or from the e xit advanced mode screen p.78
- Simultaneously p.78
- Press the reset button on the system chassis p.78
- Press the power button to turn the system off then back on do this option only if you failed to enter bios setup using the first two options p.78
- Post continues with its routines p.78
- The default screen for entering the bios setup program can be changed between ez mode or advanced mode refer to the setup mode item in section 3 boot menu for details p.79
- The boot device options vary depending on the devices you installed to the system p.79
- Hot key for the advanced bios settings p.79
- Ez mode p.79
- Chapter 3 p.79
- Asus x99 a usb 3 p.79
- Chapter 3 bios setup p.80
- Chapter 3 p.80
- Advanced mode p.80
- The advanced mode provides advanced options for experienced end users to configure the bios settings the figure below shows an example of the advanced mode refer to the following sections for the detailed configurations p.80
- Submenu items p.81
- Q fan control f6 p.81
- Myfavorites f3 p.81
- Menu items p.81
- Menu bar p.81
- Language p.81
- Ez tuning wizard f11 p.81
- Chapter 3 p.81
- Scroll bar p.82
- Quick note f9 p.82
- Last modified button p.82
- Hot keys p.82
- General help p.82
- Configuration fields p.82
- Chapter 3 p.82
- The qfan control allows you to set a fan profile or manually configure the operating speed of your cpu and chassis fans p.83
- Qfan control p.83
- Chapter 3 p.83
- Asus x99 a usb 3 p.83
- Configuring fans manually p.84
- Chapter 3 p.84
- Tuning your system settings p.85
- Ez tuning wizard p.85
- Chapter 3 p.85
- Creating raid p.86
- Chapter 3 p.86
- My favorites p.87
- Chapter 3 p.87
- Chapter 3 p.88
- Adding items to my favorites p.88
- Asus x99 a usb 3 p.89
- The security menu items allow you to change the system security settings p.89
- The main menu screen appears when you enter the advanced mode of the bios setup program the main menu provides you an overview of the basic system information and allows you to set the system date time language and security settings p.89
- Security p.89
- Main menu p.89
- Chapter 3 p.89
- User password p.90
- Chapter 3 p.90
- Administrator password p.90
- Chapter 3 p.91
- Ai tweaker menu p.91
- Ai overclock tuner auto p.91
- Cpu core ratio auto p.92
- Chapter 3 p.92
- Asus multicore enhancement auto p.92
- Max cpu cache ratio auto p.93
- Chapter 3 p.93
- Min cpu cache ratio auto p.93
- Oc tuner keep current settings p.94
- Internal pll overvoltage auto p.94
- Epu power saving mode disabled p.94
- Dram timing control p.94
- Dram frequency auto p.94
- Chapter 3 p.94
- Bclk frequency dram frequency ratio auto p.94
- Chapter 3 p.95
- Chapter 3 p.96
- Chapter 3 p.97
- Chapter 3 p.98
- Chapter 3 p.99
- External digi power control p.100
- Chapter 3 p.100
- Chapter 3 p.101
- Internal cpu power management p.102
- Chapter 3 p.102
- Extreme over voltage disabled p.103
- Chapter 3 p.103
- Fully manual mode disabled p.104
- Cpu core voltage auto p.104
- Chapter 3 p.104
- Cpu cache voltage auto p.105
- Chapter 3 p.105
- Pch i o voltage auto p.106
- Pch core voltage auto p.106
- Dram voltage cha chb chc chd auto p.106
- Dram svid support auto p.106
- Cpu svid support auto p.106
- Cpu input voltage auto p.106
- Chapter 3 p.106
- Vccio pch 1 5v voltage auto p.106
- Vccio cpu 1 5v voltage auto p.106
- Vttdr voltage chc chd auto p.107
- Vttdr voltage cha chb auto p.107
- Pll termination voltage auto p.107
- Cpu spread spectrum auto p.107
- Chapter 3 p.107
- The advanced menu items allow you to change the settings for the cpu and other system devices p.108
- Chapter 3 bios setup p.108
- Chapter 3 p.108
- Advanced menu p.108
- Intel adaptive thermal monitor enabled p.109
- Hyper threading all enabled p.109
- Execute disable bit enabled p.109
- Cpu configuration p.109
- Chapter 3 p.109
- Limit cpuid maximum disabled p.109
- Intel virtualization technology disabled p.110
- Hardware prefetcher enabled p.110
- Cpu power management configuration p.110
- Chapter 3 p.110
- Boot performance mode max performance p.110
- Adjacent cache line prefetcher enabled p.110
- Active processor cores p.110
- Pci express configuration p.111
- Pch configuration p.111
- Chapter 3 p.111
- Sataexpress_1 sris support auto p.112
- S m a r t status check on p.112
- Pch storage configuration p.112
- Chapter 3 p.112
- Chapter 3 p.113
- Support aggressive link power management disabled p.113
- Sata controller 2 mode selection ahci p.113
- Sata controller 1 mode selection ahci p.113
- Hot plug disabled sata6g_1 6 gray sata6g_7 10 black p.113
- System agent configuration p.114
- Nb pci e configuration p.114
- Dmi configuration p.114
- Chapter 3 p.114
- Usb configuration p.115
- Intel xhci mode smart auto p.115
- Intel vt for directed i o vt d p.115
- Chapter 3 p.115
- Usb single port control p.116
- Ehci legacy usb support enabled p.116
- Ehci hand off disabled p.116
- Chapter 3 p.116
- Xhci legacy usb support enabled p.116
- Xhci hand off disabled p.116
- Sa smi aspm disabled p.117
- Sa pci express p.117
- Platform misc configuration p.117
- Peg aspm support disabled p.117
- Pch pci express p.117
- Pch dmi aspm disabled p.117
- Chapter 3 p.117
- Aspm support disabled p.117
- Onboard devices configuration p.118
- Hd audio controller enabled p.118
- Chapter 3 p.118
- Intel lan controller enabled p.119
- Chapter 3 p.119
- Asmedia usb 3 controller enabled p.119
- Pci ex16_4 slot black bandwidth auto p.119
- Pci ex16_2 slot black bandwidth auto p.119
- Serial port configuration p.120
- Restore ac power loss power off p.120
- Power on by pci e pci disabled p.120
- Erp ready disabled p.120
- Chapter 3 p.120
- Apm configuration p.120
- Power on by rtc disabled p.121
- Power on by ring disabled p.121
- Network stack disabled p.121
- Network stack configuration p.121
- Chapter 3 p.121
- Cpu fan speed xxxx rpm or ignore n a cpu optional fan speed xxxx rpm or ignore n a chassis fan 1 4 speed xxxx rpm or ignore n a ext fan 1 3 speed xxxx rpm or ignore n a p.122
- Cpu core voltage 3 v voltage 5v voltage 12v voltage p.122
- Chapter 3 p.122
- Qfan tuning p.122
- Monitor menu p.122
- Cpu temperature mb temperature vrm temperature pch core temperature t sensor1 temperature ext_sensor1 temperature ext_ sensor2 temperature ext_sensor3 temperature xxx c xxx f p.122
- Cpu q fan control auto p.123
- Chapter 3 p.123
- Chassis fan 1 4 q fan control dc mode p.124
- Chapter 3 p.124
- Ext fan 1 3 q fan control dc mode p.125
- Chapter 3 p.125
- Chassis intrude detect support on p.126
- Chapter 3 p.126
- Anti surge support on p.126
- Fast boot enabled p.127
- Chapter 3 p.127
- Boot menu p.127
- Boot configuration p.127
- Chapter 3 p.128
- Boot logo display auto p.128
- Wait for f1 if error enabled p.129
- Setup mode ez mode p.129
- Option rom messages force bios p.129
- Int19 trap response immediate p.129
- Directkey drct enabled p.129
- Csm compatibility support module p.129
- Chapter 3 p.129
- Bootup numlock state on p.129
- Above 4g decoding disabled p.129
- Secure boot p.130
- Chapter 3 p.130
- Chapter 3 p.131
- Boot override p.132
- Boot option priorities p.132
- Chapter 3 p.132
- Tool menu p.133
- Gpu post p.133
- Chapter 3 p.133
- Asus ez flash 2 utility p.133
- Save to profile p.134
- Profile name p.134
- Load save profile from to usb drive p.134
- Load from profile p.134
- Chapter 3 p.134
- Asus o c profile p.134
- Chapter 3 p.135
- Asus dram spd information p.135
- Exit menu p.136
- Discard changes exit p.136
- Chapter 3 p.136
- Save changes reset p.136
- Load optimized defaults p.136
- Launch efi shell from usb drives p.136
- Updating bios p.137
- Ez update p.137
- Chapter 3 p.137
- Asus ez flash 2 p.137
- To switch to the folder info field p.138
- To switch to the drive field p.138
- To perform the bios update process reboot the system when the update process is done p.138
- Chapter 3 bios setup p.138
- Chapter 3 p.138
- Chapter 3 p.139
- Before updating bios p.139
- Asus crashfree bios 3 p.139
- Asus bios updater p.139
- Recovering the bios p.139
- Updating the bios file p.140
- Please select boot device p.140
- E1 asus dvd e818a6t 4069mb usb disk 2 3824mb uefi fat usb disk 2 3824mb enter setup p.140
- Chapter 3 p.140
- Booting the system in dos environment p.140
- And to move selection enter to select boot device esc to boot using defaults p.140
- Updating in gui environment p.141
- To switch from files panel to drives panel then select d p.141
- To restart your computer p.141
- The bios backup feature is not supported due to security regulations p.141
- Chapter 3 p.141
- Bios updater will automatically check the selected bios file and enter asus ez flash 2 updater to continue the bios update process p.141
- Asus x99 a usb 3 p.141
- Are you sure you want to update the bios p.141
- After the bios updater checks the selected bios file select yes to confirm the bios update p.141
- Yes no p.141
- To restart your computer p.142
- Chapter 3 bios setup p.142
- Chapter 3 p.142
- Again to launch secure bios update system will enter ez flash 2 updater and continue the bios update process p.142
- Notices p.143
- Federal communications commission statement p.143
- Appendices p.143
- Vcci japan compliance statement p.144
- Vcci class b statement p.144
- Kc korea warning statement p.144
- Ic canadian compliance statement p.144
- Canadian department of communications statement p.144
- Appendices p.144
- Asus recycling takeback services p.145
- Appendices p.145
- Google license terms p.145
- Appendices p.146
- Technical support p.147
- Asustek computer inc p.147
- Asus contact information p.147
- Asus computer international america p.147
- Asus computer gmbh germany and austria p.147
- Appendices p.147
- Conform with the essential requirements of the following directives p.148
- Ce marking p.148
- Year to begin affixing ce marking 2015 p.148
- Appendices p.148
- X99 pro usb 3 x99 a usb 3 p.148
- 95 ec lvd directive p.148
- We the undersigned p.148
- 65 eu rohs directiv p.148
- Ver 140331 p.148
- Signature signature p.148
- 5 ec r tte directive p.148
- Product name motherboard p.148
- 125 ec erp directive p.148
- Position ceo p.148
- 108 ec emc directive p.148
- Original declaration date 24 10 2014 original declaration date 24 10 2014 p.148
- Name jerry shen p.148
- Model name x99 pro x99 a p.148
- Ec declaration of conformity p.148
- Ec conformity marking p.148
- Declare the following apparatus p.148
- Declaration of conformity p.148
- Corrected declaration date 26 01 2015 p.148
Похожие устройства
-
 Asus TUF GAMING B550-PROРуководство по быстрому запуску
 -
 Asus PRIME A520M-A IIКраткое руководство пользователя
 -
 Asus PRIME B250M-PLUSКраткое руководство
 -
 Asus TUF GAMING Z590-PLUSКраткое руководство
 -
 Asus ProArt B650-CREATORКраткий обзор функций
 -
 Asus TUF GAMING B650-PLUSБыстрый старт
 -
 Asus ROG STRIX X670E-I GAMING WIFIКраткое руководство пользователя
 -
Asus ROG FPS-IIРуководство по быстрому запуску
-
 Asus Pro WS W680M-ACE SEКраткая эксплуатационная инструкция
 -
 Asus PRIME B760M-A WIFI D4Инструкция в сокращённом виде
 -
 Asus PRIME H770-PLUSБыстрый старт
 -
 Asus B850-PLUS WIFIКраткое руководство
Узнайте, как обновить BIOS с помощью графического интерфейса. Подробное руководство по использованию BIOS Updater и безопасному обновлению системы.