
Tristar bl-4433 Инструкция по эксплуатации онлайн
VEILIGHEIDSVOORSCHRIFTEN
• Als de veiligheidsinstructies niet worden opgevolgd, kan de fabrikant
niet verantwoordelijk worden gesteld voor schade die daar eventueel
het gevolg van is.
• Gebruik het apparaat niet indien de stekker, het netsnoer of het
apparaat zelf beschadigd is. Indien het netsnoer beschadigd is, moet u
het laten vervangen door een bekwame gekwaliceerde dienst(*) om
gevaar te voorkomen.
• Verplaats het apparaat nooit door aan het snoer te trekken en zorg
ervoor dat het snoer nergens in verstrikt kan raken.
• Het apparaat moet worden geplaatst op een stabiele, vlakke ondergrond.
• Laat het apparaat nooit onbeheerd achter wanneer de stekker in het
stopcontact steekt.
• Dit apparaat is alleen voor huishoudelijk gebruik en voor het doel waar
het voor bestemd is.
• Om kinderen te beschermen tegen de gevaren van elektrische apparatuur
mag u ze nooit zonder toezicht bij het apparaat laten. Selecteer daarom
een plek voor uw apparaat op dusdanige wijze dat kinderen er niet bij
kunnen. Zorg ervoor dat het snoer niet naar beneden hangt.
• Dompel het snoer, de stekker en/of het apparaat nooit in het water of een
andere vloeistof, dit om u te beschermen tegen een elektrische schok.
• Dit apparaat kan gebruikt worden door kinderen van 8 jaar en ouder
en personen met verminderde lichamelijke en geestelijke vermogens
of gebrek aan kennis en ervaring mits ze onder toezicht staan of
instructies ontvangen over het veilige gebruik van het apparaat en mits
ze de gevaren ervan begrijpen. Kinderen mogen niet met het apparaat
spelen. Reinigen en onderhoud mag niet door kinderen worden
uitgevoerd zonder toezicht.
• Schakel het apparaat uit en koppel het los van de netstroom, alvorens de
opzetstukken te verwisselen of de bewegende onderdelen te benaderen.
• OPMERKING: De hakmessen zijn zeer scherp. Vermijd fysiek contact tijdens
het legen en reinigen van het apparaat. U kunt ernstig letsel oplopen.
• Koppel het apparaat te allen tijde los als er geen toezicht is en alvorens
het apparaat te monteren, te demonteren of te reinigen.
• Buiten het bereik van kinderen houden indien er geen toezicht is.
* Bekwame gekwaliceerde dienst: after-sales dienst van de fabrikant of de invoerder, die erkend
en bevoegd is om dergelijke herstellingen te doen zodat elk gevaar vermeden wordt. Gelieve het
toestel bij problemen naar deze dienst terug te brengen.
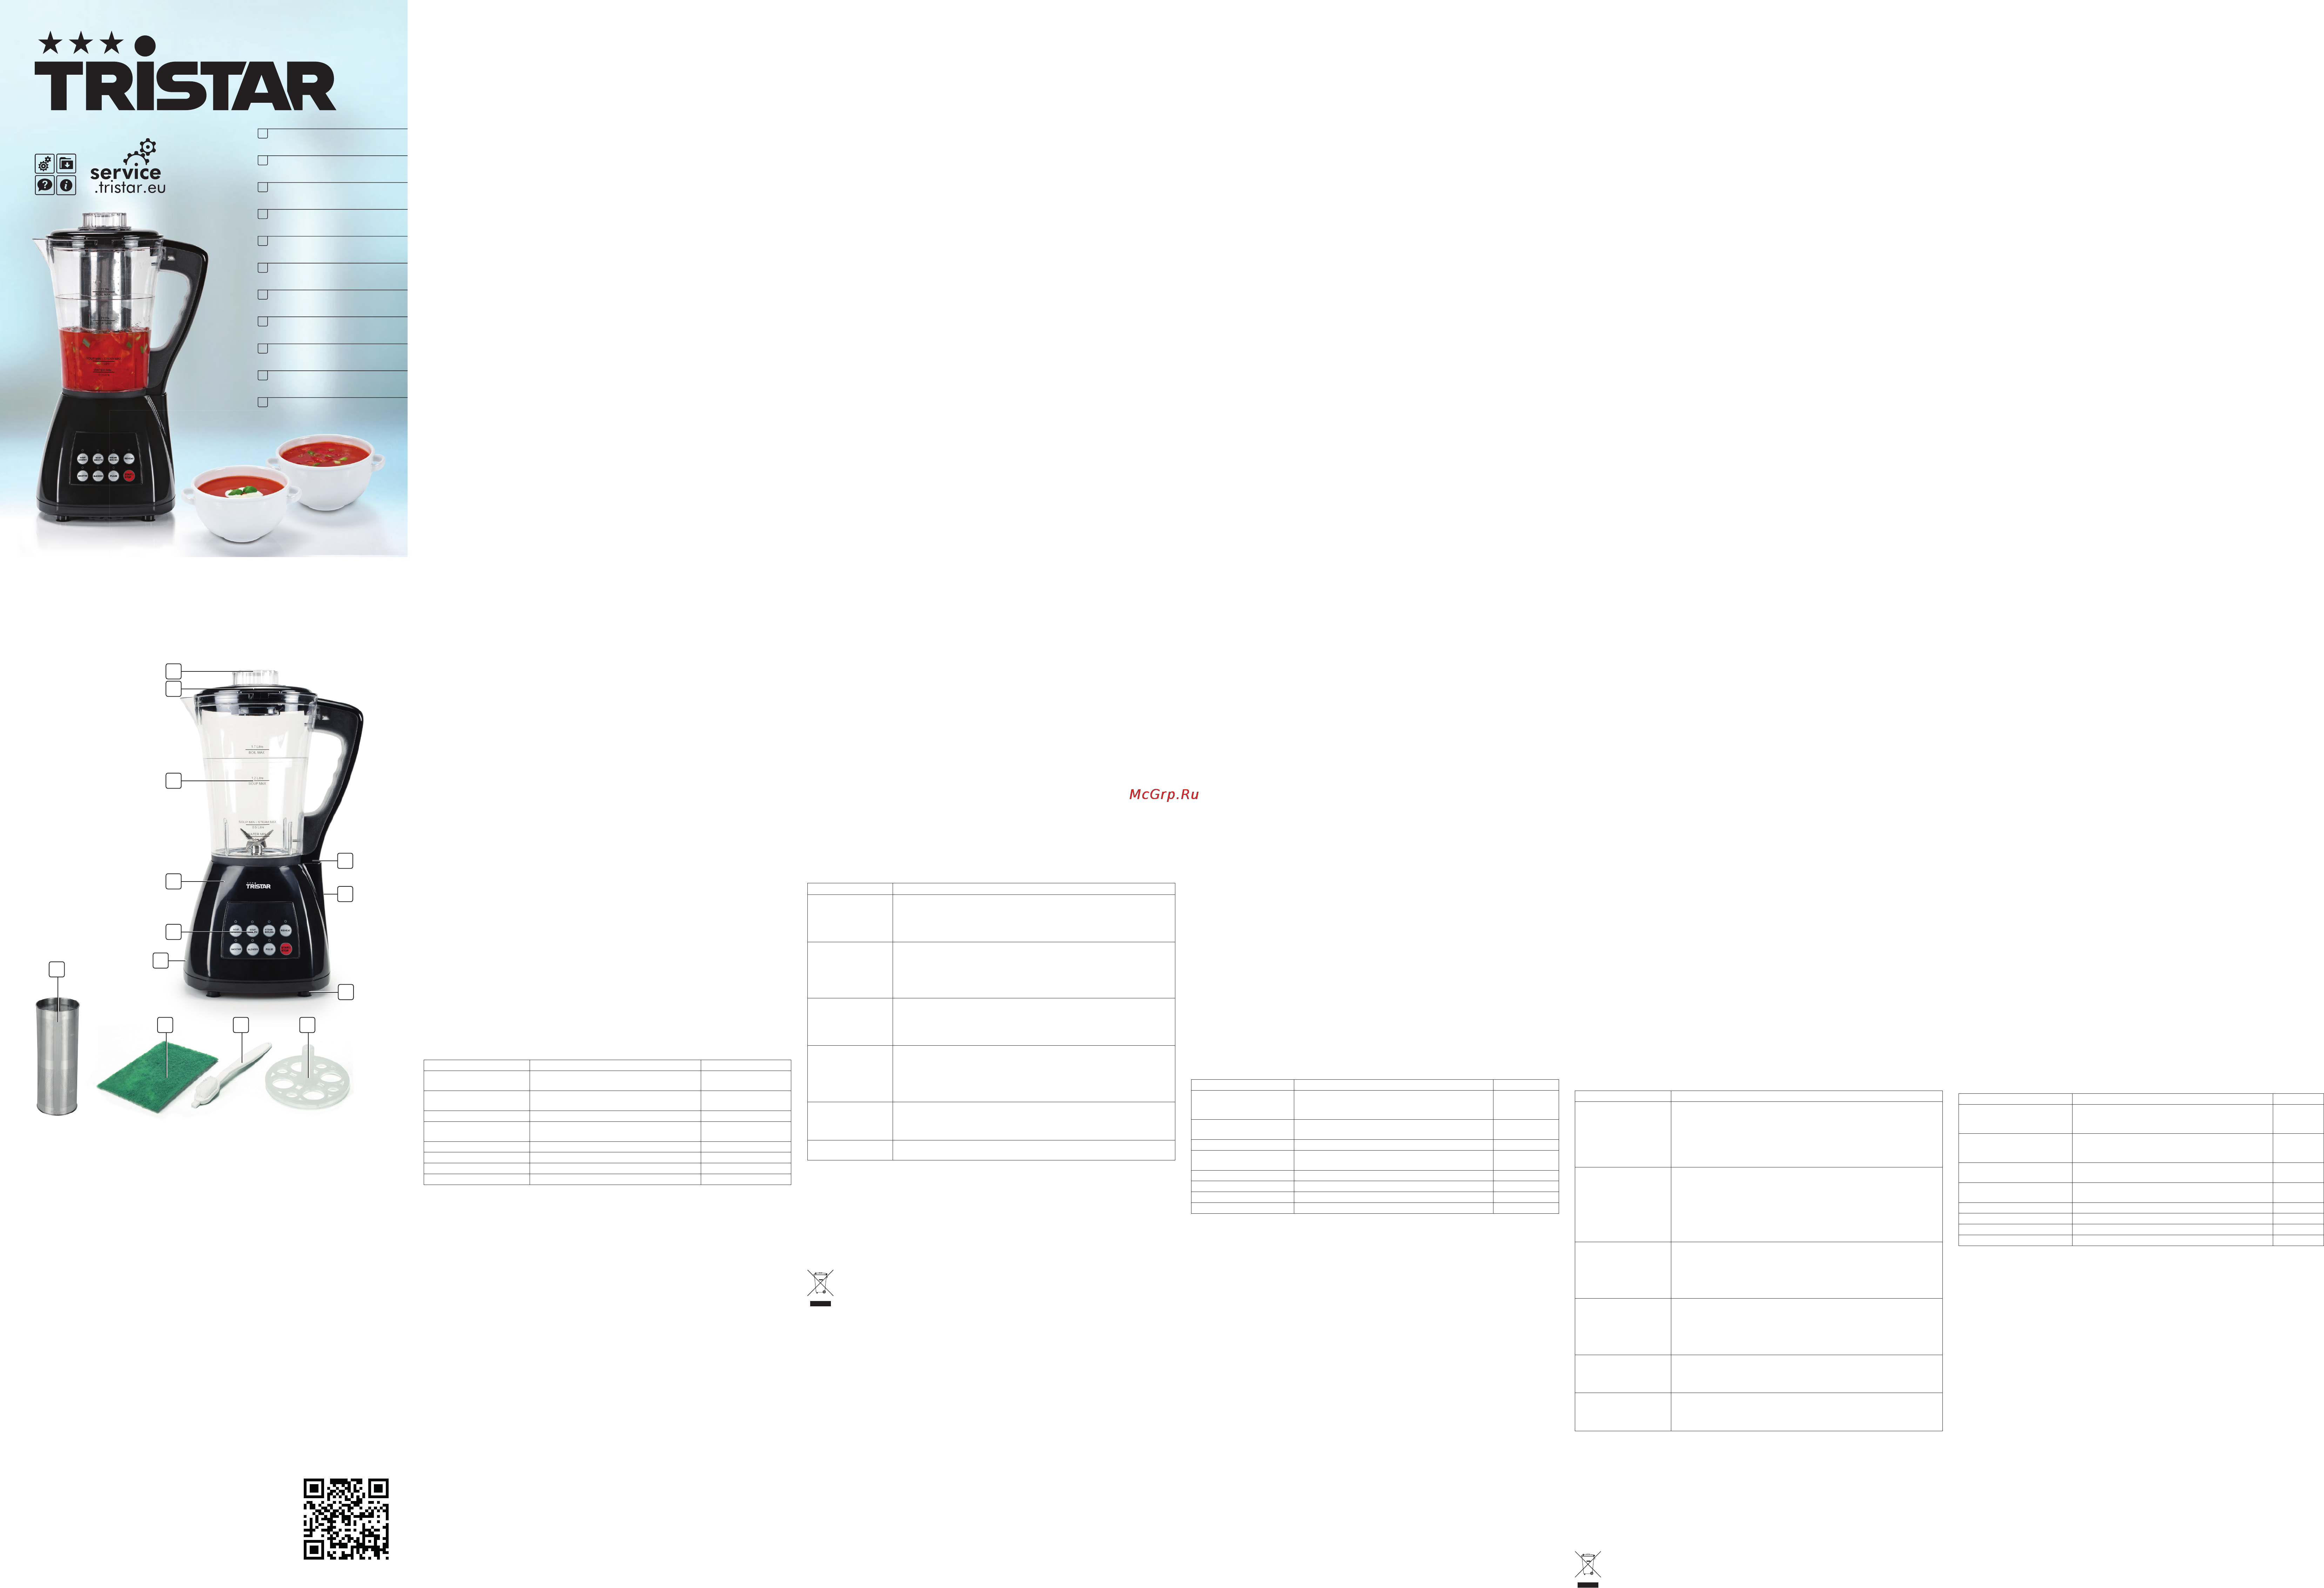
BESCHRIJVING VAN DE ONDERDELEN
1. Maatbeker
2. Deksel kan
3. Eier-/Stoommandje
4. Roestvrijstalen lter
5. Kan
6. Stekker
7. Netsnoer
8. Basis
9. Bedieningspaneel
10. Onderkant behuizing
11. Rubberen voet
12. Spons
13. Borstel
VOOR HET EERSTE GEBRUIK
• De soepblender is voorzien van verschillende veiligheidsschakelaars, inclusief een deksel
met beveiligingssysteem, een minimale vloeistofpeilsensor, een overloopsensor voor hete
vloeistoen en een microbeveiligingsschakelaar op de motorbasis.
• Veeg de mengbeker en de deksel schoon met een vochtige doek en een mild
reinigingsmiddel, alvorens de soepblender voor de eerste keer te gebruiken.
• Let op: de mengbeker beschikt over zeer scherpe messen en dient te allen tijde voorzichtig te
worden gehanteerd.
• Plaats de basis van de soepblender op een hittebestendig en stabiel oppervlak. Plaats de
mengbeker op correcte wijze op de basis.
• Plaats de deksel op de mengbeker en wees er zeker van dat het ontgrendelingssymbool
op de deksel in lijn is met de markering op het handvat van de maatbeker. Draai de deksel
vervolgens in de richting van de pijltjes, totdat het vergrendelingssymbool op de deksel in lijn
is met de referentiemarkering.
• Zorg ervoor dat de maatbeker in het deksel geklikt zit.
• Als alles correct is gemonteerd, kan men de soepblender aansluiten op de netvoeding en op
de START/STOP knop drukken om de soepblender in te schakelen. De knop zal oplichten om
aan te geven dat de soepblender is ingeschakeld.
• Als er op dit punt een alarm klinkt, dient men de soepblender los te koppelen van de
netvoeding en te controleren of de deksel en de maatbeker correct zijn bevestigd en of het
vloeistofpeil correct is, zoals staat beschreven in het hoofdstuk “Probleemoplossingen”.
• Als alles is gecontroleerd, kan de soepblender opnieuw worden aangesloten op de
netvoeding en worden ingeschakeld.
GEBRUIK
Optie Beschrijving Tijd
Grove soep
Verwarmen en blenden van harde of rauwe
groenten, fruit, bonen, etc. (soep met grove
ingrediënten)
25 minutes
Crême soep
Verwarmen en blenden van zachte en jne
groenten, fruit, etc. (crème soep)
20 minutes
Stomen/koken Stomen en koken van voedsel, zoals eieren, etc. 15 minutes
Opwarmen/warmhouden
Opwarmen van restjes of warmhouden van soep,
melk, chocolademelk, etc.
12 minutes
Smoothie Extra jn maken van de ingrediënten. 2min. 40sec.
Blender/Mix Blenden en mengen van groenten of fruit, etc. 1min. 20sec.
Pulseren Voor snel blenden met de hand
Start/Stop Machine START/STOP regelaar
Opmerking: De hierboven genoemde bereidingstijd, dient slechts ter indicatie.
• Door op de “START/STOP” knop te drukken, zullen de indicators gaan knipperen, waarna het
type kookprogramma kan worden gekozen en bevestigd. De soepblender zal 3 maal een
piepsignaal afgeven, om aan te duiden dat het bereidingsproces is begonnen.
• Als de indicators aanhoudend knipperen en piepen tijdens de bewerking, betekent dit dat er
iets fout zit. Controleer het volgende:
1. Deksel is niet correct vergrendeld.
2. Er bevindt zich geen water in de mengbeker, de droogkooksensor werkt.
3. De mengbeker is niet correct bevestigd op de hoofdbehuizing, de microbeveiligingsschakelaar
werkt. Druk op de mengbeker om het proces te hervatten.
4. Verwarmingsbasis en motor zijn oververhit, de overbelastingsinstelling werkt. Haal de
mengbeker en de motorbehuizing los en laat deze 5 minuten afkoelen.
5. Water of vloeistoen overschrijden het MAXIMUM niveau, de overloopsensor voor hete
vloeistoen werkt.
6. Water of vloeistoen bevinden zich onder het MINIMUM niveau, de veiligheidssensor voor
het minimum vloeistofpeil werkt.
Please visit our website for recipes: www.service.tristar.eu.
FUNCTIES
Soep maken
Snijd alle ingrediënten in blokjes van ongeveer 2-3cm en voeg deze toe aan de mengbeker
van de soepblender. Zorg ervoor dat de hoeveelheid ingrediënten zich tussen de SOUP MIN
en SOUP MAX markering op de maatbeker bevindt. Let op: het is niet aangeraden om rauw
vlees te gebruiken in de soepblender; vlees en vis dienen voorgekookt te worden. Voeg geen
bevroren ingrediënten toe; alle ingrediënten dienen op kamertemperatuur te zijn. Het bereiden
van gladde soep duurt ongeveer 20 minuten en het bereiden van grove soep duurt ongeveer
25 minuten. Verderop in deze handleiding zijn een aantal recepten voor verschillende soepen te
vinden in het hoofdstuk “Recepten”.
Koken
• Giet water in de mengbeker en houd hierbij de WATER MIN en BOIL MAX markeringen in
acht. Gebruik het eiermandje om de te koken voedingswaren op te plaatsen. Het koken duurt
ongeveer 15 minuten.
• Let op: de binnenkant van de mengbeker is erg heet na het koken. Het verwijderen van
het eiermandje uit de mengbeker dient dan ook met uiterste voorzichtigheid te worden
uitgevoerd.
SAFETY INSTRUCTIONS
• By ignoring the safety instructions the manufacturer can not be hold
responsible for the damage.
• Do not use this appliance with a damaged cord or plug or when the
appliance has malfunctions, or has been damaged in any manner. To
avoid a hazard make sure that a damaged cord or plug will be replaced
by an Competent qualied repair service(*). Do not repair this appliance
yourself.
• Never move the appliance by pulling the cord and make sure the cord
can not become entangled.
• The appliance must be placed on a stable, level surface.
• The user must not leave the device unattended while it is connected to
the supply.
• This appliance is only to be used for household purposes and only for
the purpose it is made for.
• To protect children against the dangers of electrical appliances, please
make sure that you never leave the appliance unattended. Therefore
you have to select a storage place for the appliance where children
are not able to grab it. Make sure that the cable is not hanging in a
downward position.
• To protect yourself against an electric shock, do not immerse the cord,
plug or appliance in the water or any other liquid.
• This appliance can be used by children aged from 8 years and above
and persons with reduced physical, sensory or mental capabilities or
lack of experience and knowledge if they have been given supervision
or instruction concerning use of the appliance in a safe way and
understand the hazards involved. Children shall not play with the
appliance. Cleaning and user maintenance shall not be made by
children without supervision.
• Switch o the appliance and disconnect from supply before changing
accessories or approaching parts that move in use.
• NOTE: The chopping blades are very sharp, avoid physical contact
during emptying and cleaning the device, you can seriously injure.
• Always disconnect the device from the supply if it is left unattended
and before assembling, disassembling or cleaning.
• Do not allow children to use the device without supervision.
* Competent qualied repair service: after sales department of the producer or importer or any
person who is qualied, approved and competent to perform this kind of repairs in order to avoid
all danger. In any case you should return the appliance to this repair service.
PARTS DESCRIPTION
1. Measuring cup
2. Jar lid
3. Egg/steam tray
4. Stainless steel lter
5. Jar
6. Electrical socket
7. Power cord
8. Main body
9. Control panel
10. Bottom cover
11. Rubber foot
12. Sponge
13. Brush
BEFORE THE FIRST USE
• The soup maker is tted with several safety features including an interlocking lid cut-out , a
minimum liquid sensor, a hot liquid overow sensor for safe use at all times and safety micro-
switch cut-o on the motor base.
• Before using the soup maker for the rst time wipe down the jug and lid with a damp cloth
using a mild detergent.
• Caution: the jug contains very sharp blades and should be handled with care at all times.
• Place the base unit of soup maker on a heat-resistant, stable surface. Position the jug on the
base unit properly.
• Put the lid on the jug make sure the lock open symbol on the lid aligns with the mark on the
top of the handle. Once aligned, turn the lid in the direction of the arrows until the lid lock
symbol aligns with the datum mark.
• Ensure the measuring cup is tted to the top of the lid.
• When everything is positioned correctly, connect the soup maker to the mains power supply
and press the START/STOP button to turn on the soup maker. The button will illuminate
indicating the soup maker is on.
• If at this point the alarm sounds, disconnect the soup maker from the mains power supply
and check that the lid is properly tted, the jug is tted properly and the uid level is correct
as described in paragraph “trouble shooting”.
• Once checked, reconnect to the mains and power up.
USE
Option Description Time
Soup Chunky
Heat and blend hard, non-soaked
vegetables, fruits, bean, etc.
25 minutes
Soup Smooth
Heat and blend soft, tender vegetables,
fruits, etc.
20 minutes
Steam/Boiling Steam and boil food, such as egg, etc. 15 minutes
Reheat/Keep Warm
Reheat leftover, or keep warm soup, milk,
chocolate, etc.
12 minutes
Smoothie To help blender contents more smoothie 2min. 40sec.
Blender/Mix Blend ,mix vegetables or fruits, etc. 1min. 20sec.
Pulse Hand press blend quickly
Start/Stop Machine START/STOP control
Note: Cooking time above is for reference only.
• Press the “START/STOP” button, the indicators ashes, then choose the type of cooking
operation to conrm, then the soup maker will beep 3 times, which means cooking process
starts.
• If the indicators will blink and beep continuously during operation, this means there’s a
mistake with the operation or there’s something wrong. Check the following:
1. Lid is not properly locked.
2. There is no water inside the jug, the over-dry sensor works.
3. Jug is not properly placed in its main body, the safety micro-switch works, press on the jug
and the process will resume.
4. Heating base and motor are over-heated, the overloading setting works. Separate the jug
and motor housing, let it rest for 5 minutes to cool down.
5. Water or liquids exceed the MAXIMUM level, the hot liquids overow sensor works.
6. Water or liquid is less than the MINIMUM level, the minimum liquid safety sensor works.
Please visit our website for recipes: www.service.tristar.eu.
FUNCTIONS
Making soup
Chop all your ingredients into approximately 2-3cm cubes and add to the soup maker jug, make
sure you keep the ingredients between SOUP MIN and SOUP MAX mark on the jug. Caution: it is
not recommended to use uncooked meats in the soup maker, meat or sh must be precooked.
Do not add any frozen ingredients, all ingredients must be at room temperature. Smooth soup
would take around 20 minutes, chunky soup would take around 25 minutes. Further in this
manual you will nd under the paragraph “Recipes” a few recipes for dierent soups.
Boiling
• Pour water between WATER MIN and BOIL MAX mark into the jug, use the egg tray to place
on the food to cook, it takes around 15 minutes.
• Caution: the inside of the jug is very hot after cooking so extreme caution should be taken
when removing the egg steamer out of the jug.
Steaming
• Pour water between WATER MIN and STEAM MAX mark into the jug, use the egg tray to place
on the food to steam, it takes around 15 minutes.
• Caution: the inside of the jug is very hot after steaming so extreme caution should be taken
when removing the egg steamer out of the jug.
EN Instruction manual NL Gebruiksaanwijzing FR Mode d'emploi
INSTRUCTIONS DE SÉCURITÉ IMPORTANTES
• Le fabricant ne sera pas tenu responsable de tous dommages si les
consignes de sécurité ne sont pas respectées.
• Ne pas utiliser cet appareil avec un cordon ou une prise endommagés
ou s’il ne fonctionne pas correctement, ou a subi des dégâts
quelconques. An d’éviter tous dangers, veillez à ce qu’un cordon ou
prise endommagés soient remplacés par un technicien agréé (*). Ne
réparez pas vous-même cet appareil.
• Ne jamais déplacer l’appareil en tirant sur le cordon et veillez à ce que
ce dernier ne devienne pas entortillé.
• L’appareil doit être posé sur une surface stable et nivelée.
• Ne jamais utiliser l’appareil sans supervision.
• Cet appareil est uniquement destiné à des utilisations domestiques et
seulement dans le but pour lequel il est fabriqué.
• Pour protéger les enfants des dangers des appareils électriques, veillez
à ne jamais laisser les appareils sans surveillance. Par conséquent, il
faudra choisir un lieu de rangement pour l’appareil inaccessible aux
enfants. Veillez à ce que le cordon ne pende pas.
• Ne pas immerger le cordon, la prise ou l’appareil dans de l’eau ou autre
liquide an de vous éviter un choc électrique.
• Cet appareil ne doit pas être utilisé par les enfants de moins de 8ans ni par
des personnes dont les capacités physiques, sensorielles ont mentales sont
réduites ou manquant d’expérience et de connaissance sauf si elles sont
surveillées ou si elles ont reçu des instructions pour utiliser cet appareil en
toute sécurité en étant conscientes des dangers liés. Les enfants ne doivent
pas jouer avec l’appareil. Le nettoyage et l’entretien régulier ne doivent pas
être eectués par des enfants sans surveillance.
• Eteignez l’appareil et débranchez-le du secteur avant de changer
les accessoires, ou d’approcher de parties amovibles durant le
fonctionnement
• REMARQUE : Les lames du hâchoir sont très tranchantes, évitez le
contact physique lors du vidage et du nettoyage de l’appareil, vous
pouvez vous blesser gravement.
• Débranchez toujours l’appareil du secteur si vous quittez la pièce et
avant de le monter, le démonter ou le nettoyer.
• Ne pas laisser les enfants jouer avec l’appareil.
* Centre de réparation qualié agréé: Service après vente du fabricant ou de l’importateur ou tout
autre personne qualiée, agréé et apte à eectuer ce type de réparation an d’éviter tous dangers.
L’appareil doit, dans tous les cas, être renvoyé à ce Centre de réparation.
DESCRIPTION DES ÉLÉMENTS
1. Verre doseur
2. Couvercle du bol
3. Panier à œufs / à vapeur
4. Filtre en acier inoxydable
5. Bol
6. Prise électrique
7. Cordon d'alimentation
8. Bloc principal
9. Panneau de commande
10. Couvercle du fond
11. Pied en caoutchouc
12. Éponge
13. Brosse
AVANT LA PREMIÈRE UTILISATION
• Le mélangeur cuiseur à soupe est équipé de plusieurs dispositifs de sécurité comprenant
un interrupteur de verrouillage du couvercle, un capteur de niveau minimum de liquide, un
capteur anti-débordement des liquides chauds et d'un micro-interrupteur de coupure sur le
bloc moteur pour un fonctionnement en toute sécurité à tout moment.
• Avant d'utiliser le mélangeur cuiseur à soupe pour la première fois, essuyez bien le bol et le
couvercle avec un chion légèrement humide et un détergent doux.
• Précaution : le bol contient des lames très coupantes et doit être manipulé avec précaution à
tout instant.
• Placez le bloc principal du mélangeur cuiseur à soupe sur une surface stable et résistante à la
chaleur. Montez correctement le bol sur le bloc principal.
• Fermez le bol avec son couvercle, vériez que le symbole du cadenas ouvert coïncide avec
la marque au sommet de la poignée. Une fois alignée, tournez le couvercle dans le sens des
èches jusqu'à ce que le symbole du cadenas ouvert s'aligne avec le repère de référence.
• Vériez que le verre doseur est monté au-dessus du couvercle.
• Quand tout est correctement mis en place, branchez le mélangeur cuiseur à soupe à
l'alimentation électrique du secteur et appuyez sur le bouton START/STOP pour allumer
l'appareil. Le bouton s'allume indiquant que le mélangeur cuiseur à soupe est prêt à l'emploi.
• Si à ce moment, un signal sonore se produit, débranchez le mélangeur cuiseur à soupe
de l'alimentation électrique du secteur et vériez que, le couvercle et le bol, sont
convenablement montés et que le niveau de liquide est correct comme indiqué au
paragraphe "Dépannage".
• Une fois les vérications eectuées, rebranchez au secteur et rallumez l'appareil.
UTILISATION
Option Description Durée
Soupe aux gros morceaux
(Soup Chunky)
Chaue et mélange intensivement les légumes non
trempés, les fruits, les haricots, etc.
25 minutes
Soupe crémeuse
(Soup Smooth)
Chaue et mélange doucement les légumes
tendres, les fruits, etc.
20 minutes
Vapeur/Ébullition (Steam/
Boiling)
Cuit à la vapeur ou fait bouillir les aliments, comme
les œufs, etc.
15 minutes
Réchauer/Maintenir au
chaud (Reheat/Keep Warm)
Réchaue les restes ou maintient au chaud la
soupe, le lait, le chocolat, etc.
12 minutes
Préparation fouettée Pour rendre plus fouetté le contenu du mélangeur. 2 mn 40 s
Mélangeur / Mixeur Mélange et mixe les fruits et les légumes, etc. 1 mn 20 s
Impulsion (Pulse) Mélange manuellement et rapidement
Marche/Arrêt (Start/Stop) Commande START/STOP de l'appareil
Remarque : les temps de cuisson sont donnés uniquement à titre de référence.
• Appuyez le bouton "START/STOP ", les indicateurs clignotent, ensuite choisissez le type de
préparation pour conrmer : le mélangeur cuiseur à soupe produit alors trois bips sonores
indiquant le début de la cuisson.
• Si les indicateurs clignotent et des bips se produisent de façon continue lors du
fonctionnement, cela signie qu'il y a une erreur avec l'opération en cours ou que quelque
chose s'est produit de façon erronée. Vériez les points suivants :
1. Le couvercle n'est pas correctement verrouillé.
2. Il n'y a pas d'eau dans le bol, le capteur de niveau minimum s'est enclenché.
3. Le bol n'est pas mis en place correctement sur le bloc principal, le micro-interrupteur de
sécurité s'est enclenché, appuyez sur le bol et le processus de cuisson reprend.
4. Le moteur ou le bloc chauant sont en surchaue, la sécurité de surcharge s'est enclenchée.
Séparez le bol du bloc moteur, laissez-le se refroidir et au repos pendant 5 minutes.
5. Le niveau de liquide ou d'eau dépasse le repère MAXIMUM, le capteur anti-débordement
des liquides chauds s'est enclenché.
6. Le niveau de liquide ou d'eau est en-dessous du repère MINIMUM, le capteur de sécurité
de niveau de liquide minimum s'est enclenché.
Veuillez consulter notre site pour des recettes: www.service.tristar.eu.
FONCTIONS
Réaliser une soupe
Coupez tous vos ingrédients en cubes de 2 ou 3 cm et placez-les dans le bol du mélangeur cuiseur
à soupe, vériez que la hauteur des ingrédients est entre les repères "SOUP MIN" et "SOUP MAX"
du bol. Précaution : il n'est pas recommandé de mettre des viandes non cuites dans le mélangeur
cuiseur : la viande ou le poisson doivent être précuits. Ne pas ajouter des ingrédients congelés,
tous les ingrédients doivent être à la température de la pièce. Une soupe crémeuse prend environ
20 minutes, une soupe aux gros morceaux environ 25 minutes. Plus loin dans ce manuel, vous
trouverez, sous le paragraphe "Recettes", quelques recettes pour diérentes soupes.
Porter à ébullition
• Versez de l'eau entre les repères WATER MIN et BOIL MAX du bol, utilisez le panier à œufs avec
la nourriture à cuire : la durée d'ébullition est d'environ 15 minutes.
• Précaution : l'intérieur du bol est très chaud après la cuisson et donc d'extrêmes précautions
doivent être prises lors du retrait du panier à œufs ou à vapeur.
www.tristar.eu
Tristar Europe B.V. | Jules Verneweg 87
5015 BH Tilburg | The Netherlands
EN
NL
FR
DE
ES
PT
PL
IT
CS
SV
SK
Instruction manual
Gebruiksaanwijzing
Mode d'emploi
Bedienungsanleitung
Manual de usuario
Manual de utilizador
Instrukcja obsługi
Manuale utente
Návod na použití
Bruksanvisning
Návod na použitie
BL-4433
PARTS DESCRIPTION / ONDERDELENBESCHRIJVING / DESCRIPTION DES
PIÈCES / TEILEBESCHREIBUNG / DESCRIPCIÓN DE LAS PIEZAS / DESCRIÇÃO
DOS COMPONENTES / OPIS CZĘŚCI / DESCRIZIONE DELLE PARTI /
BESKRIVNING AV DELAR / POPIS SOUČÁSTÍ / POPIS SÚČASTÍ
Reheat
• Previously prepared soup that has become cold can be reheated in the soup maker. Add the
cooked soup to the jug ensuring the volume is no less than the minimum and no more than
the maximum.
• The reheat program will follow the sequence: Heating-Mixing- Heating-Mixing-Heating.
• This process will continue to follow the above cycle until the soup is heated and reaches the
optimum temperature of 65°C -75°C, ready to serve. The audible alarm will then sound.
• The time taken to complete this process will depend on the temperature and volume of the
soup added but should take approximately 5-8 minutes.
• Note: the reheat process is not a cooking function; all soups used in this process must be
precooked.
Blender Smoothie
• The soup maker can also be used as a blender, simply set up the soup maker as before and
add your ingredients for blending.
• The blend function stops automatically after 1min. 20sec. To stop the cycle at any time, press
the blend button again, or press START/STOP button.
• The Smoothie function stops automatically after 2min. 40sec. To stop the cycle at any time,
press the smoothie button again, or press START/STOP button.
• Note: it is important that your ingredients reach a minimum depth of 3-4cm so that the safety
cutout sensor does not activate. But no more than the MAXIMUM.
• It is NOT possible to blend dry ingredients, as the sensor won’t recognize them.
Pulse
Use the PULSE button to blend for short times, press and keep the PULSE button to blend,
release the button to stop.
Stainless steel lter
• Proper selection of stainless steel lter direction: Filter will divide the inner jug into 2 sections,
the section inside lter makes smoothie, porridge or mixing food, the section outside lter
makes Chunky food in large pores.
• For the best result we recommend to try with dierent amounts and ingredient to nd out
what’s your favorite cooking method.
• Proper Installation of lter: in the bottom, there is ring like shape around the center blade,
make sure the lter t properly around it, then the lter touches the bottom of jug and locked
by the jug cover.
REMARKS
• Add your preferred liquid or ingredients to the jug; all liquids and ingredients used must be at
room temperature.
• Make sure the total volume of ingredients added is to the minimum but not more than
1700ml, as the internal sensor near the base of the jug must be covered with liquid. Under
lling the soup maker jug will result in the alarm sounding and the unit failing to operate.
Should the boiling action during cooking cause the hot contents to reach the lid, the upper
sensor will switch o the heating function to help prevent boiling over.
• Any interruption will result in the cancellation of the program. Restarting will result in the
cooking stages being repeated which may aect the nal recipe.
• Any ingredients to be added during the cooking process can be added through the rell hole
in the centre of the lid. Do not unlock or remove the lid as this will stop the program.
• To completely stop the program at any time, simply press the START/STOP button.
• Once the program has nished, the soup maker will sound an audible alarm and stop heating.
• Your soup can be poured straight from the jug but be careful when removing the lid from the
jug as it will be very hot.
• WARNING: heat/steam will be emitted from the lid. Care must be taken when removing the lid
and measuring cup.
CLEANING AND MAINTENANCE
• Always disconnect the soup maker from the mains power supply before cleaning.
• Do not clean the soup maker in a dishwasher. Do not immerse the soup maker in water or any
liquids.
• Clean the surface of the base unit and the outer of the jug with the supplied sponge or with a
soft, damp cloth. Rinse the lid in warm, soapy water.
• To clean the inside of the jug, rinse and use the supplied brush to remove any remaining soup
or large food particles.
• Caution: the blades inside the jug are not removable and are very sharp; extreme caution
should be taken when cleaning the inside of the jug.
• Use the soup maker’s programs to aid the removal of stubborn stains. Assemble the soup
maker and add 800ml of water and a small amount of mild detergent. Fit the lid and switch
on the soup maker. Press the BLENDER or PULSE button and the blades will rotate to clean the
jug. You can stop the cleaning process at any time by switching o the appliance.
TROUBLE SHOOTING
Problems Cause and solution
The unit is not
working and beeping
1. The jug is not properly tted onto the base, press on the jug.
2. The lid is not tted properly make sure the marks on the lid and the
jug will match.
3. There is not enough liquid in the jug, add more liquid.
4. There are some spills around the over-ow sensor.
The unit has stopped
in the mid-program
(during the
operation)
1. The lid is loose, make sure the marks on the lid and the jug will match.
2. Liquid level is too low due to evaporation during cooking ll on the liquid
through the rell hole.
3. Liquid is too much than the maximum, pour out some liquid.
4. The jug is gone loose from the base. Press on the jug and the process
will resume.
Ingredients pieces
are still too large
after the cycle is
complete (food is not
well blended.)
1. Pieces were possibly too large. Initially-use the blend function after
the cooking program.
2. Wrong function was selected: try another one.
3. Poured less water: Add sucient water.
The ingredients
are hard after the
cooking cycle. (food
cooked not well)
1. Chop the ingredients into small pieces before adding.
2. Wrong function was selected: try another one.
3. Too much water or food, lter is clogged try again with other
amounts.
4. Some food require longer cooking: select reheat function till the food
is fully cooked.
The soup is not hot
and the cooking
cycle appeared to
nish early.
There was too much hot liquid in the jug. Through the blend movement
the soup reached during cooking the upper overow sensor. Pour out a
little amount and choose the reheat function.
Food is burnt, and
stuck to the bottom.
1. Caused by high sugar or starch: use proper sugar, or starch.
2. Too much food and too little liquids, try again with other amounts.
GUARANTEE
• This product is guaranteed for 24 months granted. Your warranty is valid if the product is used
in accordance to the instructions and for the purpose for which it was created. In addition, the
original purchase (invoice, sales slip or receipt) is to be submitted with the date of purchase,
the name of the retailer and the item number of the product.
• For the detailed warranty conditions, please refer to our service website:
www.service.tristar.eu
GUIDELINES FOR PROTECTION OF THE ENVIRONMENT
This appliance should not be put into the domestic garbage at the end of its durability,
but must be oered at a central point for the recycling of electric and electronic
domestic appliances. This symbol on the appliance, instruction manual and packaging puts
your attention to this important issue. The materials used in this appliance can be recycled. By
recycling of used domestic appliances you contribute an important push to the protection of our
environment. Ask your local authorities for information regarding the point of recollection.
Stomen
• Giet water in de mengbeker en houd hierbij de WATER MIN en STEAM MAX markeringen in
acht. Gebruik het eiermandje om de te stomen voedingswaren op te plaatsen. Het stomen
duurt ongeveer 15 minuten.
• Let op: de binnenkant van de mengbeker is erg heet na het stomen. Het verwijderen van
het eiermandje uit de mengbeker dient dan ook met uiterste voorzichtigheid te worden
uitgevoerd.
Opwarmen
• Soep die eerder is bereid en is afgekoeld, kan worden opgewarmd in de soepblender.
Voeg de koude soep toe aan de mengbeker en zorg er voor dat de minimum en maximum
aanduidingen niet worden overschreden.
• Het opwarmprogramma houdt de volgende volgorde aan: Verwarmen-Mixen-Verwarmen-
Mixen-Verwarmen.
• Deze cyclus zal worden herhaald, totdat de soep volledig is opgewarmd en een temperatuur
van tussen de 65°C -75°C heeft bereikt. Dit zal worden aangeduid met het klinken van een
alarm.
• Het opwarmen neemt, afhankelijk van de temperatuur en de hoeveelheid soep, ongeveer 5-8
minuten in beslag.
• Opmerking: het opwarmproces is geen bereidingsfunctie; alle soepen die in dit proces
worden gebruikt, dienen van te voren te zijn bereid.
Blender Smoothie
• De soepblender kan ook als blender worden gebruikt. Stel het apparaat in zoals gebruikelijk
en voeg de te blenden ingrediënten toe.
• De blend-functie stopt automatisch na 1 minuut en 20 seconden. De cyclus kan op elk
gewenst moment worden onderbroken, door nogmaals op de blend-knop te drukken of door
op de START/STOP-knop te drukken.
• De smoothie-functie stopt automatisch na 2 minuut en 40 seconden. De cyclus kan op elk
gewenst moment worden onderbroken, door nogmaals op de smoothie-knop te drukken of
door op de START/STOP-knop te drukken.
• Opmerking: het is van belang dat de kan minimaal tot 3-4cm gevuld wordt, om te voorkomen
dat de sensor van het beveiligingssysteem in werking wordt gesteld. De ingrediënten mogen
echter niet de MAXIMUM aanduiding overschrijden.
• Het is NIET mogelijk om droge ingrediënten te blenden, omdat de sensor deze ingrediënten
niet zal herkennen.
Pulse
Gebruik de PUSLE knop om steeds kort te blenden. Houd de PULSE knop ingedrukt om te blen-
den en laat deze knop los om te stoppen met het blenden.
Roestvrijstalen lter
• Aanwijzingen voor het gebruik van de roestvrijstalen lter: De lter verdeelt de binnenkant
van de kan in 2 secties. De sectie in de lter is bedoeld voor het maken van smoothies, pap of
het mixen van voeding, de sectie buiten de lter is bedoeld voor het maken van grof voedsel.
• Voor het beste resultaat raden wij aan om verschillende hoeveelheden en diverse
ingrediënten uit te proberen, om uw favoriete bereidingswijze te ontdekken.
• Correcte installatie van de lter: op de bodem bevindt zich een ringvorm rondom het
middenblad. Zorg ervoor dat de lter goed rondom het middenblad wordt bevestigd op de
bodem van de mengbeker en wordt vergrendeld met de deksel.
OPMERKINGEN
• Voeg de gewenste vloeistoen of ingrediënten toe aan de mengbeker; alle vloeistoen en
ingrediënten dienen op kamertemperatuur te zijn.
• Zorg ervoor dat het totale volume van de toegevoegde ingrediënten zich boven het minimum
bevindt (maar niet boven de 1700ml), omdat de interne sensor op de basis van de mengbeker
bedekt dient te zijn met vloeistof. Indien het volume zich onder het minimum bevindt, zal er
een alarm klinken en zal het apparaat niet werkzaam zijn. Indien het koken tijdens de bereiding
ertoe leidt dat de inhoud de deksel bereikt, zal de bovenste schakelaar de verwarmingsfunctie
uitschakelen, om overkoken te voorkomen.
• Elke onderbreking zal leiden tot de annulering van het programma. Opnieuw starten zal
leiden tot het herhalen van de bereidingsfasen, wat van invloed kan zijn op het eindresultaat.
• Ingrediënten die tijdens het bereidingsproces toegevoegd dienen te worden, kunnen
worden toegevoegd via de vuldop in het midden van de deksel. De deksel mag niet worden
ontgrendeld of verwijderd, omdat dit het programma zal stoppen.
• Druk op de START/STOP knop, om het programma geheel en op elk gewenst moment te
stoppen.
• Zodra het programma is voltooid, zal de soepblender een alarm laten klinken en stoppen met
verwarmen.
• De soep kan rechtstreeks vanuit de kan worden gegoten, maar wees voorzichtig met het
verwijderen van de deksel van de mengbeker, daar deze zeer warm zal zijn.
• WAARSCHUWING: er zal hitte/stoom van de deksel afkomen. Wees voorzichtig met het
verwijderen van de deksel of de maatbeker.
REINIGEN EN ONDERHOUD
• Koppel de soepblender te allen tijde los van de netvoeding, alvorens het apparaat te reinigen.
• De soepblender is niet vaatwasserbestendig. Dompel de soepblender niet onder in water of
andere vloeistoen.
• Reinig het oppervlak van de basiseenheid en de buitenkant van de mengbeker met de
bijgeleverde spons of met een zachte, vochtige doek. Spoel de deksel in een warm sopje.
• Spoel de mengbeker om en gebruik de bijgeleverde borstel om in de mengbeker
achtergebleven soep- of voedingsresten te verwijderen.
• Let op: de messen in de mengbeker kunnen niet worden verwijderd en zijn zeer scherp; de
binnenkant van de mengbeker dient met uiterste voorzichtigheid te worden gereinigd.
• Gebruik de programma’s van de soepblender voor het verwijderen van hardnekkige
vlekken. Monteer de soepblender en voeg 800ml water en een kleine hoeveelheid mild
reinigingsmiddel toe aan de mengbeker. Plaats de deksel op de mengbeker en schakel de
soepblender in. Druk op de BLENDER knop of PULSE knop, waarna de messen zullen gaan
draaien, om de mengbeker te reinigen. Het reinigingsproces kan op elk gewenst moment
worden onderbroken, door het apparaat uit te schakelen.
PROBLEEMOPLOSSING
Problemen Oorzaken en oplossingen
Het apparaat werkt
niet en maakt een piep
geluid
1. De mengbeker is niet correct bevestigd op de basis, druk de
mengbeker aan.
2. De deksel is niet correct bevestigd, wees er zeker van dat de
markeringen op de deksel en de mengbeker overeenkomen.
3. Er bevindt zich onvoldoende vloeistof in de mengbeker, voeg meer
vloeistof toe.
4. Er bevinden zich spetters rondom de overloopsensor.
Het apparaat is
halverwege het
programma gestopt
(tijdens de bewerking)
1. De deksel zit los, wees er zeker van dat de markeringen op de
deksel en de mengbeker overeenkomen.
2. Het vloeistofpeil is te laag door de verdamping tijdens het
bereiden, vul de vloeistof bij via de vuldop.
3. Het vloeistofpeil is hoger dan het maximum, giet de overtollige
vloeistof uit de mengbeker.
4. De mengbeker is losgeraakt. Druk de mengbeker aan om het proces
te hervatten.
De in blokjes gesneden
ingrediënten zijn nog
steeds heel, nadat de
cyclus is voltooid (het
voedsel is niet goed
geblend.)
1. De blokjes waren mogelijk te groot. Gebruik de blend-functie na
het bereidingsprogramma.
2. Verkeerde functie geselecteerd, probeer een andere functie.
3. Te weinig water toegevoegd: voeg voldoende water toe.
De ingrediënten
zijn nog hard na de
bereidingscyclus
(voedsel is niet goed
gekookt)
1. Snijd de ingrediënten in kleine stukjes, alvorens ze toe te voegen.
2. Verkeerde functie geselecteerd: probeer een andere functie.
3. Teveel water of ingrediënten, lter is verstopt, probeer opnieuw
met aangepaste hoeveelheden.
4. Sommige ingrediënten vereisen een langere bereidingstijd:
selecteer de opwarmfunctie, totdat de ingrediënten gaar zijn.
De soep is niet warm
en de bereidingscyclus
lijkt voortijdig te zijn
voltooid.
Teveel warme vloeistof in de mengbeker. Door de blend-beweging
bereikte de soep tijdens het bereiden de bovenste overloopsensor.
Giet een kleine hoeveelheid uit de mengbeker en selecteer de
opwarmfunctie.
Het eten is aangebrand
en plakt aan de bodem
1. Dit wordt veroorzaakt door grote hoeveelheden suiker of zetmeel.
Gebruik aangepaste hoeveelheden suiker of zetmeel.
2. Teveel ingrediënten en te weinig vloeistoen. Probeer opnieuw
met aangepaste hoeveelheden.
GARANTIEVOORWAARDEN
• Op dit product wordt een garantie van 24 maanden verleend. Uw garantie is geldig wanneer
het product is gebruikt in overeenstemming met de gebruiksaanwijzing en voor het doel
waarvoor het gemaakt is. Tevens dient de originele aankoopbon (factuur, kassabon of
kwitantie) overlegd te worden met daarop de aankoopdatum, de naam van de retailer en het
artikelnummer van het product.
• Voor uitgebreide garantievoorwaarden verwijzen wij u naar onze servicewebsite: www.
service.tristar.eu
AANWIJZINGEN TER BESCHERMING VAN HET MILIEU
Dit product mag aan het einde van zijn levensduur niet bij het normale huisafval
worden gedeponeerd, maar dient bij een speciaal inzamelpunt voor het hergebruik van
elektrische en elektronische apparaten te worden aangeboden. Het symbool op artikel, gebruik-
saanwijzing en verpakking attendeert u hierop. De gebruikte grondstoen zijn geschikt voor
hergebruik. Met het hergebruik van gebruikte apparaten of grondstoen levert u een belangrijke
bijdrage aan de bescherming van ons milieu. Informeer bij uw lokale overheid naar het bedoelde
inzamelpunt.
5
31312
4
2
1
9
8
6
7
10
11
Содержание
- Als de veiligheidsinstructies niet worden opgevolgd kan de fabrikant niet verantwoordelijk worden gesteld voor schade die daar eventueel het gevolg van is gebruik het apparaat niet indien de stekker het netsnoer of het apparaat zelf beschadigd is indien het netsnoer beschadigd is moet u het laten vervangen door een bekwame gekwalificeerde dienst om gevaar te voorkomen verplaats het apparaat nooit door aan het snoer te trekken en zorg ervoor dat het snoer nergens in verstrikt kan raken het apparaat moet worden geplaatst op een stabiele vlakke ondergrond laat het apparaat nooit onbeheerd achter wanneer de stekker in het stopcontact steekt dit apparaat is alleen voor huishoudelijk gebruik en voor het doel waar het voor bestemd is om kinderen te beschermen tegen de gevaren van elektrische apparatuur mag u ze nooit zonder toezicht bij het apparaat laten selecteer daarom een plek voor uw apparaat op dusdanige wijze dat kinderen er niet bij kunnen zorg ervoor dat het snoer niet naar beneden h 1
- Bedienungsanleitung 1
- Bl 4433 1
- Bruksanvisning 1
- By ignoring the safety instructions the manufacturer can not be hold responsible for the damage do not use this appliance with a damaged cord or plug or when the appliance has malfunctions or has been damaged in any manner to avoid a hazard make sure that a damaged cord or plug will be replaced by an competent qualified repair service do not repair this appliance yourself never move the appliance by pulling the cord and make sure the cord can not become entangled the appliance must be placed on a stable level surface the user must not leave the device unattended while it is connected to the supply this appliance is only to be used for household purposes and only for the purpose it is made for to protect children against the dangers of electrical appliances please make sure that you never leave the appliance unattended therefore you have to select a storage place for the appliance where children are not able to grab it make sure that the cable is not hanging in a downward position to pr 1
- En instruction manual nl gebruiksaanwijzing fr mode d emploi 1
- Gebruiksaanwijzing 1
- Instruction manual 1
- Instructions de sécurité importantes 1
- Instrukcja obsługi 1
- Le fabricant ne sera pas tenu responsable de tous dommages si les consignes de sécurité ne sont pas respectées ne pas utiliser cet appareil avec un cordon ou une prise endommagés ou s il ne fonctionne pas correctement ou a subi des dégâts quelconques afin d éviter tous dangers veillez à ce qu un cordon ou prise endommagés soient remplacés par un technicien agréé ne réparez pas vous même cet appareil ne jamais déplacer l appareil en tirant sur le cordon et veillez à ce que ce dernier ne devienne pas entortillé l appareil doit être posé sur une surface stable et nivelée ne jamais utiliser l appareil sans supervision cet appareil est uniquement destiné à des utilisations domestiques et seulement dans le but pour lequel il est fabriqué pour protéger les enfants des dangers des appareils électriques veillez à ne jamais laisser les appareils sans surveillance par conséquent il faudra choisir un lieu de rangement pour l appareil inaccessible aux enfants veillez à ce que le cordon ne pende pas 1
- Manual de usuario 1
- Manual de utilizador 1
- Manuale utente 1
- Mode d emploi 1
- Návod na použitie 1
- Návod na použití 1
- Safety instructions 1
- Veiligheidsvoorschriften 1
- Www tristar eu 1
- Beim ignorieren der sicherheitshinweise kann der hersteller nicht für schäden haftbar gemacht werden verwenden sie das gerät niemals wenn kabel oder stecker beschädigt sind oder wenn das gerät eine fehlfunktion aufweist oder auf irgendeine weise beschädigt wurde um einer gefahr vorzubeugen stellen sie sicher dass beschädigte kabel oder stecker von einem autorisierten techniker ausgetauscht werden reparieren sie das gerät nicht selbst bewegen sie das gerät niemals indem sie am kabel ziehen und achten sie darauf dass das kabel nicht verwickelt wird das gerät muss auf einer ebenen stabilen fläche platziert werden das gerät darf nicht unbeaufsichtigt bleiben während es am netz angeschlossen ist dieses gerät darf nur für haushaltszwecke und für die anwendung für die es hergestellt wurde verwendet werden um kinder vor den gefahren eines elektrogeräts zu schützen müssen sie darauf achten dass das gerät niemals unbeaufsichtigt ist aus diesem grund müssen sie für das gerät einen aufbewahrungsor 2
- Cuidados importantes 2
- De bedienungsanleitung es manual de usuario pt manual de utilizador 2
- Precauciones importantes 2
- Se não seguir as instruções de segurança o fabricante não pode ser considerado responsável pelo dano não utilize este aparelho com um cabo ou ficha danificado ou quando o aparelho está avariado após ocorrer avaria ou qualquer outro dano para evitar perigos certifique se de que o cabo ou a tomada danificados são substituídos por um técnico autorizado não repare o aparelho sozinho nunca mova o aparelho puxando o cabo e certifique se de que nunca fica preso o aparelho deve ser colocado numa superfície plana e estável nunca utilize o aparelho sem supervisão este aparelho destina se apenas a uma utilização doméstica e para os fins para os quais foi concebido para proteger as crianças contra os perigos de aparelhos eléctricos certifique se de que nunca deixa os aparelhos sem supervisão para isso deve seleccionar um local de armazenamento para o aparelho onde as crianças não cheguem certifique se de que o cabo não está pendurado para baixo para se proteger de choque eléctrico não mergulhe o c 2
- Si ignora las instrucciones de seguridad eximirá al fabricante de toda responsabilidad por posibles daños no utilice ningún aparato con el cable o el enchufe dañados después de que se haya sufrido una avería o de que se haya dañado de cualquier manera para evitar riesgos asegúrese de que un técnico autorizado sustituya el cable o el enchufe dañado no repare usted mismo el aparato no mueva el aparato tirando del cable y asegúrese de que el cable no se enrolle este aparato se debe colocar sobre una superficie estable nivelada no utilice el dispositivo sin supervisión este aparato se debe utilizar únicamente para el uso doméstico y sólo para las funciones para las que se ha diseñado para proteger a los niños frente a los peligros de los aparatos eléctricos asegúrese de no dejar los aparatos sin vigilancia elija un lugar de almacenamiento para el aparato donde los niños no puedan acceder a él asegúrese de que el cable no cuelgue hacia abajo como medida de protección contra las descargas el 2
- Wichtige sicherheitsvorkehrungen 2
- Il produttore non è responsabile di eventuali danni e lesioni conseguenti alla mancata osservanza delle istruzioni non utilizzare l apparecchio se il cavo o la spina è danneggiata oppure in caso di anomalie o danni di qualunque tipo per evitare pericoli far sostituire il cavo o la spina danneggiata da un tecnico autorizzato non riparare da sé l apparecchio non spostare mai l apparecchio tirandolo per il cavo e controllare che il cavo non possa rimanere impigliato collocare l apparecchio su una superficie stabile e piana non lasciare mai l apparecchio senza sorveglianza questo apparecchio ha uso esclusivamente domestico e deve essere utilizzato soltanto per gli scopi previsti per proteggere i bambini dai pericoli derivanti dalle apparecchiature elettriche non lasciare mai l apparecchio senza sorveglianza collocare quindi l apparecchio in un luogo non accessibile ai bambini non lasciare il cavo penzoloni per proteggersi da scosse elettriche non immergere cavo spina o apparecchio in acqua 3
- Instrukcje dotyczące bezpieczeństwa 3
- Istruzioni importanti per la sicurezza 3
- It manuale utente 3
- Om dessa säkerhetsanvisningar ignoreras kan inget ansvar utkrävas av tillverkaren för eventuella skador som uppkommer använd inte den här apparaten om sladden eller kontakten är skadad eller om apparaten inte fungerar ordentligt eller om den har skadats på något sätt för att undvika faror ska alltid en skadad sladd eller kontakt bytas av en auktoriserad tekniker försök inte reparera apparaten själv flytta aldrig apparaten genom att dra den i sladden och se till att sladden inte kan trassla sig apparaten måste placeras på en stabil jämn yta använd aldrig apparaten oövervakad denna apparat får endast användas för hushållsändamål och endast för det syfte den är konstruerad för för att skydda barn mot farorna med elektriska apparater ber vi dig att aldrig lämna apparaten utan tillsyn välj därför en förvaringsplats för apparaten som är oåtkomlig för barn kontrollera så att kabeln inte hänger nedåt för att undvika eltötar ska du aldrig sänka ned sladden kontakten eller apparaten i vatten ell 3
- Pl instrukcja obsługi 3
- Producent nie ponosi odpowiedzialności za uszkodzenia wynikające z niestosowania się do instrukcji dotyczących bezpieczeństwa urządzenia nie należy używać jeśli kabel lub wtyczka są uszkodzone albo gdy urządzenie działa wadliwie lub zostało w jakikolwiek sposób uszkodzone aby uniknąć zagrożenia uszkodzony kabel lub wtyczkę powinien wymienić upoważniony technik urządzenia tego nie należy naprawiać samodzielnie urządzenia nie należy nigdy przenosić ciągnąc za kabel a także należy uważać aby kabel się nie zaplątał urządzenie należy umieszczać na stabilnej i poziomej powierzchni nigdy nie należy zostawiać włączonego urządzenia bez nadzoru urządzenie to może być używane wyłącznie do celów domowych i tylko zgodnie z przeznaczeniem aby chronić dzieci przed zagrożeniami wynikającymi z użytkowania urządzeń elektrycznych nie należy nigdy pozostawiać tego rodzaju urządzeń bez nadzoru dlatego też należy wybrać takie miejsce przechowywania tego urządzenia z którego dzieci nie będą mogły go wyjąć na 3
- Sv bruksanvisning 3
- Viktiga säkerhetsanordningar 3
- Bezpečnostné pokyny 4
- Bezpečnostní pokyny 4
- Při ignorování bezpečnostních pokynů není výrobce odpovědný za případná poškození nepoužívejte tento spotřebič s poškozeným přívodním kabelem nebo zástrčkou nebo pokud má spotřebič poruchu či byl nějakým způsobem poškozen aby se předešlo nebezpečí ujistěte se že je poškozený kabel či zástrčka vyměněna autorizovaným technikem neopravujte tento spotřebič sami nikdy spotřebič nepřenášejte tažením za přívodní šňůru a ujistěte se že se kabel nemůže zaseknout spotřebič musí být umístěn na stabilním a rovném povrchu nikdy nenechávejte zapnutý spotřebič bez dozoru tento spotřebič lze použít pouze v domácnosti za účelem pro který byl vyroben pro ochranu dětí před nebezpečím elektrických spotřebičů prosím zajistěte aby spotřebič nikdy neležel bez dozoru proto byste měli vyhradit spotřebiči místo kde na něj děti nemohou dosáhnout ujistěte se že kabel není zavěšen směrem dolů abyste se ochránili před elektrickým výbojem neponořujte napájecí kabel zástrčku či spotřebič do vody či jiné tekutiny tent 4
- Sk návod na použitie cs návod na použití 4
- V prípade ignorovania bezpečnostných pokynov výrobca nie je zodpovedný za prípadné poškodenie toto zariadenie nepoužívajte s poškodeným prívodným káblom alebo zástrčkou alebo pokiaľ má zariadenie poruchu či bolo nejakým spôsobom poškodené aby sa predišlo nebezpečenstvu uistite sa že je poškodený kábel či zástrčka vymenená autorizovaným technikom toto zariadenie neopravujte svojpomocne nikdy spotrebič neprenášejte ťahaním za kábel a uistite sa že sa kábel nemôže zaseknúť zariadenie musí byť umiestnené na stabilnom a rovnom povrchu nikdy nenechávajte zariadenie zapnuté bez dozoru toto zariadenie sa môže používať iba v domácnosti za účelom na ktorý bolo vyrobené kvôli ochrane detí pred nebezpečenstvom spôsobeným elektrickými zariadeniami prosím zaistite aby zariadenie nikdy nezostalo bez dozoru v dôsledku toho je zariadeniu potrebné vyhradiť miesto kde naň deti nemôžu dočiahnuť uistite sa že kábel nie je zavesený smerom dolu abyste sa ochránili pred elektrickým výbojom neponárajte napájac 4
Похожие устройства
- Tristar kw-2435 Инструкция по эксплуатации
- Tristar sa-1123 Инструкция по эксплуатации
- Tristar bl-4430 Инструкция по эксплуатации
- Tristar ek-3074 Инструкция по эксплуатации
- Thermos dual 2 in 1 27 can cooler-purple Инструкция по эксплуатации
- Aquario ASP2-25-100WA Инструкция по эксплуатации
- Toshiba stor.e basics, hdtb120ek3ca, 2тб, черный Инструкция по эксплуатации
- Aquario ASP2-40-100WA Инструкция по эксплуатации
- Unit uek-264 Инструкция по эксплуатации
- Unit uek-264 Инструкция по эксплуатации
- Touchbeauty as-1277 Инструкция по эксплуатации
- Touchbeauty as-0508 Инструкция по эксплуатации
- Aquario ASP3-35-100WA Инструкция по эксплуатации
- Touchbeauty as-1009 Инструкция по эксплуатации
- Touchbeauty ec-1218 Инструкция по эксплуатации
- Touchbeauty as-0708 Инструкция по эксплуатации
- Touchbeauty as-1275 Инструкция по эксплуатации
- Tristar ik-6176 Инструкция по эксплуатации
- Tristar sa-3051 Инструкция по эксплуатации
- Tristar ov-1421 Инструкция по эксплуатации
Скачать
Случайные обсуждения