![Loewe Viewvision DR+ [14/66] Initial installation](/img/pdf.png)
Loewe Viewvision DR+ [14/66] Initial installation
![Loewe Viewvision DR+ [14/66] Initial installation](/views2/1020455/page14/bge.png)
- 14
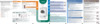
Connecting to an External Decoder Box
If you use an external decoder box for your satellite or cable TV system, follow the
connection procedure described below.
Connect your aerial socket in the wall to the aerial input socket on your set-top
box / satellite receiver using an aerial cable.
Connect the decoder to the EURO AV DECODER socket on the set-top box
/satellite receiver using a SCART cable. Further instructions can be found in
the manual for your decoder box.
Connect the EURO AV2 socket on the DVD recorder to a EURO AV 2 socket
on your set-top box / satellite receiver using a SCART cable.
Connect the EURO AV1 socket on the DVD recorder to a EURO AV 1 socket
on your television using the SCART cable.
➠ Do not connect the Decoder-Box directly to the recorder but as shown in
the figure below to the satellite/set-top box.
➠ Stations from the decoder (e.g. via Pay-TV services) can only be viewed when
the recorder is switched off (standby mode).
➠ For timer recordings to work properly on this recorder, the satellite / set-top
box must also be switched on during recording.
➠ With this configuration you cannot watch one television broadcast and record
another at the same time.
S-VIDEO
OUTPUT
UD IO I PUT
VIDEO
I PUT
D I
I PUT
S-VIDEO
I PUT
S T I PUT
P
P
O PO E T VIDEO I PUT
S T V S T V
E I
I PUT
E I
OUTPUT
S T V
Set-top box or satellite receiver
Back of the television
Back of the recorder
Antenna/
cable television
wall socket
Decoder
1.
2.
3.
4.
Connecting to an Amplier
Connecting to an analog amplifier with analog 2-channel
stereo or Dolby Pro Logic II / Pro Logic
Connect the left and right AUDIO OUT socket of the recorder to the left and
right AUDIO IN sockets of the amplifier, receiver or stereo system with the audio
cables (A).
Connecting to a digital amplifier with two-channel digital
stereo (PCM) or to an audio/video receiver with a multi-
channel decoder (Dolby Digital™, MPEG 2 or DTS)
Connect one of the DIGITAL AUDIO OUT sockets (OPTICAL O or COAXIAL
X) of the recorder to the appropriate input socket on your amplifier. Use an
appropriate digital audio cable (optical O or coaxial X - available from your
dealer).
You must configure the digital output of the recorder (Page 22).
S-VIDEO
OUTPUT
A
X
O
UD IO I PUT DI IT I PUT
O I
DI IT I PUT
OPTI
Back of the recorder
Amplifier (Receiver)
Digital multi-channel sound
A digital multi-channel connection offers the best sound quality. You will need a
multi-channel audio/video receiver which supports one or more audio formats, e.g.
MPEG 2, Dolby Digital and DTS. You will find information in the documentation
enclosed with the receiver.
➠ Due to the DTS licensing agreement the digital output will be to DTS DIGITAL-
OUT when a DTS audio stream is selected.
This recorder does not perform a (2-channel) decoding (downmix) of a DTS
sound track internally. In order to enjoy DTS multi-channel surround sound, you
have to connect this recorder to a DTS-compatible receiver via one of the
recorder’s digital audio outputs.
1.
2.
Initial Installation
Содержание
- Viewvisiondr p.1
- Operating manual p.1
- 32818 22 p.1
- Contents p.2
- Remote control assist recorder operation p.3
- Open close p.4
- Front panel p.4
- Rear panel display p.5
- Dvd rec t s hdd p.5
- Dvd in operation p.5
- Caution do not touch the inner pins of connection sockets on the rear panel electrostatic discharge may cause permanent damage to the unit p.5
- Aerial connection p.5
- Set up p.6
- Scope of delivery p.6
- Welcome p.6
- Trademark rights p.6
- Thank you p.6
- About the internal hard disk p.7
- Welcome p.7
- Shipping the unit p.7
- Disposal p.7
- Advantages of connection to a loewe tv set p.7
- For your safety p.8
- Rewritable discs p.9
- Essential information p.9
- Playable discs p.10
- Essential information p.10
- Notes on discs p.11
- Essential information p.11
- Disc related terms p.11
- Symbols p.11
- Switching over to progressive scan p.12
- Resetting the dvd recorder p.12
- Initial remote control setup p.12
- Initial installation p.12
- Connections general p.12
- Connecting to the aerial p.12
- Initial installation p.13
- Connecting to the television p.13
- Connecting to a set top box satellite receiver p.13
- Initial installation p.14
- Connecting to an external decoder box p.14
- Connecting to an amplifier p.14
- Connecting to an amplifier p.14
- Basic settings p.15
- Activating digital link p.15
- Initial installation p.15
- Connecting audio video a v accessories p.15
- Connecting a digital camcorder p.15
- Setup menu p.16
- Main menu p.16
- Initial installation p.16
- The general menu p.17
- Initial installation p.17
- Initial installation p.18
- Space delete ok cancel p.19
- Initial installation p.19
- Alphabet capital p.19
- 3 4 5 6 7 8 9 0 a b c d e f g h i j k l m n o p q r s t u v w x y z æ ç đ ø þ ß µ p.19
- Initial installation p.20
- Language menu p.21
- Initial installation p.21
- Lock menu p.22
- Initial installation p.22
- Audio menu p.22
- Initial installation p.23
- Initial installation p.24
- Recording menu p.25
- Initial installation p.25
- Initial installation p.26
- Disc menu p.26
- Space delete ok cancel p.27
- Initial installation p.27
- Dvd rw p.27
- Alphabet capital p.27
- 3 4 5 6 7 8 9 0 a b c d e f g h i j k l m n o p q r s t u v w x y z æ ç đ ø þ ß µ p.27
- Initial installation p.28
- Additional screen menus p.28
- Hdmi operation p.29
- Hdmi mode p.29
- Hdmi dvi connection p.29
- Video mode p.30
- Playing back a dvd or video cd p.30
- General functions p.30
- Video mode p.31
- Video mode p.32
- Video mode p.33
- Storing the last disc settings p.33
- Playing memory media with mixed contents p.33
- Pip picture in picture p.33
- Playing divx files p.34
- Divx subtitles p.34
- Divx mode p.34
- About divx video files p.34
- Audio mode p.35
- Copy move files folders p.36
- Audio mode p.36
- Program list p.37
- Audio mode p.37
- Photo mode p.38
- Card reader mode p.39
- Remote control assist card reader operation p.40
- Recordings on the hdd p.41
- Recording p.41
- Delayed tv viewing timeshift mode p.41
- Simultaneous record and display p.42
- Recording p.42
- Manual record p.42
- H 19m free p.42
- Recording p.43
- Timer recordings with the showview system p.43
- Timer recording p.43
- Record from external sources p.44
- Timer record list p.44
- Recording p.44
- Digital video p.44
- Recording p.45
- Menu title list and chapter list p.46
- Edit recordings p.46
- Edit recordings p.47
- Edit original and playlist p.47
- Create new playlist p.47
- Add chapter markers p.47
- Edit recordings p.48
- Confirm with ok p.48
- Add title chapter to the playlist p.48
- You can add an original title or a chapter to a playlist title even if it is already registered p.48
- The new title appears in the updated playlist all chapters of the title are added to the playlist p.48
- The available options are displayed at the left p.48
- The added chapters are displayed in the menu search chap ter chapter list playlist p.48
- Select title list playlist in which a title or chapter is to be inserted p.48
- Select playlist add p.48
- Select new playlist p.48
- Select a title chapter in the title list original or chapter list original menu which is to be inserted in the playlist p.48
- End editing of the playlist p.48
- Edit recordings p.49
- Delete title chapter from original playlist p.49
- Delete part p.49
- Title name p.50
- Select title start point p.50
- Select chapter p.50
- Edit recordings p.50
- Undo redo deletion p.51
- Sorting p.51
- Edit recordings p.51
- Combine titles p.51
- Edit recordings p.52
- Divide title p.52
- Combine chapters p.52
- Protect title p.53
- Move playlists chapters p.53
- Hide title chapter p.53
- Edit recordings p.53
- Dubbing p.54
- Before dubbing p.54
- Dubbing p.55
- Dub from hdd to dvd p.55
- Dub from dvd to hdd p.55
- Title list menus on other devices p.56
- Playing on other devices p.56
- Overwrite recordings p.56
- Dubbing p.56
- Troubleshooting p.57
- Troubleshooting p.58
- Technical specifications p.59
- Recording p.59
- Playback p.59
- Outputs p.59
- Masthead p.59
- Inputs p.59
- General p.59
- Setting the remote control p.60
- Operating loewe equipment p.60
- Operating additional devices p.60
- Remote control assist tv operation p.61
- Language code list p.62
- Enter the appropriate code when fi rst setting up disc audio disc subtitles and or disc menu further information can be found under disc languages on page 1 p.62
- List of country codes p.63
- Key in the corresponding code when first setting the area code page 4 p.63
- Glossary p.64
- Service p.66
Похожие устройства
-
 DCK KDMD12Инструкция по эксплуатации
 -
 LG DVRK 898Инструкция по эксплуатации
 -
 Bosch WTZ 11310Руководство пользователя
 -
 Candy GO 2127 LMCРуководство пользователя
 -
Candy GOE 107 LMCРуководство пользователя
-
 Bosch MSM 2623GРуководство пользователя
 -
Bosch MSM 14200Руководство пользователя
-
Bosch MSM 14100Руководство пользователя
-
 Bosch WTZ 11300Руководство пользователя
 -
 Bosch WTZ 11300ИНСТРУКЦИЯ ПО УСТАНОВКЕ
 -
 Bosch HMT75M421Правила пользования
 -
Bosch HMT75M451Правила пользования