![Loewe Viewvision DR+ [15/66] Initial installation](/img/pdf.png)
Loewe Viewvision DR+ [15/66] Initial installation
![Loewe Viewvision DR+ [15/66] Initial installation](/views2/1020455/page15/bgf.png)
15 -
➠ If the audio format of the digital output does not correspond to the capa-
bilities of your receiver, the receiver will emit a strong distorted sound or no
sound at all.
5.1 Digital surround sound via the digital connection can only be obtained if
your receiver is equipped with a digital multi-channel decoder.
You can obtain information about the audio format of the current DVD via the
“Disc Info“ menu (Page 28).
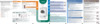
Connecting Audio/Video (A/V) Accessories
Connect the input sockets (AV2, AV3 = AUDIO IN 3 / VIDEO IN 3 on the back of
the device or AV4 = input 4 on the front of the device (page 4)) of the recorder
to the audio/video out sockets of the accessory components with the audio/video
cables.
➠ You can use either the S-VIDEO IN socket on the front panel or the VIDEO
IN socket on the rear.
If you have connected a device to AV2 and switched off its power supply, the
Digital Link Plus function to the recorder is not possible.
Video
S-Video
DV
L-Audio-R
L
R
VIDEO
OUTPUT
AUDIO
OUTPUT
S-VIDEO
OUTPUT
Back of the recorder
Front of the recorder
Connector block for an
accessory component
(VCR, Camcorder, etc.)
or
or
Connecting a digital camcorder
You can connect a digital camcorder (DV) or a digital DVD-R/RW recorder to the
DV IN socket and transfer contents of DV tapes or DVDs digitally.
Use a DV cable (not included in delivery) to connect the DV IN-/OUT socket of
your DV-camcorder/video deck to the DV IN socket on the front control panel of
this recorder.
➠ Only DV units can be connected to this socket (the source signal must be in
the DV-25 format; see page 44). It is not compatible with digital satellite tuners
or S-VHS video decks.
DV
IN/OUT
Video
S-Video
DV
L-Audio-R
Front of the recorder
DV Digital Camcorder
Activating Digital Link
With Digital Link, Loewe TV sets pass on the signals from the remote control through
the Euro-AV connection on the recorder. Digital Link is useful when you want to
put the recorder in a concealed place, e.g. in a closed rack.
➠ Your recorder must be switched on.
Button on the recorder for > 3 s
Digital Link on: LINK appears in the recorder display.
Digital Link off: FRONT appears in the recorder display.
Basic Settings
Set the remote control for recorder operation.
Push the On/Off button on the DVD recorder or
the On/Off switch on the remote control.
Initial Installation
Содержание
- Viewvisiondr p.1
- Operating manual p.1
- 32818 22 p.1
- Contents p.2
- Remote control assist recorder operation p.3
- Front panel p.4
- Open close p.4
- Rear panel display p.5
- Dvd rec t s hdd p.5
- Dvd in operation p.5
- Caution do not touch the inner pins of connection sockets on the rear panel electrostatic discharge may cause permanent damage to the unit p.5
- Aerial connection p.5
- Welcome p.6
- Trademark rights p.6
- Thank you p.6
- Set up p.6
- Scope of delivery p.6
- About the internal hard disk p.7
- Welcome p.7
- Shipping the unit p.7
- Disposal p.7
- Advantages of connection to a loewe tv set p.7
- For your safety p.8
- Rewritable discs p.9
- Essential information p.9
- Playable discs p.10
- Essential information p.10
- Symbols p.11
- Notes on discs p.11
- Essential information p.11
- Disc related terms p.11
- Switching over to progressive scan p.12
- Resetting the dvd recorder p.12
- Initial remote control setup p.12
- Initial installation p.12
- Connections general p.12
- Connecting to the aerial p.12
- Connecting to a set top box satellite receiver p.13
- Initial installation p.13
- Connecting to the television p.13
- Initial installation p.14
- Connecting to an external decoder box p.14
- Connecting to an amplifier p.14
- Connecting to an amplifier p.14
- Initial installation p.15
- Connecting audio video a v accessories p.15
- Connecting a digital camcorder p.15
- Basic settings p.15
- Activating digital link p.15
- Setup menu p.16
- Main menu p.16
- Initial installation p.16
- The general menu p.17
- Initial installation p.17
- Initial installation p.18
- Space delete ok cancel p.19
- Initial installation p.19
- Alphabet capital p.19
- 3 4 5 6 7 8 9 0 a b c d e f g h i j k l m n o p q r s t u v w x y z æ ç đ ø þ ß µ p.19
- Initial installation p.20
- Language menu p.21
- Initial installation p.21
- Lock menu p.22
- Initial installation p.22
- Audio menu p.22
- Initial installation p.23
- Initial installation p.24
- Recording menu p.25
- Initial installation p.25
- Disc menu p.26
- Initial installation p.26
- Space delete ok cancel p.27
- Initial installation p.27
- Dvd rw p.27
- Alphabet capital p.27
- 3 4 5 6 7 8 9 0 a b c d e f g h i j k l m n o p q r s t u v w x y z æ ç đ ø þ ß µ p.27
- Initial installation p.28
- Additional screen menus p.28
- Hdmi operation p.29
- Hdmi mode p.29
- Hdmi dvi connection p.29
- Video mode p.30
- Playing back a dvd or video cd p.30
- General functions p.30
- Video mode p.31
- Video mode p.32
- Video mode p.33
- Storing the last disc settings p.33
- Playing memory media with mixed contents p.33
- Pip picture in picture p.33
- Playing divx files p.34
- Divx subtitles p.34
- Divx mode p.34
- About divx video files p.34
- Audio mode p.35
- Copy move files folders p.36
- Audio mode p.36
- Program list p.37
- Audio mode p.37
- Photo mode p.38
- Card reader mode p.39
- Remote control assist card reader operation p.40
- Recordings on the hdd p.41
- Recording p.41
- Delayed tv viewing timeshift mode p.41
- Simultaneous record and display p.42
- Recording p.42
- Manual record p.42
- H 19m free p.42
- Timer recordings with the showview system p.43
- Timer recording p.43
- Recording p.43
- Record from external sources p.44
- Timer record list p.44
- Recording p.44
- Digital video p.44
- Recording p.45
- Edit recordings p.46
- Menu title list and chapter list p.46
- Edit recordings p.47
- Edit original and playlist p.47
- Create new playlist p.47
- Add chapter markers p.47
- The new title appears in the updated playlist all chapters of the title are added to the playlist p.48
- The available options are displayed at the left p.48
- The added chapters are displayed in the menu search chap ter chapter list playlist p.48
- Select title list playlist in which a title or chapter is to be inserted p.48
- Select playlist add p.48
- Select new playlist p.48
- Select a title chapter in the title list original or chapter list original menu which is to be inserted in the playlist p.48
- End editing of the playlist p.48
- Edit recordings p.48
- Confirm with ok p.48
- Add title chapter to the playlist p.48
- You can add an original title or a chapter to a playlist title even if it is already registered p.48
- Edit recordings p.49
- Delete title chapter from original playlist p.49
- Delete part p.49
- Title name p.50
- Select title start point p.50
- Select chapter p.50
- Edit recordings p.50
- Undo redo deletion p.51
- Sorting p.51
- Edit recordings p.51
- Combine titles p.51
- Edit recordings p.52
- Divide title p.52
- Combine chapters p.52
- Edit recordings p.53
- Protect title p.53
- Move playlists chapters p.53
- Hide title chapter p.53
- Dubbing p.54
- Before dubbing p.54
- Dubbing p.55
- Dub from hdd to dvd p.55
- Dub from dvd to hdd p.55
- Title list menus on other devices p.56
- Playing on other devices p.56
- Overwrite recordings p.56
- Dubbing p.56
- Troubleshooting p.57
- Troubleshooting p.58
- Technical specifications p.59
- Inputs p.59
- General p.59
- Recording p.59
- Playback p.59
- Outputs p.59
- Masthead p.59
- Setting the remote control p.60
- Operating loewe equipment p.60
- Operating additional devices p.60
- Remote control assist tv operation p.61
- Language code list p.62
- Enter the appropriate code when fi rst setting up disc audio disc subtitles and or disc menu further information can be found under disc languages on page 1 p.62
- List of country codes p.63
- Key in the corresponding code when first setting the area code page 4 p.63
- Glossary p.64
- Service p.66
Похожие устройства
-
 DCK KDMD12Инструкция по эксплуатации
 -
 LG DVRK 898Инструкция по эксплуатации
 -
 Bosch WTZ 11310Руководство пользователя
 -
 Candy GO 2127 LMCРуководство пользователя
 -
Candy GOE 107 LMCРуководство пользователя
-
 Bosch MSM 2623GРуководство пользователя
 -
Bosch MSM 14200Руководство пользователя
-
Bosch MSM 14100Руководство пользователя
-
 Bosch WTZ 11300Руководство пользователя
 -
 Bosch WTZ 11300ИНСТРУКЦИЯ ПО УСТАНОВКЕ
 -
 Bosch HMT75M421Правила пользования
 -
Bosch HMT75M451Правила пользования