![Sony KL-40WA1K — настройка звука и таймера на телевизоре [17/31]](/img/pdf.png)
Sony KL-40WA1K — настройка звука и таймера на телевизоре [17/31]
![Sony KL-40WA1K [17/31] Using the sleep timer](/views2/1091289/page17/bg11.png)
17
GB
Effect
Choice between different sound effects
User ˜ Pop ˜ Jazz ˜ Rock
Less More
Less
More
More left
More right
Off: normal
On: for music broadcasts
Off: normal
On: special acoustic effect
A: left channel B: right channel Stereo n Mono
The selected mode of the A-m -B indicator on the TV lights up.
Less
More
A: channel 1 n B: channel 2
Stereo n Mono
Main: sound from TV set
Centre in: sound from external amplifier
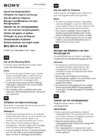
Using the Sleep Timer
You can select a time period after which the TV automatically
switches into standby mode.
1 Press MENU.
2 Push the joystick to blue or green to select the symbol t on the
menu screen. Push to yellow to confirm.
3 Push to yellow. Push to blue or green to select the time.
The time period (in minutes) changes as follows:
off ˜ 10 ˜ 20 ˜ 30 ˜ 40 ˜ 50 ˜ 60 ˜ 70 ˜ 80 ˜ 90
4 After selecting the time period, press the joystick to confirm.
One minute before the TV switches into standby mode, a message
is displayed on the screen.
TIMER
To switch off the timer
Select “off” in step 3.
To check the
remaining time
Press .
To go back to the
normal TV picture
Press MENU.
↑
SOUND CONTROL
Sound Mode
Treble
Bass
Balance
Loudness
Space
Dual Sound
Headphones:
2 Volume
2 Dual Sound
Speaker
↑
TIMER
Sleep Timer [ ]10 Min
↑
↑
Содержание
- Lcd projection tv p.1
- Kl 40wa1k p.1
- Safety information p.2
- Picture quality p.2
- Maintenance p.2
- Installation p.2
- Important information p.2
- Illumination p.2
- For safe operations p.2
- For general safety p.2
- Warning p.2
- Operating instructions 14 p.3
- Operating instructions p.3
- Getting started 6 p.3
- Getting started p.3
- Contents p.3
- Tv set front p.4
- Symbol p.4
- Refer to page p.4
- Overview p.4
- Symbol p.5
- Remote commander p.5
- Refer to page p.5
- No function on this set p.5
- Menu operation p.5
- For the menu system p.5
- Video operation p.5
- Tv teletext operation p.5
- Step 1 preparation p.6
- Getting started p.6
- Step 2 tuning in to tv stations p.7
- Choosing the menu language and the country p.7
- Presetting channels automatically p.8
- Presetting channels manually p.9
- Additional presetting functions p.9
- Repeat steps 4 and 5 to sort other programme positions p.10
- Push to blue or green to select the programme position of the channel you want to change press joystick to confirm p.10
- Push to blue or green to select the new programme position press joystick to confirm now the selected channel is changed to the new programme position p.10
- Push to blue or green to select programme sorting push to yellow to confirm p.10
- Push the joystick to blue or green to select the symbol on the menu screen push to yellow to confirm p.10
- Programme sorting p.10
- Press menu p.10
- To go back to the normal tv picture press menu p.10
- This function enables you to sort the programme positions to a preferable order p.10
- Sorting programme positions p.10
- Using further programme preset p.11
- Installation p.11
- Skipping programme positions p.12
- Manual programme preset p.12
- Captioning a station name p.12
- Using parental lock p.13
- Tuning in a channel temporarily p.13
- Parental lock p.13
- Switching off completely p.14
- Selecting tv programmes p.14
- Operating the tv using the buttons on the tv p.14
- Operating instructions p.14
- Adjusting the volume p.14
- Watching the tv p.14
- To select a double digit number p.14
- Switching the tv on and off p.14
- Switching on p.14
- Switching off temporarily p.14
- Watching teletext or video input p.15
- Watching teletext p.15
- Watching a video input picture p.15
- Muting the sound p.15
- More convenient functions p.15
- Freezing the picture p.15
- Displaying the time p.15
- Displaying the programme table p.15
- Displaying the on screen indications p.15
- Changing the screen format p.15
- Adjusting and setting the tv using the menu p.16
- Sound control p.16
- Picture control p.16
- Effect of each control p.16
- Effect p.16
- Adjusting the picture and sound p.16
- Using the sleep timer p.17
- Sound control p.17
- Effect p.17
- Operating screen mode p.18
- Changing the screen position for zoom auto wide modes p.18
- Auto 16 9 p.18
- Teletext p.19
- Switching teletext on and off p.19
- Selecting a teletext page p.19
- Direct access functions p.19
- Preventing a teletext page from being updated p.20
- Using fastext p.20
- Revealing hidden information e g for a quiz p.20
- Using the teletext menu p.21
- User pages preset user pages p.21
- Top bottom full p.21
- Time page p.21
- Text clear p.21
- Subtitles p.21
- User page bank system p.22
- Subpage p.22
- Storing pages p.22
- Displaying user pages p.22
- Connecting optional equipment p.23
- Connecting and operating optional equipment p.23
- Available output signal p.23
- Acceptable input signal p.23
- Symbol p.24
- Selecting the output p.24
- Selecting input and output p.24
- Selecting input p.24
- Output modes p.24
- Input signal p.24
- Input modes p.24
- Connector outputs p.24
- Using av preset p.25
- Checking and selecting the input and output sources using the menu p.25
- Remote control of other sony equipment p.26
- Vertical viewing area p.27
- Optimum viewing area p.27
- Horizontal viewing area p.27
- For your information p.27
- Attach the filter p.28
- Turn off the power and disconnect the power cord p.28
- Remove the front panel p.28
- Pull the filter upward and remove it p.28
- Cleaning the air filter p.28
- Clean the dust with a vacuum cleaner p.28
- Attach the front panel p.28
- When the indicator on the front panel flashes p.29
- Turn off the power and disconnect the power cord p.29
- Replacing the lamp p.29
- Remove the front panel p.29
- Loosen the screw with the object such as a coin and remove the lamp cover p.29
- Loosen the screw and pull out the lamp p.29
- Attach the new lamp p.29
- Attach the lamp cover p.29
- Attach the front panel p.29
- Indication on the screen p.30
- Troubleshooting p.30
- Specifications p.30
- Solution p.30
- Receivable channels and channel displays p.30
- Receivable channels p.30
- Problem p.30
- Warning indicators p.31
- Stabilizing the projection tv p.31
- Pass a strong cord or a chain through each bracket mounted in 1 and then secure to a wall or a pillar etc p.31
- Mount the two supplied brackets with the screws to the upper rear side of the projection tv p.31
- Indicator flashing patterns p.31
Похожие устройства
-
 Sony BRAVIA KDS-55A2000Инструкция по эксплуатации
 -
Sony BRAVIA KDS-70R2000Инструкция по эксплуатации
-
 Sony BRAVIA KDF-50E2000Инструкция по эксплуатации
 -
Sony BRAVIA KDF-50E2010Инструкция по эксплуатации
-
 Sony GRAND VEGA KF-50SX200KИнструкция по эксплуатации
 -
 Sony GRAND VEGA KF-50SX300KИнструкция по эксплуатации
 -
Sony GRAND VEGA KF-60SX300KИнструкция по эксплуатации
-
Sony GRAND VEGA KF-42SX300KИнструкция по эксплуатации
-
 Sony GRAND VEGA KF-50SX100KИнструкция по эксплуатации
 -
 Sony KL-50SX100Инструкция по эксплуатации
 -
 Sony KP-41S5KИнструкция по эксплуатации
 -
Sony KP-41S5RИнструкция по эксплуатации
Узнайте, как выбрать звуковые эффекты и настроить таймер сна на вашем телевизоре. Легкие шаги для улучшения звучания и автоматического отключения.