![Indesit FMR 54 K.A (AN) — инструкция по установке и эксплуатации бытового прибора [16/44]](/img/pdf.png)
Indesit FMR 54 K.A (AN) — инструкция по установке и эксплуатации бытового прибора [16/44]
Превью страниц
Страница 16 /
44
![Indesit FMR 54 K.A (AN) [16/44] Positioning](/views2/1955782/page16/bg10.png)
16
GB
Installation
! Please keep this instruction booklet in a safe place for
future reference. If the appliance is sold, given away or
moved, please make sure the booklet is also passed on to
contained within it.
! Please read this instruction manual carefully: it contains
important information concerning the safe operation,
installation and maintenance of the appliance.
Positioning
!
should be disposed of in accordance with local separated
!
accordance with the instructions provided. Incorrect installation
may damage property or cause harm to people or animals.
Built-in appliances
Use an appropriate cabinet to ensure that the appliance
operates properly:
resistant material.
glues which can withstand temperatures of up to 100°C.
under the counter
in a kitchen unit, the cabinet must have the following
dimensions:
595 mm.
595 mm.
25 mm.
545 mm.
5 mm.
567 mm.
23 mm.
575-585 mm.
45 mm.
558 mm.
547 mm. min.
* Stainless steel models only
! The appliance must not come into contact with electrical
parts once it has been installed.
The indications for consumption given on the data plate
have been calculated for this type of installation.
Ventilation
To ensure adequate ventilation, the back panel of the
cabinet must be removed. It is advisable to install the oven
so that it rests on two strips of wood, or on a completely
560 mm.
45 mm.
Secure the appliance to the cabinet by opening the oven
door and inserting 4 screws into the 4 holes on the outer
frame.
! All parts which ensure the safe operation of the appliance
must not be removable without the aid of a tool.
Electrical connection
Ovens equipped with a three-pole power supply cable are
designed to operate with alternating current at the voltage
and frequency indicated on the data plate located on the
Fitting the power supply cable
1. Open the terminal board
by inserting a screwdriver
into the side tabs of the
cover. Use the screwdriver
as a lever by pushing it
2. Install the power supply
cable by loosening the
cable clamp screw and the
three wire contact screws
L-N-
.
Connect the wires to the
corresponding terminals:
the Blue wire to the terminal
to the terminal marked
N
L
Содержание
157- Руководство по эксплуатации
- Istruzioni per l uso
- Instruções para a utilização
- Fmr 54 k a
- Contents
- Духовой шкафсодержание
- Índice
- Sumario
- Operating instructions
- Manual de instrucciones
- Forno sommario
- Warnings
- Avvertenze
- Advertências
- Advertencias
- Предупреждения
- Assistance
- Asistencia
- Assistenza
- Сервисное обслуживание
- Assistência
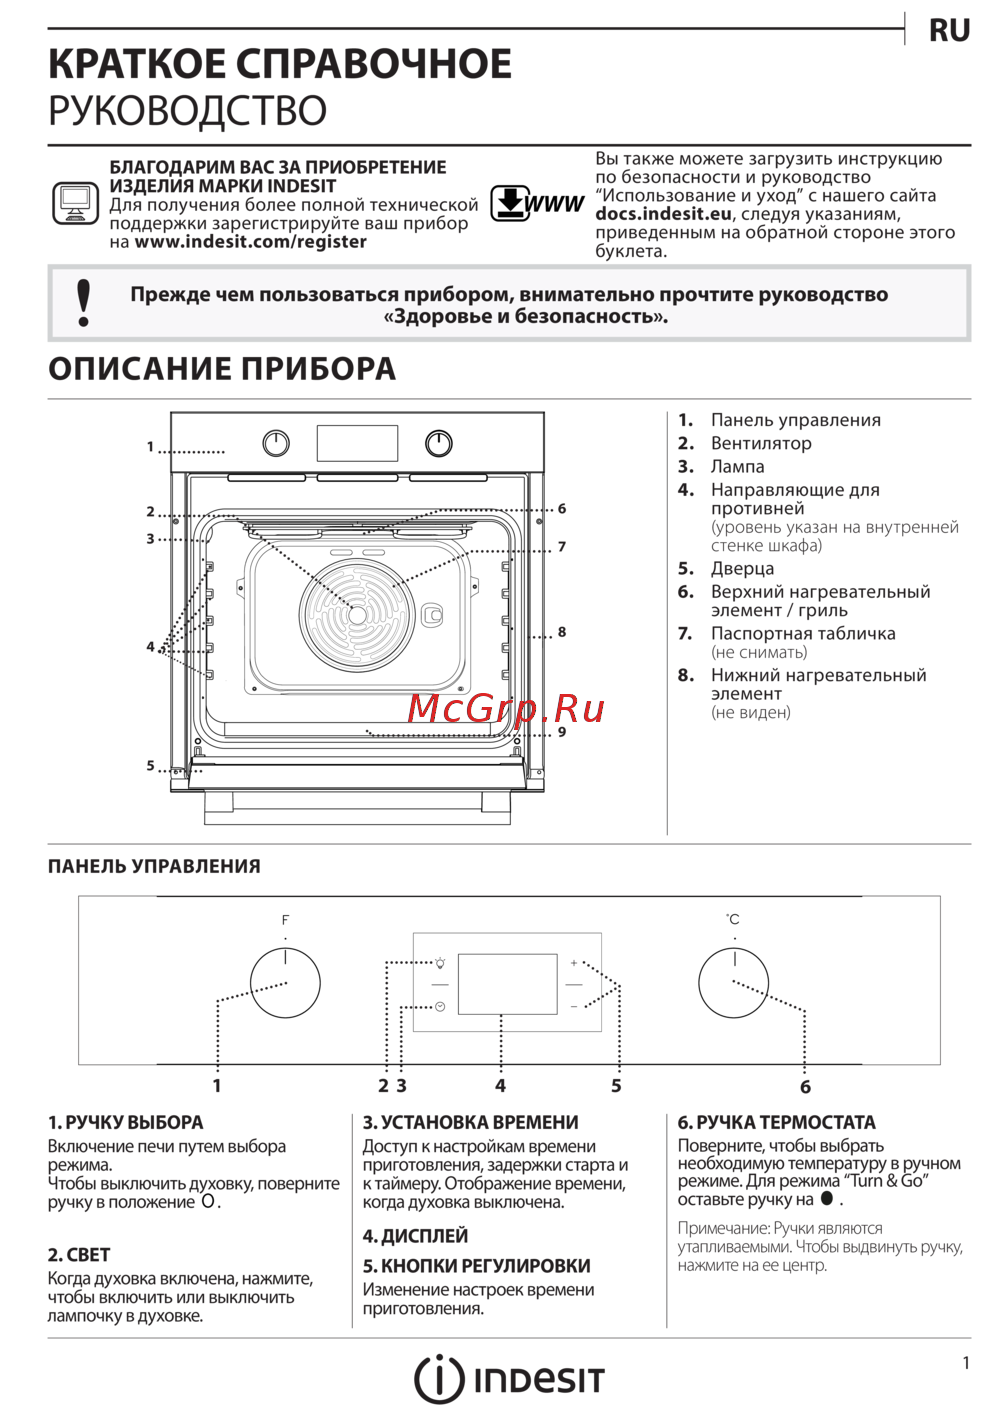
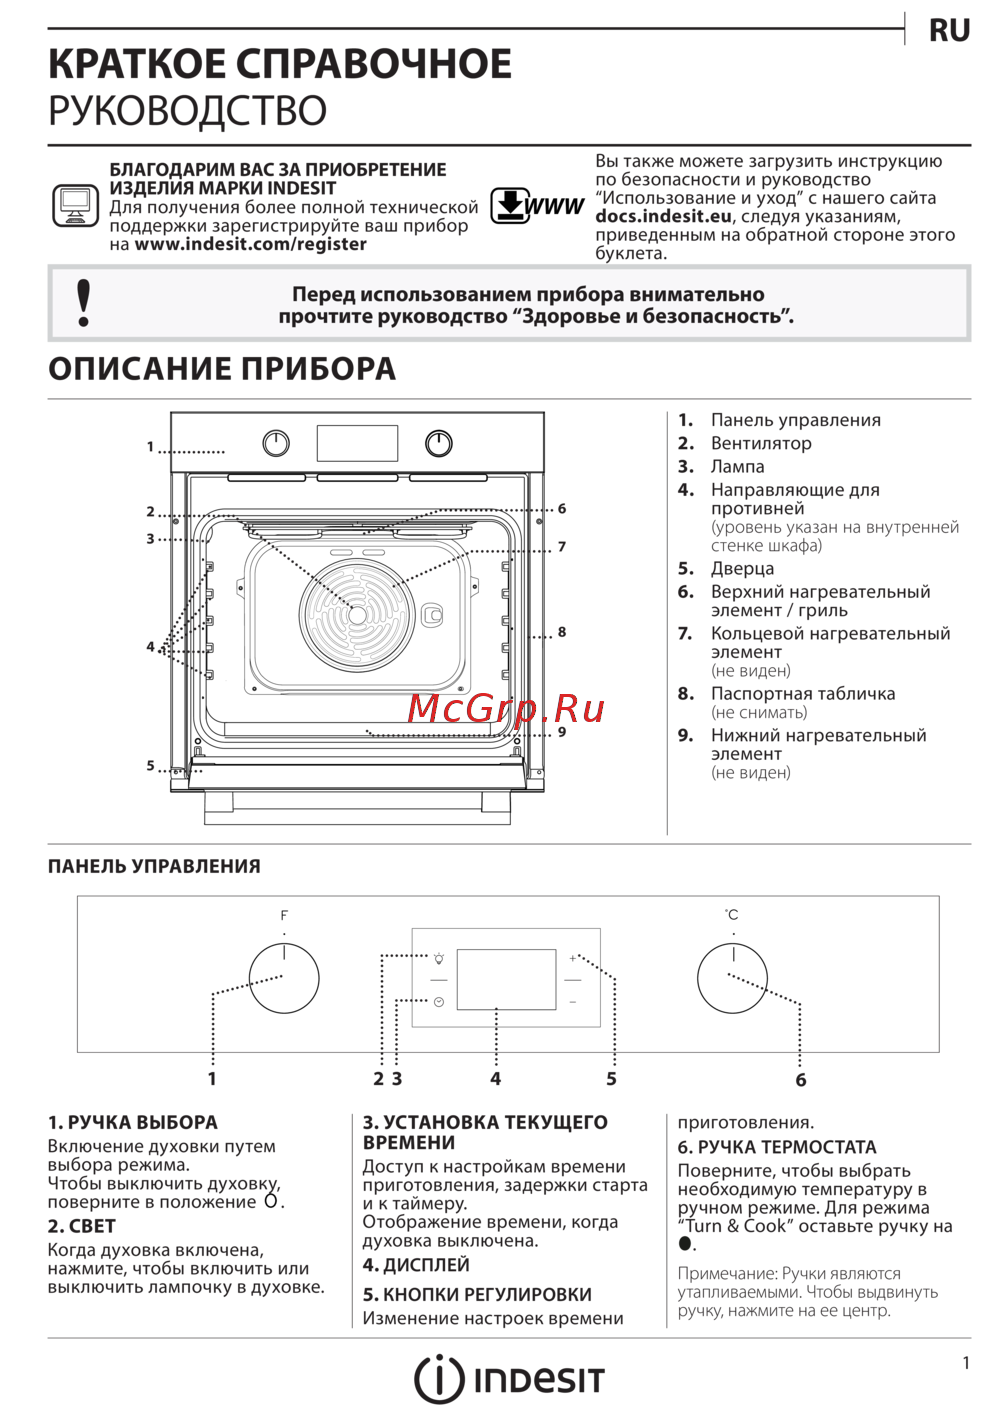
- Описание изделия
- Descrição do aparelho
- Descrizione dell apparecchio
- Description of the appliance
- Descripción del aparato
- Описание изделия
- Descrição do aparelho
- Descrizione dell apparecchio
- Description of the appliance
- Descripción del aparato
- Posizionamento
- Installazione
- Collegamento elettrico
- Orologio con contaminuti rustico
- Avvio e utilizzo
- Avviare il forno
- Programmi
- Consigli pratici di cottura
- Tabella cottura
- Smaltimento
- Sicurezza generale
- Risparmiare e rispettare l ambiente
- Pulire l apparecchio
- Precauzioni e consigli
- Manutenzione e cura
- Escludere la corrente elettrica
- Sostituire la lampadina
- Pulire la porta
- Electrical connection
- Positioning
- Installation
- Starting the oven
- Start up and use
- Clock with country style timer
- Practical cooking advice
- Cooking modes
- Cooking advice table
- Switching the appliance off
- Respecting and conserving the environment
- Precautions and tips
- Maintenance and care
- General safety
- Disposal
- Cleaning the appliance
- Cleaning the oven door
- Replacing the light bulb
- Positionnement
- Instalación
- Conexión eléctrica
- Colocación
- Una vez instalado el aparato el cable eléctrico y la toma de corriente deben ser fácilmente accesibles
- Sólo para modelos con guías embutidas sólo para modelos con guías a ras
- La toma tenga conexión a tierra y que sea conforme con la ley la toma sea capaz de soportar la carga máxima de potencia de la máquina indicada en la placa de características la tensión de alimentación eléctrica esté comprendida dentro de los valores indicados en la placa de características la toma sea compatible con el enchufe del aparato si no es así sustituya la toma o el enchufe no utilice prolongaciones ni conexiones múltiples
- La empresa declina toda responsabilidad cuando estas normas no sean respetadas
- El instalador es responsable de la correcta conexión eléctrica y del cumplimiento de las normas de seguridad
- El cable no debe sufrir pliegues ni compresiones
- El cable debe ser revisado periódicamente y sustituido sólo por técnicos autorizados ver asistencia
- Conexión del cable de alimentación eléctrica a la red instale en el cable un enchufe normalizado para la carga indicada en la placa de características ver al costado en el caso de conexión directa a la red es necesario interponer entre el aparato y la red un interruptor omnipolar con una distancia mínima entre los contactos de 3 mm dimensionado para esa carga y que responda a las normas vigentes el cable a tierra no debe ser interrumpido por el interruptor el cable de alimentación eléctrica se debe colocar de modo tal que no alcance en ningún punto una temperatura que supere en 50 c la temperatura ambiente por ejemplo la parte posterior del horno
- Antes de efectuar la conexión veriique que
- Puesta en funcionamiento y uso
- Poner en funcionamiento el horno
- Reloj con contador de minutos rústico
- Programas
- Consejos prácticos para cocinar
- Tabla de cocción
- Programas alimentos peso kg posición de los estantes precalentamiento minutos temperatura aconsejada
- Multicocción
- Horno tradiciónal
- Horno superior
- Gratin
- Duración de la cocción minutos
- Precauciones y consejos
- Mantenimiento y cuidados
- Limpiar el aparato
- Eliminación
- Cortar la corriente eléctrica
- Ahorrar y respetar el medioambiente
- Seguridad general
- Sustituir la bombilla
- Limpiar la puerta
- Posicionamento
- Ligação eléctrica
- Instalação
- O cabo deve ser veriicado periodicamente e substituído somente por técnicos autorizados veja a assistência técnica
- Ligação do cabo de fornecimento à rede eléctrica monte no cabo uma icha em conformidade com as normas para a carga indicada na placa de identiicação veja ao lado no caso de uma ligação directa à rede será necessário interpor entre o aparelho e a rede um interruptor omnipolar com abertura mínima entre os contactos de 3 mm na dimensão certa para a carga e em conformidade com as normas em vigor a ligação à terra não deve ser interrompida pelo interruptor o cabo de alimentação deve ser colocado de maneira que em nenhum ponto ultrapasse de 50 c a temperatura do ambiente por exemplo a parte traseira do forno
- Depois de ter instalado o aparelho o acesso ao cabo eléctrico e à tomada da corrente deve ser fácil
- Apenas para modelos com guias integradas apenas para modelos com guias em fio
- Antes de efectuar a ligação certiique se que
- A tomada tenha uma ligação à terra e seja em conformidade com a legislação
- A tomada tenha a capacidade de suportar a carga máxima de potência da máquina indicada na placa de identiicação
- A tomada seja compatível com a icha do aparelho em caso contrário substitua a tomada ou a icha não empregue extensões nem tomadas múltiplas
- A tensão de alimentação seja entre os valores da placa de identiicação
- A empresa exime se de qualquer responsabilidade se estas regras não forem obedecidas
- O técnico instalador é responsável pela realização certa da ligação eléctrica e da obediência das regras de segurança
- O cabo não deve ser dobrado nem comprimido
- Relógio com contador de minutos rústico
- Início e utilização
- Início do forno
- Programas
- Conselhos práticos para cozedura
- Temperatura aconselhada
- Tabela de cozedura
- Pré aquecimento minutos
- Programas alimentos peso kg posição das prateleiras
- Gratinado
- Forno tradicional
- Forno de cima
- Duração da cozedura minutos
- Cozedura múltipla
- Segurança geral
- Precauções e conselhos
- Manutenção e cuidados
- Limpeza do aparelho
- Eliminação
- Economia e respeito do meio ambiente
- Desligar a corrente eléctrica
- Substituição da lâmpada
- Limpeza da porta
- Электрическое подключение
- Установка
- Расположение
- Настройка часов и таймера
- Включение и эксплуатация
- Включение духового шкафа
- Практические советы по приготовлению
- Программы
- Таблица приготовления
- Экономия электроэнергии и охрана окружающей среды
- Утилизация
- Предосторожности и рекомендации
- Общие требования к безопасности
- Чистка изделия
- Чистка дверцы
- Техническое обслуживание и уход
- Отключение электропитания
- Замена лампочки
Похожие устройства
-
 Indesit IFE 3634 WHРуководство по эксплуатации
 -
 Indesit IFE 3634 WHРуководство по эксплуатации
 -
 Indesit IFE 3634 WHИнструкция по работе
 -
 Indesit FIMS 531 J K.A IXИнструкция 1
 -
 Indesit IGW 324 IXИнструкция по эксплуатации
 -
 Indesit IFWS 5844 JH IXРуководство по эксплуатации
 -
 Indesit IFWS 3841 JH IXРуководство по эксплуатации
 -
 Indesit IFW 5844 JH IXРуководство по эксплуатации
 -
 Indesit IFW 3844 JP IXРуководство по эксплуатации
 -
 Indesit IFW 3841 JH IXРуководство по эксплуатации
 -
 Indesit IFW 3534 H IXИнструкция по эксплуатации
 -
 Indesit FM 54 RK.AРуководство по эксплуатации
Подробная инструкция по безопасной установке и эксплуатации бытового прибора. Узнайте, как правильно подключить и обслуживать устройство для его долговечной работы.