![Indesit K 245 G (R) — обзор функций газовых плит с духовкой и грилем [21/48]](/img/pdf.png)
Indesit K 245 G (R) — обзор функций газовых плит с духовкой и грилем [21/48]
![Indesit K 245 G (R) [21/48] The different functions and uses of the oven](/views2/1961165/page21/bg15.png)
21
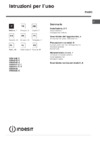
A. Tray for Catching Overflows
B. Gas Burner
C. Flame Failure Device for Cooktop Burners (only a
few models)
D. Top Grate
E. Control Panel
F. Adjustable Feet or Legs
G. Dripping Pan or Baking Sheet
H. Electronic Lighting Device (only a few models)
K. Oven Rack
L. Electronic Lighting for Hob Burners (only a few
models)
M. Oven and Grill Control Knob
N. Control Knobs for Gas Burners on Hob
O. Button for Oven and Rotisserie Light (only a few
models)
P. Timer Knob (only a few models)
The cooker with gas oven and gas grill
The various functions included in the cooker are selected by
operating the control devices located on the cooker control
panel.
Control Knobs for the Gas Burners on the Hob (N)
The position of the gas burner controlled by each one of the
knobs is shown by a symbol of a solid ring:•. To light one of
the burners, hold a lighted match or lighter near the burner.
Press down and turn the corresponding knob in the counter-
clockwise direction to the maximum E setting. Each burner
can be operated at its maximum, minimum or intermediate
power. Shown on the knob are the different symbols for off •
(the knob is on this setting when the symbol lines up with the
reference mark on the control panel), for maximum E and
minimum C.
To obtain these settings, turn the knob counter-clockwise
with respect to the off position. To turn off the burner, turn the
knob clockwise until it stops (corresponding again with the •
symbol).
Electronic Ignition for the Gas Hob
Some of the models are provided with instant electronic lighting
of the hob gas burners; these models are identified by the pres-
ence of a lighting device (see detail H). This device operates
when a slight pressure is applied to the “L” button marked with
1
symbol. To light a specific burner just press the button la-
belled “L” while pushing the corresponding knob all the way in
and turning it counter-clockwise until it lights. For immediate
lighting, first press the button and then turn the knob.
Some models are equipped with an ignition button incorporated
into the control knob. If this is the case, the ignitor (H) is present,
but not the “L” button (the
1
symbol is located near each knob).
To light a burner, simply press the corresponding knob all the
way in and then turn it anti-clockwise to the “High” E setting,
keeping it pressed in until the burner lights.
Important: Should the burner flames accidentally go out,
turn off the control knob and wait at least 1 minute before
trying to relight.
Models with Hob Gas Burner Safety Devices to
Prevent Leaks (only on certain models)
These models can be identified by the presence of the
device itself (see detail C).
Important: Since the hob burners are equipped with a
safety device, you must hold the control knob in for about
6 seconds after the burner has been lighted to allow the
gas to pass until the safety thermocouple has heated.
Notice: The first time you use your appliance, we recom-
mend that you set the thermostat to the highest setting
and leave the oven on for about half an hour with nothing
in it, with the oven door shut. Then, open the oven door
and let the room air. The odour that is often detected dur-
ing this initial use is due to the evaporation of substances
used to protect the oven during storage and until it is in-
stalled.
The different functions and uses of the oven
F
A
E
K
G
D
B
MN
L
P
O
H
C
Содержание
- Per garantire l efficienza e la sicurezza di questo elettrodomestico rivolgetevi esclusivamente a centri di assistenza tecnica autorizzati richiedete sempre l utilizzo di parti di ricambio originali p.3
- Avvertenze p.3
- Istruzioni per l installazione p.4
- Porre particolare attenzione ai cavi delle candele ed ai tubi delle termocoppie attenzione al termine dell operazione sostituire la vecchia etichetta di taratura con quella corrispondente al nuovo gas di uti lizzo reperibile presso i nostri centri assistenza tecnica nota qualora la pressione del gas utilizzato sia diversa o va riabile da quella prevista è necessario installare sulla tubazione d ingresso un appropriato regolatore di pres sione secondo uni cig 7430 regolatori per gas canalizzati p.7
- K 244 g r k 245 g r k 246 gs r k 142 gs r p.7
- Caratteristiche dei bruciatori ed ugelli p.7
- A 15 c e 1013 mbar gas secco propano p c s 50 37 mj kg butano p c s 49 47 mj kg naturale p c s 37 78 mj p.7
- Caratteristiche tecniche p.8
- La cucina con forno gas e grill gas p.9
- Min 150 180 220 max p.10
- Le diverse funzioni presenti nella cucina p.10
- 145 160 200 250 p.10
- Ausiliario a 10 14 p.11
- Semi rapido s 16 20 p.11
- Rapido r 24 26 p.11
- Bruciatore ø diametro recipienti cm p.11
- Consigli pratici per la cottura p.12
- Manutenzione ordinaria e pulizia della cucina p.13
- Consigli pratici per la cottura p.14
- Warning never place hot containers or items and flammable materials inside the dishwarmer drawer p.15
- To maintain the efficiency and safety of this appliance we recommend call only the service centers authorized by the manufacturer always use original spare parts p.15
- Important safety warnings p.15
- Installation p.16
- K 244 g r k 245 g r k 246 gs r k 142 gs r p.19
- Burner and nozzle characteristics p.19
- At 15 c and 1013 mbar dry gas propane p c s 50 37 mj kg butane p c s 49 47 mj kg natural p c s 37 78 mj p.19
- Technical specifications p.20
- The different functions and uses of the oven p.21
- The cooker with gas oven and gas grill p.21
- Min 150 180 220 max p.22
- 145 160 200 250 p.22
- Cooking advice p.23
- Cooker routine maintenance and cleaning p.24
- Cooking advice p.25
- K 244 g r k 245 g r k 246 gs r k 142 gs r p.30
- Min 150 180 220 max p.32
- 145 160 200 250 p.32
- S 16 20 p.33
- R 24 26 p.33
- Biztonsági utasítások p.36
- Üzembe helyezés p.37
- A lábak felszerelés p.37
- A készülék szintezés p.37
- A készülék elhelyezése p.37
- Gáz csatlakoztatás p.38
- Átállás más gázfajtára p.38
- Csak szakembereknek p.39
- A gázgrill átállítása más gázfajtára p.39
- K 244 g r k 245 g r k 246 gs r k 142 gs r p.40
- Msz en 30 1 1 1999 p.41
- Min 150 180 220 max p.43
- Elektromos szikragyújtó a gázég p.43
- 145 160 200 250 p.43
- Ég az edény átmér p.44
- Segéd ég 10 14 p.44
- Közepes ég 16 20 p.44
- Gyors ég 24 26 p.44
- A forgónyárs használata p.44
- Sütemények sütése p.45
- Hal és hús sütése p.45
- A sütemény túl száraz kal és csökkentse a sütési p.45
- Sütési tanácsok p.45
- Karbantartás tisztítás p.46
- Sütési tanácsok p.47
- Merloni elettrodomestici p.48
Похожие устройства
-
 Indesit IS5V5PMW/RUИнструкция по работе
 -
 Indesit K 3C7 M (R)Инструкция 1
 -
Indesit K 3C0 M (R)Инструкция 1
-
 Indesit VRM 641DC_DXРуководство по эксплуатации
 -
 Indesit VRM 640_C_XРуководство по эксплуатации
 -
 Indesit VRM 630CРуководство по эксплуатации
 -
 Indesit VRA 641DB_DC_DXРуководство по эксплуатации
 -
 Indesit VRA 640C_XРуководство по эксплуатации
 -
 Indesit VRA 631TB_T XРуководство по эксплуатации
 -
 Indesit VEM 645CРуководство по эксплуатации
 -
 Indesit TK 64 S (S IX) (SD) (SD IX)Инструкция по эксплуатации
 -
 Indesit PIM 640AS_AST_SРуководство по эксплуатации
Изучите основные функции газовых плит с духовкой и грилем. Узнайте о контроллерах, системах безопасности и способах зажигания для удобства использования.