
Tascam GT-R1 Руководство по эксплуатации онлайн
»
GT-R1
Portable
Guitar/Bass
Recorder
D01035410B
OWNER’S MANUAL
This device has a serial
number located on the rear
panel. Please record it and
retain it for your records.
Serial number:
__________________
Содержание
- Owner s manual 1
- Portable guitar bass recorder 1
- Table of contents 2
- Table of contents 3
- Table of contents 4
- Introduction 5
- Main functions 5
- Supplied accessories 5
- Introduction 6
- Li ion00 6
- Notes about this manual 6
- Recycling the rechargeable battery 6
- Trademarks 6
- About sd cards 7
- Inserting the sd card 7
- Preparation 7
- Inserting a new card 8
- Preparation 8
- Removing the sd card 8
- Installing the battery 9
- Other cases that require formatting 9
- Powering the unit 9
- Preparation 9
- Changing the battery 10
- Charging the battery 10
- Preparation 10
- Preparation 11
- Turning the power on and off 11
- Preparation 12
- Resetting the unit 12
- Setting the date and time 12
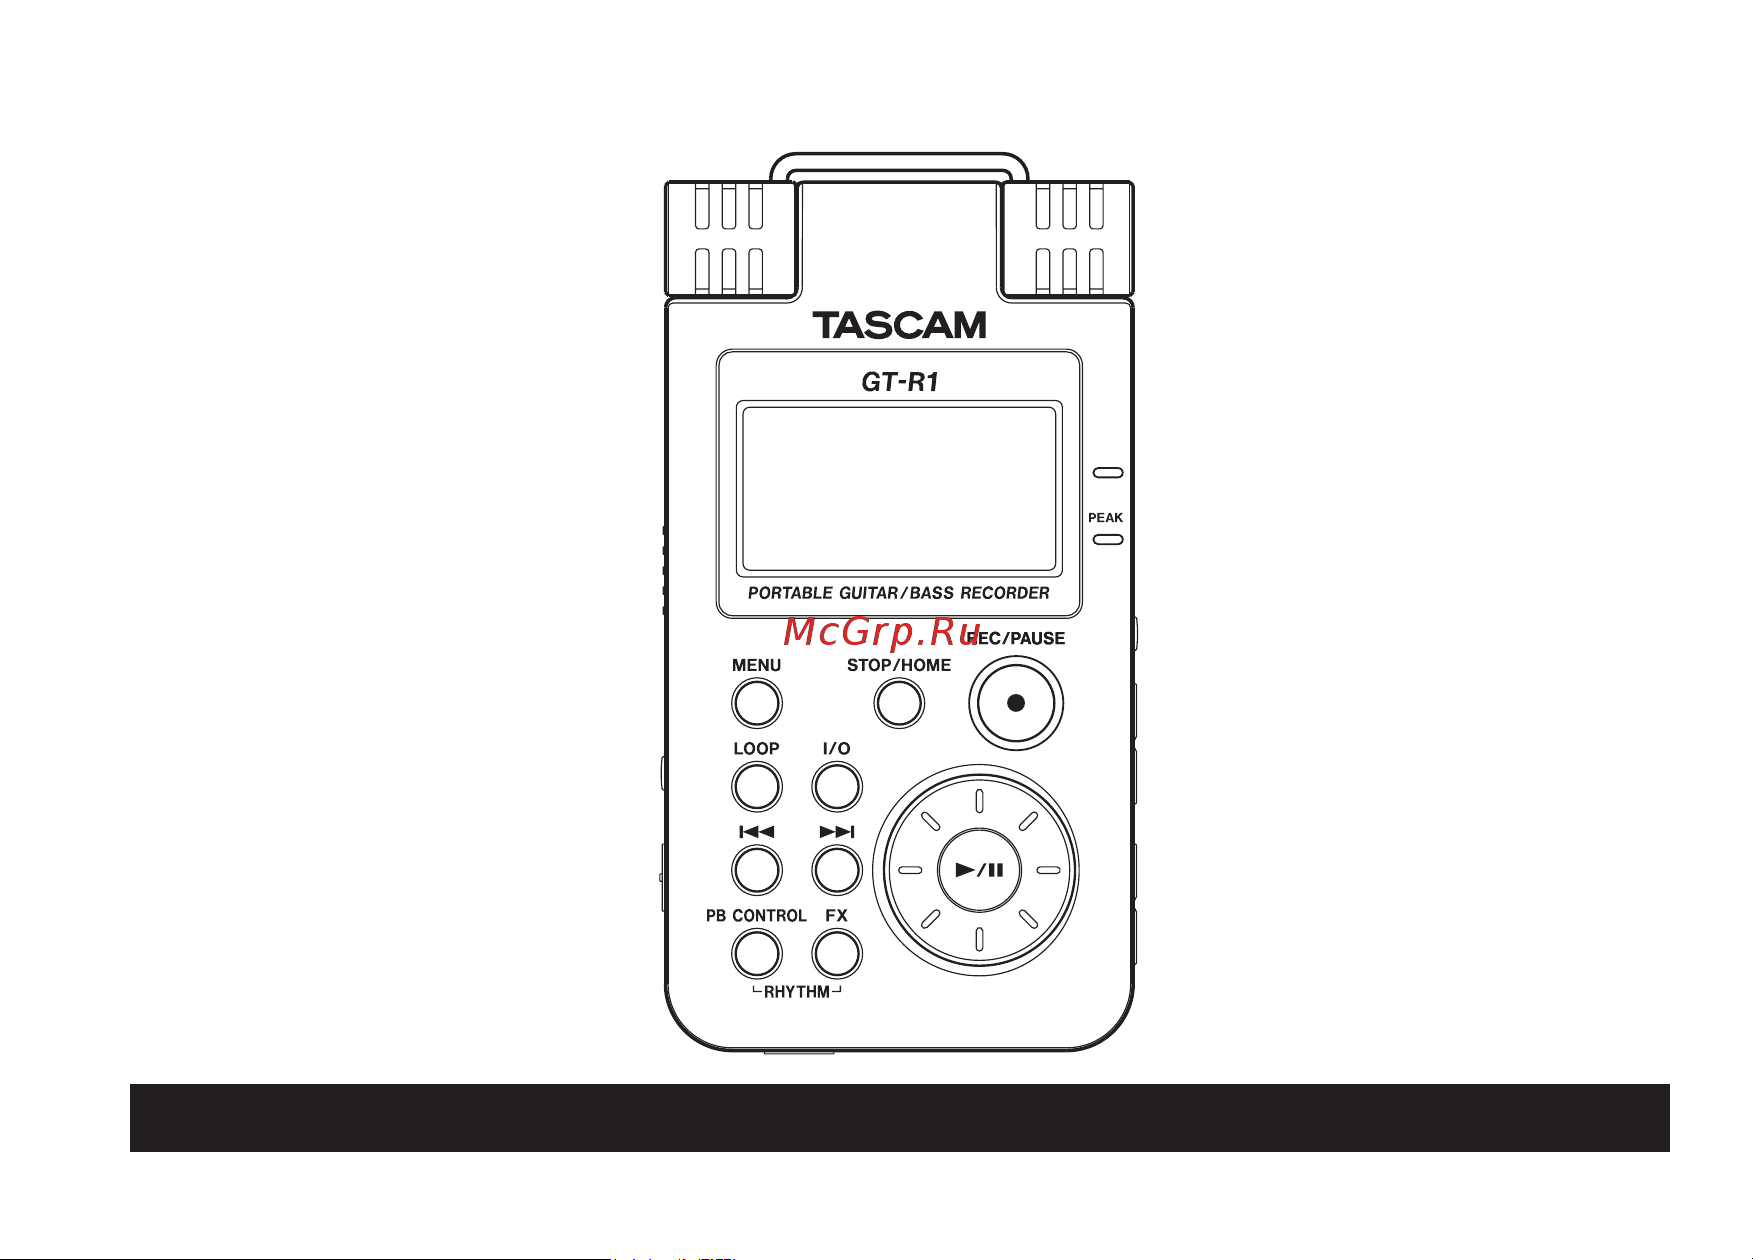
- Part names and functions 13
- Top panel 13
- Part names and functions 14
- Part names and functions 15
- Part names and functions 16
- Part names and functions 17
- Right side panel 17
- Part names and functions 18
- Left side panel 19
- Part names and functions 19
- Front panel 20
- Part names and functions 20
- Rear panel 20
- Bottom panel 21
- Part names and functions 21
- Home screen 22
- Screen overview 22
- Screen overview 23
- Screen overview 24
- Record screen 25
- Screen overview 25
- Rhythm screen 26
- Screen overview 26
- Operation basics 27
- Screen overview 27
- Setting screen structure 27
- Setting screens 27
- Screen overview 28
- Screen overview 29
- Operation example 30
- Screen overview 30
- Screen overview 31
- Practicing music with this unit 32
- Select the input 32
- Use input monitoring 32
- Learn musical phrases 33
- Play along with the rhythm machine 33
- Practicing music with this unit 33
- Tune instruments 33
- Use a metronome 33
- Use effects 33
- Change track pitch 34
- Perform along with a track 34
- Practicing music with this unit 34
- Record as you play with the rhythm machine 34
- Repeat and loop playback 34
- Change track speed 35
- Overdub 35
- Practicing music with this unit 35
- Reduce guitar or bass sounds 35
- Connecting monitors 36
- Connecting with a computer 36
- Making connections 36
- Disconnecting from a computer 37
- Making connections 37
- Connecting a guitar or bass 38
- Connecting an external mic 38
- Connecting mics and other audio devices 38
- Making connections 38
- Connecting mixers and other audio equipment 39
- Jack stereo mini jack on the rear panel 39
- Making connections 39
- You can connect the line output of an audio device or mixer to the 39
- Recording 40
- Selecting the file type and sampling frequency 40
- File size from the following options 64m 128m 256m 512m 1g and 2g factory setting 41
- Item select the maximum 41
- Item to open the 41
- Key to open the menu 41
- On the recording settings screen where you select the audio file type as described above you can also set the maximum size of the audio file recording automatically stops if the maximum file size is reached while recording audio 1 press the 41
- Recording 41
- Recording settings screen 41
- Screen 41
- Select the 41
- Setting the maximum file size 41
- With the 41
- Recording 42
- Selecting the input source 42
- Recording 43
- Setting the int mic in input functions 43
- Recording 44
- Display of input functions on the record screen 45
- Recording 45
- Adjusting the built in microphone angle 46
- Microphone angle 46
- Recording 46
- Adjusting the input level 47
- Recording 47
- Recording 48
- About recording modes 49
- Ordinary recording 49
- Recording 49
- Overdubbing 50
- Preparation for overdubbing 50
- Recording 50
- Overdub recording 51
- Recording 51
- Recording 52
- Caution 53
- Recording 53
- To stop recording press the 53
- Playback 54
- Selecting tracks 54
- Starting and stopping playback 54
- Key to search backwards or the 55
- Key to search forwards 55
- Playback 55
- Press and hold the 55
- Search forward and backward 55
- Using the wheel to change the playback position 55
- You can use the wheel to adjust the playback position within a track when you turn the wheel the position in the playback position display bar changes so you can visually confirm that the playback position has been moved 55
- Adjusting the volume 56
- Jack the volume level appears on 56
- Keys to adjust the volume of the monitoring signal output from the 56
- Playback 56
- The display while being adjusted 56
- Use the 56
- Playback area and playlist 57
- Setting the playback area 57
- Playback area and playlist 58
- Selecting a folder for the playback area 58
- Playback area and playlist 59
- Selecting a file to set the playback area 59
- Adding tracks to the playlist 60
- Playback area and playlist 60
- Playlist 60
- Editing the playlist 61
- Playback area and playlist 61
- Playback area and playlist 62
- Browse screen 63
- Screen navigation 63
- Browse screen 64
- File operations 64
- Icons on the browse screen 64
- Browse screen 65
- Folder operations 65
- Setting the playback control functions 66
- Special playback control functions 66
- Changing speed without changing pitch 67
- Changing the speed 67
- Special playback control functions 67
- Changing pitch without changing speed 68
- Reducing guitar and bass sounds 68
- Special playback control functions 68
- Special playback control functions 69
- Loop playback 70
- Loop repeat and single playback 70
- Loop repeat and single playback 71
- Repeat and single track playback modes 71
- Copying audio files from a computer 72
- Copying tracks from a computer 72
- Preparing audio files on a computer 72
- Copying tracks from a computer 73
- If you name the sub folders and music tracks these names will appear on the screen of this unit 73
- Managing the music folder from a computer 73
- You can create up two levels of sub folders inside the music folder since you can set the gt r1 to only play the contents of a specific folder you can organize tracks into genres artists or other categories as you like see folder operations on page 65 73
- You can manage the contents of the music folder on an sd card in the gt r1 from a computer 73
- Setting the effect 74
- Turning the effect on and off 74
- Using the effects 74
- Using the effects 75
- Closing the effect screen 76
- Effect modules 76
- Using the effects 76
- Auto chromatic tuner mode 77
- Preparation 77
- Using the tuner 77
- Bass bass tuner mode 78
- Guitar guitar tuner mode 78
- Osc oscillator mode 78
- Using the tuner 78
- Using the tuner 79
- Rhythm mode 80
- Using the rhythm machine 80
- Rhythm screen features 81
- Using the rhythm machine 81
- Using the rhythm machine 82
- Setting the rhythm machine 83
- Using the rhythm machine 83
- Using the rhythm machine 84
- Playing along with the rhythm machine 85
- Preparation 85
- Using the rhythm machine 85
- Adjust the input level 86
- If a mark remains at the right end of the l r meter use the 86
- If the 86
- Indicator to the side of the display lights lower the input level 86
- Knob on the effect screen if you are using an effect 86
- Use the 86
- Using the rhythm machine 86
- Volume control on the right side panel to adjust the input level 86
- Volume control to lower the input level or lower the level of the effect with the 86
- Practicing with a rhythm 87
- Record playing with a rhythm 87
- Using the rhythm machine 87
- Key again 88
- Key stops flashing and stays lit 88
- Key to play the recorded file 88
- Key to stop the rhythm machine and create a recording file 88
- Keys at the same 88
- Play along with the rhythm machine 88
- Press the 88
- The rhythm machine starts and recording the rhythm machine starts and recording begins when recording begins the 88
- The screen appears as below the screen appears as below 88
- Time to leave rhythm mode and open the home screen 88
- Using the rhythm machine 88
- When you are finished playing press the 88
- Apply effects to the rhythm machine 89
- Using the rhythm machine 89
- Making system settings 90
- System settings and formatting 90
- Formatting the sd card 91
- Restoring the factory settings 91
- System settings and formatting 91
- System settings and formatting 92
- Using full format 92
- Using quick format 92
- File information page 93
- Viewing file information 93
- Memory information page 94
- System information page 94
- Viewing file information 94
- Effects preset list 95
- Effects preset list 96
- Effects preset list 97
- Effect module parameters list 98
- Effect module parameters list 99
- Effect module parameters list 100
- Effect module parameters list 101
- Rhythm pattern list 102
- Rhythm pattern list 103
- Gt r1 messages 104
- Gt r1 messages 105
- Backup files on the card to your computer and format the card using the gt r1 106
- Erase unnecessary files or move them to your computer to make open space 106
- Gt r1 messages 106
- Message meaning and response 106
- The file is larger than the designated size or the recording time exceeds 24 hours 106
- The total number of folders and files is already 999 erase unnecessary files or move them to your computer 106
- There was some type of error with the card turn off the power and replace the card with a working card 106
- This appears when the card in the unit during startup is a protected card without the necessary music folder and other folders and files 106
- This appears when there is some type of error with the card 106
- Writing to the card timed out 106
- Gt r1 messages 107
- If any of these errors occur turn the gt r1 power off and restart the unit 107
- If the error message continues to appear please contact a teac repair center 107
- Message meaning and response 107
- Audio input and output 108
- Specifications 108
- Audio performance 109
- Other specifications 109
- Specifications 109
- Ac adapter ps p520 bp l2 lithium ion battery accessory kit tripod tripod adapter microphone stand adapter windscreen 110
- Accessories available for purchase 110
- Computer requirements 110
- Macintosh 110
- Recomended usb host controller 110
- Specifications 110
- Supported os 110
- Windows 110
- Dimensions 111
- Specifications 111
- Printed in china 112
- Teac america inc 112
- Teac canada ltd 112
- Teac corporation 112
- Teac europe gmbh 112
- Teac mexico s a de c v 112
- Teac uk limited 112
Похожие устройства
- Roland Mobile BA Руководство по эксплуатации
- Tascam iXRTP Руководство по эксплуатации
- Tascam MiNiSTUDIO CREATOR US-42 Руководство по эксплуатации
- Tascam iXR Руководство по эксплуатации
- Tannoy OCV 6-WH Руководство по эксплуатации
- Tascam DR-05 version 2 Руководство по эксплуатации
- Soundking KG05 Руководство по эксплуатации
- Soundking KG06 Руководство по эксплуатации
- Soundking FPH12A-1 Руководство по эксплуатации
- Soundcraft Ui24R Руководство по эксплуатации
- Soundking SKD130 Руководство по эксплуатации
- Soundcraft Signature 10 Руководство по эксплуатации
- Soundcraft Signature 12 Руководство по эксплуатации
- ERJK LIVE K3St Руководство по эксплуатации
- Soundcraft MSB-32 Cat5 Mini Stagebox 32 (3U) Руководство по эксплуатации
- Soundcraft Si Performer 1 Руководство по эксплуатации
- SOLID STATE LOGIC MX4 Руководство по эксплуатации
- SOLID STATE LOGIC MadiXtreme 128 Руководство по эксплуатации
- SOLID STATE LOGIC MadiXtreme 64 Руководство по эксплуатации
- SOLID STATE LOGIC Alpha Link MX 16-4 Руководство по эксплуатации