![Makita 4351CT — инструкция по использованию и настройке инструмента для резки [9/32]](/img/pdf.png)
Makita 4351CT — инструкция по использованию и настройке инструмента для резки [9/32]
![Makita 4351CT [9/32] Installing or removing saw blade fig 4 5 6](/views2/1175526/page9/bg9.png)
9
FUNCTIONAL DESCRIPTION
CAUTION:
• Always be sure that the tool is switched off and unplugged before adjusting or checking function on the tool.
Selecting the cutting action (Fig. 1)
This tool can be operated with an orbital or a straight line (up and down) cutting action. The orbital cutting action
thrusts the blade forward on the cutting stroke and greatly increases cutting speed.
To change the cutting action, just turn the cutting action changing lever to the desired cutting action position.
Refer to the table to select the appropriate cutting action.
Switch action (Fig. 2)
CAUTION:
• Before plugging in the tool, always be sure that the tool
is switched off.
To start the tool, slide the switch lever to the “I” position.
To stop the tool, slide the switch lever to the “O” position.
Speed adjusting dial (Fig. 3)
For 4351CT, 4351FCT
The tool speed can be infinitely adjusted between 800
and 2,800 strokes per minute by turning the adjusting
dial. Higher speed is obtained when the dial is turned in
the direction of number 5; lower speed is obtained when
it is turned in the direction of number 1.
Refer to the table to select the proper speed for the work-
piece to be cut. However, the appropriate speed may dif-
fer with the type or thickness of the workpiece. In
general, higher speeds will allow you to cut workpieces
faster but the service life of the blade will be reduced.
CAUTION:
• The speed adjusting dial can be turned only as far as 5
and back to 1. Do not force it past 5 or 1, or the speed
adjusting function may no longer work.
The tools equipped with electronic function are easy to
operate because of the following features.
Constant speed control
Electronic speed control for obtaining constant speed.
Possible to get fine finish, because the rotating speed is
kept constant even under load condition.
Soft start feature
Safety and soft start because of suppressed starting
shock.
Lighting up the lamps
For 4351FCT only
CAUTION:
• Do not look in the light or see the source of light
directly.
To turn on the lamp, pull the trigger. Release the trigger
to turn it off.
NOTE:
• Use a dry cloth to wipe the dirt off the lens of lamp. Be
careful not to scratch the lens of lamp, or it may lower
the illumination.
ASSEMBLY
CAUTION:
• Always be sure that the tool is switched off and
unplugged before carrying out any work on the tool.
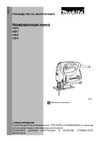
Installing or removing saw blade (Fig. 4, 5 & 6)
CAUTION:
• Always clean out all chips or foreign matter adhering to
the blade and/or blade holder. Failure to do so may
cause insufficient tightening of the blade, resulting in a
serious personal injury.
• Do not touch the blade or the workpiece immediately
after operation; they may be extremely hot and could
burn your skin.
• Tighten the saw blade securely. Failure to do so may
cause a serious injury.
• When you remove the saw blade, be careful not to hurt
your fingers with the top of the blade or the tips of work-
piece.
Position Cutting action Applications
0 Straight line cutting action
For cutting mild steel, stainless steel and plastics.
For clean cuts in wood and plywood.
I Small orbit cutting action For cutting mild steel, aluminum and hard wood.
II Medium orbit cutting action
For cutting wood and plywood.
For fast cutting in aluminum and mild steel.
III Large orbit cutting action For fast cutting in wood and plywood.
Workpiece to be cut Number on adjusting dial
Wood 4 – 5
Mild steel 3 – 5
Stainless steel 3 – 4
Aluminum 3 – 5
Plastics 1 – 4
Содержание
- Символы p.6
- Symbole p.6
- Symbols p.6
- English p.7
- Specifications p.7
- Save these instructions p.7
- General safety rules p.7
- Explanation of general view p.7
- Use clamps or another practical way to secure and support the workpiece to a stable platform p.8
- Warning misuse or failure to follow the safety rules stated in this instruction manual may cause serious personal injury p.8
- Specific safety rules p.8
- Save these instructions p.8
- Do not let comfort or familiarity with product gained from repeated use replace strict adher ence to jig saw safety rules if you use this tool unsafely or incorrectly you can suffer serious personal injury 1 hold power tools by insulated gripping sur faces when performing an operation where the cutting tool may contact hidden wiring or its own cord p.8
- Always use safety glasses or goggles ordi nary eye or sun glasses are not safety glasses 4 avoid cutting nails inspect workpiece for any nails and remove them before operation 5 do not cut oversize workpiece 6 check for the proper clearance beyond the workpiece before cutting so that the blade will not strike the floor workbench etc 7 hold the tool firmly 8 make sure the blade is not contacting the workpiece before the switch is turned on 9 keep hands away from moving parts 10 do not leave the tool running operate the tool only when hand held 11 always switch off and wait for the blade to come to a complete stop before removing the blade from the workpiece 12 do not touch the blade or the workpiece immediately after operation they may be extremely hot and could burn your skin 13 do not operate the tool at no load unneces sarily 14 some material contains chemicals which may be toxic take caution to prevent dust inhala tion and skin contact follow material sup plier safety data 15 always p.8
- For 4351fct only p.9
- Assembly p.9
- Switch action fig 2 p.9
- Speed adjusting dial fig 3 p.9
- Selecting the cutting action fig 1 p.9
- Lighting up the lamps p.9
- Installing or removing saw blade fig 4 5 6 p.9
- Functional description p.9
- Rip fence set optional accessory p.10
- Operation p.10
- Metal cutting p.10
- Hex wrench storage fig 7 p.10
- Front flush cuts fig 12 p.10
- Finishing edges fig 15 p.10
- Dust extraction p.10
- Cutouts p.10
- Circular cuts fig 21 22 p.10
- Bevel cutting p.10
- Straight cuts fig 19 20 p.10
- Maintenance p.11
- Guide rail adapter set accessory p.11
- For model 4351t p.11
- For model 4351ct 4351fct p.11
- For european countries only p.11
- Ec declaration of conformity p.11
- Ct 4351fct p.11
- Cover plate fig 26 p.11
- Ce 2006 p.11
- Anti splintering device fig 27 p.11
- Accessories p.11
- Technische daten p.12
- Diese anweisungen aufbewahren p.12
- Deutsch p.12
- Allgemeine sicherheitsregeln p.12
- Übersicht p.12
- Spezielle sicherheitsregeln p.13
- Wahl der schnittbewegung abb 1 p.14
- Schalterfunktion abb 2 p.14
- Hubzahl stellrad abb 3 p.14
- Funktionsbeschreibung p.14
- Bewahren sie diese hinweise sorgfältig auf p.14
- Randnahe schnitte abb 12 p.15
- Montage demontage des sägeblatts abb 4 5 u 6 p.15
- Montage p.15
- Inbusschlüssel aufbewahrung abb 7 p.15
- Gehrungsschnitte p.15
- Einschalten der lampen p.15
- Betrieb p.15
- Ausschnitte p.15
- Bearbeitung von kanten abb 15 p.16
- Wartung p.16
- Staubabsaugung p.16
- Schneiden von metall p.16
- Parallelanschlagsatz sonderzubehör p.16
- Führungsanschlagsatz zubehör p.16
- Zubehör p.17
- Nur für europäische länder p.17
- Ce konformitätserklärung p.17
- Ce 2006 p.17
- Zachowaj tę instrukcję p.18
- Wyjaśnienia dotyczące urządzenia i jego użycia p.18
- Polski p.18
- Ogólne zasady bezpieczeństwa p.18
- Dane techniczne p.18
- Szczegółowe zasady bezpieczeństwa p.19
- Działanie włącznika rys 2 p.20
- Zawsze używaj maski przeciwpyłowej respiratora właściwego dla obrabianego materiału i wykonywanej pracy p.20
- Zachowaj tę instrukcję p.20
- Wybór sposobu cięcia rys 1 p.20
- Pokrętło regulacji prędkości rys 3 p.20
- Opis działania p.20
- Zapalanie lampek p.21
- Zakładanie lub wyjmowanie brzeszczotu rys 4 5 i 6 p.21
- Wycięcia p.21
- Składanie p.21
- Przechowywanie klucza sześciokątnego rys 7 p.21
- Postępowanie p.21
- Cięcie ukośne p.21
- Urządzenie antyodpryskowe rys 27 p.22
- Płyta ochronna rys 26 p.22
- Konserwacja p.22
- Cięcie metalu p.22
- Zestaw prowadnicy wyposażenie dodatkowe p.22
- Zestaw adaptora prowadnicy wyposażenie p.22
- Wykańczanie brzegów rys 5 p.22
- Wyposażenie p.23
- Ue deklaracja zgodności p.23
- Tylko dla krajów europejskich p.23
- Szummy p.23
- Model 4351t p.23
- Model 4351ct 4351fct p.23
- Drgania p.23
- Ce 2006 p.23
- Русский язык p.24
- Технические характеристики p.24
- Сохраните эту инструкцию p.24
- Общие правила безопасности p.24
- Алюмини p.24
- Описание функционирования p.26
- Сохраните эти инструкции p.26
- Особые правила безопасности p.26
- Установка или удаление лезвия пилы рис 4 5 и 6 p.27
- Сборка p.27
- Регулятор переключения скорости рис 3 p.27
- Действия при переключении рис 2 p.27
- Высвечивание ламп p.27
- Эксплуатация p.28
- Хранение торцевого гаечного ключа рис 7 p.28
- Резка металла p.28
- Передние разрезы вровень рис 12 p.28
- Отделка краев рис 15 p.28
- Наклонная резка p.28
- Извлечение пыли p.28
- Вырезание p.28
- Установка направляющей планки дополнительная принадлежность p.29
- Стыковочная накладка рис 26 p.29
- Противорасщепляющее устройство рис 27 p.29
- Принадлежности p.29
- Набор направляющего держателя принадлежность p.29
- Ехническое обслуживание p.29
- Модель 4351t p.30
- Модель 4351ct 4351fct p.30
- Ес декларация соответствия p.30
- Ce 2006 p.30
Похожие устройства
-
 Makita 4329Инструкция по применению
 -
Makita 4328Инструкция по применению
-
Makita 4327Руководство пользователя
-
Makita 4326Руководство по работе с устройством
-
 Makita 4329Руководство по эксплуатации
 -
 Makita 4326Инструкция по эксплуатации
 -
 Makita 4326Инструкция по эксплуатации
 -
Makita 4327Инструкция по эксплуатации
-
Makita 4329Инструкция по эксплуатации
-
 Makita 4350CTИнструкция по эксплуатации
 -
 Makita 4351FCTИнструкция по эксплуатации
 -
Makita 4350FCT, 720 ВтИнструкция по эксплуатации
Узнайте, как правильно использовать и настраивать инструмент для резки с различными режимами работы. Обеспечьте безопасность и эффективность при выполнении задач.