
Ridgid 40110, 150 мм откидные Инструкция по эксплуатации онлайн
EN
Pipe Vise User Guide
WARNING
Read the warnings and instructions
for all equipment and material being
used before operating this tool to
reduce the risk of serious personal
injury.
• Properly support the vise and pipe. Failure to properly sup-
port the equipment can cause vise tipping, falling pipe, chain
breakage and serious injury.
• Use appropriate safety equipment. Always wear proper eye
and foot protection to reduce the risk of injury.
• Do not use handle extensions (“cheaters”) or excessive
force. These may damage the tool or cause serious injury.
Selection of appropriate materials and installation, join-
ing and forming methods is the responsibility of the system designer
and/or installer. Selection of improper materials and methods could
cause system failure.
Stainless steel and other corrosion resistant materials can be
con taminated during installation, joining and forming. This contam-
ination could cause corrosion and premature failure. Care ful evalu-
ation of materials and methods for the specic service conditions,
including chemical and temperature, should be completed before
any installation is attempted.
If you have any question concerning this RIDGID
®
product:
– Contact your local RIDGID distributor.
– Visit RIDGID.com to nd your local RIDGID contact point.
– Contact Ridge Tool Technical Service Department at rtctech-
services@emerson.com, or in the U.S. and Canada call (800)
519-3456.
Description
RIDGID
®
Pipe Vises use a chain or yoke vise to hold and work pipe.
Many Pipe Vises include features to allow pipe bending.
The bench vises are mounted to a bench or other stable horizontal
platform. For lighter duty applications, portable vises are equipped
with a clamp or chain for temporary mounting. Vises/jaws are avail-
able for use with plastic pipe.
See the product label for specifications or consult the RIDGID
catalog.
Figure 1 – RIDGID Pipe Vises
Pipe Vise User Guide
Inspection/Maintenance
Clean the vise to aid inspection and improve control. Inspect the vise
before each use for proper assembly, wear, damage, modication
or other issues that could affect safe use. Clean the jaws with a wire
brush. Replace jaws if teeth are worn to prevent pipe slippage. If any
problems are found, do not use until corrected.
For chain vises, inspect the chain for separation of the links or any
other damage. Link separation indicates the chain has been over-
stressed and should be replaced. Use only identical replacement
parts from RIDGID when servicing.
Conrm that the mounting fasteners are secure.
Lubricate all moving parts/joints as needed with light lubricating oil.
Wipe up excess oil.
Set Up/Operation
1. Make sure all equipment is inspected and set up per its instruc-
tions.
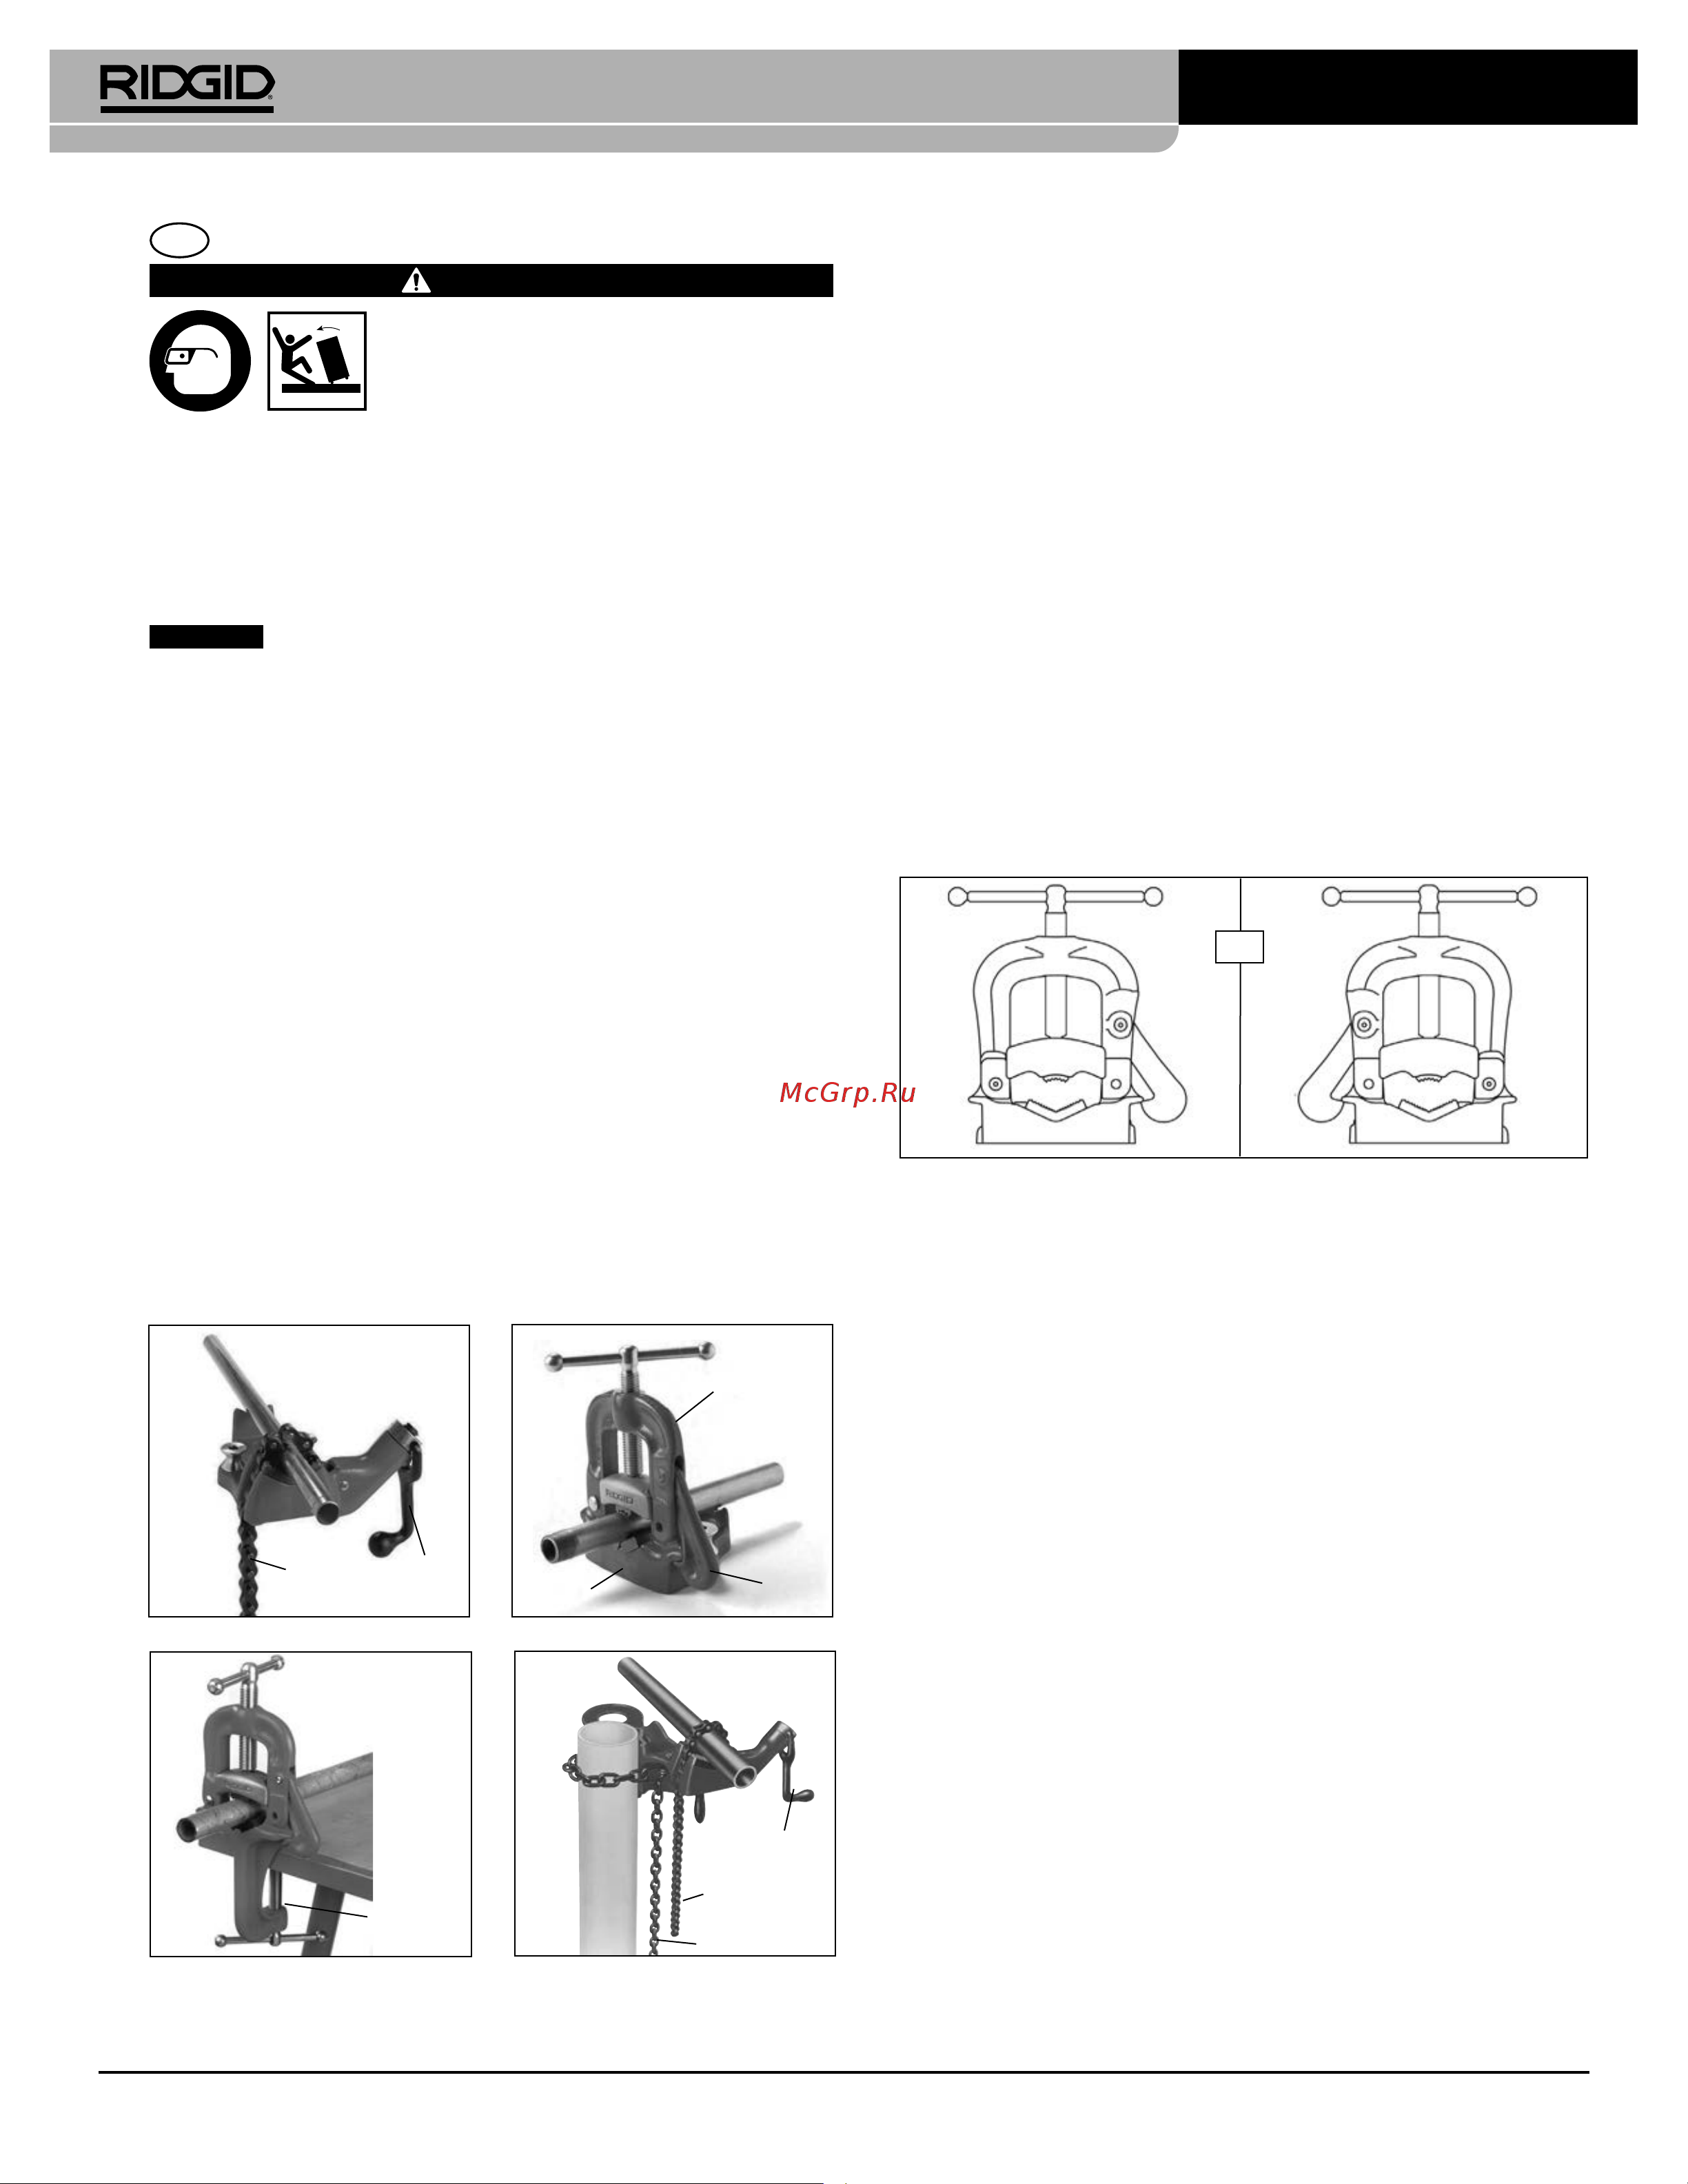
2. Assemble the Yoke Vise:
a. Place the yoke on base with hook orientation as required,
left or right side (Figure 2).
b. Insert Hinge Bolt through yoke and base assembly. Assem-
ble washer and nut to Hinge Bolt, and then tighten. If yoke
does not swing freely on base, tap threaded end of Hinge
Bolt with hammer.
Figure 2 – Yoke Vise Assembly
3. Choose a level, stable location to mount the vise. Loca tion
must be able to support the working loads applied to the pipe/
vise without bending, breaking, moving, tipping or other issues.
Material may need to be added to allow proper mounting
(wood or metal backing). Make sure there is nothing that will
be damaged by mounting the vise (electrical wires, etc.).
4. Pipe vises are usually located along the edge of benches. Chain
vises overhang the edge and have stops that locate the vise
relative to the bench edge.
a. Bench Vises: Use the holes in the vise base as a template
for locating the holes in the bench. Use the largest diameter
fastener that will t in the vise and spool holes. Use appro-
priate grade fasteners for the installation. Use through bolts
with washers and locking nuts/wash ers. Bolts go through the
bending spools. See the vise parts list for more information.
Do not weld the vise in place. The vise bases are not
designed to be welded to.
b. Portable Yoke Vise: Securely clamp the vise to the platform
by tightening the clamp screw assembly (Figure 1C).
c. Portable Chain Vise: Hold the vise near a stable vertical
post/pipe. Wrap the coin chain around post and hook the
chain pin in the base groove. Securely tighten the chain
around post by rotating the eye bolt with handle (Figure 1D).
Conrm that the vise is secure and stable.
5. Carefully place the pipe on vise. Do not drop the pipe on the
vise. For best stability during use, keep the pipe end to be
worked on as close to the vise as possible.
6. Use appropriate pipe supports if the pipe extends past the base
of the vise.
Place stands to properly support long pipes. Generally pipe
should be supported in at least two places. The number and
A. Bench Chain Vise
C. Portable Yoke Vise
D. Portable Chain Vise
Clamp
Screw
Assembly
Base
B. Bench Yoke Vise
Yoke
Handle
Link
Chain
Coin Chain
NOTICE
Hook
Handle
Link Chain
Printed
7/18
EC42887
999-888-102.09
REV. A
©2018 RIDGID, Inc.
The Emerson logo and RIDGID logo are registered trademarks of Emerson Electric Co. or RIDGID, Inc. in the U.S. and other countries.
All other trademarks belong to their respective holders.
OR
Содержание
- Description 1
- Inspection maintenance 1
- Pipe vise user guide 1
- Set up operation 1
- Warning 1
- Avertissement 2
- Description 2
- Inspection et entretien 2
- Mode d emploi des étaux à tuyaux 2
- Pipe vise user guide 2
- Afin de limiter les risques de plissage du tuyau coudez le d en viron 10 degrés à la fois en faisant avancer ou reculer le tuyau entre les bobines de cintrage jusqu à obtenir le rayon voulu 3
- Montage et utilisation 3
- Pipe vise user guide 3
- Advertencia 4
- Descripción 4
- Inspección y mantenimiento 4
- Montaje y operación 4
- Pipe vise user guide 4
- Prensa de tornillo para tubos modo de empleo 4
- Bedienungsanleitung für rohrschraubstöcke 5
- Beschreibung 5
- Pipe vise user guide 5
- Warnung 5
- Kontrolle wartung 6
- Pipe vise user guide 6
- Vorbereitung und betrieb 6
- Beschrijving 7
- Handleiding voor pijpklemmen 7
- Inspectie onderhoud 7
- Pipe vise user guide 7
- Waarschuwing 7
- Avvertenza 8
- Guida dell utente della morsa per tubi 8
- Instelling bediening 8
- Pipe vise user guide 8
- Configurazione funzionamento 9
- Descrizione 9
- Ispezione manutenzione 9
- Pipe vise user guide 9
- Descrição 10
- Guia do utilizador do torno de canos 10
- Pipe vise user guide 10
- Configuração funcionamento 11
- Inspeção manutenção 11
- Para reduzir o risco de dobras incorretas dobre o cano aproximadamente 10 graus de cada vez movendo o cano ligeiramente para dentro ou fora das bobinas de dobra até formar a dobra desejada 11
- Pipe vise user guide 11
- Beskrivning 12
- Bruksanvisning rörskruvstycke 12
- Inspektion underhåll 12
- Inställning användning 12
- Pipe vise user guide 12
- Varning 12
- Advarsel 13
- Beskrivelse 13
- Brugervejledning til rørskruestikker 13
- Eftersyn vedligeholdelse 13
- Pipe vise user guide 13
- Advarsel 14
- Opsætning drift 14
- Pipe vise user guide 14
- Rørtvinge bruksanvisning 14
- Beskrivelse 15
- Inspeksjon vedlikehold 15
- Oppsett drift 15
- Pipe vise user guide 15
- Asennus käyttö 16
- Kuvaus 16
- Pipe vise user guide 16
- Putkipuristimen käyttöohje 16
- Tarkastus huolto 16
- Varoitus 16
- Instrukcja użytkownika imadła do rur 17
- Kiertymisvaaran vähentämiseksi taivuta putkea noin 10 astetta kerrallaan siirtäen putkea hieman ulos tai sisään taivutusurissa kunnes haluttu taive saavutetaan 17
- Ostrzeżenie 17
- Pipe vise user guide 17
- Pipe vise user guide 18
- Przeglądy konserwacja 18
- Przygotowanie obsługa 18
- Kontrola údržba 19
- Nastavení provoz 19
- Pipe vise user guide 19
- Uživatelská příručka trubkového svěráku 19
- Výstraha 19
- Ke snížení rizika zalomení trubky trubku ohýbejte postupně v krocích po přibližně 10 stupních kdy trubkou lehce hýbete z ohýbacích cívek a zpět dokud se nevytvoří požadovaný ohyb 20
- Pipe vise user guide 20
- Príručka pre používateľov zveráka na rúrky 20
- Výstraha 20
- Kontrola údržba 21
- Nastavenie používanie 21
- Pipe vise user guide 21
- Avertizare 22
- Descriere 22
- Ghid de utilizare menghină pentru țevi 22
- Inspecții întreținere 22
- Pipe vise user guide 22
- Pregătire operare 22
- Figyelmeztetés 23
- Láncos kengyeles satuk kezelési kézikönyv 23
- Pentru a reduce riscul de flambare îndoiți țeava aproximativ 10 grade o dată mișcând țeava ușor spre interiorul sau exteriorul matrițelor de îndoire până se formează încovoierea dorită 23
- Pipe vise user guide 23
- Beállítás működtetés 24
- Ellenőrzés karbantartás 24
- Ismertetés 24
- Pipe vise user guide 24
- Pipe vise user guide 25
- Επιθεώρηση συντήρηση 25
- Οδηγός χρήσης για σωληνομέγγενες 25
- Περιγραφή 25
- Προειδοποιηση 25
- Korisnički priručnik za škripac za cijevi 26
- Pipe vise user guide 26
- Upozorenje 26
- Εγκατάσταση λειτουργία 26
- Pipe vise user guide 27
- Podešavanje rad 27
- Pregled održavanje 27
- Opozorilo 28
- Pipe vise user guide 28
- Pregled vzdrževanje 28
- Priprava uporaba 28
- Uporabniški vodič za cevno objemko 28
- Pipe vise user guide 29
- Upozorenje 29
- Uputstvo za cevnu stegu 29
- Kontrola održavanje 30
- Pipe vise user guide 30
- Podešavanje rad 30
- Pipe vise user guide 31
- Внимание 31
- Описание 31
- Осмотр обслуживание 31
- Руководство пользователя трубных тисков 31
- Установка использование 31
- Boru anahtarı kullanım kılavuzu 32
- Pipe vise user guide 32
- С целью снижения риска образования складок необходимо сгибать трубу примерно на 10 градусов за один проход слегка перемещая трубу внутрь или наружу в гибочных роликах до получения требуемого радиуса изгиба 32
- Açıklama 33
- Hazırlık kullanım 33
- I nceleme bakım 33
- Pipe vise user guide 33
- Орнату пайдалану 34
- Сипаттама 34
- Тексеру техникалық қызмет көрсету 34
- Құбыр іскенжесін пайдалану нұсқаулығы 34
- Pipe vise user guide 35
- Іскенжені қатайту үшін тұтқа ұзартқыштарын бастырмалар қолданбаңыз тұтқаларды балғамен ұрмаңыз бұл іскенже жүгін арттырып іскенже не жұмыс бөлшегінің зақымдалуына әкелуі мүмкін 35
- Ширатылу ықтималдығын азайту үшін қажетті бүгу түзілгенше құбырды бүгілетін орағыштар ішіне не тыс ақырындап жылжытып құбырды бір уақытта шамамен 10 градусқа бүгіңіз 35
- Құбырды іскенжеге мұқият орналастырыңыз құбырды іскенжеге тастамаңыз пайдалану барысында орнықтылықты барынша жақсарту үшін теңселетін құбыр шетін іскенжеге барынша жақын ұстаңыз 35
- Pipe vise user guide 36
Похожие устройства
- BLACK & DECKER BD40K4 Инструкция по эксплуатации
- Bosch Орбитальная (эксцентриковая) шлифмашина PEX 220 A (0603378020) +Бокс Инструкция по эксплуатации
- Bosch Gluey (06032A2102) Инструкция по эксплуатации
- Makita DHS660Z без акк. и з.у Инструкция по эксплуатации
- Makita DTW181Z без акк. и з.у Инструкция по эксплуатации
- Makita DUT130Z без акк. и з.у Инструкция по эксплуатации
- Makita TW141DZ без акк. и з.у Инструкция по эксплуатации
- Makita DCS552Z без акк. и з.у Инструкция по эксплуатации
- Makita DLS111ZU без акк. и з.у Инструкция по эксплуатации
- Makita DHR283ZJU без акк. и з.у Инструкция по эксплуатации
- Makita DHR282ZJU без акк. и з.у Инструкция по эксплуатации
- Makita DTL061Z без акк. и з.у Инструкция по эксплуатации
- Makita DTL063Z без акк. и з.у Инструкция по эксплуатации
- BLACK & DECKER Инструмент многофункциональный MT218KB-QW MultyEvo +Ящик 1-92-734 Инструкция по эксплуатации
- Bort BEK-18 Инструкция по эксплуатации
- Bort BEK-40 Инструкция по эксплуатации
- Bosch GBH 180-LI (0615990L6J), 1Х4Ач + ЗУ GAL18-V40 Руководство пользователя
- Bosch GSA 18V-LI (0615990L6H), 1Х4.0Ач + ЗУ GAL18-V40 Инструкция по эксплуатации
- Einhell PXC AXXIO (4431140) без акк. и з.у Инструкция по эксплуатации
- BLACK & DECKER BL186N без акк и з.у Инструкция по эксплуатации