![AMERICAN DJ Focus Spot THREE Z [17/20] Master slave operation](/img/pdf.png)
AMERICAN DJ Focus Spot THREE Z [17/20] Master slave operation
![AMERICAN DJ Focus Spot THREE Z [17/20] Master slave operation](/views2/2008199/page17/bg11.png)
The UC IR (sold separately) infrared remote gives you control of
various functions (See below). To control the fixture you must aim the
remote at the front of the fixture and be no more than 30 feet away.
The Airstream IR (sold separately) remote transmitter plugs into
the headphone jack of your iOS phone or tablet. To control your IR
fixture you must raise the volume to the maximum on your iOS phone
or tablet and aim the transmitter at the fixture sensor and be no more
than 15 feet away. After you have purchased the Airstream IR trans-
mitters, the app is a free download from the app store for your iOS
phone or tablet. The app comes with 3 pages of control depending
on the fixture you are using. Please see below for IR functions. This
unit works with App page 1.
STAND BY - Pressing this button will blackout the fixture.
FULL ON - Hold this button down to fully light up the unit. When you
let the button go, the unit will return to its previous state.
FADE/GOBO - Press this button once to access gobo wheel 1, press
the button again to access gobo wheel 2. Use the number buttons to
find your desired gobo.
“DIMMER +” and “DIMMER -” - Use these buttons to adjust the out-
put intensity in Color mode.
STROBE - This button will activate the strobe effect. Press and hold
this button to activate strobing and release the button to stop strob-
ing.
COLOR - Press this button to enter to access the color wheel. Use
the number buttons to select your desired color. Adjust the output
intensity using the “DIMMER +” and “DIMMER -” buttons.
1-9 - In color mode and gobo mode, these buttons will allow you to
select a desired color or gobo. In show mode buttons 1-4 will let you
select your desired show.
SOUND ON & OFF - These buttons activate and deactivate the
sound active mode.
SHOW - This activates the show mode. Use buttons 1-4 to select
your desired show.
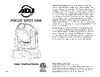
Focus Spot Three Z Remote Operation Focus Spot Three Z Master-Slave Set Up
Master-Slave Operation This function will allow you to link up to 16
units together and operate without a controller. The units will be sound
activated. In Master-Slave operation one unit will act as the controlling
unit and the others will react to the controlling units programs. Any unit
can act as a Master or as a Slave.
1. Using approved DMX data cables, daisy chain your units togeth-
er via the XLR connector on the rear of the units. Remember the
Male XLR connector is the input and the Female XLR connector
is the output. The rst unit in the chain (master) will use the female
XLR connector only - The last unit in the chain will use the male
XLR connector only. For longer cable runs we suggest a termina-
tor at the last fixture.
2. On the Master unit press the MENU button until “Slave Mode” is
displayed, and press ENTER. Use the UP and DOWN buttons to
scroll to the “Master” setting and press ENTER.
3. After setting the Master unit to the master setting find and set
your desired operating mode.
4. On the slave units press the MENU button until “Slave Mode” is
displayed, and press ENTER. Choose either “Slave 1” or “Slave
2” and press ENTER.
5. The slave units will now follow the Master unit.
ADJ Products, LLC - www.adj.com - Focus Spot Three Z Instruction Manual Page 32 ADJ Products, LLC - www.adj.com - Focus Spot Three Z Instruction Manual Page 33
With this feature you can connect the xtures to one another
using the PowerCon input and output sockets. The quantity that
can be connected is 3 xtures maximum @ 120V and 6 xtures
maximum @ 230V. After you have reached the maximum amount
of xtures you will need to use a new power outlet. They must be
the same xtures. DO NOT mix xtures.
Focus Spot Three Z Power Cord Daisy Chain
Содержание
- User instructions p.1
- Focus spot three z p.1
- Warning p.2
- Unpacking p.2
- Introduction p.2
- Customer support p.2
- Caution p.2
- Power supply p.5
- Dmx 512 p.5
- When longer runs of cable are used you may need to use a terminator on the last unit to avoid erratic behavior a terminator is a 110 120 ohm 1 4 watt resistor which is con nected between pins 2 and 3 of a male xlr connector data and data this unit is inserted in the female xlr connector of the last unit in your daisy chain to terminate the line using a cable terminator adj part number z dmx t will decrease the possibilities of erratic behavior p.6
- Special note line termination p.6
- Some manufactures use 5 pin dmx 512 data cables for data transmission in place of 3 pin 5 pin dmx fixtures may be implemented in a 3 pin dmx line when inserting stan dard 5 pin data cables in to a 3 pin line a cable adaptor must be used these adaptors are readily available at most electric stores the chart below details a proper cable conversion p.6
- Pin xlr to 5 pin xlr conversion p.6
- Pin xlr dmx connectors p.6
- Pin 5 do not use p.6
- Pin 4 do not use p.6
- Notice p.6
- Not used p.6
- Lighting stores your cables should be made with a male and female xlr connector on either end of the cable also remember that dmx cable must be daisy chained and cannot be split p.6
- Ground shield p.6
- Focus spot three z dmx set up p.6
- Data true signal p.6
- Data compliment signal p.6
- Conductor 5 pin xlr male in 3 pin xlr female out p.6
- Be sure to follow figures two and three when making your own cables do not use the ground lug on the xlr connector do not con nect the cable s shield conductor to the ground lug or allow the shield conductor to come in contact with the xlr s outer casing grounding the shield could cause a short circuit and erratic behavior p.6
- Focus spot three z 18 channel mode p.7
- Channel value function p.7
- Gobo wheel 2 p.8
- Gobo wheel 1 p.8
- Gobo 6 p.8
- Gobo 5 gobo 4 p.8
- Gobo 3 gobo 2 p.8
- Gobo 1 gobo 7 gobo 6 gobo 5 gobo 4 gobo 3 gobo 2 p.8
- Gobo 1 p.8
- Focus spot three z 18 channel mode p.8
- Channel value function p.8
- Focus spot three z 21 channel mode p.9
- Channel value function p.9
- Gobo 1 p.10
- Focus spot three z 21 channel mode p.10
- Channel value function p.10
- Gobo wheel 2 p.10
- Gobo wheel 1 p.10
- Gobo 6 p.10
- Gobo 5 gobo 4 p.10
- Gobo 3 gobo 2 p.10
- Gobo 1 gobo 7 gobo 6 gobo 5 gobo 4 gobo 3 gobo 2 p.10
- Slave mode p.11
- Dmx addres p.11
- Channel mod p.11
- Sound stat p.12
- Sound sens p.12
- Show mod p.12
- Dmx last stat p.12
- Dimmer curv p.12
- Back ligh p.13
- Auto tes p.13
- Zoom mod p.13
- Tilt inver p.13
- Pan inver p.13
- Manual tes p.13
- Function dela p.13
- Pro default p.14
- Fixture tim p.14
- Fixture temp p.14
- Firmware versio p.14
- Prism 1 offse p.15
- Pan offse p.15
- Gobo 2 offse p.15
- Gobo 1 offse p.15
- Color offse p.15
- Adjustment of the tilt home position p.15
- Adjustment of the pan home position p.15
- Tilt offse p.15
- Setting adjustment for the color wheel p.15
- Setting adjustment for the 2nd gobo wheel p.15
- Setting adjustment for the 1st prism p.15
- Setting adjustment for the 1st gobo wheel p.15
- Zoom offse p.16
- Universal dmx control p.16
- Sound active mode p.16
- Show mode p.16
- Setting adjustment for the zoom p.16
- Setting adjustment for the rotating prism p.16
- Setting adjustment for the focus p.16
- Setting adjustment for the 2nd prism p.16
- Rprism offse p.16
- Prism 2 offse p.16
- Focus offse p.16
- Master slave operation p.17
- Trouble shooting listed below are a few common problems that you may encounter with solutions p.19
- No light output from the unit p.19
- Low frequencies bass should cause the unit to react to sound tapping on the microphone quiet or high pitched sounds may not activate the unit p.19
- Locate and remove the unit s powercon cord once the cord has been removed the fuse holder is located next to the power socket use a philips head screw driver unscrew the fuse holder remove the bad fuse and replace with a new one p.19
- Focus spot three z warranty p.19
- Focus spot three z trouble shooting p.19
- Focus spot three z fuse replacement p.19
- Focus spot three z cleaning p.19
- Due to fog residue smoke and dust cleaning the internal and exter nal optical lenses and mirror should be carried out periodically to optimize light output cleaning frequency depends on the environ ment in which the fixture operates i e smoke fog residue dust dew in heavy club use we recommend cleaning on a monthly basis periodic cleaning will ensure longevity and crisp output 1 use normal glass cleaner and a soft cloth to wipe down the out side casing 2 use a brush to wipe down the cooling vents and fan grill 3 clean the external optics with glass cleaner and a soft cloth every 20 days 4 clean the internal optics with glass cleaner and a soft cloth every 30 60 days 5 always be sure to dry all parts completely before plugging the unit back in p.19
- Be sure the external fuse has not blown the fuse is located on the rear panel of the unit 2 be sure the fuse holder is completely and properly seated unit does not respond to sound p.19
- Adj products llc www adj com focus spot three z instruction manual page 36 adj products llc www adj com focus spot three z instruction manual page 37 p.19
- Model focus spot three z p.20
- Auto sensing voltage p.20
- Adj products llc 6122 s eastern ave los angeles ca 90040 usa tel 323 582 2650 fax 323 725 6100 web www adj com e mail info americandj com p.20
- A d j supply europe b v junostraat 2 6468 ew kerkrade the netherlands service adjgroup eu www adj eu tel 31 45 546 85 00 fax 31 45 546 85 99 p.20
- This fixture contains a automatic volt age switch which will auto sense the voltage when it is plugged into the power source p.20
- Specifications and improvements in the design of this unit and this manual are subject to change without any prior written notice p.20
- Please note p.20
Похожие устройства
-
 AMERICAN DJ Dotz TPAR SystemРуководство по эксплуатации
 -
 ADJ Hydro Beam X1Руководство по эксплуатации
 -
 Involight LDF100Руководство по эксплуатации
 -
 AMERICAN DJ Focus Spot ONEРуководство по эксплуатации
 -
 Involight LED PAR984WРуководство по эксплуатации
 -
 Antari M-7Руководство по эксплуатации
 -
 STAGG SLI KINGPAR22Руководство по эксплуатации
 -
 ADJ Par Z MoveРуководство по эксплуатации
 -
 Involight LED ARCH2410Руководство по эксплуатации
 -
 ADJ Micro Royal GalaxianРуководство по эксплуатации
 -
 STAGG SLR LITE 1-2 BLРуководство по эксплуатации
 -
 Involight LED PAR993WРуководство по эксплуатации