![Makita JR3051TK [6/44] Operation](/img/pdf.png)
Makita JR3051TK [6/44] Operation
![Makita JR3051TK [6/44] Operation](/views2/1772528/page6/bg6.png)
6 ENGLISH
Attach the hook by following procedure.
1.
Insert the tip of slotted screwdriver into the notch
and remove the the cover by pressing and sliding it.
►Fig.3: 1. Notch 2. Cover
2.
Insertthesquarenutsintothetoolasshowninthegure.
3. Secure the hook with the screws.
►Fig.4: 1. Square nut 2. Hook 3. Screw
ASSEMBLY
CAUTION: Always be sure that the tool is
switched off and unplugged before carrying out
any work on the tool.
Installing or removing the recipro
saw blade
CAUTION: Always clean out all chips or for-
eign matter adhering to the blade and around the
blade clamp.Failuretodosomaycauseinsufcient
tighteningoftheblade,resultinginaseriousinjury.
Before installing the recipro saw blade, always make
sure that the blade clamp lever (part of the blade clamp
sleeve) is in released position on the insulation
cover.Ifthebladeclampleverisinxedposition,rotate
the blade clamp lever in the direction of the arrow so
that it can be locked at the released position .
►Fig.5: 1. Blade clamp lever 2. Released position
3. Fixed position
Insert the recipro saw blade into the blade clamp as far
asitwillgo.Thebladeclampsleeverotatesandxesthe
recipro saw blade. Make sure that the recipro saw blade
cannot be extracted even though you try to pull it out.
►Fig.6: 1. Recipro saw blade 2. Blade clamp sleeve
CAUTION: If you do not insert the recipro saw
blade deep enough, the recipro saw blade may be
ejected unexpectedly during operation. This can
be extremely dangerous.
To remove the recipro saw blade, rotate the blade
clamp lever in the direction of the arrow fully. The reci-
pro saw blade is removed and the blade clamp lever is
xedatthereleasedposition .
►Fig.7: 1. Recipro saw blade 2. Blade clamp lever
CAUTION: Keep hands and ngers away from
the lever during the switching operation. Failure
to do so may cause personal injuries.
NOTE:
If you remove the recipro saw blade without
rotating the blade clamp lever fully, the lever may not be
locked in the released position . In this case, rotate
the blade clamp lever fully again, then make sure that
the blade clamp lever locked at the released position .
NOTE: If the blade clamp lever is positioned inside
thetool,switchonthetooljustasecondtoletthe
blade out. Unplug the tool before installing or remov-
ing the recipro saw blade.
OPERATION
CAUTION: Always hold the tool rmly with
one hand on insulation cover and the other on the
switch handle.
CAUTION: Always press the shoe rmly
against the workpiece during operation. If the
shoe is removed or held away from the workpiece
during operation, strong vibration and/or twisting will
be produced, causing the blade to snap dangerously.
CAUTION:
Always wear gloves to protect your
hands from hot ying chips when cutting metal.
CAUTION: Be sure to always wear suitable
eye protection which conforms with current
national standards.
CAUTION: Always use a suitable coolant
(cutting oil) when cutting metal. Failure to do so will
cause premature blade wear.
CAUTION:
Do not quirk the blade during cutting.
Presstheshoermlyagainsttheworkpiece.Donot
allow the tool to bounce. Bring the recipro saw blade
into light contact with the workpiece. First, make a pilot
groove using a slower speed. Then use a faster speed
to continue cutting.
►Fig.8
NOTICE: Do not cut the workpiece with the shoe
away from the workpiece or without the shoe.
Doing so increases the reaction force which may
break the recipro saw blade.
MAINTENANCE
CAUTION: Always be sure that the tool is
switched off and unplugged before attempting to
perform inspection or maintenance.
NOTICE: Never use gasoline, benzine, thinner,
alcohol or the like. Discoloration, deformation or
cracks may result.
To maintain product SAFETY and RELIABILITY,
repairs,anyothermaintenanceoradjustmentshould
be performed by Makita Authorized or Factory Service
Centers, always using Makita replacement parts.
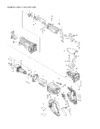
Replacing carbon brushes
►Fig.9: 1. Limit mark
Check the carbon brushes regularly.
Replace them when they wear down to the limit mark.
Keep the carbon brushes clean and free to slip in the
holders. Both carbon brushes should be replaced at the
same time. Use only identical carbon brushes.
1.
Use a screwdriver to remove the brush holder caps.
2. Take out the worn carbon brushes, insert the new
ones and secure the brush holder caps.
►Fig.10: 1. Brush holder cap
Содержание
- Jr3051t p.1
- Power supply p.4
- English original instructions p.4
- Specifications p.4
- Intended use p.4
- Ec declaration of conformity p.4
- Warning p.4
- Vibration p.4
- Warning p.5
- Switch action p.5
- Save these instructions p.5
- Save all warnings and instruc tions for future reference p.5
- Safety warnings p.5
- Recipro saw safety warnings p.5
- General power tool safety warnings p.5
- Functional description p.5
- Caution p.5
- Notice p.6
- Maintenance p.6
- Installing or removing the recipro saw blade p.6
- Caution p.6
- Assembly p.6
- Replacing carbon brushes p.6
- Operation p.6
- Optional accessories p.7
- Caution p.7
- Vibracije p.8
- Tehnični podatki p.8
- Slovenščina originalna navodila p.8
- Priključitev na električno omrežje p.8
- Predvidena uporaba p.8
- Opozorilo p.8
- Izjava o skladnosti es p.8
- Shranite vsa opozorila in navo dila za poznejšo uporabo p.9
- Shranite ta navodila p.9
- Opis delovanja p.9
- Kavelj p.9
- Delovanje stikala p.9
- Varnostna opozorila za uporabo recipročne žage p.9
- Varnostna opozorila p.9
- Splošna varnostna opozorila za električno orodje p.9
- Upravljanje p.10
- Obvestilo p.10
- Namestitev ali odstranitev rezila sabljaste žage p.10
- Montaža p.10
- Vzdrževanje p.11
- Obvestilo p.11
- Menjava karbonskih krtačk p.11
- Dodatna oprema p.11
- Paralajmërim p.12
- Furnizimi me energji p.12
- Dridhja p.12
- Deklarata e konformitetit me ke në p.12
- Albanian udhëzimet origjinale p.12
- Zhurma p.12
- Specifikimet p.12
- Përdorimi i synuar p.12
- Veprimi i ndërrimit p.13
- Ruajini të gjitha paralajmërimet dhe udhëzimet për të ardhmen p.13
- Ruajini këto udhëzime p.13
- Përshkrimi i punës p.13
- Paralajmërimet e përgjithshme për sigurinë e veglës p.13
- Paralajmërime sigurie p.13
- Paralajmërime për sigurinë e sharrës reciprokuese p.13
- Vini re p.14
- Përdorimi p.14
- Montimi p.14
- Kujdes p.14
- Instalimi ose heqja e diskut të sharrës reciprokuese p.14
- Aksesorë opsionalë p.15
- Zëvendësimi i karbonçinave p.15
- Vini re p.15
- Mirëmbajtja p.15
- Kujdes p.15
- Шум p.16
- Спецификации p.16
- Предупреждение p.16
- Предназначение p.16
- Захранване p.16
- Вибрации p.16
- Български превод на оригиналните инструкции p.16
- Предупреждение p.17
- Общи предупреждения за безопасност при работа с електрически инструменти p.17
- Запазете настоящите инструкции p.17
- Запазете всички предупрежде ния и инструкции за справка в бъдеще p.17
- Ео декларация за съответствие p.17
- Предупреждения за безопасност p.17
- Предупреждения за безопасна работа с електрически трион p.17
- Монтаж или демонтаж на ножа за трион p.18
- Сглобяване p.18
- Предупреждение p.18
- Описание на функциите p.18
- Кука p.18
- Внимание p.18
- Включване p.18
- Смяна на графитните четки p.19
- Поддръжка p.19
- Експлоатация p.19
- Допълнителни аксесоари p.19
- Внимание p.19
- Бележка p.19
- Električno napajanje p.20
- Vibracija p.20
- Upozorenje p.20
- Specifikacije p.20
- Namjena p.20
- Izjava o sukladnosti ez p.20
- Hrvatski originalne upute p.20
- Čuvajte ove upute p.21
- Upozorenje p.21
- Uključivanje i isključivanje p.21
- Sigurnosna upozorenja za pilu lisičji rep p.21
- Sigurnosna upozorenja p.21
- Sačuvajte sva upozorenja i upute radi kasnijeg korištenja p.21
- Opća sigurnosna upozorenja za električne ručne alate p.21
- Funkcionalni opis p.21
- Napomena p.22
- Montaža p.22
- Postavljanje ili uklanjanje lista pile lisičji rep p.22
- Održavanje p.22
- Zamjena ugljenih četkica p.23
- Dodatni pribor p.23
- Спецификации p.24
- Предупредување p.24
- Напојување p.24
- Наменета употреба p.24
- Македонски оригинални упатства p.24
- Вибрации p.24
- Бучава p.24
- Предупредување p.25
- Општи упатства за безбедност за електричните алати p.25
- Декларација за сообразност од еу p.25
- Безбедносни предупредувања за убодната пила p.25
- Безбедносни предупредувања p.25
- Чувајте го упатството p.25
- Чувајте ги сите предупредувања и упатства за да може повторно да ги прочитате p.25
- Составување p.26
- Предупредување p.26
- Опис на функциите p.26
- Монтирање или отстранување на сечилото од убодната пила p.26
- Кука p.26
- Внимание p.26
- Вклучување p.26
- Работење p.27
- Опционален прибор p.27
- Одржување p.27
- Замена на карбонските четкички p.27
- Забелешка p.27
- Внимание p.27
- Бука p.28
- Упозорење p.28
- Технички подаци p.28
- Српски оригинално упутство p.28
- Намена p.28
- Мрежно напајање p.28
- Ез декларација о усаглашености p.28
- Вибрације p.28
- Функционисање прекидача p.29
- Упозорење p.29
- Сачувајте сва упозорења и упутства за будуће потребе p.29
- Сачувајте ово упутство p.29
- Општа безбедносна упозорења за електричне алате p.29
- Опис начина функционисања p.29
- Безбедносна упозорења за повратну тестеру p.29
- Безбедносна упозорења p.29
- Кука p.30
- Склапање p.30
- Рад p.30
- Постављање или уклањање листа повратне тестере p.30
- Обавештење p.30
- Опциони прибор p.31
- Одржавање p.31
- Обавештење p.31
- Замена угљених четкица p.31
- Zgomot p.32
- Vibraţii p.32
- Sursă de alimentare p.32
- Specificaţii p.32
- Română instrucţiuni originale p.32
- Destinaţia de utilizare p.32
- Declaraţie de conformitate ce p.32
- Avertizare p.32
- Păstraţi toate avertismentele şi instrucţiunile pentru consultări ulterioare p.33
- Păstraţi aceste instrucţiuni p.33
- Descrierea funcţiilor p.33
- Avertizări de siguranţă p.33
- Avertismente privind siguranța pentru ferăstrăul alternativ p.33
- Avertismente generale de siguranţă pentru maşinile electrice p.33
- Acţionarea întrerupătorului p.33
- Operarea p.34
- Montarea sau demontarea pânzei de ferăstrău alternativ p.34
- Cârlig p.34
- Atenţie p.34
- Asamblare p.34
- Întreţinere p.35
- Înlocuirea periilor de cărbune p.35
- Atenţie p.35
- Accesorii opţionale p.35
- Шум p.36
- Українська оригінальні вказівки p.36
- Технічні характеристики p.36
- Призначення p.36
- Попередження p.36
- Джерело живлення p.36
- Вібрація p.36
- Попередження про дотримання техніки безпеки p.37
- Попередження p.37
- Зберігайте ці вказівки p.37
- Збережіть усі інструкції з тех ніки безпеки та експлуатації на майбутнє p.37
- Заходи безпеки під час роботи з ножівкою p.37
- Загальні застереження щодо техніки безпеки при роботі з електроінструментами p.37
- Декларація про відповідність стандартам єс p.37
- Гак p.38
- Встановлення та зняття полотна ножівки p.38
- Попередження p.38
- Опис роботи p.38
- Обережно p.38
- Зборка p.38
- Дія вимикача p.38
- Увага p.39
- Технічне обслуговування p.39
- Робота p.39
- Обережно p.39
- Заміна вугільних щіток p.39
- Додаткове приладдя p.39
- Русский оригинальные инструкции p.40
- Осторожно p.40
- Назначение p.40
- Источник питания p.40
- Вибрация p.40
- Шум p.40
- Технические характеристики p.40
- Сохраните данные инструкции p.41
- Сохраните брошюру с инструк циями и рекомендациями для дальнейшего использования p.41
- Правила техники безопасности при эксплуатации сабельной пилы p.41
- Общие рекомендации по технике безопасности для электроинструментов p.41
- Меры безопасности p.41
- Декларация о соответствии ес p.41
- Установка или снятие полотна сабельной пилы p.42
- Сборка p.42
- Осторожно p.42
- Описание работы p.42
- Крючок p.42
- Действие выключателя p.42
- Внимание p.42
- Внимание p.43
- Эксплуатация p.43
- Примечание p.43
- Обслуживание p.43
- Замена угольных щеток p.43
- Дополнительные принадлежности p.43
- Www makita com p.44
- Makita europe n v p.44
- Makita corporation p.44
- Jan baptist vinkstraat 2 3070 kortenberg belgium p.44
- 11 8 sumiyoshi cho anjo aichi 446 8502 japan p.44
Похожие устройства
-
 Makita jr3070ctРуководство по эксплуатации
 -
 Makita JR3051TKИнструкция к товару
 -
 Makita JR3051TKСписок деталей
 -
 Makita DJR188Z без акк. и ЗУИнструкция по эксплуатации
 -
 Makita jr3050tИнструкция по эксплуатации
 -
 Makita jr3060tИнструкция по эксплуатации
 -
Makita jr3070ctИнструкция по эксплуатации
-
 Elitech ПС 500Руководство по эксплуатации
 -
 Deko DKRS20-LiИнструкция по эксплуатации
 -
 Deko DKRS20Инструкция по эксплуатации
 -
 Deko DKRS1000Инструкция по эксплуатации
 -
 Deko DKRS1200Инструкция по эксплуатации